My friend Jan has just bought a Scor-Pal - I think I may have enabled her a little bit LOL! She came over for a crafty afternoon and so I showed her how to make a pizza box using her Scor-Pal. Click here for the tutorial. In the tutorial the semi circular hole at the front of the box is made with a 1/2" circle punch but that seemed a bit small to me so I used a 3/4" punch.
I chose Sahara Sand CS for the box as I wanted a neutral colour so my ruffled flower would really stand out. The patterned paper is from the Sweet Pea stack. I used a ticket corner punch on my layers. When Joanne showed us how to make the flower, we used the SU! Scallop Circle punch. As I wanted a larger flower to go on a box front, I used a scalloped circle Nestability die. Joanne has now kindly made a video showing how to make this ruffled flower - click here to view it.
This time I used two different colours of CS for the flower - Rose Red and Pretty in Pink. I used a leaf die and added some shaping to each leaf. A sentiment, ric-rac and some olive crystals finished off the box.
Supplies:
Stamps: SU! One of a Kind set
CS: SU! Sahara Sand, Pretty in Pink & Rose Red
Patterned paper: SU! Sweet Pea Designer Series Paper stack
Ink: SU! Rose Red
Tools: Metric Scor-Pal, scalloped circle Nestability die, Woodware ticket corner punch, SU! 3/4" circle punch, water spritzer, paper piercer
Embellishments & accessories: Olive ric-rac, olive crystals, brad
We're off out for a picnic with some friends this afternoon. I suppose sunshine on a British bank holiday was just too much to expect, at least we won't have to worry about sunburn!
Pages
▼
Monday, 31 May 2010
Saturday, 29 May 2010
CAS Elegant Congratulations Card for Tanya
My friend Tanya has just got a promotion at work so I wanted to send her a congratulations card. I wanted to make a classy, elegant card and I think black and white always fits that bill and I reckoned my new card fronts die would work well here too. I think that brackety shaped edge is so elegant!
Very simple card, I stamped the Bella Toile background and the sentiment - love that font! - added some ribbon, a Prima flower with a gem brad centre and some crystals.
Supplies:
Stamps: SU! Bella Toile background stamp, Waltzingmouse Stamps Say It with Style set
CS: White CS
Ink: VersaFine Onyx Black
Tools: Sizzix Bigz XL Card Fronts, A2 Eyelet & Ornate die
Embellishments & accessories: black grosgrain ribbon, gem brad, crystals
Friday, 28 May 2010
CAS OLW6 Challenge Cards
This week's One Layer Wednesday challenge over at Susan's Simplicity blog is to overlap a sentiment and image. I used my PTI Green Thumb set which I've not used a great deal so while it was out I made two cards.
I found these tag shaped cards in my stash, I'd forgotten all about them, so I was determined to use one. After stamping, I added a little colour at the bottom of each stem by water colouring with a Going Gray Watercolor Wonder Crayon - just to ground them. The pretty ribbon with iridescent edging came out of my scrap ribbon jar.
My second card measures 4" square and I used the wellies stamps and the shoes sentiment - they've not seen ink before. Again, I added some gray water colouring to ground the boots. I don't own wellies but if I was to get some I'd love a pink pair with cute polka dots and green trim!
Some neglected stamps used, items from stash and scrap jar used - that's a good thing, thanks for the great challenge Susan!
Supplies:
Stamps: PaperTrey Ink Green Thumb set
CS: White tag shaped card blank, cream 4" square card blank
Ink: VersaMagic chalk ink in Tea Leaves, Pink Petunia, Spring Pansy, Thatched Straw, Gingerbread & Aloe Vera
Tools: SU! Neutrals Watercolor Wonder Crayons
Embellishments & accessories: Pink iridescent edged satin ribbon
Thursday, 27 May 2010
Dandelion Frame Ornate Cards
I made these cards with my new Sizzix Bigz XL card fronts die, I was chuffed to bits to get it at a great price from eBay! It's wonderful, you get two different card fronts on the one die, this elegant ornate brackety shape and then a more fun circles eyelet shape. I've made a card today with the eyelet shape so that will be featured on the blog soon! You cut, score and fold your CS and then die cut the card front you want. It makes A2 sized cards (US size) but the cards fit fine in a C6 envelope.
I first made the Celery and Choc Chip version. I cut the Choc Chip card and then cut a Celery piece to go over the top. After stamping the dandelion frame and sentiment, I added some crystal ultrafine glitter here and there for some sparkle. I then added Choc Chip satin ribbon and chocolate candy dots.
After I'd finished the card, I wondered how it would look oriented as landscape rather than portrait so I made another card straight away. This time I used Cameo Coral (a very neglected colour from my stash!) with the Choc Chip, a different sentiment and pearls instead of candy dots. I know the dandelion frame stamp is meant to be stamped in portrait orientation but I quite like it in landscape too.
Supplies:
Stamps: Hero Arts Dandelion Frame cling stamp, sentiment on Celery card also Hero Arts, sentiment on Coral card from SU! Sincere Salutations set
CS: SU! Chocolate Chip, Certainly Celery & Cameo Coral
Ink: SU! Chocolate Chip
Tools: Sizzix Bigz XL Card Fronts, A2 Eyelet & Ornate die
Embellishments & accessories: SU! Chocolate Chip satin ribbon, Art Institute Crystal ultrafine glitter, Pebbles Inc. Chocolate Candy Dots, half pearls
Wednesday, 26 May 2010
Chocolates Girl Birthday Wishes for Michelle
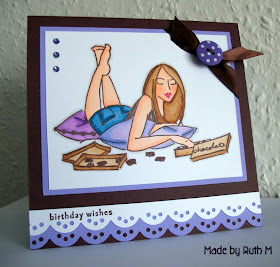
Yesterday it was Michelle's (from the Card Grotto) birthday and this is the card I sent her. I hope you had a wonderful day Michelle and managed to eat some chocolate on your special day!
The card measures 5 3/4" square and was made with SU! Choc Chip CS. I inked the stamp with Rich Cocoa Memento ink but got a cotton bud and wiped the ink off the lips and then gave her pink lips by using my SU! Regal Rose marker. I coloured the image with Copic markers. I added some lush Choc Chip satin ribbon to one corner with a Doodlebug dotty button on top. The scalloped borders were made with a Sizzix Decorative Strip die. I added some blingy pale purple crystals to finish off the image panel.
This is the inside of the card. I stamped a sentiment inside a Waltzingmouse Stamps frame that matches Labels Four Nestie dies. The Accent Flower was inked in Lavender Lace ink and kissed to the Fine Flourish stamp that had been inked with Choc Chip ink. I love the look of these kissed flowers and the flower is such a nice shape - easy to trim!
This is the envelope. Another kissed flower on top of two flourishes made with the gorgeous stamp from the SU! Season of Joy set - an idea stolen from my crafty friend Jan!
Supplies:
Stamps: Rubber Romance 'Nay', Birthday Wishes from SU! Wow Flowers set, Hero Arts Fabulous Birthday, Waltzingmouse Stamps Very Vintage Labels No 4 set, SU! Flower Accent, SU! Fine Flourish, SU! Season of Joy set
CS: SU! Chocolate Chip and Whisper White, Bristol Board, Bazzill Fairy Dust
Ink: Memento Rich Cocoa, SU! Lavender Lace & Chocolate Chip, SU! Regal Rose marker
Tools: Copic markers, Sizzix Scallops Decorative Strip die, Labels Four Nestabilities dies
Embellishments & accessories: SU! Choc Chip satin ribbon, Doodlebug buttons, crystals, glue dots
Monday, 24 May 2010
CAS Summer Butterfly Card
Today's CAS68 challenge on Splitcoast Stampers was to Think Summer. Summer to me means bright colours, sunshine and butterflies - and a long, cool Pimm's and ginger ale with ice and cucumber - yum!
I punched out the butterfly aperture from the front of a 4" square textured card, then stamped the flowery butterfly shape and punched it out of Barely Banana CS. I've glued the butterfly so the shape is inside the card. The sentiment is one long stamp but I did some masking so I could split it into two. Some bright ribbon and rounded corners finished off the card.
This photo shows the rest of the sentiment inside the card:
Supplies:
Stamps: SU! Flight of the Butterfly set, Stampendous Sunshine Wave
CS: Anita's 4" square textured white card blank, SU! Barely Banana
Ink: SU! Regal Rose - ink pad & marker
Tools: SU! Butterfly punch, X Cut Corner Rounder punch, Stamp-A-Ma-Jig
Embellishments & accessories: Pink stitched grosgrain ribbon
Sunday, 23 May 2010
More CAS Thank You Cards
I'll be sending some more eBay packages off so I need more quick and simple thank you notes to slip inside with the goodies. For the first set of cards I used the Bird Call embossing folder and my current favourite thanks stamp.
For the second set of cards I dug out my long neglected PaperTrey Ink Green Thumb stamp set and used the strawberry and 'thank you berry much' stamps. I added scored lines above and below the berries and sentiment using my Scor-Pal.
I'm off now to sit in the garden with a good book - bliss!
Supplies for Bird Thanks card:
Stamps: SU! Thank You Kindly set
CS: Anita's 4" square textured white card blanks
Ink: SU! Regal Rose
Tools: Cuttlebug Bird Call embossing folder
Supplies for Thank You Berry Much card:
Stamps: PTI Green Thumb set
CS: Anita's 4" square textured white card blanks
Ink: VersaMagic chalk ink in Red Magic, Tea Leaves & Midnight Black
Tools: Scor-Pal
Friday, 21 May 2010
CAS Thank You Sew Much - For OLW5 Challenge
Susan's CAS One Layer Wednesday challenge this week is to use faux embellishment stamps. This was perfect for me to get a new stamp inky - I just got the Off Beat Background set from Waltzingmouse stamps and the fab stitching stamp is from there. As it turned out, it was perfect for me to get some old stamps inky too - my button stamps come from a really old Woodware set that hasn't been used in a loooong time! Thanks Susan for another enjoyable one layer card challenge!
The card measures 4" square. I used three different colours of blue chalk inks for my stamping. I thought the sentiment was ideal to go with the stitching! This will be another eBay thank you note.
Supplies:
Stamps: Waltzingmouse Stamps Off Beat Backgrounds & Sewing Box Hugs sets, Woodware His Birthday set
CS: Anita's 4" square textured white card blank
Ink: VersaMagic chalk inks in Sea Breeze, Aegean Blue & Night Sky
Thursday, 20 May 2010
May Stamper's Ten Make & Take Cards
These are the two cards we made at Joanne's Stamper's Ten Make and Take meeting on Tuesday night. I was really chuffed to see we were using one of the new SU! colours, the lush Rich Razzleberry. I struggle with floral punch craft sometimes so Joanne is used to me getting twitchy when I see dimensional flowers she's created. So I went all twitchy when I saw that Razzleberry flower on the Warm Wishes card but Joanne was quick to assure me it was easy to make with no cutting or fiddly flower shaping!
We stamped the French Filigree background stamp with VersaMark ink and embossed it with clear embossing powder on the white panel. The patterned paper is from the Cottage Wall pack. We scalloped the Rich Razzleberry piece of CS with the border punch.
To make the flower we punched 5 Scallop Circles, pierced a hole in the centre of each flower, spritzed them with water on both sides and scrunched them up. We then undid them and scrunched them up again in a different direction, opened them out again and put each flower onto a brad. Then we shaped each layer, pinching and folding the layers up to get the full foofy flower. The layers are so soft and pliable when they're wet but I can't believe how stiff the flower ends up after it's dried! We used the bird wing from the Two Step Bird punch for the leaves - we used a DEET and moulding mat to add some shaping to the leaves.
For the second card we used the Bloomin' with Beauty set. We stamped the text and flower in Basic Grey ink - stamping off twice for the text and once for the flower. The flower was coloured with ink from Old Olive and Not Quite Navy ink pads and an Aqua Painter. Some piercing to the corners and some Certainly Celery ribbon finished off the image panel and the Not Quite Navy panel was edged with the Eyelet Border punch. The right hand side of the card was stamped with the very pretty Bella's Border wheel.
A very enjoyable evening, as per usual, and the foofy flower was indeed a doddle to make. In fact, Joanne took a photo of how happy I was at how easy and fun it was to make! What a cheesy grin!
Supplies for Warm Wishes card:
Stamps: SU! Cheer & Wishes set, French Filigree background stamp
CS: SU! Whisper White & Rich Razzleberry
Patterned paper: SU! Cottage Wall Designer Series Paper pack
Ink: SU! Rich Razzleberry, Versamark
Tools: SU! Scallop Circle punch, SU! Scallop Border punch, SU! Two Step Bird punch, DEET & moulding mat, paper piercer, heat gun
Embellishments & accessories: SU! clear embossing powder, brad, glue dots
Supplies for blue blossom card:
Stamps: SU! Bloomin' with Beauty set, Bella's Border wheel
CS: SU! Certainly Celery, Not Quite Navy & Very Vanilla
Ink: SU! Basic Gray, Not Quite Navy & Old Olive, Certainly Celery wheel cartridge
Tools: SU! Eyelet Border punch, SU! Mat Pack & piercing tool, Aqua Painter
Embellishments & accessories: SU! Certainly Celery grosgrain ribbon
Tuesday, 18 May 2010
Kissed Flower Trio Stamper's Ten Challenge Card
This is the card I made with the supplies Joanne gave us for the Stamper's Ten challenge this month. We were given CS in Close to Cocoa, Chocolate Chip and Very Vanilla, a piece of Bella Bleu patterned paper and some lush Chocolate Chip satin ribbon.
I used two new stamps for my card - Flower Accent and Fine Flourish - and tried out the kissing technique. I inked the flower in Creamy Caramel ink, stamped off once first and then kissed it to the Fine Flourish stamp which I'd inked with Chocolate Chip. I ended up with different toned flowers due to a mistake. I usually use scrap paper to stamp off onto but I stamped off onto CS by mistake with the first flower. So for my second flower, I stamped off onto scrap paper and I noticed that I got a much lighter colour. I liked the different tones so for my third flower I stamped off onto CS again.
I used my DEET and moulding mat to add some shaping to the flowers and then I added Pumpkin Pie felt flowers and small gem brads to the centres. I love the little pop of colour that the Pumpkin Pie adds to this card! I punched the branch from the Two Step Bird punch a few times, trimmed the length and glued them behind my flowers. I inked the Fine Flourish stamp in Creamy Caramel, stamped off once, and then stamped it onto Vanilla CS. I added the sentiment in Chocolate Chip ink and punched it out with a circle punch and matted it onto a larger circle.
We've got the Stamper's Ten Make and Take this evening - wonder what Joanne has got planned for us to make, can't wait to find out!
Supplies:
Stamps: SU! Flower Accent & Fine Flourish, sentiment from SU! Best Yet set
CS: SU! Close to Cocoa, Chocolate Chip & Very Vanilla
Patterned paper: SU! Bella Bleu Designer Series Paper pack
Ink: SU! Creamy Caramel & Chocolate Chip
Tools: SU! Circle punches, DEET & moulding mat
Embellishments & accessories: SU! Chocolate Chip satin ribbon, SU! Flower Fusion felt flowers, SU! clear rhinestone circle brads, glue dots
Monday, 17 May 2010
Chrysanthemum Happy Birthday - WMS May Blog Waltz
The WMS blog waltz is today and I thought I'd take part this time. I used my new gorgeous Chrysanthemums set along with the Vintage Circles Small and Say It With Style sets. I adore the font used in that set!
Edited to add: I originally said I was going to give this to my friend Jan for her birthday in June - but I've since made another card for her! This will now go into my stash of cards I keep on hand.
I stamped the flowers in Pink Grapefruit chalk ink, the leaves in Tea Leaves chalk ink and then I added some darker colour to the images with coloured pencils. I then added a touch of sparkle to the big bloom by adding some Fruit Punch Stickles. The flower layers are popped up.
I used the Fiskars Heritage 3-in-1 Corner punch for the decorative corners on my red panel. To finish off, I added a pearl stick pin and some olive crystals.
Here's a photo showing a close up of the sparkly bloom:
I'm really looking forward to seeing what everyone else created!
Supplies:
Stamps: Waltzingmouse Stamps Big Blooms - Chrysanthemums, Vintage Circles Small & Say It With Style sets
CS: Elzybells Smooth White CS, SU! Ruby Red & Old Olive
Ink: VersaMagic Pink Grapefruit & Tea Leaves chalk inks
Tools: Derwent ColourSoft pencils, circle Nestie die, Fiskars Heritage 3-in-1 Corner punch,
Embellishments & accessories: SU! Old Olive grosgrain ribbon, Fruit Punch Stickles, clear gem brad, olive Swarovski crystals, pearl stick pin & clutch from Quixotic paperie, 3d foam pads, glue dots
Saturday, 15 May 2010
More CAS Thank You Notes
Another batch of CAS thank you notes to be included with the eBay parcels I'll be sending off.
I made a set of 3 chrysanthemum thanks cards, they're exactly the same but I used a different ink colour for each card. I love the large solid chrysanthemum and I'm crazy about that 'thanks' stamp - made me very happy to stamp these quick and simple one layer cards!
Then it struck me that so far all my thank you notes were flowery and girly - what a surprise! So I made a few masculine designs too just in case I get a few male winning bidders.
Very simple stamping on the grass card using a Hero Arts large background stamp. For the circle thank you, I stamped the solid circle and sentiment on a piece of smooth CS and then cut it out with a circle Nestie die because I thought the intricate image might not stamp cleanly onto the textured card.
For the last card I chose a bold colour combo and used the fab Spellbinders Fleur-de-lis dies as I wanted to see what it looked like if you cut and embossed both shapes - I likey! I've popped up the frame. No room on the front for a sentiment so I stamped a 'thanks so much' inside.
Supplies:
Stamps: SU! Thank You Kindly set, Waltzingmouse Stamps Big Blooms - Chrysanthemums, Say It With Style & Vintage Circle Small sets, Hero Arts Silhouette Grass
CS: Anita's 4" square textured white card blanks, Bazzill Sienna, SU! Tempting Turquoise
Ink: VersaMagic Pixie Dust, Pink Petunia, Pink Grapefruit, Aegean Blue & Night Sky chalk inks, SU! Creamy Caramel & Chocolate Chip
Tools: Circle Nestabilities die, Spellbinders Fleur-de-lis Shapeabilities dies
Embellishments & accessories: 3d foam pads
Friday, 14 May 2010
Warm Fuzzies - CAS Thank You Notes
I'm selling some items on eBay and I decided to make some quick and easy thank you notes to include in the parcels. I've totally cheated here - I've used gorgeous flocked wrapping paper so the only stamping was the sentiment. I love the fuzzy texture and the dramatic colour - fabulous!
My birthday gifts from Kevin and Peter were wrapped in this lush paper and then Kevin gave me the rest of the roll to bring home and use on my cards, bless his heart. I made 8 cards in this batch.
Supplies:
Stamps: SU! Thank You Kindly set
CS: Anita's 4" square textured white card blanks
Patterned paper: roll of flocked wrapping paper
Ink: VersaFine Onyx Black
Thursday, 13 May 2010
CAS Butterfly Thank You - OLW4
I just found out Susan (LateBlossom on SCS) is running a one layer card challenge each Wednesday on her Simplicity blog. Susan is the queen of CAS one layer cards! This week the challenge was to make a one layer card but add a ribbon. Preferably, we were to use ink and ribbon only - but I snuck in pierced antennas!
This challenge was perfect for me 'cos I need quick and simple thank you notes to slip into the eBay packages I'll be sending off soon. This card will be one of those. Thanks Susan!
I knew straight away I wanted to use my bright butterfly ribbon. I bought the 3 metre spool many months ago and it's been sitting neglected in my stash ever since. So having started with the ribbon I needed to find stamps and ink. The solid butterfly from PTI's Butterfly Kisses set was perfect I thought as it is a similar shape to the butterflies on the ribbon. I stamped the butterfly and sentiment and then added the pierced antennas. To finish off, I rounded the bottom corners of the card.
Supplies:
Stamps: PaperTrey Ink Butterfly Kisses set, Hero Arts Thank You Messages clear set
CS: Anita's A6 white card blank
Ink: VersaColor Raspberry pigment ink, VersaFine Onyx Black
Tools: X Cut Pokey Tool & mouse mat, X Cut Corner Rounder punch
Embellishments & accessories: Smirk butterfly grosgrain ribbon
Dandelion Bookmarks
I've struggled a bit with the Hero Arts Dandelion Frame stamp. I made a card with it a little while ago and after I'd finished I wondered if I would do better if I cut the image into two narrow strips, rather than keeping the image whole. So I tried it out.
As soon as I had my two strips, I immediately thought bookmarks. So I whipped these two quick and easy bookmarks up straight away. I used the SU! 1 3/8" circle and Scalloped Circle punches for the topper, punching the plain circles out of two different patterned papers.
Owen's is the one with the stripey paper topper - I couldn't resist stamping a butterfly on my bookmark!
Supplies:
Stamps: Hero Arts Dandelion Frame cling stamp, SU! Flight of the Butterfly set
CS: SU! Confetti White, Chocolate Chip & Old Olive
Patterned paper: SU! Old Olive Prints Designer Series Paper pack
Ink: SU! Chocolate Chip & Old Olive
Tools: SU! Scalloped Circle punch, SU! 1 3/8" circle punch, X Cut corner rounder punch, Crop-A-Dile
Embellishments & accessories: SU! Chocolate Chip taffeta ribbon
Monday, 10 May 2010
CAS Chrysanthemum Thanks So Much
Todays CAS challenge on Splitcoast Stampers was to follow a sketch layout inspired by Kelly (kmahany). Click here to see Kelly's lovely card.
Well, my new stamps from Waltzingmouse arrived today so I had to try them out. I bought the Big Blooms - Chrysanthemums set and it is fab, I love it! I loved the bold graphic style of the set as soon as I saw it. I stamped and cut out 2 small solid leaves first. Then I used the medium and small solid flowers and trimmed them both and then attached them together with a small rhinestone brad.
I was chuffed to find that the lush velvet scalloped ribbon from my stash went beautifully with the turquoise ink I'd used. As I put the ribbon at the bottom instead of a sentiment I stamped the 'thanks so much' above the patterned paper. To finish off, I rounded the top right corner of the card. A bit of a change for me colour wise but I really like this combo!
Supplies:
Stamps: Waltzingmouse Stamps Big Blooms - Chrysanthemums set, sentiment from SU! Trendy Trees set
CS: White CS for card blank, SU! Whisper White
Patterned paper: SU! Old Olive Prints Designer Series Paper pack
Ink: VersaMagic Tea Leaves, Turquoise Gem & Aquatic Splash chalk inks
Tools: Stamp-A-Ma-Jig, Crop-A-Dile Corner Chomper
Embellishments & accessories: Velvet ribbon from Doodlebug Boutique Trims Swimming Pool assortment pack, SU! small clear rhinestone brad, glue dots
Sunday, 9 May 2010
Bella Toile Elegant Thanks Card
I wanted to make an elegant thank you card today. I also wanted to use some new goodies - the SU! Bella Toile background stamp, Old Olive satin ribbon plus a pearl stick pin. I've been umming and aahing over the Bella Toile stamp and I finally decided to get it and I absolutely LOVE it!
I stamped the background stamp on Perfect Plum CS using Elegant Eggplant ink. I edged an Eggplant CS strip with the Eyelet Border punch and added the satin ribbon. I stamped the thanks - I just adore that font! - and added the elegant hardware frame. To finish off, I added the pearl stick pin. I didn't want to cover up the gorgeous background so I kept the card simple and easy but I hope elegant and classy too!
After finishing the card front, I decorated an envelope and the inside of the card. This photo shows the envelope:
This photo shows the inside of the card:
Supplies:
Stamps: SU! Bella Toile background stamp, SU! Thank You Kindly set, inside sentiment from SU! Vintage Vogue set, A Muse Essential Ovals clear set
CS: SU! Old Olive, Perfect Plum, Elegant Eggplant & Whisper White
Ink: SU! Elegant Eggplant, VersaMagic Tea Leaves chalk ink
Tools: SU! Eyelet Border punch, 1 1/2" & 1 3/4" circle punches, Stamp-A-Ma-Jig
Embellishments & accessories: SU! Old Olive satin ribbon, frame from SU! Hodgepodge Hardware kit, pearl stick pin & clutch from Quixotic Paperie
Thursday, 6 May 2010
May 2010 Card Group Projects
Today was our May card group meeting and the projects were two pop up cards and a gift box. We used the Sizzix Bigz Pop Ups die which makes pop up cards so easy to make.
The first card is a pop up cupcake card made with a 4" x 4" textured white card blank. Here's the front:
And here's the inside:
The second card has a pop up gift inside. We used the SU! Circle Circus stamp set and got busy with circle punches! Here's the front:
And here's the inside:
The gift box was demonstrated to us last week by Joanne at the SU! workshop. I thought I'd let my card group ladies actually make one themselves while the instructions were still fresh in my mind. The box is made with an A4 piece of CS which is scored at 7, 14, 21 and 28 cms, turned 90 degrees and scored at 7 cms. After the box was assembled, we used stamps from the SU! Petal Pizzazz and Circle Circus sets to decorate the front. We stamped one flower full strength and two paler coloured flowers by stamping off once first. The leaves were stamped off once first also.
As always, it was a thoroughly enjoyable afternoon. The ladies got their SU! goodies from last week's workshop so they were very happy about that!
Waving hello to Wendy and Margaret - wishing you happy browsing!
Supplies for pop up cupcake card:
Stamps: Hero Arts clear Cupcakes set, Hero Arts Birthday Messages clear set, Stampa Rosa star swirl
CS: Anita's 4" x 4" textured white card blank, SU! Pretty in Pink, Real Red, Creamy Caramel & Whisper White
Patterned paper: Basic Grey Cupcake/Confetti
Ink: SU! Chocolate Chip & Real Red, VersaMagic Tea Leaves chalk ink, Marvy markers to colour the candle
Tools: 1 1/2" and 1 3/4" circle punches, Sizzix Bigz Pop Ups die, Sizzix 'Ribbons' Decorative Strip die
Supplies for the pop up gift card:
Stamps: SU! Circle Circus set, Hero Arts clear Birthday Messages set, inside sentiment by PSX
CS: Craft Creations white hemp textured A6 card blank, SU! Pretty in Pink, Regal Rose, Real Red, Old Olive & Whisper White
Patterned paper: My Mind's Eye Be Merry Candy Stripes
Ink: SU! Real Red & Regal Rose, VersaMagic Tea Leaves & Sea Breeze chalk inks
Tools: Various sized circle punches, Sizzix Bigz Pop Ups die, Sizzix Gift #2 die, Woodware flower punches
Embellishments & accessories: Red holographic circle stickers, 3d foam pads
Supplies for the gift box:
Stamps: SU! Petal Pizzazz and Circle Circus sets
CS: SU! Regal Rose & Whisper White
Ink: SU! Pumpkin Pie, Regal Rose & Old Olive
Tools: Metric Scor-Pal, SU! Scalloped Circle punch, X Cut small circle punch, Crop-A-Dile
Embellishments & accessories: SU! Pumpkin Pie grosgrain ribbon, 3d foam pads