Pages

Wednesday, 29 February 2012

Three Tree Christmas Cards - 52 CCT Challenge

This week's challenge at the 52 {Christmas} Card Throwdown Challenge blog the challenge is to use stickers and/or rub-ons.  I knew I had some Christmas sentiment rub-ons lurking around somewhere but I wasn't sure about stickers.  Anyway, a good old rootle in my Christmas stash box produced some sheets of parcel stickers and some My Mind's Eye glittered chipboard shape stickers - I was all set to go!  I couldn't decide whether to use the parcel stickers or the glittered shapes so I used both and made 3 cards.  That's the thing about stickers, they're fast and easy!

This first card uses the parcel stickers.  My friend Debbie got these from Tesco after Christmas in their sale and she gave me a couple of packs - about 2 years ago - so it's about time they were used!  I put the stickers onto CS, cut out the tree shaped one and punched out the sentiment circle one.  I cut a tad off the side of my Baja Breeze side opening A6 landscape card and added a red punched border and a snowflake embossed strip.  I decided to punch a part circle in the mat panel for my sentiment circle to nestle into and I've popped up the tree and sentiment.  I've added a few blue gems to the tree to finish off the front.


More stickers inside the card - again I put the stickers onto CS and cut them out - and I popped the gift up.  For the envelope flap though I just peeled and stuck the sticker straight down.


Then I made 2 quick CAS cards using glittered chipboard tree stickers and sentiment rub-ons.  For the larger square card I added some silver fabric snowflake trim that I bought half price at a garden centre after Christmas.  It is lovely but very fiddly to glue down when you want it in a line - I snipped off some individual flakes and they were much easier to glue!  I added some aqua gems and rounded the top right corner.


Then I made a small square card where as well as the sticker and rub-on I added some gingham ribbon, punched snowflakes and blue gems.  I used a white rub-on for this card and die cut a frame from black CS.


I stamped the same snowflake cluster and sentiment stamp inside both cards.  I also stamped the snowflakes on the envelope flap but I haven't taken a photo.


Supplies for blue tree card:
Stamps: none
CS: SU! Baja Breeze, Riding Hood Red & Crumb Cake
 Ink: none
Tools: Rectangle Nestabilities dies, Craft Tonic 'Dotty Border' border punch, Cuttlebug Snowflakes embossing folder, circle punches
Embellishments & accessories: blue gems, 3d foam pads


Supplies for CAS glitter tree cards:
Stamps: PSX Snowflake Medley, sentiment from Penny Black

CS: Square white card blanks, SU! Basic Black,
Ink: Broken China Tim Holtz Distress ink, Memento Tuxedo Black
Tools: My Mind's Eye silver glittered chipboard shape stickers, Crop-A-Dile Corner Chomper, Woodware small snowflake punch, Hero Arts 'Small Tag Frame' Frame Cuts die, rub-on tool
Embellishments & accessories: Pebbles Inc. black & white Merry Christmas rub-ons, silver fabric snowflake trim, gingham ribbon, blue & aqua gems


Photobucket

Monday, 27 February 2012

Brickwork, Bunting & Butterfly Window Congratulations Card

Zoë is a lovely lady who comes to Joanne's SU! make and take evenings, she's a teacher and she's been studying and working very hard to achieve a masters degree.  Zoë passed and this is the card I made to congratulate her on her academic achievement - and if that's not a reason to hang out the bunting I don't know what is!

I made a 5" x 7" card base from Pool Party CS and used my fab new window die again - I am loving this  window die and it's perfect paired with the brick embossing folder.  I went through my papers to find some suitable wallpaper and I settled on this flowery design from the SU! Domestic Goddess DSP pack.  For this card I've added acetate behind the window frame to resemble glass although you can't tell that from the photo.  The window is popped up.  I thought it would be great fun to add some celebratory bunting!  After stamping and punching the pennants I pierced holes in the triangles and threaded them onto a length of linen thread so I got a hanging banner.  Before gluing the brickwork panel to the card, I pierced holes at the sides so I could push the thread through the holes to attach the banner and I taped the ends of the thread behind the brick panel.  I added a tiny dab of glue just at the top of both the left and right pennants to keep them in place on the wall but I left the centre pennant free to dangle.  I knew I wanted to use that gorgeous 'Congratulations' stamp from the Swirls & Curls Verses set and after I'd stamped it I used a square punch on one end to make a flag shape and I popped it up.  Seeing the butterfly on the sentiment prompted me to add a butterfly to the window frame.  I used a clear Sakura StarDust pen to add sparkle to my butterflies and the die cut one on the window also got a rhinestone jewel.


Here's the inside and the envelope featuring more Pool Party patterned papers from the Domestic Goddess pack with some Island Indigo punched borders.  I wanted to use the 'so happy for you' sentiment as I am so happy for Zoë that all her determination, dedication and hard work paid off.  I was chuffed when I realised the wording fitted in the oblong frame from my Hero Arts Luscious Frames set!  I couldn't resist adding the butterfly with a trail to keep the butterfly theme going!


Supplies:
Stamps: SU! Pennant Parade & So Happy For You sets, Hero Arts Luscious Frames clear set
CS: SU! Pool Party, Island Indigo & Whisper White, Core'dinations Cream 'n Sugar, acetate
Patterned paper: SU! Domestic Goddess DSP
Ink: SU! Early Espresso, Island Indigo & Pool Party
Tools: Creative Expressions Brick embossing folder, Poppystamps Grand Madison Window die, SU! Petite Pennants builder punch, 1 1/4" square punch, 1/2" circle punch, & Eyelet Border punch, Crop-a-Dile Corner Chomper, SU! Beautiful Wings Embosslits die, paper piercing tool
Embellishments & accessories: Sakura clear StarDust pen, SU! rhinestone jewel, SU! linen thread, SU! Designer Sanding Block, 3d foam pads


Photobucket

Sunday, 26 February 2012

Denim Shirt Card - CAS-ual Fridays #41 Challenge

This week at the CAS-ual Fridays challenge blog the challenge is 'Jest for the Pun of it' - to use a pun or a sentiment in a silly way to create a joke on your CAS creation.  I love pairing this sentiment with my man's shirt stamp and I haven't inked them up in a while.  I bought the shirt years ago, it's one of the oldest stamps in my stash but I came across the sentiment stamp on eBay quite a while after getting the shirt and I just had to have it as the two go perfectly together!

My shirt is made with a soft chambray denim from an old shirt of Owen's that was going to be thrown out a long time ago.  I saved the old shirt for stamping on, I love that I can get an actual fabric shirt!  I cut a piece of double sided adhesive paper, attached one side to some white CS and after stamping the shirt onto the denim, I cut the image out roughly, peeled off the backing sheet from the adhesive paper and smoothed the stamped fabric piece onto it.  I then trimmed the shirt closely and popped it up on the white panel.  I used a ticket corner punch on the corners of the white panel and placed silver nailheads on the black mat.  After stamping the sentiment I added 3 die cut buttons, popping the centre one up.


Inside the card I've glued a strip of denim patterned paper and added 3 more buttons.  I placed a larger button on the envelope flap to finish off.


Supplies:
Stamps: Stampendous 'His Shirt', sentiment from Rubbernecker Stamp Co
CS: PaperMania square white card blank, SU! Basic Black
Patterned paper: denim paper from unknown source - been in my stash for years!
Ink: VersaFine Onyx Black
Tools: Sizzix Buttons Sizzlits die, SU! Ticket Corner punch
Embellishments & accessories: silver nailheads, 3d foam tape, old denim shirt


Photobucket

Saturday, 25 February 2012

Lace 'A' Monogram Card - Simply Stampin' Challenge #48

It's a theme challenge at Simply Stampin' this week - and the theme is 'lace'.  I've been inspired by my fab demo Joanne for my card.  I saw this lovely card months ago she made that showcases the new 2012 In Colors and I've wanted to make a version of it ever since.  This lace challenge was the perfect opportunity!  Yellow is not a 'go to' colour for me but I seem to be warming up to it these days and I do like it paired with blue.  I've used So Saffron, Marina Mist, Night of Navy with Whisper White as my combo - and I threw in some Flirtatious DSP for the inside and envelope.

First I made a Marina Mist side opening landscape A6 size card and then cut my white lace strips using the Lace Ribbon Border punch.  I then punched 1" circles of So Saffron and Night of Navy CS, glued those behind the lace borders and glued the three strips to the card front.  I debated about adding a sentiment or not  and then decided to add a monogram instead.  So I stamped the A from the Broadsheet Alphabet set and used plain and scalloped circle punches to mat and layer.  I tied Night of Navy grosgrain ribbon around the card in a knot before attaching the monogram element.  The Saffron and Navy circles are both popped up.  I then punched So Saffron and Night of Navy itty bitty flowers, gave them some shaping (more influence from Joanne there!), glued a flower to each lace circle centre and gave each one a rhinestone jewel.  I also added a jewel to the monogram A letter.


For the inside, I cut a Whisper White panel, added a strip of patterned paper and just part of a punched Night of Navy Lace Ribbon Border.  I could end up using this as a birthday card and if so I'll add a birthday sentiment at the time - from my eagerly awaited Happiest Birthday Wishes set!  A 3/4" circle punch is the perfect size to cut out the flower at the centre of the lace circle border.  After punching a flower out I tidied up the edges with a sanding block, matted and layered onto plain and scalloped punched circles and added a 1/4" Marina Mist circle to the flower centre.  I glued a strip of paper to the front of the envelope and glued the scalloped circle over the top to finish off.

I hope you can join us at Simply Stampin' this week to take part in this lace challenge - I'd love to check out your lacy creations!


Supplies:
Stamps: SU! Broadsheet Alphabet set
CS: SU! Marina Mist, So Saffron, Night of Navy & Whisper White
Patterned paper: SU! Flirtatious DSP
Ink: SU! Marina Mist
Tools: SU! Lace Ribbon Border, itty bitty flower, 1 3/4" Scallop Circle, 1/4", 3/4", 1", 1 1/4" & 1 3/8" Circle punches, Designer Sanding Block, large ended embossing tool & moulding mat for flower shaping
Embellishments & accessories: SU! Rhinestone Jewels, SU! Dimensionals


Photobucket

Friday, 24 February 2012

Snowflake Happy Christmas Jewel Cluster Card

Over at the 52 CCT blog this week they've set an 'angels' theme challenge and as I don't have anything suitable in my stash I'm not taking part in the challenge.  However, I was determined to still make a weekly Christmas card by Friday to add to my box - well, it got to Friday and I hadn't made my Christmas card!  So to make things easier for myself I've raided my 'works in progress' box and I found this stamped and mounted panel I made months ago but never got round to placing on a finished card.  I'd been playing with my distress inks, made a few bits and pieces and tossed them in the box. 

For this panel I'd inked the snowflake with Broken China and Peeled Paint inks, spritzed with water and stamped the image.  I added the sentiment over the top, sponged on more Broken China and Peeled Paint inks and then spritzed Blue Smoke Perfect Pearls mist over the panel.  I'd added a yummy green glittery brad to the snowflake centre and matted the white panel onto Broken China CS.  The blue and green colours reminded me of some gorgeous jewel clusters I'd bought recently.  I found the Pear Pizzazz A6 landscape card already scored and folded in my stash, glued on the stamped panel and added the self adhesive jewel cluster - fast and easy Christmas card! 


All I then had to do was decorate the envelope and the inside of the card.  I inked the sentiment stamp with markers, stamped and die cut the rectangle panel, sponged the edges and layered it onto a Broken China mat.    For the envelope, I inked the snowflake stamp with the blue and green inks, spritzed with water and stamped it in the corner. 


Supplies:
Stamps: Hero Arts Big Snowflake cling stamp, Woodware 'Wishing You' clear stamp, Hero Arts 'Warm Wishes to You'
CS: SU! Pear Pizzazz & Whisper White, Core'dinations Broken China
Ink: Tim Holtz Broken China & Peeled Paint Distress Inks, SU! Early Espresso, Certainly Celery & Marina Mist
Tools: Rectangle Nestabilities dies, sponge daubers
Embellishments & accessories: Perfect Pearls 'Blue Smoke' mist, PaperMania glitter brad, Mark Richards jewel cluster


Photobucket

Wednesday, 22 February 2012

Two Growing Green Sponged Colour Cards

I came across this beautiful floral 'with love' card that had been made with the SU! Fabulous Florets stamp set.  I saved the card on a Pinterest board because I wanted to use the method of  colouring that Loll had used on her card.  I don't have the Fabulous Florets set so I've substituted the Growing Green set.  I'm not good at colouring in, I know many people say they find colouring quite relaxing but I'm afraid it can be quite fraught and stressful for me!  I'm always envious of beautifully watercoloured stamped open line images and I'm never satisfied with my own efforts - shading just seems to defeat me!  I know I tend to make life easier for myself by using solid image stamps and I admittedly don't practise my colouring enough - and I'm a big fan of paper piecing!  Loll's results were stunning so I couldn't wait to give this sponging method a go.

I sponged Pink Pirouette ink onto Whisper White CS and stamped a few flowers over the top with Early Espresso ink.  I sponged some Pretty in Pink ink over the flowers, cut them out in layers and then edged each flower piece with Regal Rose ink using a sponge dauber.  I added some deeper colour in the centre of the flower with Regal Rose ink squeezed onto the ink pad lid which I picked up with a blender pen.  For the leafy stem, I sponged Certainly Celery ink onto Whisper White CS, then sponged on some Lucky Limeade ink, stamped the leafy image, cut it out and then sponged the edges with Old Olive ink on a sponge dauber.

I was in the mood to make a shaped card and I decided to use oval and Labels 10 Nestie dies so I die cut all the shapes for the card base and layers.  I stamped the white layer with the French Script background stamp in Crumb Cake ink after stamping off once first and I sponged the edges.  I stamped the sentiment, punched out the oval and sponged the edges with Regal Rose ink.  I then attached the leafy stem to the white panel with glue dots and then applied my flower layers by popping each layer up with 3d foam pads.  So that the card would stand up for display, I cut a smidge off the bottom of the oval.  I added some gems to finish off the front.


Here's the inside and the envelope.


After I'd finished I realised I'd gone well away from Loll's clean and simple look and I wished I'd kept to a panel with lots of white space as Loll had done with her original card.  I think that's what made her card so striking and what attracted me to it in the first place so I just had to make another card.  I still haven't managed as pure a CAS look as Loll but this does have more white space at least.  It gave me more practise at this method of colouring and that's no bad thing - and I must say it's a fab, easy method, I love it! 

I coloured the flowers exactly as I did for the previous card but I did the leafy stem a wee bit differently for this card.  I stamped the leafy stem onto Whisper White CS first, sponged Pear Pizzazz ink over the stamped image, added some light Old Olive ink sponging over the image, cut out the stem and edged the image with Old Olive ink.   Again, I've used glue dots to attach the stem and I've popped up the flower layers with 3d foam pads.  I stamped a sentiment, added some striped grosgrain ribbon and added olive gems to punched photo corners to finish off the front. 


Here's the inside and envelope for my second card.  I stamped the stems in Old Olive and left those plain but coloured and cut out a few smaller flowers from the Growing Green set for the inside of the card.


Supplies for Birthday Wishes card:
Stamps: SU! Growing Green & Watercolor Trio sets, SU! French Script bg stamp, 'fabulous birthday' from Hero Arts
CS: SU! Lucky Limeade, Early Espresso & Whisper White
Ink: SU! Early Espresso, Crumb Cake, Pink Pirouette, Pretty in Pink, Regal Rose, Certainly Celery, Lucky Limeade & Old Olive
Tools: Petite Oval & Labels Ten Nestabilities dies, SU! plain oval punch, sponges & sponge daubers, blender pen
Embellishments & accessories:  SU! rhinestone gems, glue dots & 3d foam pads


Supplies for Warm Wishes card:
Stamps: SU! Growing Green & Cheer & Wishes sets
CS: SU! Pink Pirouette, Early Espresso, Old Olive & Whisper White
Ink: SU! Early Espresso, Pink Pirouette, Pretty in Pink, Regal Rose, Pear Pizzazz & Old Olive
Tools: SU! Photo Corners punch, Stamp-a-ma-jig, sponges & sponge daubers, blender pen
Embellishments & accessories: olive rhinestone gems, SU! Pretty in Pink striped grosgrain ribbon, glue dots & 3d foam pads


Photobucket

Monday, 20 February 2012

Warm Wishes Window Card

I saw Michelle's beautiful card she made for the brand new Die-ing for a Challenge blog  'Anything Goes' challenge.  You can check the new Die-ing For A Challenge blog here.  There will be a themed challenge each month but they're breaking us in gently with an Anything Goes theme for the first challenge.  I have a good collection of dies but it just so happened that I had received a brand new die so I thought I'd use that to take part in the challenge.  It's the wonderful Poppystamps Grand Madison Window die - I LOVE it!

I thought my brick embossing folder would be a perfect partner for the window so I first embossed some Core'dinations CS, scuffed it to reveal the mortar detail and covered the front of a cream A6 card blank. As my window was to be on the outside with the viewer looking in, I rootled in my patterned paper stash to find something that would resemble wallpaper.  I glued that to a piece of CS and glued that panel to the card front.  I die cut the window from Crumb Cake CS, stamped my woodgrain  stamp over the top in Soft Suede ink and also sponged the edges with the same ink.  For my window blind I die cut a vanilla Dainty Lace Border, glued that to the bottom of a strip of wide striped grosgrain ribbon and glued that behind the frame.  I'll be honest here - I actually tried the ribbon as curtains first but that wasn't working at all for me so then I hit upon the idea of a blind which I found much easier!  I then popped up the frame on the card front using 3d foam tape.

I wanted to have a potted plant on the outside of my window frame so I punched a pot from Cajun Craze CS and sponged the edges with Cajun Craze ink.  I die cut Little Leaves from Old Olive CS, snipped them, sponged the edges with olive ink and glued them to the pot.  I punched 3 small Razzleberry flowers, placed them on a foam moulding mat and added some shaping by pressing a large ended embossing stylus in the centres.  I glued the flowers on and added gem centres.  I stamped the Warm Wishes sentiment on Vanilla CS, punched it out with the Modern Label punch, sponged the edges, popped it up and added more gems. 


For the inside of the card and the envelope I inked up the gorgeous SU! Forever Flowers wheel in Rich Razzleberry ink and added some colour with inks and a blender pen.


I found this quite a time consuming card to make, not one you can churn out in five minutes and my desk looked like a bomb site after I'd done!  But, oh my goodness, it was such fun, I think this is a very versatile die and I'm looking forward to playing with it more!
  
Supplies:
Stamps: 'Warm Wishes' from SU! Cheer & Wishes set, Hero Arts Designer Woodgrain background stamp, SU! Forever Flowers wheel
CS: PaperMania cream A6 card blank, SU! Crumb Cake, Rich Razzleberry, Old Olive, Cajun Craze & Very Vanilla, Core'dinations Coconut Cream
Patterned paper: SU! Paisley Petals DSP
Ink: SU! Soft Suede, Rich Razzleberry, Old Olive & Cajun Craze, SU blender pen
Tools: Creative Expressions Brick embossing folder, Poppystamps Grand Madison Window die, MFT Die-namics Dainty Lace Border die, SU! Little Leaves die, Woodware small flowerpot punch, SU! Modern Label punch, flower punch from SU! Itty Bitty Shapes punch pack, ultrafine sandpaper, sponge daubers, embossing stylus & moulding mat
Embellishments & accessories: SU! wide striped grosgrain ribbon, SU! rhinestones, 3d foam tape


Photobucket

Saturday, 18 February 2012

Triple Treat Flower Just For You Card - Simply Stampin' Challenge #47

This week at Simply Stampin' we have a colour combo for you.


It's a fab combo, if you want to give it a go but don't have the exact colours then you can always substitute, we'd love you to play along!  Just remember to use at least one SU! main product in your project - a stamp, punch, die, CS or patterned paper.

I wanted to use Wisteria Wonder patterned paper and as I went through the papers and realised there were 4 different patterns I decided I'd use use all 4 patterns on my card which led to the four squares grid design of my card.  The card measures 5 3/4" square, each Melon Mambo mat measures 2 1/2" square and each patterned paper mat measures 2 1/4" square.  On a side note, I was intrigued to know where the wording came from on the paper with the text on.  So I Googled and found out it's from Shakespeare's Sonnet 83.  Well, you can't beat a bit of Will Shakespeare to add a classy touch to a card!

I received some Melon Mambo embossing powder as part of a Christmas gift and I hadn't got round to using it so this colour challenge gave me the perfect opportunity to try it out.  I stamped the Triple Treat flowers in VersaMark ink firstly on Pink Pirouette CS and then again on Whisper White CS and I heat embossed with the Melon Mambo EP each time.  I have to say the Melon Mambo EP comes out a less vibrant colour than I was expecting, it's really lovely!  I die cut some Whisper White Little Leaves to tuck behind my flowers.  I punched out the flowers and I've popped up the 5 Petal flower shapes over the top of the Fancy Flower shapes and then popped those up also.  I really wanted to use the Fancy Flower shape with a circle centre featuring a sentiment for my 4th square.   I inked the Dot, Dot, Dot stamp with VersaMark ink, stamped onto Melon Mambo CS, heat embossed with Melon Mambo EP and punched out the Fancy Flower shape.  I needed to find a sentiment that would fit in a circle as the centre of my flower.  I inked only the 'Just For You' words on the stamp from the Ovals All set with a Melon Mambo marker and punched it out with the 1 1/4" circle punch - yay, perfect!  I layered that onto a Wisteria Wonder circle and popped that up on my Melon Mambo Fancy Flower. Some rhinestones finished off the card front.


Here's the inside and envelope - what no sentiment inside?!  Oh, I have plans for that Pink Pirouette square, don't you worry!  It will be stamped with the 'Happiest Wishes on your Birthday!' stamp from the Happiest Birthday Wishes Hostess set - I just need to wait a while before I can get my inky mitts on it!  I belong to a Stamper's Ten group and it's my turn for the hostess goodies this month.  Actually, our Stamper's Ten meeting should have been on the 14th but as it was Valentine's Day and Wendy had plans for that evening we've pushed it back to the 21st so I'm having to wait a whole week longer to place my order!  Honestly, as I said to my hubby, "get your priorities right, rubber before romance, that's what I say!"  Then we both burst out laughing as that saying could be taken in a whole other context LOL!


Supplies:
Stamps: SU! Triple Treat Flower a la carte stamp, SU! Dot, Dot, Dot background stamp, 'Just for You' from Ovals All set
CS: SU! Pink Pirouette, Melon Mambo, Wisteria Wonder & Whisper White
Patterned paper: Wisteria Wonder papers from SU! In Color DSP Stack
Ink: VersaMark, SU! Melon Mambo & Wisteria Wonder
Tools: SU! Little Leaves Sizzlits die, SU! 5 Petal Flower, Fancy Flower, 1 1/4", 1 3/8" & 1/2" Circle punches
Embellishments & accessories: SU! Melon Mambo Stampin' Emboss Powder, SU! Basic Rhinestones & SU! Dimensionals


Photobucket

Friday, 17 February 2012

Lighthouse Circle Birthday Card - Nautical But Nice!

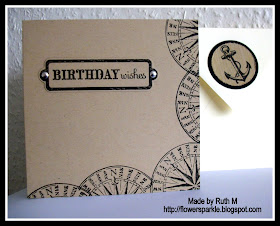
I was so pleased with myself that I had made 3 masculine cards for my card group meeting in February.  My ladies know I'm not fond of making masculine cards so I expected them to be pleasantly surprised - and they were.  However, Lesley pointed out to me that my masculine cards mostly feature trees or leaves -  hmmmm, she does have a point there!  I have some male clothing stamps - shirt, jeans, a waistcoat but we've made cards with those a long time ago at card group so I've not used them recently, I think I need to dust them off and revisit them.  Lesley said perhaps I needed to acquire some summer themed male stamps - hey, who am I to argue about acquiring new stamps?!  To be fair, she also said I could borrow her beach huts stamp again.  So anyway, the SU! Sail Away stamp is going on my next order.  In the meantime, I came across this Kanban  Lighthouse clear set of stamps and it was very reasonably priced so I thought I'd try them out.  I have to say, I really like this set - I particularly like the compass image but it's only a quarter circle shape and I wish it was a full compass circle but that's a small quibble!  I've just realised that there happens to be a leafy, swirly vine as part of the lighthouse image so I've not managed to completely avoid leaves LOL!

I stamped the lighthouse image on SU! Crumb Cake CS  with VersaFine Onyx Black ink and then dusted off my sadly neglected SU! Watercolor Wonder Crayons to add the colour.  I just wanted to add colour here and there rather than colour in the whole image.  I used a wet paintbrush to pick up the colour from the crayons and scribbled the brush on a tile before I applied the paint to the image.  I had to colour the sails a few times with the Whisper White crayon in order for the colour to show up on the Crumb Cake CS but I was pleased at how well the crayons worked for this.  After I'd finished colouring I cut the image out with a circle Nestie die and used another neglected item from my stash - my distressing tool - to roughen up the edges.  I stamped woodgrain on a Crumb Cake panel, inked the edges with Crumb Cake ink and repeatedly stamped the compass image on the card front as a background.  Before adhering the woodgrain panel to the card front I added some string and the 3 screw brads.  I really like these brads, I couldn't resist them when I found them but they've been in my stash for a couple of months awaiting a suitable card - I think they go so well with woodgrain!  I stamped the quarter compass again, cut it out with a circle punch, distressed the edges and popped it up.


Inside I used a Hero Arts frame stamp and die ( I do love 'em!) and I added silver nailheads.  I stamped more compass images along 2 sides.  For the circular element on the envelope flap, I stamped the anchor and overstamped that with the woodgrain stamp and punched out circles - I distressed the Crumb Cake circle with the distressing tool.  So now I have a masculine birthday card to add to my card box - almost unheard of!  I enjoyed putting this card together but now feel the need to stamp some flowers LOL!


Supplies:
Stamps: Kanban Lighthouse clear set, Hero Arts Woodgrain background stamp, Hero Arts Sending You Love clear set
CS: SU! Crumb Cake & Basic Black
Ink: VersaFine Onyx Black, SU! River Rock & Crumb Cake, SU! Whisper White, Basic Black, Ruby Red, Summer Sun, Not Quite Navy, Garden Green, Close to Cocoa & Chocolate Chip Watercolor Wonder Crayons
Tools: Circle Nestabilities die, circle punches, Hero Arts 'Small Tag Frame' Frame Cuts die, Tim Holtz distressing tool, sponge dauber
Embellishments & accessories: Woodware screw brads, silver nailheads, string, 3d foam pads


Photobucket

Thursday, 16 February 2012

Season of Joy Card - 52 CCT Colour Combo Challenge Card

This week at the 52 {Christmas} Card Throwdown blog the challenge is a colour combo.  The ladies have been kind and given us a nice and easy, traditional, festive combo to work with.  The ladies were also very kind to me last week - my layered poinsettia card got chosen for the Top Honor spot - I was very chuffed indeed!

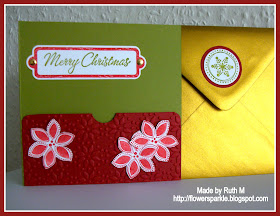
My Valentine's card from hubby came in a lovely gold envelope and Owen now knows not to write on any special envelopes he gives me - it's taken a while to train him but he's got it now LOL!  This challenge seemed the perfect project to use my gold envelope for so I measured the envelope first and made a 12.5 cms (4 7/8") square Old Olive card base to fit.  I found the ticket shape already cut out in my stash so I decided to use that.  I stamped the words stamp from the Season of Joy set twice, once in Old Olive ink and again in Riding Hood Red ink, cut out some red pieces and glued them over the top of the green.   I embossed just part of the card with the Sizzix 'Sugar' embossing folder and then assembled the ticket panel, adding some gold lurex ribbon and some gold nailheads.  I added more ribbon around the embossing to finish off the card front.


I decided to make this a gift card or money holder so I glued an embossed panel to act as a pocket and added a sentiment.  I then stamped and cut out 3 poinsettias from the Season of Joy set to finish off the inside.  I glued a stamped and punched snowflake element to the envelope flap to finish off.    Another Christmas card added to the box and it's only February - it feels good!


Supplies:
Stamps: SU! Season of Joy set, 'Merry Christmas' from SU! Four the Holidays set, frame from Hero Arts Sending You Love clear set
CS: SU! Old Olive, Cherry Cobbler & Whisper White
Ink: SU! Old Olive & Riding Hood Red
Tools: Sizzix Tickets Framelits die, Sizzix 'Sugar' embossing folder, circle punches, Hero Arts
'Small Tag Frame'  Frame Cuts die,  corner rounder punch
Embellishments & accessories: gold lurex ribbon, gold nailheads


Photobucket

Wednesday, 15 February 2012

Flower Circle Frame Hello Card

I've been using the frames and sentiments from my Hero Arts Luscious Frames set for the insides of my cards and I thought it was about time I let one of the stamps shine on the front of a card.  I was inspired by this lovely card I saw on Pinterest.  I really love the colour combo Lisa used but I decided to stick to a white card base this time.  I'll try a kraft and turquoise combo another time though, it looks fab!  I also love Lisa's perfect piercing around part of the circle and I know for certain mine wouldn't turn out anything like that so I'm happy to admire it but omit the piercing LOL!

I love mixing new items with older stuff from my stash and I first stamped a background with an old SU! background stamp called Fern Lace.  US background stamps are not an ideal fit for our A6 sized cards so I cut the height of the card down to 5 1/2" after stamping the background.  If I'd thought a bit beforehand I could have stamped the background twice and covered the join with my CS strip and then I needn't have cut down the card.  Hey ho, something to bear in mind for next time!  I added a wide strip of Early Espresso CS and a decorative punched Melon Mambo border.  I stamped the circle frame in Lucky Limeade ink and fussy cut it out.  I stamped the flowers in Melon Mambo ink and I cut the flowers out with circle punches.  I added rhinestones to the flower centres and popped a few flowers up. 

 I stamped a frame and sentiment from the set inside the card.  For the envelope I used another new Hero Arts clear set (Stencil Art) - I stamped once in Limeade, again in Melon Mambo and cut out the Melon Mambo flowers and glued them over the top of the Limeade vine.


I have always loved the look of this Stencil Art set and could picture that gorgeous vine decorating the front of an envelope.  I've picked the set up so many times on my trips to the Glitter Pot but always put it back as £13.95 seemed a lot to pay for a set to just decorate envelopes with LOL!  I couldn't picture what else I could do with it.  Yes, I know you're surprised, but I actually do sometimes show restraint when it comes to buying stamps LOL!  Well, recently I saw the set for sale on Etsy for $6.99 and with shipping it came to a tad over $10 (£6.49) so I snapped it up!  Once I received the set I realised it co-ordinates with a Hero Arts stamp/die combo set I have plus a Hero Arts background stamp I have - yay, I'm well chuffed!

Supplies:
Stamps: Hero Arts Luscious Frames & Stencil Art clear sets, SU! Fern Lace background stamp
CS: PaperMania A6 white card blank, SU! Early Espresso, Melon Mambo & Whisper White
Ink: SU! Lucky Limeade, Melon Mambo & Early Espresso
Tools: SU! Eyelet Border punch, circle punches
Embellishments & accessories: SU! Basic Rhinestones, 3d foam pads


Photobucket

Tuesday, 14 February 2012

Sparkly Hearts Valentine's Day Card For Owen

Here is the Valentine's card I made for my hubby Owen using black, white and red which is a fave colour combo of his.  I also used the fabulous SU! You are Loved set and the sparkly red glimmer paper.  I LOVE that paper, I'm going to stock up with it so that I have lots to use for Christmas cards!

I started off by stamping the Hero Arts Starburst Lace stamp in Real Red ink and I covered the centre with a black circle and added a popped up sparkly heart.  I added the beautiful sentiment and more punched sparkly hearts.  I simply matted my panel onto a black layer and adhered it to the front of a 5 1/4" square white card base.


Here's the inside and envelope.  I used 'Hugs & Kisses' from the Hero Arts 'Sending You Love' set for the sentiment, I love that I can cut the sentiments out with a matching frame die! I coloured in the flower with a Real Red marker and a blender pen.  I added gold brads before gluing the red sparkly strip to the card.  A few more punched hearts finished off the inside and the envelope flap.


Supplies:
Stamps: SU! You are Loved set, Hero Arts Starburst Lace stamp & Sending You Love clear set
CS: PaperMania square white card blank, SU! Basic Black & Whisper White, SU! red Glimmer Paper
Ink: Memento Tuxedo Black, SU! Real Red
Tools: Circle Nestabilities die, SU! Full Heart punch, Woodware heart punches, Hero Arts 'Small Tag Frame'  Frame Cuts die, blender pen
Embellishments & accessories: gold brads, 3d foam pads


Photobucket

Saturday, 11 February 2012

Just Believe Just For You Card - Simply Stampin' Challenge #46

It's sketch time at Simply Stampin' this week and what a lovely layout it is!  I've stayed faithful to the sketch but actually I think it would be fun to play around with it and try different shapes.  I hope you'll come along and play with us and make a project with this sketch, I'd love to come and see what you make!

Baja Breeze, Elegant Eggplant and Rose Red are definite fave colours of mine but I don't think I've ever put the 3 colours together but that's what I used here for my combo (with some Whisper White) and I used my much loved SU! Just Believe set.  I made a Baja Breeze side opening A6 landscape card, added the white punched Eyelet Border and the Elegant Eggplant strip.  I stamped the silhouette flowers twice in Elegant Eggplant ink without re-inking, cut the panel to size, inked the edges and matted it onto a Rose Red layer.  I then stamped my two circle images, punched them out, sponged the edges and added those to the card.  I stamped the gorgeous leafy frame, added the sentiment, cut it out and popped it up.  To finish off the card front, I added a Rose Red marbled button with some white grosgrain ribbon threaded through the holes.


Here's the inside of the card and the front of the envelope.  I may add a sentiment inside later when I know what occasion I'm going to use the card for - or I may leave it as a note card.


Supplies:
Stamps: SU! Just Believe set
CS: SU! Baja Breeze, Elegant Eggplant, Rose Red & Whisper White
Ink: SU! Baja Breeze, Elegant Eggplant & Rose Red
Tools: SU! Eyelet Border, 1 1/4" & 1 3/8" Circle punches, sponge daubers
Embellishments & accessories: SU! Rose Red button from Subtles Designer Buttons pack, SU! Whisper White grosgrain ribbon,  SU! Dimensionals & glue dots


Photobucket

Thursday, 9 February 2012

Poinsettia Season's Greetings Card - 52 CCT Sketch Challenge Card

Here is this week's Christmas card for the 52 {Christmas}Card Throwdown challenge.  We had a really great sketch to work with this week, I like the layout so much that I'll probably make a few more cards with it.  I'm thinking that if I rotate it, the layout will work as a Z Fold card - I'll have to put that theory to the test!


I thought my poinsettia stamp would work really well for the square panel so I started off by stamping that in Early Espresso ink - twice onto Cherry Cobbler CS and twice onto Real Red CS.  I cut the layers out and joined them together with a gold glimmer brad.  I rootled through my Christmas patterned paper and decided I wanted to use my flocked holly paper - it's so gorgeous - and I decided my sparkly red glimmer paper would be a great contrast to that.  I found the Season's Greetings stamp fitted perfectly inside the smaller Hero Arts Small Tag Frame die and I've popped that up over the red glimmer strip.  I finished off by adding red metal nailheads to the corners of the vanilla panel.  Metal, shiny glimmer paper and matte velvet flocked paper - I have to say I really like how the different textures look together on this card!


I simply stamped the poinsettia a few times in Cherry Cobbler ink inside the card and on the envelope and added the sentiment to finish off. 


Supplies:
Stamps: Poinsettia from Creative Expressions, 'Season's Greetings' from SU! Four the Holidays set, inside sentiment from Hero Arts Very Merry Christmas clear set
CS: PaperMania cream square card blank, SU! red Glimmer Paper & Cherry Cobbler, Real Red & Very Vanilla CS
Patterned paper: Making Memories flocked holly paper

Ink: SU! Early Espresso & Cherry Cobbler
Tools: Hero Arts 'Small Tag Frame' Frame Cuts die,  paper piercing tool
Embellishments & accessories: SU! gold glimmer brad, red metal nailheads, 3d foam tape, glue dots


Photobucket