Pages

Saturday, 29 June 2013

Christmas Date Card - 52 {C}CT June Pick A Previous Sketch Challenge

As we have a 5th Saturday in June there's a 'Pick a Previous' challenge at 52 {C}CT.


We would like you to select any one of our previous sketches and create a Christmas card using that layout.  There is a sketches archive tab on the 52 {C}CT challenge blog so please visit that page to make your selection.  Then create your card and submit it to the challenge making sure to tell us which previous sketch you've used.  Remember, you can rotate and flip sketches and substitute shapes - as long as the original layout comes through in your creation, it's all good!

I've chosen sketch #5 from May 2012 for my card.  I've added punched snowflakes in place of the sentiment, otherwise I've remained pretty faithful to the sketch.


I used my Woodware Christmas Date stamp and inked it up a few times with VersaMark and heat embossed it with white embossing powder.  I stamped on Cherry Cobbler CS first and then on patterned paper and Gumball Green CS in order to paper piece the '25' and the holly.  I've added strips of Snow Festival DSP and a Gumball Green die cut border along one side of the snowflake paper.  I popped up the holly and added red metal nailheads as berries.  I punched 3 small snowflakes and added jewel centres to complete the card front.


Here's the inside and the envelope.


We are half way through the year now, we're in week 26, so if you've been playing along with us each week your stash of festive cards is building nicely.  If you haven't started making your Christmas cards yet, now would be a great time to start!   I really hope you'll have fun picking a previous sketch to work with and sharing your Christmas cards with us this week at 52 {C}CT, I'm looking forward to visiting your blogs to see what you've made!  Don't forget to check out what the other DT members have made to inspire you!

Supplies:
Stamps: Woodware 'Christmas Date' clear stamp, SU! 'Wacky Wishes' set
CS: PaperMania A6 white card blank, SU! Cherry Cobbler, Gumball Green, Baja Breeze & Whisper White

Patterned paper:  SU! 'Snow Festival' DSP
Ink: VersaMark, SU! Cherry Cobbler
Tools: SU! 'Finishing Touches' Edgelits die, X Cut snowflake punch, plain circle Nestabilitiies dies, heat tool
Embellishments & accessories: SU! white embossing powder, Dimensionals, red metallic nailheads


 photo FlowerSparkleLRuth.gif


Wednesday, 26 June 2013

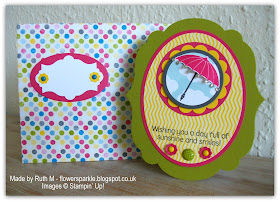
Parasol Sunshine & Smiles Card - Inkspirational June Sketch Challenge # 26

Week 4 in the month means it's time for a sketch challenge at Inkspirational and this is the fab layout we have for you this time.


One of my favourite things to do is use dies to make shaped card bases and as soon as I saw this sketch I knew I'd have to make a shaped card!  I cut two Lucky Limeade shapes using the largest sized SU! Labels Framelits die, cut a Whisper White shape and glued it to one of the Limeade shapes so I have a white inside.  I cut a smidgen off the bottom of this piece, scored it at the top and glued that to the front piece to form the card base.  Cutting the smidgen off the back piece means the card stands up nicely for display even though it's shaped - fab!


I stamped the clouds, stamped the parasol handle and punched out a 1 3/4" circle.  I stamped the parasol, fussy cut it and attached it to the circle by gluing the sides down flat and placing a thick pop dot underneath the centre so it has some shape.  I stamped the sentiment, added a Limeade brad underneath along with two punched flowers with brad centres.  I popped up the Basic Gray circle over the larger yellow and pink punched circles.  To complete the card front I just couldn't resist blinging up the parasol!


I stamped a parasol inside with a sentiment over the top - which I really should have done before gluing the two card base pieces together - mental note duly made!


Cards made using the largest sized Labels Framelits die are too wide to fit inside a regular envelope which gave me the opportunity to make a snazzy matching envelope using patterned paper.  I cut  paper measuring 8 1/2" square and using the diagonal scoring plate scored two sides at 4 3/8" and two sides at 3 3/4".  I layered a fancy label onto an oval and added punched flowers with brad centres so I have somewhere to write the recipients name.


Here's the card and envelope together - very bright and cheery I think!


I hope you'll join in with our sketch challenge at Inkspirational this week, I'd love to visit your blogs to see your wonderful creations!  The other DT members will have made fab cards to inspire you so check them out before you go off to create!

Supplies:
Stamps: SU! 'Rain or Shine' set, Hero Arts 'Clouds' background stamp, Hero Arts 'Sending Smiles Messages' clear set
CS: SU! Lucky Limeade, Melon Mambo, Daffodil Delight, Basic Gray & Whisper White

Patterned paper:  SU! Sunshine & Sprinkles DSP
Ink: SU! Soft Sky, Melon Mambo, Daffodil Delight & Basic Gray
Tools: SU! Labels Collection Framelits die, Apothecary Accents Framelits die, SU! 1 3/4" & 2 1/2" plain circle punches, 2 3/8" scallop circle punch, Itty Bitty Flower punch, Woodware 2" circle punch, SU! Simply Scored & Diagonal Plate, paper piercer
Embellishments & accessories: SU! Everyday Enchantment Limeade brad, Daffodil Delight & Marina Mist brads, Rhinestone Jewels, Dimensionals, thick pop dot


 photo DragonflyRuth.gif

Monday, 24 June 2013

Field Flowers Warmest Wishes Birthday Card

I have two ladies, Angela and Janet, coming to my home this afternoon for a card class.  Angela lives in my neighbourhood, just up the road from me, and for many years we've exchanged pleasantries when we've met in the street.  Then one day I saw her shopping in the Glitter Pot, our local craft shop so I went to talk to her and discovered she had just started to make cards.  My friend Jan was with me and she had just been to my house to make two cards and she showed them to Angela who then promptly asked if she could come to my place to make cards too!  It seems we've gone from casual acquaintances to friends due to our love of crafting, how nice is that?!

Angela came for a visit a couple of weeks ago to have a look at some of the cards I'd made and she asked if she and Janet could come to make a card with a floral theme.  Well, as florals are my favourite (as well as butterflies!), of course I said yes to that request!  So here is the card they will make.  I chose Field Flowers as it's one of my favourite stamp sets - two-step flower stamping and some fussy cutting equals one very happy stamper - in my book anyway, I hope Angela and Janet will feel the same!  Obviously two-step stamping requires the use of the Stamp-a-ma-jig which can be tricky for newer card makers so they may not share the same level of enthusiasm - but I'll work on that LOL!  

I made the A6 card base with Blushing Bride CS, layered the white panel onto Primrose Petals and Early Espresso mats and added some Primrose Petals stitched ribbon.  I think this could turn into one of my favourite colour combos!  I stamped the stem in Espresso, the solid flower in Blushing Bride and the outline flower in Primrose Petals.  I stamped one flower direct to the card and stamped a second one on a separate piece of CS which I fussy cut and popped up.  I stamped the butterfly onto Blushing Bride CS, added colour with inks and a blender pen, punched the butterfly and glued it to the card after stamping the antennae. 


I've also decorated the inside of the card and the envelope - I'm hoping Angela and Janet will want to do that too, although I'll leave that up to them!


Supplies:
Stamps: SU! 'Field Flowers', 'Blooming with Kindness' & 'Papillon Potpourri' sets, Penny Black 'Lovely Day'
CS: SU! Blushing Bride, Primrose Petals, Early Espresso & Whisper White
Ink: SU! Blushing Bride, Primrose Petals & Early Espresso, Blender Pen
Tools:  SU! Bitty Butterfly punch, Stamp-a-ma-jig
Embellishments & accessories: SU! Primrose Petals stitched ribbon, Dimensionals


 photo FlowerBoxRuth.gif

Saturday, 22 June 2013

Trees & Snowman Joyful Christmas Season Card - 52 {C}CT June Embellishment Challenge

We've got a fab embellishment challenge for you at 52 {C}CT this week - Jacqueline has chosen sequins and pearls.


I knew I wanted to use sequins as ornaments on Christmas trees and I was so chuffed to find that my sequins were the perfect size for the Hero Arts tree stamp I chose to use!  I made a Baja Breeze A6 card base, tore white CS for snow, stamped the sentiment and glittered the snow edges with Star Dust Stickles.  I tucked the trees behind the snow and popped up a cheery snowman.  I punched red stars to top the trees and added gold sequins to the star centres.  I then punched tiny snowflakes and added pearls to the centres to complete the card front.


Here's the inside and the envelope with more sequin ornament trees - I loved them on the card so couldn't resist popping another one inside and on the envelope flap!  Can you tell I had a very happy time putting this card together?!


I hope you'll play along with us at 52 {C}CT this week with our embellishment challenge, sequins and pearls can be classy and elegant or fun and whimsical so what will you make?  I'd love to visit your blogs to see your fab creations!  Please check out the cards from the other DT members, there's bound to be lots of inspiration there!

Supplies:
Stamps: Hero Arts 'Joy Snowman' stamp & die combo set, 'Joyful Christmas Season' cling set, 'Very Merry Christmas' clear set, PSX 'Snowflake Medley'
CS: SU! Baja Breeze & Whisper White
Ink: Memento Tuxedo Black, SU! Baja Breeze, Gumball Green, Real Red & Pumpkin Pie, blender pen
Tools: Tree & Snowman Sizzix Framelits dies from 'Joy Snowman' stamp & die combo set, Woodware star & snowflake punches
Embellishments & accessories: pack of coloured sequins, Star Dust Stickles, SU! Pearl Jewels, Dimensionals


 photo HeartSwingRuth.gif

Friday, 21 June 2013

Hot Air Balloons Birthday Wishes Card

I really like the 'rain or shine' card on page 28 of the SU! Spring/Summer catalogue and this card is my CASEd version.  Elements I kept from the original card are the vellum panel, bright paper strip, clouds embossed panel and a button but I've used hot air balloons rather than an umbrella.   The card base is a side opening A6 size made from Marina Mist CS.  I popped up the three hot air balloons and the sentiment. 


Here's the inside and the envelope.  I think this is such a fun and cheery card, I love the bright, happy colours!


Supplies:
Stamps: SU! 'Up, Up & Away' & 'Wacky Wishes' sets
CS: SU! Marina Mist, Real Red & Whisper White, Vellum CS

Patterned paper:  SU! Polka Dot Parade DSP
Ink: Memento Tuxedo Black, SU! Marina Mist, Real Red & Daffodil Delight
Tools: SU! Labels Framelits die, Cloudy Day embossing folder, Modern Label punch, Simply Scored, Stamp-a-ma-jig
Embellishments & accessories: SU! Real Red button, Whisper White Baker's Twine, Dimensionals


 photo ruthcamera.gif

Wednesday, 19 June 2013

Flower Edged Happy Birthday Card - Inkspirational June CASE Challenge #25

This week we have a CASE challenge for you at Inkspirational.  We would like you to CASE this very pretty card made by Vicki Burdick.


The elements I wanted to take from Vicki's design were the layout, the crisp white embossing, the use of two colours in addition to the white and the pearls.  So more or less everything then LOL!  I've used a flower cut and emboss die instead of hearts and opted for two bright colours (Strawberry Slush and Coastal Cabana) rather than the subtle tones of Vicki's original.   I flipped the layout to portrait orientation and cut a tad off the side of the card so my card has a flower edge.  The flowers are popped up and I added a sentiment banner and two butterflies. Here's the card open on display.


Here's the card closed ready to pop in the envelope.  I glued white CS inside the card.


Here's the inside and the envelope.  Surprise, surprise - more butterflies!


A very happy, cheery card I think!  I hope you'll play along with us this week at Inkspirational, I'd love to come and see your interpretations!  The other DT members will have posted fab cards to inspire you today - and our 'Weekend Warrior' Sandie will be posting her card on Saturday - so make sure you check those out!

Supplies:
Stamps: SU! 'Itty Bitty Banners' set, Hobby Art 'Sentiments' clear set
CS: SU! Strawberry Slush, Coastal Cabana & Whisper White
Ink: SU! Strawberry Slush & Early Espresso
Tools: Ellison Flower #2 Cut'nEmboss die, SU! Beautiful Wings Embosslits die
Embellishments & accessories: SU! Pearl Jewels, Dimensionals


 photo FlowerBoxRuth.gif

Monday, 17 June 2013

In Colour Flowers Thank You Card

I made two of these cards to thank customers for their SU! orders.  I thought it would be fun to use all the new In Colours so they got a sneak peek at them!  I also used a flower stamp from a new set that is available - the Best of Flowers set.

I stamped the flower in each of the In Colour inks and then used the inks and a blender pen to colour in each flower.  I cut the flowers out with the 1 1/4" scalloped circle punch - I do love a flower stamp and matching punch combo!  I glued strips of CS across the front of a white A6 card and popped up the flowers and punched sentiment labels - simple!  The new colours (from the top) are Baked Brown Sugar, Coastal Cabana, Pistachio Pudding, Strawberry Slush and Crisp Cantaloupe.  I like all of the colours but Coastal Cabana and Strawberry Slush are already my firm favourites!


Here's the inside and envelope.  I decided I liked the flowers as they were and so I didn't colour them in. 


Supplies:
Stamps: SU! 'Best of Flowers' & 'Embellished Events' sets
CS: SU! Baked Brown Sugar, Coastal Cabana, Pistachio Pudding, Strawberry Slush, Crisp Cantaloupe & Whisper White
Ink: SU! Baked Brown Sugar, Coastal Cabana, Pistachio Pudding, Strawberry Slush & Crisp Cantaloupe, blender pen
Tools: SU! 1 3/8" circle punch, 1 1/4" & 1 3/4" scalloped circle punches, Word Window punch
Embellishments & accessories: Dimensionals


 photo FlowerRuth.gif

Saturday, 15 June 2013

Embossed Ornaments Merry & Bright Card - 52 {C}CT June Theme Challenge

It's time for the June theme challenge at 52 {C}CT and Jacqueline has chosen Christmas Ornaments for the theme - what a wonderful choice!  I saw a card some time ago while surfing the web that had used an ornaments embossing folder with parts cut out and patterned paper behind the cut outs and I thought "I must try that sometime".   That time was now!


I started by embossing the white CS and then punched out the circle ornament shapes.  With the fancy shaped ornament I tried cutting out the shape with my craft knife but it looked ragged, not like the crisp cuts the circle punches had made!  Onto plan B then - I embossed another piece of white CS, punched out the circles and then embossed just the fancy ornament onto a scrap of blue patterned paper.  It was double sided paper with a really pale colour on the back and I noticed that was showing through the embossing in places so I enhanced that look by scuffing the whole piece with fine sandpaper.  I wanted to add some coloured ribbon but I didn't have anything the right colour so I brayered Perfect Plum ink over a strip of SU! Whisper White organza ribbon.  I've not done that before so I wasn't sure how well it would work - I'm very happy to say it worked brilliantly!  After attaching the ribbon strip to the embossed panel, I stamped and punched a sentiment label and popped it up.  I glued the patterned papers to the Perfect Plum A6 card front, glued the white embossed panel over the top and popped up the blue ornament.   I coloured in the ornament tops with a silver Gelly Roll pen and sprinkled on some jewels.


I have the perfect ornaments theme sentiment for the inside of this card!  I used Perfect Plum and Island Indigo markers to ink up the stamp, cut it out with an Apothecary Accents label die, sponged the edges with Island Indigo ink and glued it to the white panel.  I'd kept the large embossed ornament circle that I'd punched out from the embossed panel and I used that to decorate my envelope flap.  I lightly brayered over the circle with Perfect Plum ink and layered onto larger circle mats.  I added more jewels to finish off.


Christmas ornaments are just SO festive and I hope you'll raid your craft stash for your ornament stamps, punches, dies and other supplies so you can play along with us this week at 52 {C}CT!  The other DT members will have fab cards to inspire you so do please check them out!  I'll be visiting your blogs soon to see your fab ornament themed cards!

Supplies:
Stamps: Personal Impressions 'Christmas Messages' clear set, inside sentiment is part of SU! 'Something for Christmas' stamp
CS: SU! Perfect Plum & Whisper White

Patterned papers:  various Echo Park 'Winter Wishes' papers
Ink: Perfect Plum & Island Indigo, Sakura silver Gelly Roll pen
Tools: DoCrafts Ornaments embossing folder, SU! Word Window punch, SU! Apothecary Accents label die, circle punches, brayer, sponge dauber
Embellishments & accessories: SU! Whisper White Organza ribbon, Rhinestone Jewels, Dimensionals, fine sandpaper


 photo BlueBflyRuth.gif


Friday, 14 June 2013

Sparkly Congratulations Engagement Card


My friend Kath asked me to make a personalised engagement card for her grandson Mark and his fiancee Steph.  Mark has just proposed while on holiday with Steph and Kath wants to pop the card through their letter box so it's waiting for them when they get back from holiday at the weekend so there wasn't a lot of time for me to hang about with this one!

I've always liked the champagne glasses 'celebrate' card on page 41 of the UK SU! catalogue so that was my starting point.  I decided to mount the glasses on a circle to go in the centre of the gorgeous Hello, Doily stamp.  I stamped the Doily in Blushing Bride ink, trimmed the white panel to size, layered onto a Basic Gray mat and attached the layers to a 5 1/4" square Blushing Bride card base.  I inked the glass stamp with Blushing Bride ink so that I had pink bubbly and then I added Basic Gray ink to the glass with a marker pen.  I fussy cut both glasses, popped them up and added jewels for the bubbles. I then punched some silver glitter hearts, glued a couple flat to the card and popped a couple up.  I computer generated the sentiment using the Euphoria Script font and layered it onto a Basic Gray strip.


I cut a white panel for inside the card, stamped the sentiment and partial doilies at opposite corners and added more punched hearts.  The envelope flap got punched hearts too!


I was pleased how this card came together and I just hope the happy couple like it!

Supplies:
Stamps: SU! 'Hello Doily' stamp, 'Embellished Events' set, Hobby Art 'Sentiments' clear set
CS: SU! Blushing Bride, Basic Gray & Whisper White, Silver Glimmer Paper
Ink: SU! Blushing Bride & Basic Gray
Tools: Plain circle Nestabilities dies, SU! Heart to Heart & Full Heart punches, X Cut heart punch
Embellishments & accessories: SU! Rhinestone Jewels, Dimensionals


 photo SparkleHeartRuth.gif

Thursday, 13 June 2013

June 2013 Card Group Projects

It was our June card group meeting this afternoon - and a good inky time was had by all!  As usual I designed three cards for the ladies to make.  The first card is based on a card I made recently in this post - today's card is easier though as there's a lot less Stamp-a-ma-jig action on the tag!  I attached a strip of patterned paper to an A6 Island Indigo card base and die cut a Pool Party tag.  I cut a piece of Whisper White CS to slot into the tag and rounded the corners.  I stamped the flourish in Pool Party ink and stamped the flowers in Island Indigo ink - once on Pool Party CS and again on Whisper White CS.  I stamped the sentiment, fussy cut the flowers and popped them up.  A bright pop of Tangerine Tango was added with ribbon and a button to echo the colour in the patterned paper - and that's quite enough Tangerine Tango on a card for me!  I added a punched butterfly with aqua nailheads and popped the tag up on the card.


For the second card I was inspired by this lovely card made by Wanda which is very clean and fresh.  I came over all shabby and distressed though when I made my version!  I wanted to extend the layered stamping to include the splodge and postmark and I thought some inky distressing was called for. I used Pale Plum CS for the A6 card base and added an Elegant Eggplant mat.  I embossed Very Vanilla CS with the Vintage Wallpaper folder and very lightly brayered Crumb Cake ink over the embossing.  For the main image panel, I stamped the French Script background in stamped off once Crumb Cake ink, stamped the bloom in Perfect Plum ink and the sentiment in Elegant Eggplant ink.  I stamped the splodges in Crumb Cake and the postmark in Baked Brown Sugar ink.  I sponged the edges of both Vanilla panels with Baked Brown Sugar ink.  I then edged the image panel with Elegant Eggplant ink to add a touch more definition and I popped the panel up.


Onto card three which involves getting very inky fingers!  I kept to a CAS design and made the card neutral so it could be used for a male or female.  I started off by cutting a square of Naturals White CS, I placed it on my craft mat and applied Broken China, Faded Jeans and Chipped Sapphire Distress Inks with sponge applicator tools.  When I was happy with how the colours had blended I stamped the bird and sentiment and layered onto silver paper and black CS mats.  I glued the panel to a 5 1/4" Naturals White card base.  I made sure to take my Ranger Craft Scrubbie hand cleaning bar so the ladies could go home without blue fingers LOL!


Supplies for card 1:
Stamps: SU! 'Creative Elements' set, Hobby Art 'Best Wishes'
CS: SU! Island Indigo, Pool Party & Whisper White

Patterned paper:  SU! Sycamore Street DSP
Ink: SU! Pool Party & Island Indigo
Tools: SU! Two Tags die, Bitty Butterfly punch, corner rounder punch
Embellishments & accessories: SU! tangerine Tango ribbon & button, aqua nailheads, 3d foam pads


Supplies for card 2:
Stamps: SU! 'Blooming with Kindness' & 'French Foliage' sets, SU! 'French Script' background stamp
CS: SU! Pale Plum, Elegant Eggplant & Very Vanilla
Ink: SU! Crumb Cake, Perfect Plum, Elegant Eggplant & Baked Brown Sugar
Tools: SU! Vintage Wallpaper embossing folder, brayer, sponge daubers
Embellishments & accessories:  3D foam tape


Supplies for card 3:
Stamps: Inkadinkado 'Birds Galore' clear set, Hobby Art 'Sentiments' clear set
CS: SU! Naturals White & Basic Black, silver paper
Ink: Tim Holtz Broken China, Faded Jeans & Chipped Sapphire Distress Inks, Memento Tuxedo Black
Tools: ink applicator tools & sponges
Embellishments & accessories:Ranger Craft Scrubbie for clean up!


 photo CardFuchsiaRuth.gif

Wednesday, 12 June 2013

Nautical Birthday Wishes Card - Inkspirational Challenge #24

It's time for our monthly photo challenge at Inkspirational and here's the wonderful photo we want you to be inspired by.


I went with the nautical theme for my card and decided on a red, navy blue and kraft colour scheme.  I stamped the main image and sentiment in Night of Navy ink and popped up a lighthouse stamped in Real Red ink and fussy cut.  I layered onto Real Red and Night of Navy mats and mounted onto a 5 1/4" square Crumb Cake card base.  I found a fab nautical themed stamp set in a local craft shop recently - it was so reasonably priced for such a large set of stamps and I knew it would work well with my Kanban Lighthouse stamp set.  The stamps are made from clear vinyl, not the good photopolymer stuff, so even though the set was a great price I wasn't sure how good the images would stamp.  I ummed and aahed for a while and then bought the set anyway.  The new style SU! ink pads work brilliantly with clear stamps and I'm chuffed to bits that this cheapy set stamps absolutely fine!  I stamped the anchor and the length of rope, fussy cut them and popped them up. 


Here's the inside and the back of the envelope.  The images in the set are great and I wanted to use as many as I could!  I love the large map type image and the two gulls look like they're having a cosy chat LOL!


I just HAD to use the wonderful compass image in the set, so that got stamped on the front of the envelope!


It's not often a masculine card gets added to the stash but this challenge was the perfect opportunity for me to do just that!  I hope you'll be inspired by the seascape photo and join in our challenge at Inkspirational this week, I'd love to see what you make!  Don't forget to check out what the other DT members have created for your inspiration!

Supplies:
Stamps: Kanban 'Lighthouse' clear set, Viva Decor 'By the Seaside' clear set, Stampendous 'Sending Wishes' cling stamp
CS: SU! Crumb Cake, Real Red, Night of Navy & Very Vanilla
Ink: SU! Real Red & Night of Navy
Embellishments & accessories: 3D foam pads


 photo ruth.gif

Monday, 10 June 2013

Aqua & Yellow Summer Silhouettes Birthday Card

It's my friend Jan's birthday on Thursday and I always make three birthday cards for her.  One to give her from me at card group, one from me and Owen and one for her husband Alan to give to her.  This is the card I made for Alan to give to her.  I was totally inspired by photos I saw on Pinterest for this card.  I just adored this pincushion colour combo image - the original pic can be found here

Photo courtesy of I Heart Linen 

I saw this beautiful, stunning card made by Narelle Farrugia on Pinterest too so I took inspiration from it and CASEd her card.  Narelle's blog post for this card can be found here.  I don't usually gravitate towards yellow but yellow and blue make a striking and yummy combo! 


I started with a 5 3/4" Pool Party card base and then got busy layering with patterned papers and Bermuda Bay, Daffodil Delight and Coastal Cabana cardstocks.  For the main image panel I stamped and fussy cut leaves and flowers.  I stamped a butterfly in Bermuda Bay ink, coloured with Crushed Curry ink and a blender pen and punched it out.  I used a bookplate die for the sentiment, popped that and the flowers up and added jewels.  I added a bow to finish off the front.  I found it hard to get a good photo colour wise - Bermuda Bay is such a rich, deep greeny aqua colour but in the photo it looks more turquoisey blue.  The yellow is softer in real life too.  I absolutely LOVE Bermuda Bay, it is my favourite of the new SU! colours.


Here's the inside.  The border was stamped in Coastal Cabana ink - it goes beautifully with Bermuda Bay! - and I used Crushed Curry ink for the sentiment.  I was sure I wouldn't like Crushed Curry, not being a yellow lover, but it is a lovely golden yellow so I was pleasantly surprised to find I do like it!    


Here's the envelope flap with stamped leaves and a butterfly.  I'm happy how this card turned out - I just have to hope that Alan and Jan like the card!


Supplies:
Stamps: SU! 'Summer Silhouettes', 'Papillon Potpourri' & 'Blooming with Kindness' sets, Hero Arts 'Yummy Treats' clear set
CS: SU! Pool Party, Bermuda Bay, Coastal Cabana, Daffodil Delight & Whisper White

Patterned paper:  SU! Pool Party In Color DSP, Daffodil Delight Polka Dot Parade DSP
Ink: SU! Bermuda Bay, Coastal Cabana, Daffodil Delight & Crushed Curry
Tools: SU! Bitty Butterfly punch, Sizzix Bookplates die, Stamp-a-ma-jig
Embellishments & accessories: SU! Daffodil Delight stitched ribbon, Rhinestone Jewels, Dimensionals


 photo ruthpbcat.gif