This afternoon we got together for our card group meeting. I really cannot believe we only have one more meeting in 2016 - this year seems to have flown by! Three Christmas projects for the ladies to make today, two cards and a gift bag with tag. Everyone loves the spinner cards so I made sure to include another one of those this month!
I decorated the front of a plain white gift bag using some patterned paper and a scalloped border strip. Then I made a tag to attach to one of the handles. I just adore the sweet gingerbread man! The XCut 'Gingerbread Family' die set was a total impulse buy, I saw it in a local shop, fell in love with it and bought it immediately! In the die set there are gingerbread shapes in two sizes and then clothing and accessories dies to dress up the gingerbread people. I kept things simple for this tag though. I die cut the larger gingerbread shape from Crumb Cake and Whisper White CS and I inset the white pieces into the Crumb Cake shape. I applied Crumb Cake ink to the shape using a sponge dauber and added the buttons and bow tie. I popped up the gingerbread man onto the red tag and added the sentiment label. I used red satin ribbon and Kraft Rope Trim to tie the tag to the bag handle.
Here's a closer look at the tag. The cheery gingerbread man is guaranteed to raise a smile I think!

This time I used the circle spinner track die from the SU! 'Sliding Star Framelits' die set to create a spinner card. I cut the track from a square of Rich Razzleberry CS, popped that square up onto a Sweet Sugarplum mat layer and glued that to the front of a 5 5/8" square white card base. I stamped small poinsettias onto white CS using stamped off once Sweet Sugarplum ink and stamped the sentiment in Rich Razzleberry ink. I cut it out with a 2" circle punch, glued it to the larger Razzleberry circle which I then popped up in the centre. To make the spinner element I used two pennies sandwiched together with a round 3D foam pad. I stamped two poinsettias onto a piece of vellum with VersaMark ink and heat embossed using Vintage Plum embossing tinsel - very pretty and sparkly! I placed the vellum piece on top of a piece of Sweet Sugarplum CS and die cut the poinsettias. I attached the layers together with a rhinestone brad, adhered the flower to the penny spinner element and inserted it into the track. To complete the card front I added four Sweet Sugarplum scalloped decorative corners.

Here's a closer look at the sentiment circle and poinsettia spinner.
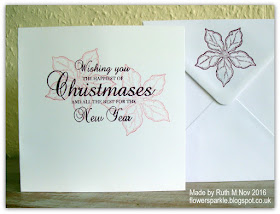
Here's the inside and the envelope.
Last month at card group Val asked for a reminder about the triple time stamping technique. A great opportunity for the group to revisit the technique then! I used the SU! 'Flurry of Wishes' snowflake stamp set to create an A6 landscape oriented card. I trimmed the Night of Navy card base to 5 3/4" wide to better accommodate the mat layer sizes.
WHITE STAMPING PANELS WERE CUT TO:
5 1/2" x 3 7/8"
4 1/2" x 2 7/8" and
3 1/2" x 1 7/8"
NAVY MAT LAYERS WERE CUT TO:
4 3/4" x 3 1/8" and
3 3/4" x 2 1/8"
I stacked the three white panels together and used removable adhesive tape to keep the panels in place. I stamped the sentiment in Night of Navy ink first, then stamped the larger snowflakes in Marina Mist ink, the medium ones in Pool Party ink and the small ones in Night of Navy ink. I separated the layers, glued the largest one to the front of the card base, glued the two remaining stamped panels to the Navy mat layer pieces and glued them to the card. I stamped a large snowflake onto Marina Mist CS and a small snowflake onto Pool Party CS and punched the shapes out. I punched out a Night of Navy snowflake, glued the three snowflake layers together and popped up the snowflake element. To finish I added a rhinestone to the snowflake centre.
Here's the inside and the envelope.
We'll exchange Secret Santa gifts at our December meeting and I made a set of gift tags for all of us. I'll share the gift tags in a day or so.
Supplies for gift bag and tag:
Stamps: Personal Impressions 'Christmas Messages' set
CS: SU! Real Red, Crumb Cake, Early Espresso & Whisper White
Patterned paper: SU! 'Candy Cane Lane' DSP
Ink: SU! Crumb Cake & Early Espresso
Tools: Creative Expressions Sue Wilson ''Pierced Tags' die set, XCut 'Gingerbread Family' die set, QuicKutz 'Scallop' border die, SU! 'Word Window' punch, sponge dauber
Embellishments & accessories: SU! Real Red satin ribbon, SU! Kraft Rope Trim, Dimensionals
Supplies for poinsettia spinner card:
Stamps: Creative Expressions Sue Wilson 'Shaded Poinsettia' & 'Shaded Poinsettia Additions' sets, SU! 'Best Yet' set, Woodware 'Happiest of Christmases' set
CS: SU! Sweet Sugarplum, Rich Razzleberry & Whisper White (thick & regular), vellum
Ink: SU! Sweet Sugarplum & Rich Razzleberry, VersaMark
Tools: Creative Expressions Sue Wilson 'Classic Poinsettia' die set, SU! 'Sliding Star' Framelits die set, MFT Die-namics 'Photo Corners' die set, heat tool
Embellishments & accessories: Stampendous Vintage Plum embossing tinsel, rhinestone brad, 3mm dimensional foam tape
Supplies for snowflakes triple time stamped card:
Stamps: SU! 'Flurry of Wishes' set, Hero Arts 'Very Merry Christmas' set
CS: SU! Night of Navy, Marina Mist & Whisper White
Ink: SU! Night of Navy, Marina Mist & Pool Party
Tools: SU! 'Flower Medallion' & 'Snow Flurry' punches
Embellishments & accessories: rhinestone jewel, Dimensionals


