Pages

Thursday, 26 January 2017

Hot Air Balloons Z Fold Birthday Card

It's good to have a card for a male in the stash and the SU! 'Lift Me Up' bundle is ideal for creating one of those tricky masculine cards!

I made a 5 3/4" square Night of Navy card base and made it into a Z Fold card by scoring the card front at the halfway point and folding the panel back.  I've used two patterned papers from the SU! 'Carried Away' DSP pack to decorate my card and envelope.  I stamped clouds on Whisper White CS using Soft Sky ink and stamped balloons on Mint Macaron and Smoky Slate CS using Night of Navy ink.  I've cut apart the two sentiments I used on this card as I know I'll get more use out of them that way.  I stamped 'Sending Smiles' onto the white square, trimmed the square to size, matted it onto a Mint Macaron CS layer and glued that layer to the front panel.  I glued the Smoky Slate balloon flat to the white panel, popped up the small Mint Macaron balloon using Dimensionals and I applied the large balloon to the white panel using an action wobble spring.  I added small silver ball embellishments to the large balloon.


Here's the inside of the Z Fold card and the front of the envelope.  I have to say I'm not keen on the 'Hope your day is on cloud nine' sentiment in the 'Lift Me Up' set.  It strikes me as odd because I've always heard or seen the expression used in reference to a person being on cloud nine.  Because I thought it was odd I knew I wouldn't use the sentiment as it was.  So I was happy to trim off that part of the sentiment stamp and just have 'Happy Birthday', it will definitely be used more after surgery and it's a lot less faffy than masking!


Supplies:
Stamps: SU! 'Lift Me Up' set
CS: SU! Night of Navy, Smoky Slate, Mint Macaron & Whisper White

Patterned paper: SU! 'Carried Away' DSP
Ink: SU! Soft Sky & Night of Navy
Tools: SU! 'Up & Away' Thinlits dies set, SU! Simply Scored score board, Hero Arts label die
Embellishments & accessories: Woodware Action Wobble Spring, silver ball embellishments, SU! Dimensionals


 photo RoseRuth.gif

Monday, 23 January 2017

Cygnets Tag

My friend Jan and I both fell in love with the SU! 'Swan Lake' stamp set as soon as we saw it in the Spring/Summer catalogue.  I decided to use the set to make a fun tag to go on her carrier bag of new SU! goodies!

Not only did this give me the chance to play with a new stamp set but I also tried out my new SU! watercolour pencils.  I stamped the images onto watercolour paper using VersaFine Onyx Black ink and used the pencils and a water brush to add the colours to the images - I applied the dry pencil colours to parts of the images and then dragged the colours out with the water brush. For the water, I lightly scribbled the Pacific Point watercolour pencil around the stamped scene and then went over it with the water brush.  I went in again with the Pacific Point pencil and water brush to get a deeper colour underneath the plants and cygnets - or swanlets as I found myself calling them at first when I couldn't remember the proper name for baby swans!  I die cut the scene and a Melon Mambo mat using the 'Lots of Labels' die set, punched a hole in the tag and tied it to the bag handles using black and white baker's twine.


The SU! watercolour pencils were so lovely and easy to use.  When I first started stamping, many years ago now, I always used watercolour pencils to colour in my stamped images.  I haven't used them for years and I wasn't sure I'd still have them.  I went digging in my stash and I'm happy to say I found them so I'll use those alongside my SU! watercolour pencils.  I like watercolouring using inks and a water brush too but I think pencils are quicker and easier.  I like that you can get different strengths of colours depending on whether you lay down the colour with a light or heavy pressure when putting the pencil to the paper.  It's quite nice to rediscover and reuse a method you haven't used for a long time!

Supplies:
Stamps: SU! 'Swan Lake' set
CS: SU! Melon Mambo, watercolour paper
Ink: VersaFine Onyx Black
Tools: SU! 'Lots of Labels' Framelits die set, SU! watercolour pencils, circle punch, water brush
Embellishments & accessories: SU! black & white baker's twine 


 photo RoseRuth.gif

Friday, 20 January 2017

Dragonfly Wonderful Friend Thanks Card

My friend Lesley ordered the 'Dragonfly Dreams' bundle as part of her January SU! order and I thought I'd make her a thank you card using my own bundle.  I know Lesley's favourite SU! colour is Pool Party so I used that along with white and a little bit of copper as my colour combo.

I stamped the dots, dragonfly and sentiment using VersaMark ink and heat embossed using copper powder.  I glued the Pool Party dotty strip to a larger strip of Copper Foil Sheet and glued that to the front of the Pool Party A6 card base.  I stamped the dots on Whisper White CS in stamped off once Pool Party ink, die cut the square and popped the square up.  I'd stamped the dragonfly on watercolour paper so that I could add colour to the wings using Pool Party ink and a water brush.  I die cut the dragonfly, glued the body flat to the white square and added Dimensionals under the wings with the backing paper left on so that the wings will stay raised.


Here's a closer look at the dragonfly.


Here's the inside and the envelope.  I really love how the copper looks paired with Pool Party!  Bless her heart, Lesley phoned me after she'd opened the card to tell me she loved it!


Supplies:
Stamps: SU! 'Dragonfly Dreams' set
CS: SU! Pool Party & Whisper White, SU! Copper Foil Sheet, watercolour paper
Ink: VersaMark, SU! Pool Party
Tools: SU! 'Detailed Dragonfly' Thinlits & 'Stitched Shapes' Framelits die sets, heat tool, water brush
Embellishments & accessories: SU! copper embossing powder, Dimensionals


 photo RoseRuth.gif


Wednesday, 18 January 2017

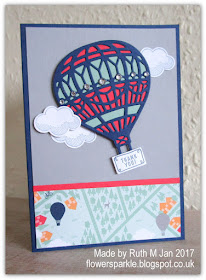
Hot Air Balloon Thank You Card

SU! demos always know what day their SU! goodies will arrive but not what time of day UPS will deliver them.  For my most recent order I was lucky and got a morning delivery on a day off from work which meant I had lots of time to play with my new goodies!  This is a card I made using the 'Lift Me Up' bundle and the 'Carried Away' DSP which is a SAB freebie.  I must say I really love these hot air balloon stamps and dies!

I glued some patterned paper to the bottom of a Smoky Slate panel, added a strip of Watermelon Wonder CS and glued the whole panel to the front of a Night of Navy A6 card base.  I stamped and die cut the clouds and the Thank You rectangle, die cut the balloon pieces and popped up one cloud and the hot air balloon.  I added some rhinestone jewels to the balloon to complete the card front.


Here's the inside and the envelope.  Yeah, that 'Thank You' stamp is very large and I wouldn't normally have put a sentiment that big inside a card - it's just that I wanted to use another of my SAB freebies - the 'So Very Much' stamp set!  


My friend Jan bought the 'Lift Me Up' bundle as part of her January SU! order and I gave this card to her.  I always put a 'handmade by' or similar sentiment on the back of my cards.  I bought the SU! 'I Stamped This' set a while ago and the set has a 'Just for You' stamp with a hot air balloon so I had to use that on the back of the card!


Supplies:
Stamps: SU! 'Lift Me Up', 'So Very Much' & 'I Stamped This' sets
CS: SU! Night of Navy, Smoky Slate, Watermelon Wonder, Mint Macaron & Whisper White

Patterned paper: SU! 'Carried Away' DSP
Ink: SU! Night of Navy & Watermelon Wonder
Tools: SU! 'Up & Away' Thinlits & 'Stitched Shapes' Framelits dies sets, SU! 'Word Window' punch
Embellishments & accessories: SU! rhinestone jewels, Dimensionals


 photo RoseRuth.gif


Monday, 16 January 2017

Mr & Mrs T-shirts Wedding Card

This is the second wedding card I made for my friend Kath.  Once the t-shirts idea had popped into my head I just had to have a go.  This was a lot of fun to make!

I made a 5 3/4" square card, chose a colour combo of Blushing Bride, Basic Gray, Basic Black and Whisper White and used elements from my MFT 'Blueprints 14' die set.  I stamped the MR and MRS on the two t-shirts and then die cut the shapes.  I added just a bow tie to the MR t-shirt and a lacy collar and three rhinestone jewels to the MRS t-shirt.  I stamped the ampersand and used punches to make the circle element.  Once I'd adhered all the layers in place I popped up the t-shirts and ampersand circle and added the scalloped border and three punched hearts.  I sprinkled on a few rhinestone jewels to complete the card front.


My SU! order arrived while I was making this card so I took the opportunity of using a new stamp set on the inside of the card - the 'Any Occasion' SAB set.  Hmmm, some of the stamps in that set are SO teeny tiny - you definitely need to clean them and put them away immediately so they don't get mislaid!  I added a stamped and die cut 'sending you love' sentiment label.  For the envelope I stamped a lacy border using another SU! SAB set -  'Delicate Details' and popped up a die cut name label element.


Supplies:
Stamps: SU! 'Custom Tee', 'Any Occasion' & 'Delicate Details' sets, 'MR & MRS' from Clearly Besotted 'Magnolia Blooms' set, Hero Arts 'Sending You Love' set
CS: SU! Blushing Bride, Basic Gray, Basic Black & Whisper White
Ink: Memento Gray Flannel & Tuxedo Black, SU! Blushing Bride
Tools: SU! 'T-shirt Builder' Framelits die set, MFT 'Blueprints 14' die set, Hero Arts 'Small Tag Frame' die set, Sizzix 'Card, Fancy Frame Flip-Its #2' Framelits die set, MISTI, circle punches
Embellishments & accessories: SU! rhinestone jewels, silver metallic enamel heart shapes, Dimensionals


 photo RoseRuth.gif


Saturday, 14 January 2017

Detailed Floral Wedding Wishes Card

My friend Kath asked me to make a wedding card for her and I ended up making two cards for her to choose from.  I made this classic and elegant card first and then I had an idea that my new t-shirt stamps and dies would make a cute and fun wedding card.  Once I'd had the idea I just had to make it so I'll be sharing the t-shirts wedding card soon!

I made a 5 3/4" square card using the beautiful SU! 'Detailed Floral' Thinlits die set and a Rich Razzleberry and Whisper White colour combo.  I added some sparkly silver ribbon and a few rhinestone jewels and popped up the sentiment oval.


Here's the inside of the card and the back of the envelope.  To get the continuous border along the bottom of the white panel I die cut twice using the smaller floral image die.  For the envelope flap element I die cut the smaller floral image again and punched out a circle which I layered onto a larger Rich Razzleberry punched circle.    


One of the fab Christmas gifts I received from my good friend Lesley was a gorgeous Tonic Studios banner die.  I thought it would be perfect to use on the front of the envelope as a name label!


Supplies:
Stamps: SU! 'Floral Phrases' set
CS: SU! Rich Razzleberry & Whisper White
Ink: SU! Rich Razzleberry
Tools: SU! 'Detailed Floral' Thinlits & 'Stitched Shapes' Framelits die sets, SU! circle punches, Tonic Studios 'Beautiful Banner' die set
Embellishments & accessories: SU! silver glitter ribbon, rhinestone jewels, Dimensionals


 photo RoseRuth.gif

Thursday, 12 January 2017

Frosted Medallions Thank You Centre Step Card

Whilst browsing on Pinterest I came across this lovely card made by Julie Davison.  I last made a step card in 2012 so I reckoned it was about time I made another!  Julie has made a fab video tutorial for how to make a horizontal centre step card.  After watching the video I practised using a piece of A4 CS as I don't have US sized CS and I tweaked the measurements slightly.  Even though I'm in the UK and we have the metric measuring system I'm very old school and prefer to work in inches!  When I came to cut the slits using my SU! trimmer I saw that the cutting arm ruler only has centimetres so I ended up using a mish mash of inches and centimetres!

I loved Julie's colour combo so I kept to the colours she'd used.  I stamped a different image on the front panel - a gorgeous lacy strip from the SU! 'Delicate Details' SAB set.  I stamped two more medallion images, fussy cut the Pool Party medallion, punched the small Smoky Slate circle, layered the shapes and popped up the Pool Party shape.  I also popped up the sentiment label and I added some rhinestone jewels.  The Silver Glimmer Paper gives a lovely touch of sparkle but more sparkle by way of rhinestone jewels is never a bad thing!


Here's the back of the card and the front of the envelope.  That lacy strip is beautiful!


I also decorated the envelope flap using the doily image from the 'Frosted Medallions' set and circle punches.


Supplies:
Stamps: SU! 'Frosted Medallions', 'Flourishing Phrases' & 'Delicate Details' sets
CS: SU! Pool Party, Basic Gray & Whisper White, SU! Silver Glimmer Paper
Ink: SU! Pool Party & Smoky Slate
Tools: SU! Stampin' Trimmer, SU! circle punches, Spellbinders 'Grommet Tags' die set
Embellishments & accessories: SU! rhinestone jewels, Dimensionals


 photo RoseRuth.gif


Saturday, 7 January 2017

Three Butterfly Thank You Cards

This is a set of three thank you cards I made using the Poppystamps 'Bellina Butterfly Ribbon' die which I received as part of a Christmas gift from my sweet friend Lesley.  Such a beautiful die, I love it!  I used SU! note cards and I made each card the same but used three different colours - Blushing Bride, Flirty Flamingo and Melon Mambo along with the black and white.

Here are the three cards and envelopes together.


Here is just one of the cards.  I die cut three butterfly ribbon shapes from black CS, cut three butterfly shapes from white CS, inset the white positive shapes into the negative space left on the black CS and added pieces of coloured CS behind.  I glued each whole strip to the front of the note cards and trimmed off the excess.  I absolutely loved the sequins image in the SU! 'Hello Darling' set but I didn't buy the set while it was current.  I saw it on ebay a little while ago and added the set to my stash.  I stamped the sequins and the sentiments on each card, added antennae (from the Memory Box 'Leavenworth Butterfly Trio' die) to each butterfly and finished each card front off with a rhinestone jewel.   


Here's how I decorated the insides and the fronts of the envelopes for each card.


I have more thank you cards to give out so I need to spend some time in my craft room making them.  I'm back at work now after my Christmas break so it might be a few days before I get any crafty play time!

Supplies:
Stamps: SU! 'Hello Darling' & 'Simply Sketched' sets, Clearly Besotted 'Brushed Greetings II' set
CS: SU! white note cards, Blushing Bride, Flirty Flamingo, Melon Mambo, Basic Black & Whisper White
Ink: SU! Blushing Bride, Flirty Flamingo & Melon Mambo, Memento Tuxedo Black
Tools: Poppystamps 'Bellina Butterfly Ribbon' die, Memory Box 'Leavenworth Butterfly Trio' die
Embellishments & accessories: SU! rhinestone jewels 


 photo RoseRuth.gif


Thursday, 5 January 2017

January 2017 Card Group Projects - One Layout, Three Cards

Today we got together for our first card group meeting of 2017.  It came around quite quickly and I hadn't got any clear ideas as to what to make - I did know I wanted to use my SU! 'Frosted Medallions' set on one card.  As I was short of time I turned to Pinterest for inspiration and I came across this beautiful set of three 'Frosted Medallions' cards made by Rachel Tessman.

While I worked at the Glitter Pot as a class tutor I designed and ran a few 'One Layout, Four Cards' classes where I'd prepare a sketch and use it to create four cards for the class.  A few of my card group ladies came along to those classes and they wondered if I could do something similar for card group. Well, I was happy to give it a go and everyone seems to like the idea so I'll be doing more of them.  I've CASEd Rachel's design and used the layout as the Card Group Layout #1.  

For me, a sketch is a starting point and while you can choose to interpret a sketch faithfully, it's great to be able to make some changes such as rotating the sketch and changing any shapes.  You can interpret strictly or loosely - just as long as the basic layout is recognisably visible on your completed card it's all good!  


Here's my CASEd version of one of Rachel's cards.  I loved the look of the wonky panels on Rachel's cards - such a fun, quirky touch!  I adore the medallion image and I just had to stamp two images, one in Rich Razzleberry and one in Bermuda Bay ink so I could fussy cut the Bermuda Bay medallion and pop it up over the top of the Rich  Razzleberry image.  I used Pool Party CS for the card base and Rich Razzleberry CS for the mat layer.  Rachel has a fab method of cutting a rectangular panel in half so you end up with a triangle which you use as the wonky mat layer.  I glued the Rich Razzleberry triangle in place, glued the white image layer on top of the mat layer and then trimmed off the excess  as per Rachel's instructions.  I completed the card front by stamping the sentiment in Rich Razzleberry ink.


Here's the inside and the envelope.  There's a lovely doily image in the 'Frosted Medallions' set too!


For card two I've rotated the sketch and used a landscape oriented design.  I spritzed water on a panel of Pink Pirouette CS and embossed it using the fabulous SU! 'Hexagons Dynamic' embossing folder.  Wow, this folder is really impressive, the embossing is SO deep!  I matted the pink embossed panel onto a Basic Black CS mat.  I stamped and die cut two leaves, stamped and punched three flowers, shaped them and positioned them on the pink panel, popping up the three flowers.  I stamped and die cut the sentiment oval and popped it up on the pink panel - so instead of having a sentiment on the sentiment part of the layout I used an embellishment - black ribbon tied in a knot - instead.


Here's the inside and the envelope.


I love it when a sketch can be used on both rectangular and square cards and I made sure to include a square card using layout #1!  My ladies occasionally have to prod me to create masculine cards for card group but I took the opportunity of playing with some new SU! goodies to make a masculine birthday card - well, the stamps and dies were still out on my desk after I'd made a card for Owen!

For this card I kept fairly faithful to the layout - albeit using squares instead of rectangles - and I didn't position the image and mat layers right up against the top and left hand side.  I made a 4 3/4" square Crumb Cake card base, stamped the sentiment and adhered a panel of Pool Party CS.  I stamped the t-shirt onto a piece of Echo Park patterned paper, stamped the 'Vintage', die cut the t-shirt and popped it up on a Night of Navy panel.  To complete the card front I added three silver nailheads to the Night of Navy panel.  


Here's the inside and the envelope.  After I'd glued the strip of diagonal striped paper to the white panel I drew a line above it with a Night of Navy marker - a simple trick to get a neat, finished look!  I then glued the white panel inside the card.  I used a couple of fun stamps from the 'Custom Tee' stamp set to decorate the envelope flap.


As the sketch idea went down so well I set the ladies some homework!  I've asked them to create a card using the layout.  I think it will be really interesting to see the different interpretations!

Supplies for medallion card:
Stamps: SU! 'Frosted Medallions' & 'Birthday Blossoms' sets
CS: SU! Pool Party, Rich Razzleberry & Whisper White
Ink: SU! Pool Party, Rich Razzleberry & Bermuda Bay
Tools: SU! 1 3/4" & 2" circle punches
Embellishments & accessories: SU! Dimensionals


Supplies for floral birthday card:
Stamps: SU! 'Flower Shop', 'Petite Petals' & 'Happiest Birthday Wishes' sets, Stampendous 'Sending Wishes'
CS: SU! Melon Mambo, Pink Pirouette, Old Olive, Basic Black & Whisper White
Ink: Memento Tuxedo Black
Tools: SU! 'Hexagons Dynamic' embossing folder, 'Pansy' & 'Petite Petals' punches, 'Stitched Shapes' Framelits die set, flower shaper tool & moulding mat, water spritzer bottle
Embellishments & accessories: SU! Basic Black taffeta ribbon, Dimensionals


Supplies for t-shirt birthday card:
Stamps: SU! 'Custom Tee' & 'Perfect Pairings' sets, Hero Arts 'Yummy Treats' set
CS: SU! Crumb Cake, Pool Party, Night of Navy & Whisper White

Patterned paper: Echo Park teal
Ink: SU! Night of Navy
Tools: SU! 'T-shirt Builder' Framelits die set
Embellishments & accessories: silver nailheads, SU! Dimensionals


 photo RoseRuth.gif

Tuesday, 3 January 2017

T Shirt Thank You Card

This is a card I made for my hubby Owen to say heartfelt thanks for the wonderful gifts he gave me at Christmas, he certainly spoiled me!  I really enjoyed spending some time in my craft room and I took the opportunity to play with some new goodies I pre-ordered from the upcoming SU! Spring/Summer catalogue.

The 'Custom Tee' stamp set with matching 'T-shirt Builder' Framelits dies bundle leapt out at me as a 'must have' when I first saw the catalogue.  I was very intrigued by the 'Hexagons Dynamic' embossing folder so I got that too.  Oh my word, the folder gives such a deep impression, it's fabulous!  I embossed the panel of black CS, added the star brad, glued the panel to the front of an SU! white note card and stamped the sentiment.  I stamped the t-shirt on a piece of patterned paper from the 'Serene Scenery' DSP pack and stamped the 'All Star Champ' wording.  I die cut the patterned paper t-shirt plus a couple of plain Crumb Cake t-shirts so I could stack the shapes together for some dimension.  I applied some Soft Suede ink around the edges of the t-shirt using a sponge dauber and popped up the t-shirt.


Here's a closer look at the deep embossing.  The dynamic folder is such a lot thicker than a normal embossing folder, you run it through the Big Shot using Tab 1 and only one cutting plate.  I also followed the recommendation to spritz the CS with water before embossing.  I was amazed at the depth of embossing, it's a definite wow!


I made an envelope from black CS using the envelope punch board.  Here's the inside of the card and the front of the envelope.


Here's the back of the envelope with a twine closure made using CS circles and brads.


Owen loved the card I'm very happy to say!

Supplies:
Stamps: SU! 'Custom Tee' & 'Hello Darling' sets, Clearly Besotted 'Brushed Greetings II' set
CS: SU! Basic Black & Crumb Cake, SU! white note card

Patterned paper: SU! 'Serene Scenery' DSP stack
Ink: Memento Tuxedo Black, SU! Real Red & Soft Suede
Tools: SU! 'Hexagons Dynamic' embossing folder, 'T-shirt Builder' Framelits die set, envelope punch board, sponge dauber, circle punch, paper piercer
Embellishments & accessories: SU! star brad, black & white baker's twine, Dimensionals, Woodware silver brads


 photo RoseRuth.gif