Pages

Friday, 31 March 2017

Faux Wooden & Floral Birthday Card & Matching Gift Box

Yet another card with a matching hexagonal gift box - I've really got to stop making the boxes as I'm running out of room to store them!  I had to get this idea 'out of my system' as it were.  I came across this lovely card made by Joanne James on Pinterest not long after I'd saved this picture of a faux wooden gift box.  I knew immediately I wanted to CASE the card and make a matching hexagonal faux wooden gift box and I was itching to get going with it as soon as I had the time!  Here's the card, envelope and gift box all together.


The Melon Mambo gatefold card measures 5 1/2" square and I used Mint Macaron CS for the mat layers.  I stamped two separate pieces of Crumb Cake CS with the SU! 'Hardwood' stamp, trimmed them to size, edged both pieces with Soft Suede ink using a sponge dauber and glued both faux wood panels to the Mint Macaron mat layers.  I used stamps from the SU! 'Flower Shop' and 'Petite Petals' sets to decorate the hexagonal element.  I stamped the flowers in Melon Mambo ink (1st and 3rd generation stamping), Soft Suede ink (1st and 2nd generation stamping) and Mint Macaron ink,  I snipped between each petal, shaped each flower and popped a rhinestone jewel in each flower centre.


Here's the inside of the gatefold card.


Here's the envelope flap.


I stamped the two pieces of Crumb Cake CS needed for the box with the 'Hardwood' stamp before I die cut the two box shapes.  I stamped a separate 'Hardwood' panel, cut it with a hexagon die, inked the edges with Soft Suede ink and popped it up.  The large flowers and 'for you' label are also popped up.


Here's a side view of the box.  After gluing the box together I inked all the edges with Soft Suede ink applied with a sponge dauber.  I do like adding a ribbon pull - this one is made from Melon Mambo stitched satin ribbon.


I had a wonderful time getting this out of my system and I'm happy how it turned out!

Supplies:
Stamps: SU! 'Hardwood' background stamp, SU! 'Flower Shop, Petite Petals' & 'Birthday Blooms' sets
CS: SU! Crumb Cake, Melon Mambo, Mint Macaron & Whisper White
Ink: SU! Melon Mambo, Mint Macaron & Soft Suede 

Tools: SU! 'Window Box' Thinlits & 'Project Life Cards & Labels' Framelits die sets, Sizzix 'Hexagon' Framelits dies, flower shaping tool & moulding mat, sponge dauber
Embellishments & accessories: SU! Melon Mambo stitched satin ribbon, rhinestone jewels, Dimensionals

Ruth

Wednesday, 29 March 2017

Sunburst, Hot Air Balloon & Clouds Birthday Greetings Card

I'm trying to get ahead and add a few birthday cards to my stash - this card is suitable for a male so that's a bonus!

I die cut two Sunburst shapes, one Daffodil Delight and one Basic Gray, glued the two shapes together so they were offset and keeping the shape larger than I needed I glued the Sunburst to a panel of Soft Sky CS. I trimmed off the excess Sunburst pieces and glued the Soft Sky panel to the front of an A6 sized card base made from Whisper White thick CS.  I attached the die cut hot air balloon with an action wobble spring, inked each cloud with Smoky Slate ink applied with a sponge dauber and adhered the clouds in place.  I popped up the stamped and punched sentiment oval and decorated the hot air balloon with small silver nailheads.


Here's the inside and the envelope flap.


Monday, 27 March 2017

Daisy Just Because Card & Matching Gift Box

Whilst browsing Pinterest I came across this striking card made by Jeanie Stark and that's what convinced me I needed to add the SU! 'That's the Tag' bundle to my crafting stash!  I love the simple, yet bold design of Jeanie's card and I couldn't wait to make my own version.  Jeanie later made a matching hexagonal gift box and so I just had to make one of those too!

Here's the card and box together.


Jeanie's excellent blog post includes full details of how she made her card.  I really like the look of inlaid die cut pieces and I did the daisy petals as well as the flower centres and leaves.  I inked each petal with Pink Pirouette ink and inked the flower centres with Soft Suede ink using sponge daubers before inlaying all the die cut pieces.  I love the dimension this adds!  Yes, it was a tad fiddly and time consuming but it was a Sunday afternoon, hubby was watching football on the TV and I was really happy with the finished results so it was well worth that little bit of extra effort!  I stamped the 'Just Because' sentiment from the 'Tin of Cards' set and popped up the daisy panel.


I used the polka dot paper to decorate the inside of the card and the envelope.  I used two oval dies from the 'Stitched Shapes' die set to create the name label which I popped up.


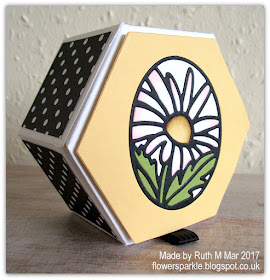
Here's the gift box.  I used a square die from the 'Stitched Shapes' die set to cut patterned paper squares to decorate the box sides.  The So Saffron hexagon panel is popped up.  


Here's another view.  I added a ribbon pull tab to the front of the box.


Supplies:
Stamps: SU! 'Tin of Cards' set
CS: SU! So Saffron, Old Olive, Basic Black & Whisper White (regular & thick)

Patterned paper: Core'dinations
Ink: Memento Tuxedo Black, SU! Pink Pirouette & Soft Suede
Tools: SU! 'Timeless Tags' Thinlits, 'Window Box' Thinlits & 'Stitched Shapes' Framelits die sets, Sizzix 'Hexagon' Framelits die set, sponge daubers
Embellishments & accessories: SU! Basic Black stitched satin ribbon, Dimensionals

Ruth

Saturday, 25 March 2017

Blooms & Wishes For You Card - Plus Some Succulents

The two pages featuring the 'Blooms & Bliss' Suite of products in the SU! 2016 - 2017 annual catalogue are so, so pretty!  I love the floral 'Best Wishes' card on page 139 and I've CASEd the card to make my own version.

I made an A6 sized card base from Whisper White thick CS and glued a piece of patterned paper from the 'Blooms & Bliss' DSP pack at the bottom.  I cut a piece of Whisper White regular CS to fit the front of the card, tore the bottom part and stamped the images and sentiment.  I stamped, fussy cut and popped up a few flowers.   I attached a strip of Sweet Sugarplum ribbon behind the tear line and glued the whole panel to the front of the card.  I sprinkled on a few rhinestone jewels to finish the card front.


Here's the inside of the card and the envelope flap.  I stamped the 'Best Wishes' onto a scrap of Mint Macaron CS and cut it out with a die from the 'Project Life Cards & Labels' die set.  I stamped, fussy cut and popped up the Rich Razzleberry flower and added a bit of bling.


Oh, I did enjoy using these pretty stamps and colours, I had a very happy time in my craft room!

Every time I browse Pinterest the pages seem awash with products made using the SU! 'Succulent Garden' Suite of products.  I love looking at all the gorgeous projects but I know myself well enough to know I wouldn't enjoy that amount of stamping and die cutting so I've passed on that particular offering from the Spring/Summer catalogue!  

I noticed that we had quite a large number of succulent plants for sale at Wilko so I bought a selection and placed them in a mini greenhouse - actually, it's a windowsill propagator purchased at an absolute bargain price from Wilko after Christmas!  I placed pebbles at the bottom and popped in the plant pots.  The sweet metal watering can held a candle but I burned the candle, cleaned out the container and I thought it would be a fun addition to my mini greenhouse!


Here's a closer view.  The work of moments - but at least the paper variety don't need watering - fingers crossed these survive my TLC!


Supplies:
Stamps: SU! 'Blooms & Wishes' set
CS: SU! Mint Macaron, Whisper White (thick & regular) 

Patterned paper: SU! 'Blooms & Bliss' DSP
Ink: SU! Blushing Bride, Island Indigo, Mint Macaron, Rich Razzleberry, Sahara Sand & Sweet Sugarplum
Tools: SU! 'Project Life Cards & Labels' die set
Embellishments & accessories: SU! Sweet Sugarplum ruched ribbon, rhinestone jewels, Dimensionals

Ruth

Thursday, 23 March 2017

Awesomely Artistic Thank You Card

One of the new SU! stamp sets I got recently was the 'Awesomely Artistic' set and I got to ink it up a few days ago.  I came across this lovely card on Pinterest that appealed to me immediately and I saved it to CASE.  I thought the 'Awesomely Artistic' set would be a perfect substitution for the 'Avant Garden' set used on the original card.  When I CASE a card most times I will Copy And Selectively Edit.  This time, as well as using an alternative stamp set, I used a different colour scheme and added a few details of my own.

The card base was made with Soft Suede CS and all the stamping was done with Soft Suede ink.  The smaller stitched square shape behind the white square was die cut from Crumb Cake CS.  I attached a strip of burlap ribbon and stamped the lace border before adhering the white panel to the front of the card.  The MISTI is brilliant for ensuring perfect stamp placement and I used it to stamp the sentiment and the lace border - plus a double lace border on the front of the envelope.  I tucked the two white die cut leaves behind the white square, glued the two stitched square shapes together and popped the whole shape up.  I stamped the round image, punched it out with a 1" circle punch, popped it up and added two rhinestone jewels to complete the card front.


Here's how I decorated the inside of the card and the envelope flap.  For the envelope, I stamped the flower cluster in stamped off once Soft Suede ink, cut it out with a circle punch, glued it to a larger Soft Suede circle and popped up the stamped and punched round image.  I like the mix of pretty and rustic on this card!


Supplies:
Stamps: SU! 'Awesomely Artistic', 'Rose Wonder' & 'Delicate Details' sets
CS: SU! Soft Suede, Crumb Cake & Whisper White
Ink: SU! Soft Suede
Tools: SU! 'Stitched Shapes' Framelits & 'Flourish' Thinlits die sets, assorted circle punches, MISTI
Embellishments & accessories: SU! Burlap Ribbon, Rhinestone Jewels, Dimensionals


Ruth


Tuesday, 21 March 2017

Sugarplum & Razzleberry Window Box Card & Gift Box

Time for a new look on the blog!  I've chosen a fresh, clean and simple look which will better suit web surfing on smartphones and tablets.  Leonardo da Vinci said: "Simplicity is the ultimate sophistication" - I'm not going to argue with a genius!

Today I'm sharing the card and gift box I gave to Eileen at Wilko for her birthday.  I made this card and box previously and this time I wanted to make some changes.  I used the same DSP pack, 'Blooms & Bliss' but I used Sweet Sugarplum and Rich Razzleberry papers and matching cardstocks.

Here are the card and gift box together.


Here is just the card.  I glued patterned paper to a layer of Rich Razzleberry CS, added the ribbon and adhered the panel to the front of a 5 1/2" square Sweet Sugarplum card base.  I die cut two hexagons, one from Whisper White Thick CS and a second from Sweet Sugarplum Glimmer Paper.  I die cut the intricate floral design from the white hexagon, glued the sparkly Sweet Sugarplum hexagon behind and popped the shape up onto a larger Rich Razzleberry CS hexagon.   I popped up the stamped and die cut sentiment label, added large Rich Razzleberry punched photo corners and sprinkled on a few rhinestone jewels.


Here's the inside of the card and the envelope flap.


Another of my new SU! goodies makes an appearance on the front of the envelope.  I used dies from the 'Timeless Tags' Thinlits die set to create a name label for the front of the envelope.  


Here's just the gift box.  I popped up the hexagon on the top of the box and added a sentiment banner.  After adhering the square panels to the sides of the box I wrapped a length of Sweet Sugarplum ruched ribbon round the box and attached it with a piece of tape.  I covered the join with a die cut flower with a brad in the centre.  I also added a ribbon pull to the front of the box top.

The patterned paper I used has a design of tiny four petal flowers so I used a four petal flower cut using the SU! 'Floral Fusion' Sizzlits die.  I used a Build A Brad to decorate the centre of the flower.  So a real mix of brand new items and some older items that have been in my stash for many years!


Here's a view of the top of the box.  I stamped the sentiment in VersaMark ink, heat embossed it with white embossing powder and a rhinestone jewel to dot the i in birthday was the final finishing touch.  I think these hexagonal gift boxes are a great size, perfect to put all kinds of pressies in!  My gift box held a round 75g tin of Waitrose Garden Bergamot & Jasmine Hand & Nail Therapy which I wrapped in tissue paper first.  I chose that specifically to match the other garden items I'd bought for Eileen - and because it was the perfect size to go inside the gift box!


I am very happy to report that Eileen loved the card, gift box and pressies and she wrote me a very sweet thank you card - so warm fuzzies all round!

Supplies:
Stamps: SU! 'Birthday Blossoms' set
CS: SU! Sweet Sugarplum, Rich Razzleberry & Whisper White (regular & thick), Sweet Sugarplum Glimmer Paper

Patterned paper: SU! 'Blooms & Bliss' DSP
Ink: VersaMark & SU! Rich Razzleberry
Tools: SU! 'Window Box' & 'Timeless Tags' Thinlits dies sets, SU! 'Floral Fusion' Sizzlits die, SU! 'Photo Corners' punch, Sizzix 'Hexagon' Framelits die set. Spellbinders 'Labels Trio' die set
Embellishments & accessories: SU! Build A Brad, white embossing powder, Sweet Sugarplum ruched ribbon, rhinestone jewels, Dimensionals

Ruth

Sunday, 19 March 2017

High Tide Lighthouse Card

The SU! High Tide set, a lovely two step scene building set, has been in my craft room for a few weeks and I finally found time to have a play with it.  The lighthouse is such a stunning image!

I stamped the sandbank in Sahara Sand, the grasses in Always Artichoke, the sea in Marina Mist, the light beams in So Saffron and the birds, sentiment and lighthouse were stamped using Dapper Denim ink.  I stamped the lighthouse first, then the sandbank and then I masked the sides of the lighthouse to stamp the sea.  I'm so chuffed that I was able to position the sentiment so that the word 'LIGHT' appears on top of the light beam!  I trimmed the white panel, matted it onto a layer of Dapper Denim CS and adhered the layer to the front of a So Saffron A6 sized card base.  I stamped the lighthouse again, fussy cut it and popped it up for a bit of dimension - so no need for the masking, but I didn't plan on popping up a fussy cut lighthouse at that time!  I applied some shimmer to the sea using the clear Wink of Stella pen.


Here's the inside of the card and the envelope.  I've performed surgery on the the gulls stamp - I've cut the stamp in two so that the large gulls are separated from the small gulls.  It will be easy enough to mount the two together on a clear block if I want to stamp the large and small gulls together.


This is not a stamp set I'll reach for if I need to whip up a card in a hurry.  I like to take my time with a two step stamping set and patience is certainly rewarded.  It's a very well designed stamp set with lovely images.  A good set for masculine cards too!   

Supplies:
Stamps: SU! 'High Tide' set
CS: SU! So Saffron, Dapper Denim & Whisper White
Ink: SU! Sahara Sand, Always Artichoke, Marina Mist, So Saffron & Dapper Denim
Tools: SU! 'Stitched Shapes' Framelits die set, circle punch
Embellishments & accessories: SU! clear Wink of Stella pen, Dimensionals


Friday, 17 March 2017

Indigo & Mint Window Box Card & Gift Box

My friend Jan wanted to come round to make a card and matching box using the SU! 'Window Box' die set and this is what I designed for her to make.  Unfortunately, we couldn't get together on the Saturday we'd planned because I was poorly.  We got together yesterday though and Jan loved the card and box!


I knew I wanted sparkly Glimmer Paper peeping out from behind the beautiful floral cut out design and I chose Mint Macaron Glimmer Paper.  Patterned papers from the 'Blooms & Bliss' DSP pack were chosen next and then I set to work making the card.  I die cut the floral cut out piece from a panel of Whisper White Thick CS, added the patterned paper and Mint Macaron linen ribbon and taped a piece of Mint Macaron Glimmer Paper behind the cut out design.  I matted that panel onto a layer of Island Indigo CS and adhered that layer to the front of a Mint Macaron A6 sized card base.  I stamped, die cut and popped up the sentiment label.  I used a die from the 'Project Life Cards & Labels' die set and cut two shapes.  I cut the Island Indigo shape apart and glued the two ends behind the Mint Macaron shape.  A couple of rhinestone jewels on the sentiment label completed the card front.


Here's how I decorated the inside of the card and the front of the envelope.


I cut the box from Whisper White Thick CS and attached a piece of Mint Macaron Glimmer paper underneath the lid after die cutting the floral cut out design.  One of the square dies from the 'Stitched Shapes' Framelits set is perfect for cutting squares to go on the sides of the box!  I attached six Island Indigo stitched square shapes and added smaller patterned paper squares - alternating the two patterns I'd chosen.  I used PVA glue applied from a fine tip glue bottle to adhere the tabs and assemble the box.


I added a ribbon pull tab to make it easy for the recipient to open the box.


I got the 'Window Shopping' bundle and I used a stamp from the 'Window Shopping' set and a sweet die from the 'Window Box' die set to create a tag for the gift box.  I attached the tag to Mint Macaron linen ribbon tied in a bow diagonally across the box.


Considering this was my first attempt using the 'Window Box' die set I'm very pleased how this turned out - I'm also very pleased that the box was easier to create than I'd imagined it would be!

Supplies:
Stamps: SU! 'Birthday Blossoms' & 'Window Shopping' sets
CS: SU! Island Indigo, Mint Macaron & Whisper White (Thick & Regular)

Patterned paper: SU! 'Blooms & Bliss' DSP
Ink: SU! Island Indigo
Tools: SU! 'Window Box' Thinlits & 'Stitched Shapes'  & 'Project Life Cards & Labels' Framelits die sets
Embellishments & accessories: SU! Mint Macaron linen ribbon, rhinestone jewels, Dimensionals


Wednesday, 15 March 2017

Sparkly Butterflies Sunburst Thank You Card

The SU! 'Sunburst' die has been available for some time but I have passed on it thinking I wouldn't use it all that much.  I was narrow minded about the use of the die, thinking of it ONLY as a sunburst.  Looking at Pinterest made me see that it's a great general purpose background die - as well as a great sunburst die!  My sweet friend Lesley let me borrow her 'Sunburst' die and, of course, I've now had to add the die to my own collection!

Whilst browsing Pinterest for 'Sunburst' die cards I came across this very pretty card made by Robin Messenheimer and I just had to CASE it.  I love the use of floral paper, the offset die cut pieces and the texture added to the die cut shape. Robin's card clearly shows that the die is a fab design element on a card - I'm a convert to this versatile die now!

My floral paper and sunburst panel is layered onto a mat of Mossy Meadow CS and I adhered that to the front of a Pool Party A6 card base.  I used the 'Seaside' embossing folder to add texture to the Blushing Bride sunburst shape.  In the second release of SU! Sale-A-Bration items a 6" x 6" mixed colour pack of Glimmer Paper was one of the offerings.  Glimmer Paper in Bermuda Bay, Mint Macaron and Sweet Sugarplum was irresistible to me!  I used some Blushing Bride Glimmer Paper and just a tad of the gorgeous Mint Macaron glittery goodness to punch Bitty Butterflies to add to my sentiment circle.


Here's the inside of the card and the envelope decorated with that beautiful floral paper.


I hope the recipient enjoys this card as much as I enjoyed making it!

Supplies:
Stamps: SU! 'Rose Wonder' set
CS: SU! Blushing Bride, Mossy Meadow, Pool Party & Whisper White, Blushing Bride & Mint Macaron Glimmer Paper

Patterned paper: SU! 'Birthday Bouquet' DSP
Ink: SU! Mossy Meadow
Tools: SU! 'Sunburst' Thinlits die, circle 'Stitched Shapes' Framelits die, 'Seaside' embossing folder, various circle punches
Embellishments & accessories: SU! rhinestone jewels, Dimensionals


Monday, 13 March 2017

With Love Cut Out Hearts Design Note Card

I made this quick and easy love note as a thank you for my hubby.  I came home from work a few nights ago to find flowers, a card and dinner waiting for me - how lovely!

My SU! order arrived on Thursday and I used two new die sets to make this little card.  I cut Whisper White Thick CS using the largest die from the 'Project Life Cards & Labels' Framelits set and scored and folded it in half to make a 4" x 3" note card.  I used the small square hearts die from the 'Window Box' Thinlits set to create the cut out design and I then cut out a square using a die from the 'Stitched Shapes' die set.  I cut a piece of red Glimmer Paper, attached it to the back of the stitched square so part of it extended beyond the square and popped the shape up.  The 'With Love' sentiment from the 'Tin of Tags' set was stamped in Real Red ink.


I used three of the tiny cut out hearts to decorate the inside of the card.


Out came my envelope punch board and some Real Red dotty paper and in no time at all I had an envelope ready for me to slip the card into.  I like to put name labels on envelopes sometimes and I took the opportunity to use a die from the 'Project Life Cards & Labels' set to make a label.  That was, of course, after stamping the label from from my new 'Awesomely Artistic' stamp set that coordinates with the label die! 

Here's the card and envelope together.


 I confess that I have added quite a few new SU! supplies to my stash.  Luckily, I had a few days off from work which gave me time to spend in my craft room, I had a marvellous time!  I'll be sharing what I've created over the next few days.  Three days off this week too, yay!

Supplies:
Stamps: SU! 'Tin of Tags' & 'Awesomely Artistic' sets
CS: SU! Whisper White Thick, red Glimmer Paper

Patterned paper: SU! 'Polka Dot Parade' DSP
Ink: SU! Real Red
Tools: SU! 'Project Life Cards & Labels' Framelits, 'Window Box' Thinlits, 'Stitched Shapes' Framelits die sets, Envelope Punch Board

Embellishments & accessories: SU! Dimensionals


Thursday, 9 March 2017

Butterflies Sending Wishes Double Z Fold Card & Matching Gift Box

My lovely friends Lesley and Wendy came to have a crafty play with me last Saturday and I designed a butterflies Double Z Fold card for them to make plus a matching square gift box.  I was inspired by this very pretty card made by Janine Rawlins that I found on Pinterest.  When I CASE a card I usually like to tweak a bit and add a couple of touches of my own.  While I do love the soft colours in the SU! 'Falling In Love' suite I like to add a hint of strong colour when working with pastel shades for a pop of contrast.  I added some Early Espresso to the mix of Sweet Sugarplum, Soft Sky and Very Vanilla.  I used three different papers from the 'Falling In Love' DSP pack, added a large die cut butterfly to the design and placed my sentiment in a different position.

Here are the card and box together.


Here are a couple of pics showing the front view of the double Z fold card.  I attached the Early Espresso detailed butterfly shapes to the solid butterfly shapes by applying glue to the bodies only, leaving the wings unglued for a bit of dimension.  I added pearls to each butterfly body.


Here's a view from the top so you can see the Double Z Fold construction.


A side view of the card.  I adhered the sentiment oval and the butterflies flat to the card rather than using Dimensionals so that the card didn't end up too bulky when it was closed.


I glued a panel to the back of the card so I have somewhere to write a message.


Here's the card folded closed ready to be placed in the envelope.


I decorated the envelope flap with an oval butterfly element.


I used the Gift Box Punch Board to make a 2 1/2" square gift box.  The box can be closed with interlocking slots on the top but I find it can be a bit faffy to interlock them so I've tied ribbon around the box to hold it closed.  The colour blue in the 'Falling In Love' suite is Soft Sky but as I don't have any Soft Sky ribbon I used Pool Party stitched satin ribbon instead - and it matches really well!  


After I'd tied a knot in the ribbon I sneaked a bit of double sided tape underneath the ribbon on the sides of the box to hold it in place and I popped up a butterfly on each side of the box.  The recipient will be able to undo the bow and get into the box but the ribbon will stay attached to the box.


Here's a top view of the box.  I used an oval Stitched Shape Framelits die to create a tag.  I stamped the 'for you' onto the patterned paper, die cut the oval, glued the patterned paper to a Very Vanilla oval shape, punched a small hole and tied the tag to the bow using Early Espresso baker's twine.  


Saturdays are usually a work day for me so it was a real treat to be able to spend time with good friends, it was wonderful, a very happy day indeed!  

I'm not quite sure what I've done to deserve it but I have time off this weekend as well, yay!  I've asked my friend Jan to come round for a crafty play on Saturday.  I recently placed a Stampin' Up! order and the box of goodies arrived this evening.  The 'Window Shopping' bundle is one of the items I ordered and Jan has asked if she can make a card and matching box using the bundle.  I'm so looking forward to trying out some new goodies in my craft room tomorrow!

Supplies:
Stamps: SU! 'Butterfly Basics' & 'Birthday Blooms' sets
CS: SU! Sweet Sugarplum, Soft Sky, Early Espresso & Very Vanilla

Patterned paper: SU! 'Falling In Love' DSP
Ink: SU! Early Espresso
Tools: SU! 'Butterflies' Thinlits, 'Bold Butterfly' Framelits & 'Stitched Shape' Framelits die sets, Gift Box Punch Board, small handheld circle punch
Embellishments & accessories: SU! Pool Party stitched satin ribbon, pearl jewels, Dimensionals