Pages

Tuesday, 11 July 2017

Hot Air Balloon Square Step Panel Birthday Card

It was Owen's birthday on Sunday and for his card I took the opportunity of trying another version of  a step panel card.  After recently making an A6 sized step panel card I wanted to make a larger, square version - this card measures 5 1/2" square.

To make this sized card, cut CS to 10 1/4" x 5 1/2" and score at 5 1/2", 6 5/8", 8 5/8" and 9 3/4".  For the front panel cut CS to 5 5/8" x 4" and score at 4" and 5 1/8".

This style of card is perfect for showcasing patterned papers.  I love the different papers in the SU! 'Carried Away' DSP pack which match the 'Lift Me Up' stamp set and 'Up and Away' Thinlits dies so I knew exactly what I wanted to use for Owen's card!   I used the Dapper Denim ombre paper from the 'Color Theory' DSP stack to die cut the solid portions of the hot air balloon.  I cut the detailed balloon twice, once in Whisper White CS and again in Night of Navy CS and glued the navy shape on top of the white shape just slightly offset for a bit of dimension.  I embellished the balloon with small silver metal domed dots.  I mounted the balloon on an action wobble spring which adds a fun touch to the card.  To complete the card front I stamped and punched the sentiment circle and popped it up.


Here's another view from a different angle.  This card didn't want to stand up as well as the A6 sized card so I made a sleeve using Night of Navy CS and I slid that inside the 'box' at the bottom of the card which helped.


A message panel was adhered on the back of the card.


I made an envelope using the envelope punch board and a different design of 'Carried Away' DSP.  I popped up a name label to finish.  I'm very pleased to say that Owen loved the card!


Supplies:
Stamps: SU! 'Best Yet' set, Clearly Besotted 'Happy Birthday' set
CS: SU! Night of Navy , Watermelon Wonder & Whisper White

Patterned paper: SU! 'Carried Away' DSP
Ink: SU! Night of Navy & Watermelon Wonder
Tools: SU! 'Up and Away' Thinlits & 'Stitched Shapes' Framelits die sets, envelope punch board, Sizzix 'Card, Fancy Frame Flip-Its #2' Framelits die set 

Embellishments & accessories: small silver metal domed dots, SU! Dimensionals
Ruth


Saturday, 8 July 2017

July 2017 Card Group Projects

Last Thursday we got together for our July card group meeting and we all had a great afternoon despite feeling like we were melting in the sultry heat!  I made three cards for the ladies to make - I even included a card this month that would be a good masculine card - but, unsuprisingly, butterflies and flowers feature on the other two cards!

I thought the ladies would enjoy making something similar to this card I made previously.  I've tweaked the design slightly but kept to the same colour scheme.  I applied Broken China and Peeled Paint Distress Inks to Whisper White thick CS using ink duster brushes.  I stamped the water drops image twice and added a highlight of watered down white acrylic paint to each water drop using a very fine paintbrush.  I applied the same Distress Ink colours to a piece of SU! Shimmery White CS and then cut a solid butterfly shape - I love the subtle shimmer! - and a black fancy outline butterfly shape using dies from the SU! 'Move Me' Thinlits die set.  I love the shape of this butterfly, it's so pretty!  I popped up the sentiment oval and added a faceted gem to the butterfly to finish the front.


Some simple stamping decorates the inside of the card and the envelope.


For card two I used the fab new SU! 'Pinewood Planks' Dynamic embossing folder to create a wooden background panel.  I embossed a piece of Crumb Cake CS, lightly brayered Soft Suede ink over the top, edged the panel with Soft Suede ink using a sponge dauber and layered the panel onto a mat of Early Espresso CS.  I glued the entire layer to the front of my Very Vanilla A6 sized card base - made using the new Very Vanilla thick CS, I love that we have Vanilla as well as Whisper White thick CS now!  I stamped the oak tree in Soft Suede ink, used a blender pen to colour the trunk by just drawing the colour in from the stamped image.  I applied Old Olive ink, dabbing gently with a sponge dauber, to colour the tree canopy and the ground.  I glued the flagged sentiment banner in place before adhering my matted and layered tree panel.  I've used a square Stitched Shapes Framelits die as well as two plain square dies from the Layering Squares Framelits die set - they work so well together!  


Here's the inside and the envelope.  I stamped the oak leaves in Old Olive ink and the sentiment in Early Espresso ink.


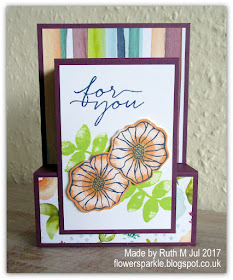
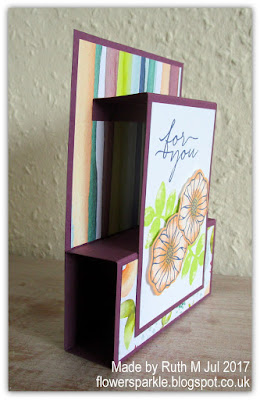
Card three was CASEd from a step panel card design I came across on Pinterest.  The card is made using two pieces of CS that are adhered together and the card folds flat to go inside an envelope.  Jenny very kindly shared the  measurements for the card that fits inside a C6 envelope on her blog post so I used those measurements to create my version of a step panel card.  A fancy fold card that's easy to make and folds flat to go inside a normal sized envelope - gotta love that!  I made my card with SU! Fresh Fig CS and used the SU! 'Oh So Eclectic' stamp set and matching 'Naturally Eclectic' DSP.  I stamped the leaves in full strength Lemon Lime Twist ink, used stamped off once Peekaboo Peach ink for the solid flowers and full strength Night of Navy ink for the detailed flowers.  I coloured the centres of the flowers with Peekaboo Peach ink applied with a blender pen and popped them up.


Here's an angled side on view.


Here's a straight side on view.


Here's the back panel of the card and the envelope.


Supplies for butterfly card:
Stamps: Inkylicious 'Water/Rain Drops' set, SU! 'Flourishing Phrases' set, Inkadinkado 'Nostalgia' set
CS: SU! Basic Black & Whisper White thick, SU! Shimmery White
Ink: VersaFine Onyx Black, Tim Holtz Broken China & Peeled Paint Distress Inks
Tools:Go Kreate 'Frame Pointy #1' die set, SU! 'Move Me' Thinlits die set, Petite Oval Nestabilities dies, Inkylicious ink duster brushes
Embellishments & accessories: SU! clear faceted gem, watered down white acrylic paint


Supplies for tree card:
Stamps: SU! 'Lovely as a Tree' & 'Wetlands' sets, Hero Arts 'Messages With Flourish' set
CS: SU! Crumb Cake, Early Espresso, Old Olive & Very Vanilla thick
Ink: SU! Early Espresso, Old Olive & Soft Suede
Tools: SU! 'Pinewood Planks' dynamic embossing folder, 'Layering Squares' & 'Stitched Shapes' Framelits die sets,  MFT 'Fishtail Flags' Stax die, brayer, sponge daubers
Embellishments & accessories: SU! Dimensionals


Supplies for floral step panel card:
Stamps: SU! 'Oh So Eclectic' & 'Blooms & Wishes' sets
CS: SU! Fresh Fig & Whisper White

Patterned paper: SU! 'Naturally Eclectic' DSP
Ink: SU! Lemon Lime Twist, Night of Navy & Peekaboo Peach
Tools: SU! 'Eclectic Layers' Thinlits die set, 'Simply Scored', blender pen
Embellishments & accessories: SU! rhinestone jewels, Dimensionals

Ruth

Thursday, 6 July 2017

Tea Bag Sachet Gift Box - Holds 4 Tea Bag Sachets

A couple of months ago one of my card group ladies, Margaret, brought along to group a tea bag gift box she'd purchased and she wondered if we could make one at card group.  I asked to borrow it and said I'd have a go at making one myself first.  I didn't have time to have a go before last month's card group meeting and I didn't want to leave it for another month so I made sure I made a box before our July meeting!  I took it along and the ladies loved it so we'll be making one at next month's card group meeting.

Here are a few photos of the box Margaret bought.


Pieces of concertina folded acetate hold the tea bag sachets in place.


The back of the box.


The box is held closed by self adhesive hook and loop dots.


Here's a side view of the open box.  There are 4 Twinings fruit infusions tea bag sachets inside.


I measured the box and score lines, jotted the details down and got creating.  The box is made using one sheet of A4 (or US Letter size) CS and is very easy to make.  A few cuts, a few scores, adhering pieces together and this neat little package is all done!  I prefer to work in inches as I can see the imperial increments better than I can see metric millimeters!  However, I wanted to include measurements for a metric version of the box here on my blog as well.  So choose whichever you prefer from the two sets of measurements below.     

MEASUREMENTS IMPERIAL:
  1. Cut CS to 10 1/2" x 3 1/4" (for the box) and score this piece at 3 1/2", 4 1/2", 8" & 9".
  2. Cut 2 pieces of CS to 7" x 2 1/2" (for the concertina sides) and score these pieces at 1/2", 1 1/4" 2", 2 3/4", 3 1/2" 4 1/4", 5", 5 3/4" & 6 1/2".
MEASUREMENTS METRIC:
  1. Cut CS to 27 x 8.3 cms (for the box) and score this piece at 9, 11.5, 20.5 & 22.5 cms.
  2. Cut 2 pieces of CS to 19 x 6 cms (for the concertina sides) and score these pieces at 1.5, 3.5, 5.5, 7.5, 9.5, 11.5, 13.5, 15.5 & 17.5 cms.
ONCE YOU'VE CUT & SCORED, FOLLOW THE INSTRUCTIONS BELOW:
  1. Cut patterned paper panels/stamped panels to fit the front, back, top and front flap sections of the box and adhere in place.
  2. Tie ribbon round the front of the box if desired.  
  3. Concertina fold the two side pieces and adhere these to the box.  I found it easier to do one side at a time.  I applied strong adhesive tape to the back tab of one piece and adhered that, then I applied tape to the back tab of the other side and adhered that.  Then I applied tape to both of the front tabs and carefully lined up the top of the front panel of the box with the score line at the top of the back of the box before pressing down to adhere.
  4. Embellish the front flap as desired and apply self adhesive hook and loop (Velcro) dots to keep the box closed.  Magnets would work too.  
I started off by choosing some pretty floral paper from the SU! 'Delightful Daisy' DSP pack and I chose my Calypso Coral, Night of Navy and Pool Party colour combo from the DSP.  I made the box and concertina sides from Calypso Coral CS.


Margaret's purchased box had acetate concertina sides but I find CS much easier to score than acetate so I stuck with CS for the concertina side pieces.


Pieces of the pretty floral paper decorate the back and top of the box as well as the front of the box.


The self adhesive hook and loop dots came from Wilko and they hold the box closed beautifully.


Here's the box filled, ready to be closed and presented.  I'm chuffed how this project turned out and now I know the boxes are easy to make I'll be making more for sure!   


Here are the tea bag sachets that are inside.  They are from a box of 20 Twinings Fruits Selection - currently available from Tesco at half price!  


I'm attending a Slimming World group and each week I take something along to go in the Slimmer of the Week basket.  I made another box using different patterned papers and colours and placed the same selection of fruit flavoured tea bags inside.  So this box is what I popped into the basket this week.  


I placed an online order at Twinings for a box of their Classics Selection 'cos I know not everyone enjoys fruit teas and some people would prefer to receive proper 'normal' tea!  I quite like different teas and because I'm following Slimming World I've tried more varieties recently.  A current fave is the Cherry Bakewell green tea.  When I visited the Twinings website I was tickled to discover their Pick and Mix option where you can buy individual tea bags - what a great way to try something new without having to buy a whole box of a flavour you might not enjoy!  I chose a few different individual flavour tea bags (including Nutty Chocolate flavour Assam) and my Twinings package arrived today so I'm looking forward to tasting the different teas!  

Supplies for the coral box:
Stamps: SU! 'Label Me Pretty' & 'Birthday Blooms' sets
CS: SU! Calypso Coral & Whisper White

Patterned paper: SU! 'Delightful Daisy' DSP
Ink: SU! Calypso Coral & Night of Navy
Tools: SU! Simply Scored, SU! 'Pretty Label' punch
Embellishments & accessories: SU! Pool Party ruched ribbon, SU! Dimensionals, gold sequins, self adhesive hook and loop dots


Supplies for the plum box:
Stamps: SU! 'Label Me Pretty' & 'Birthday Blooms' sets
CS: SU! Sweet Sugarplum & Whisper White

Patterned paper: SU! 'Succulent Garden' DSP
Ink: SU! Sweet Sugarplum & Sahara Sand
Tools: SU! Simply Scored, SU! 'Pretty Label' & 'Bitty Butterfly' punches
Embellishments & accessories: SU! Mint Macaron ribbon, rhinestone jewels, Dimensionals

Ruth