Pages

Wednesday, 24 April 2019

Gingham & Roses Thank You Card

This is the card I made to say thank you to a friend for my birthday gift.  I know she likes purple so I chose to use the Highland Heather gingham paper from the SU! 'Gingham Gala' DSP pack, it's so pretty and fresh!

I've always loved floral two-step stamping sets and the old, retired SU! 'Roses in Winter' set is such an easy set to work with as you don't need to get exact placement as the images are fairly abstract.  I stamped the solid image in Highland Heather ink (stamped off once), stamped the next layer in full strength Highland Heather ink and stamped the final flower layer in full strength Gorgeous Grape ink.  I repeated just the last two layers to get a smaller rose.  I used Granny Apple Green ink for the leaves (stamped off once and then full strength).  After stamping all the images I fussy cut them and adhered the leaves to the backs of the flowers.  I glued the gingham mat layer to the card front, stamped the sentiment and popped the main image mat layer up on 3D foam tape.  I popped up the roses and added some Glitter Enamel Dots to complete the card front.


Here's the inside and the envelope.  I added a strip of the gingham paper inside the card, used a flagged banner die for the sentiment and added a few more Glitter Enamel Dots.  I popped up the rose on the envelope flap.


Supplies:
Stamps: SU! 'Roses in Winter', 'One Big Meaning' & 'Tropical Chic' sets
CS: SU! Basic Black & Whisper White

Patterned paper: SU! 'Gingham Gala' 6" x 6" DSP pack
Ink: SU! Highland Heather, Gorgeous Grape & Granny Apple Green, VersaFine Onyx Black
Tools: MFT Die-namics 'Fishtail Flags' Stax die set
Embellishments & accessories: 3D foam tape, SU! Glitter Enamel Dots, Dimensionals

Ruth


Thursday, 18 April 2019

Rainbow Floral Lots Of Happy Card - RRCB#108

Last night I checked out the current challenge over at Retro Rubber and I very much  liked what I saw - a rainbow challenge!  I was determined to spend some time in my craft room on my day off from work today and I wanted to make an encouragement card for someone.  What's better than rainbow colours to spread a little happiness?!


I've used the Stampin' Up! 'Vintage Vogue' set for my card and that's been in my stash for nine years - and it's not going anywhere!  Even though the style of the stamps is vintage I think the rainbow colours give a fresh contemporary look to the card - amazing that colours can make such a difference!

First off I stamped the flowers using Lovely Lipstick, Pumpkin Pie, Daffodil Delight, Marina Mist, Highland Heather and Gorgeous Grape inks.  My card base is a standard A6 size and I die cut a white wonky stitched rectangle for my main image panel and I layered that onto a mat of SU! 'Gorgeous Grape' CS.  After I'd stamped the sentiment I stamped the background leafy image a few times in stamped off once Granny Apple Green ink.  I fussy cut each flower and added a wee bit of shaping and then glued them to the panel.  I added pearls to the centres of the small flowers but placed an iridescent domed embellishment in the centre of the large flower. 

A couple of fun facts: the word iridescent was coined from the Latin word for rainbow which is iris.  Also, Iris was a messenger of the Greek gods and was the Greek goddess of the rainbow.


Here's the inside and the envelope flap. 


This card was made for a lovely person who I wanted to send positive vibes and happiness to.  I just hope she enjoys receiving the card as much as I enjoyed making it!  

Supplies:
Stamps: SU! 'Vintage Vogue' & 'Rooted In Nature' sets, sentiment on card front from SU! 'Lots of Happy' card kit
CS: SU! Gorgeous Grape & Whisper White
Ink: SU! Lovely Lipstick, Pumpkin Pie, Daffodil Delight, Granny Apple Green, Marina Mist, Highland Heather & Gorgeous Grape
Tools: Creative Dies Plus 'Wonky Stitches' nested rectangles die set

Embellishments & accessories: the Works iridescent embellishments, self adhesive pearls
Ruth

Peony Thank You Card

Last week I spent a couple of days with my lovely friend Gill.  I had such a great time and I wanted to thank her for that as well as for my birthday gifts.  One of the birthday gifts I received from my hubby was the Altenew 'Hope' stamp set and matching dies - I fell in love with the beautiful layered peony as soon as I saw it!  Gill is very feminine and so a pretty design is always called for when I make a card for her and I decided the peony from the 'Hope' set would be ideal.

I started off by stamping the flower and leaves using a number of SU! ink colours - Powder Pink, Blushing Bride, Flirty Flamingo, Melon Mambo, Crushed Curry, Pumpkin Pie, Soft Sea Foam, Lemon Lime Twist and Granny Apple Green.  The layered flower is so bold and I think it shows up perfectly against white.  I wanted to add a bit of texture and interest though so I embossed a panel of Whisper White thick CS using the 'Lace' Dynamic embossing folder and I adhered that to the front of a Flirty Flamingo A6 sized card base.  Oh my word, that lace embossing folder is so gloriously pretty and feminine - just gorgeous!

I popped up a die cut wonky stitched rectangle frame and added the leaves and flower.  I stamped the sentiment in VersaMark, heat embossed with white embossing powder and die cut a wonky stitched square.  I'd applied the frame to the card front at a wonky angle but I applied the sentiment square straight.  Whilst Gill and I were out shopping together we went into the Works and she pointed out some iridescent embellishments to me which I bought.  Obviously, I had to add a few to this card!  I also upped the pretty, feminine factor with a few pearls as well.


Here's the card at a different angle which shows off the gorgeous lace embossing.


Here's the inside of the card.  I stamped the scrap of lace image using stamped off once Flirty Flamingo ink, the heartfelt sentiment in Granny Apple Green ink and the little hearts in full strength Flirty Flamingo ink. 


Here's the envelope flap with another stamped lace scrap, a sentiment and a stamped and punched butterfly.


We'd love to have some girly friendship time again and I hope it's soon!

Supplies:
Stamps: Altenew 'Hope' set, SU! 'Southern Serenade', 'Perpetual Birthday Calendar', 'Tin of Cards' & 'Butterfly Gala' sets
CS: SU! Flirty Flamingo, Granny Apple Green & Whisper White (thick & regular)
Ink: SU! Powder Pink, Blushing Bride, Flirty Flamingo, Melon Mambo, Crushed Curry, Pumpkin Pie, Soft Sea Foam, Lemon Lime Twist & Granny Apple Green
Tools: Altenew 'Hope' die set, SU! 'Lace' Dynamic embossing folder, Creative Dies Plus 'Wonky Stitches' nested rectangle and square die sets, SU! 'Butterfly Duet' punch
Embellishments & accessories: the Works iridescent embellishments, SU! pearl jewels, Dimensionals

Ruth

Tuesday, 16 April 2019

Pusheen Thank You Card & Quote Gift

A lovely young lady at work, Beth, made me a birthday cake decorated with Pusheen the cat.  It was very sweet of her and I was really touched!


Beth placed three of the Pusheen tags on the cake board and I thought it'd be fun to use one on a thank you card for her! 

One of the new crafty goodies I got as a birthday pressie was the Altenew 'Caps Bold Alphabet' die set.  Wendy made Lesley a beautiful birthday card using the eclipse technique with these dies and they got added to the birthday wish list pretty smartish!  The eclipse technique is where you die cut a shape or shapes from a panel of stamped CS, patterned paper or CS so you have positive die cut shapes and the negative space.  The positive die cut shapes are adhered slightly offset from the negative space in order to get the eclipse effect, usually they're popped up on foam tape.

Jennifer McGuire has a fab tip for this technique - you place your dies together on a mat using the measurement lines as a guide for straight placement and then you tape the dies together with strips of painter's tape so that the letters stay together.  I placed the dies onto a panel of pink dotted paper and cut out the word 'THANK'.  I then cut out the letters again, cutting each letter three times from SU! Early Espresso CS.  I glued the Early Espresso letters together in a stack and then glued on the pink dotted letters.  I glued the pink dotted paper to a piece of Whisper White CS, added a strip of Early Espresso stitched ribbon and glued the whole panel to the front of a side opening 7" x 5" Early Espresso card base.  To make the card 7" x 5" I joined two pieces of Early Espresso CS together because whenever I make landscape cards I prefer to have the fold at the side as opposed to a tent fold at the top as the cards always stand up better that way.  

I trimmed around the Pusheen tag and attached a wobble action spring to the tag and stuck that in place.  Pusheen is already so cute but to have a Pusheen on a spring so you can make her wobble - that's even cuter!  I stamped the 'YOU', trimmed it to size and popped it up.  I punched hearts, again stacking Early Espresso CS shapes followed by pink dotted paper shapes.  I went over the letters and hearts with a clear Wink of Stella pen for some shimmer.  I popped up the positive letters just slightly offset from the negative space, glued the hearts in place and added rhinestone jewels to the hearts to complete the card front.


Here's a closer look at the shimmery letters.


Here's the inside of the card.  I stacked punched hearts again and used the Wink of Stella pen to add shimmer.


Here's the front of the envelope.  I used the Altenew 'Invisible Alpha' stamp set to stamp the name.


After I'd finished the card and while my supplies were still out I thought it would be nice to make Beth a little something to accompany the card.  I decided on stamping a quote piece which I attached to a card with an easel so it can stand up on display.  I love this quote, not a bad philosophy to live by!  I stamped the quote and then stamped the watercolour wash image over the top in stamped off once Flirty Flamingo ink.  I die cut the oval and I popped that up on 3D foam tape on top of my matted layers.  I punched stacked hearts again and added Wink of Stella and rhinestone jewels to the hearts.


Here's a closer look at the quote panel and the sweet shimmery hearts.


I used the Tim Holtz 'Small Easel' Bigz die to create the easel I attached to the back - such a useful die!


Seeing matching items together makes me so happy so here's the card and quote piece together!  I'm so pleased to say that Beth loved the card and gift - I had a blast making these for her!


Supplies:
Stamps:  'YOU' from a stamp in the SU! 'One Big Meaning' set, inside sentiment from Hero Arts 'Hugs 'n Hearts' set, Altenew 'Invisible Alpha' set, Inkylicious 'Be Whatever' stamp, watercolour wash from SU! 'Perpetual Birthday Calendar' set
CS: SU! Early Espresso, Flirty Flamingo & Whisper White

Patterned paper: Bo Bunny 'Flamingo' Double Dot double sided paper
Ink: SU! Early Espresso & Flirty Flamingo, Early Espresso marker
Tools: Altenew 'Caps Bold Alphabet' die set, SU! 'Heart to Heart' punch, Creative Dies Plus nesting oval 'Wonky Stitches' die set, Tim Holtz 'Small Easel' Bigz die
Embellishments & accessories: Pusheen tag, 3D foam tape, Woodware Action Wobble Spring, SU! Early Espresso stitched ribbon, clear Wink of Stella pen, rhinestone jewels, Dimensionals

Ruth

Saturday, 13 April 2019

Flowers & Bees 70th Birthday Card

One of my colleagues, Eileen, celebrated her 70th birthday last weekend and I thought that milestone birthday merited a hand made card! Here's the card and the back of the envelope together.


The card base measures 5 3/4" square and I layered the white panel onto a mat of Sweet Sugarplum CS.  The SU! 'Garden In Bloom' set has such a beautiful watercolour look to it, even though the set is retired I love to use these pretty stamps still!  I used Grapefruit Grove, Mango Melody and Sweet Sugarplum inks for the blooms and Granny Apple Green ink for the leaves.  I stamped off once for the solid images and stamped the outlines in full strength ink.  After fussy cutting, I adhered the leaves behind the blooms and popped them up.  I used a flag banner die to cut out the sentiment strip.  I cut a few Sweet Sugarplum CS '70' numbers,  stacked them together and then glued on Sweet Sugarplum Glimmer Paper numbers - a bit of sparkle for the milestone birthday numbers was definitely a must I think!  After stamping and fussy cutting the bees I used a clear Wink of Stella pen to add shimmer to the wings and I popped those up.  To complete the front I sprinkled on a few Sweet Sugarplum sequins.


Here's a closer look at the shimmery bee wings.


Here's the inside.  I used an oval stitched die for the sentiment and couldn't resist adding a stamped and fussy cut butterfly and bee.


Here's the envelope flap with a stamped, fussy cut and popped up flower.


I completed the envelope by adding a fancy die cut name label to the front. 


Supplies:
Stamps: SU! 'Garden In Bloom' & 'Birthday Blossoms' sets
CS: SU! Sweet Sugarplum & Whisper White
Ink: SU! Grapefruit Grove, Mango Melody, Sweet Sugarplum & Soft Suede
Tools: MFT Die-namics 'Fishtail Flag' Stax die set, SU! 'Large Numbers' & 'Stitched Shape' Framelits die sets, Tonic Studios 'Beautiful Banner' die
Embellishments & accessories: SU! Fancy Frost sequins, Dimensionals, clear Wink of Stella pen

Ruth

Monday, 8 April 2019

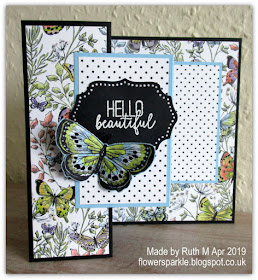
Butterfly Double Z Fold Hello Beautiful Birthday Card

This is the birthday card I made for my lovely friend Lesley.  I thought the Double Z Fold card was ideal for using the beautiful patterned papers from the SU! 'Botanical Butterfly' DSP pack!

Here's the card and envelope together.  That butterfly patterned paper is stunning and I love how it looks on the envelope flap!


Here's the card.  I used the fab label die from the 'Rose Trellis' Thinlits die set for the sentiment, stamping the words in VersaMark and heat embossing with white embossing powder.  I wanted white dots to show behind the label so I cut a white label shape to go behind the black shape.  Actually I cut two pieces of Whisper White thick CS and the bottom piece only just cut through but the dots all stayed in place which made it easy to adhere it behind the black label shape!  I roughly cut out the butterfly from a sheet of the patterned paper, adhered it to a piece of Balmy Blue CS and then fussy cut the butterfly shape.  I folded up the wings, glued the body to the panel and placed Dimensionals under the wings with the backing paper left on so that the wings stay popped up.


Here's a closer look at the butterfly.  I used a double headed pearl stamen embellishment for the antennae - it's a length of white covered wire with a black pearl at each end.  I coloured the wire with a black Sharpie and adhered it behind the butterfly.  I used a black Gelly Roll Glaze pen to add gloss to the black markings on the butterfly body.


Here's another view of the card.


Here's the back of the card which I decorated with a strip of patterned paper, a stamped and punched sentiment label plus two fussy cut little butterflies.


In the first photo you can see I decorated the flap of the envelope with some of the gorgeous patterned paper.  To complete the project I added a strip of the patterned paper to the front of the envelope also.  When I add strips to the inside panels of cards and to envelopes I often draw a line next to the paper using an SU! Stampin' Write marker or a Sharpie and a ruler - a quick but effective finishing touch!


It was a total joy to make this card for lovely Lesley!

Supplies:
Stamps: SU! 'Butterfly Gala' & 'Label Me Pretty' sets
CS: SU! Balmy Blue, Basic Black & Whisper White

Patterned paper: SU! 'Botanical Butterfly' DSP pack
Ink: VersaMark, Memento Tuxedo Black, black Sharpie, black Gelly Roll Glaze pen
Tools: SU! 'Rose Trellis' Thinlits die set, SU! 'Pretty Label' punch, heat tool

Embellishments & accessories: SU! white embossing powder, Dimensionals, pearl double headed stamen
Ruth

Friday, 5 April 2019

April 2019 Card Group Projects

Yesterday afternoon we got together for our April card group meeting.  Two of us, myself and Lesley, have birthdays in April and we both received some beautiful cards, lots of amazing inspiration for us all!

Last month I designed a card using the SU! Tropical Chic' set and then I ended up making two more versions of the card.  It was suggested that one of the alternative versions could be made at the April get together which I thought was an excellent idea!  So this is the tropical card the ladies made this month.  The ink colours are Blushing Bride, Granny Apple Green and Shaded Spruce and I used first and second generation stamping for the leaves.  Two of the flowers are popped up. 
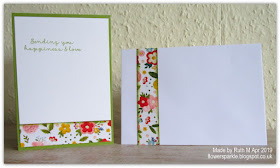

Here's the inside and the envelope.


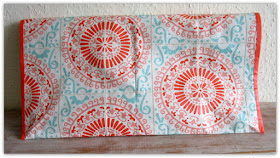
A couple of weeks ago I did some shopping in T K Maxx and bought one of their large shopping bags.  


I was struck by the lovely colour combo and was inspired to use the colours on a card, opting for Calypso Coral, Crisp Cantaloupe, Pool Party and white.  After die cutting the white panel I adhered a piece of Crisp Cantaloupe CS behind, glued the white panel to a mat layer of Calypso Coral CS and glued that to the front of the white card base.  I stamped the sentiment, stamped and die cut the leaves and flower and popped the flower up.  I added Calypso Coral die cut dots to the die cut portion to complete the card front.


Here's the inside of the card and the envelope.


Card three features the gorgeous SU! 'Needle and Thread' stamp set with the 'Tufted' embossing folder which gives a fabulous quilted look and texture.  Val said it reminded her of a mattress topper!  I used Old Olive, Flirty Flamingo and Poppy Parade inks and made the card base from Old Olive CS.  I embossed the white rectangular panel with the stitched die from the 'Needlepoint Elements' die set and inked the edges of the panel with Old Olive ink using a sponge dauber.  I stamped and die cut the leaves and flowers, popping up the two flowers.  I stamped the sentiment and used a die to cut a flagged banner shape.  To finish off the front I added three gold sequins for a touch of sparkle.  


Here's a closer look at the image panel so you can see the embossed stitched detailing.


Here's the inside of the card and the envelope which I decorated with strips of patterned paper from the 'Needlepoint Nook' DSP pack.


You can't beat a happy afternoon of crafting with good friends! 

Supplies for tropical Best Wishes card:
Stamps: SU! 'Tropical Chic' & 'Petal Palette' set
CS: SU! Blushing Bride, Shaded Spruce & Whisper White

Patterned paper: SU! 'Tropical Escape' 6" x 6" DSP pack
Ink: SU! Blushing Bride, Granny Apple Green & Shaded Spruce
Tools: SU! 'Tropical' Thinlits die set
Embellishments & accessories: SU! Dimensionals


Supplies for floral Birthday Wishes card:
Stamps: SU! 'Oh So Eclectic' & 'Sincere Salutations' sets, Penny Black 'Lovely Day'
CS: SU! Calypso Coral, Crisp Cantaloupe & Whisper White
Ink: SU! Calypso Coral, Crisp Cantaloupe & Pool Party
Tools: SU! 'Eclectic Layers' Thinlits die set, dots cut from a die from the SU! 'Trim Your Stocking' Thinlits die set
Embellishments & accessories: SU! Dimensionals


Supplies for embroidery flowers happiest birthday card:
Stamps: SU! 'Needle & Thread' set
CS: SU! Old Olive & Whisper White

Patterned paper: SU! 'Needlepoint Nook' DSP
Ink: SU! Flirty Flamingo, Old Olive & Poppy Parade
Tools: SU! 'Needlepoint Elements' Framelits die set, SU! 'Tufted' Dynamic embossing folder, MFT Die-namics 'Fishtail Flags' Stax die set, sponge dauber
Embellishments & accessories: gold sequins, SU! Dimensionals

Ruth