Pages

Thursday, 31 October 2019

Roses Lots Of Happy Card

This is a birthday card I made for a special friend - although I made it as a friendship card as I didn't see her on her actual birthday.  I've used the gorgeous SU! 'Beautiful Friendship' set and sentiments from the stamp set that comes with the 'Lots of Happy' card kit.

The Coastal Cabana card base measures 5 1/2" square and I embossed the Flirty Flamingo banner with the SU! 'Petal Burst' embossing folder.  I stamped the roses image in Flirty Flamingo ink, the centres in Rococo Rose ink and the leaves in stamped off once Bermuda Bay ink.  A touch of shimmer was added to the roses with a clear Wink of Stella pen.  I layered the white panel onto a Bermuda Bay CS mat and popped it up.  To complete the front I sprinkled on a few rhinestone jewels.


Here's the inside of the card.  I stamped small roses and leaves and stamped the 'You Deserve The Best Life Has To Offer' sentiment so it partially overlapped the roses using Bermuda Bay ink.


I stamped the very pretty small roses again on the envelope flap.  I wanted to make a pretty, feminine card and I was fairly pleased with the end result.


Supplies:
Stamps: SU! 'Beautiful Friendship' set, sentiments from stamp set in the 'Lots of Happy' card kit
CS: SU! Bermuda Bay, Coastal Cabana, Flirty Flamingo & Whisper White
Ink: SU! Bermuda Bay, Flirty Flamingo & Rococo Rose
Tools: SU! 'Petal Burst' embossing folder, MFT 'Fishtail Flags Stax' die set
Embellishments & accessories: SU! clear Wink of Stella pen, rhinestone jewels, Dimensionals

Ruth

Wednesday, 30 October 2019

Ornament & Holly Christmas Time Card

I'm taking part in Dena Rekow's monthly Facebook Classes.  As part of the October class Dena organised a contest and to take part you needed to make a card using:
  • 1/2 a sheet of CS
  • a 4" x 5 1/4" piece of CS
  • a piece of 3 1/2" x 4 3/4" embossed CS
  • a tag
  • a 1 1/2" x 4" piece of CS
  • and a small circle or other shaped piece  
As the measurements Dena gave are for a standard US sized card I adapted the sizes a bit to better suit a standard UK A6 sized card.  I used the SU! 'Christmas Gleaming' stamp set and a colour combo of Mossy Meadow, Poppy Parade and Whisper White.  I embossed the white panel with the 'Softly Falling' embossing folder.  I cut a piece of Poppy Parade patterned paper from the 'See a Silhouette' DSP pack with a 'Stitched Rectangle' die, punched a hole and added some Jute Twine to create a tag.  I stamped the holly image onto watercolour paper and used Mossy Meadow and Poppy Parade inks and an Aqua Painter to colour the image.  I fussy cut the holly and tucked it behind the ornament.  I coloured the ornament top with a gold Sharpie and added some Whisper White baker's twine.  I popped up the tag and the ornament using Dimensionals and added a few red rhinestones to the ornament to finish.


Here's the inside and the envelope.  I used a gold gel pen to add strings for the ornaments and to colour the tops.


Supplies:
Stamps: SU! 'Christmas Gleaming' set
CS: SU! Mossy Meadow, Poppy Parade & Whisper White, watercolour paper

Patterned paper: SU! 'See a Silhouette' DSP
Ink: SU! Mossy Meadow & Poppy Parade, gold metallic Sharpie, gold gel pen
Tools: SU! 'Gleaming Ornaments' punch pack, 'Stitched Rectangles' die set, 'Softly Falling' embossing folder, Crop-A-Dile

Embellishments & accessories: SU! Aqua Painter, Jute Twine. Whisper White baker's twine, red rhinestone jewels, Dimensionals
Ruth

Tuesday, 29 October 2019

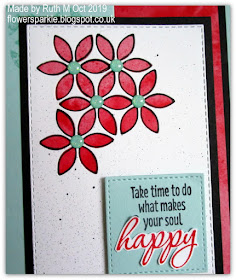
Tasteful Textures Happy Z Fold Card

This is a Z Fold card I made for Amanda, an SU! demo in Australia to celebrate World Card Making Day.  I've used the 'Tasteful Textures' stamp set with the matching 'Tasteful Backgrounds' die set and the colour combo is Pool Party, Poppy Parade, black and white.

I made an A6 sized Z Fold card from Pool Party CS and stamped the flower image a couple of times in Pool Party ink.  I die cut the flower background from a Whisper White stitched rectangle shape, glued a piece of Poppy Parade patterned paper (from the 'See a Silhouette' DSP pack) behind and glued the white rectangle to a Basic Black CS mat layer.  I drew around the edges of the petals with a Basic Black marker to add some definition and I used the marker to add some spritzing.  I stamped the sentiment in black ink onto a Pool Party stitched square shape, stamped the word 'happy' separately in Poppy Parade ink, fussy cut it and glued the red word over the top of the black word.  I popped up the Pool Party square and added some Glitter Enamel Dots to the flower centres.


Here's a closer look at the outlined petals and the spritzing detail.


Here's the inside of the card.


Here's a closer look at the sentiment panel.  I stamped the flower centre red dots using a round eraser on the top of a pencil.  Originally I stamped in full strength Poppy Parade ink but I thought it looked too dark so I stamped circles separately on a scrap of Whisper White CS in stamped off once Poppy Parade ink, cut them out with a 1/4" circle punch and glued them in place.  I liked that look much better!


I also stamped on the envelope and added a name label.


Amanda and I arranged to swap cards as part of celebrations for World Card Making Day and I really enjoyed making this card, I do hope she likes it.  I returned home yesterday from a short trip to the New Forest and Amanda's card for me was waiting on the doormat.  It was so lovely to come home to some very pretty happy mail!

Supplies:
Stamps: SU! 'Tasteful Textures' set, eraser on the top of a pencil used for dots
CS: SU! Basic Black, Pool Party & Whisper White

Patterned paper: SU! 'See a Silhouette' DSP
Ink: SU! Pool Party & Poppy Parade, Memento Tuxedo Black, SU! Basic Black marker
Tools: SU! 'Tasteful Backgrounds' & 'Stitched Rectangles' die sets, 1/4" circle punch, Simply Scored
Embellishments & accessories: SU! Glitter Enamel Dots, Dimensionals

Ruth

Thursday, 10 October 2019

Floral Double Point Fold Card - World Card Making Day 2019

I just haven't been spending enough time in my craft room lately and I'd like to change that.  Saturday October 5th was World Card Making Day and although I worked in the morning I was determined to make a card on the day.  Stampin' Up! offered an opportunity through a Facebook group to make a card on World Card Making Day and to send that card to a fellow SU! demonstrator and I happily took part!

Dena Rekow from the Creativity Cave runs monthly Facebook classes and I'm taking the classes currently.  Each month Dena records three Facebook Live videos.  Each video features three card layouts and at least three card designs per layout.  There's also a class members Facebook group where everyone can share their creations.  So every month you get nine card layouts and see a lot of cards as inspiration - I'm loving it so far!

One of the September class layouts was a Double Point Fold card which was a new design to me so I decided to make one.  I chose some SU! 'Garden Lane' DSP which gave me the colour combo of Mint Macaron, Mossy Meadow, Pear Pizzazz and Whisper White.  I made a card plus a matching envelope.


Here's just the card.  I embossed the Mint Macaron panel with the 'Layered Leaves' 3D embossing folder.  For the main image panel I've used the gorgeous SU! 'Beautiful Friendship' stamp set.  I stamped the flowers in Mint Macaron, the leaves in Pear Pizzazz and the flower centres in Mossy Meadow.   The 'Smile' sentiment is from the SU! 'Daisy Lane' stamp set. I added a few rhinestones for a touch of sparkle.


Here's the inside of the card.  I thought the 'take time to do what makes your soul happy' sentiment from the 'Tasteful Textures' set was ideal for a fellow stamper and card maker!  A much needed reminder for me too actually!


Here's the envelope.  I popped up the name label.


How nice to spend some crafty 'me' time, it was lovely, I'm so glad I took part!  I'll be sending this card out later on today and I'll be making another card this afternoon to mail out.  There was a bit of confusion over who was sending me a card and as a result I'll be swapping cards with an SU! demo in Australia - an added fun bonus!

Supplies:
Stamps: SU! 'Beautiful Friendship', 'Daisy Lane' & 'Tasteful Textures' sets
CS: SU! Mint Macaron, Mossy Meadow & Whisper White

Patterned paper: SU! 'Garden Lane' DSP
Ink: SU! Mint Macaron, Mossy Meadow & Pear Pizzazz
Tools: SU! 'Layered Leaves' 3D embossing folder, 'Stitched Nested Labels' die set, Envelope Punch Board
Embellishments & accessories: SU! rhinestone jewels, Dimensionals

Ruth

Wednesday, 9 October 2019

Inked Background & Silhouette Birthday Card

Dena Rekow from the Creativity Cave is my favourite stamper to watch and learn from, she is such fun!  I've watched many of her YouTube videos and I've recently joined her online monthly Facebook classes.

I love inked backgrounds and I've always got great results with Inkylicious ink duster brushes used with Tim Holtz Distress Inks.  The Inkylicious ink duster brushes do not work well with the SU! inks however, sponges seem to be the best option to apply the SU! inks but I've found my results mainly unsuccesful.  Dena uses oval make up brushes with SU! classic inks to create inked backgrounds and her results look stunning.  I found some oval brushes on the UK Amazon website and ordered a few to try them out for myself.  Oh my word, the brushes work amazingly well with the SU! inks, the results are so much better than using sponges to apply the inks!

I used the brushes to apply SU! Daffodil Delight, Calypso Coral and Poppy Parade inks to a panel of Whisper White CS.  Once you've picked up ink from the pad it's important to brush onto scrap paper to get rid of any excess ink before brushing directly to your CS panel.  Once I'd brushed my background I stamped the sentiment and adhered the very pretty floral silhouette die cut shape from the SU! 'Springtime Impressions' die set.  I trimmed the panel to fit the front of my A6 sized card base, glued the panel in place and added some black rhinestones.
.
 
 
One of Dena's 'go to' embellishment tricks is to splatter clear Wink of Stella over a piece.  It adds such a lovely touch of shimmer!


Here's the inside of the card and the envelope.


Supplies:
Stamps: SU! 'Beautiful Friendship' & 'Perennial Birthday' sets
CS: SU! Basic Black & Whisper White
Ink: SU! Daffodil Delight, Calypso Coral & Poppy Parade, VersaFine Onyx Black
Tools: SU! 'Springtime Impressions' die set, oval make up brushes
Embellishments & accessories: black rhinestones, clear Wink of Stella pen

Ruth


Friday, 4 October 2019

Fancy Frame & Butterflies 50th Birthday Card

A lovely friend, Wendy, celebrated her 50th birthday at the end of September.  I chose to make Wendy a pretty, feminine card using a Petal Pink, white and gold colour combo.  As it was a milestone birthday, I went all out and made a patterned paper matching envelope too!  Here's the card and envelope together. 


The Petal Pink card base measures 5 3/4" square, I added a Whisper White CS mat layer and adhered the Petal Pink Tonic Studios 'Tea Party Square Base' fancy die cut over the top. I cut out several 50 numbers and stacked them together to get a really dimensional 50 which I added to stitched circle die cuts.  I added three butterflies, a sentiment circle and sprinkled on a few rhinestones to finish the card front.  You can't tell from the photo but I added clear Wink of Stella to the Petal Pink outline butterfly die cut shapes so they have a subtle shimmer.


Here's a side view so you can see the depth of the stacked number die cuts. 


Here's the inside of the card.  I used a gold metallic Sharpie marker to add a line above the strip of patterned paper.


Here's the envelope.  I popped up the name label and added more bling.  I so enjoyed making this for Wendy!

Supplies:
Stamps: Hero Arts 'Wonderful Day', SU! 'Perennial Birthday' set
CS: SU! Petal Pink, Whisper White & Gold Foil sheet

Patterned paper: SU! 'Petal Promenade' DSP
Ink: SU! Petal Pink & Soft Suede, gold metallic Sharpie marker
Tools: Tonic Studios 'Tea Party Square Base',  SU! 'Large Numbers', M&C Boutique stitched circles, Memory Box 'Cascadia Butterfly Trio', 'Leavenworth Butterfly Trio', 'Bistro Label' & 'Chadwick Label' die sets, SU! Envelope Punch Board
Embellishments & accessories: clear Wink of Stella pen, SU! rhinestone jewels, Dimensionals

Ruth

Wednesday, 2 October 2019

September 2019 Card Group Projects

Wait, what, September has been and gone?!  I totally neglected to post the projects we made at our September get together and it's now October, I don't know what happened to September, it passed by in a blur! 

I only created two projects for the ladies in September because we made a flower pot card again and they are rather time consuming to make.  Chris Slogar made a wonderful flower pot card tutorial video for Splitcoast Stampers which can be found HERE on YouTube.

The card we made this time was a Christmas poinsettia flower pot card.  The colour combo is Cherry Cobbler, Garden Green, Whisper White and a touch of gold foil.  The poinsettias were stamped onto Cherry Cobbler CS with Memento Tuxedo Black ink.


Here's a side view. 


Here's a view of the back of the card.

Here's the envelope.  I used the same patterned paper that I'd used on the card base to tie everything together.


The second card we made was CASEd (my interpretation of CASE = Copy And Selectively Edit) from a card shown on page 117 of the SU! 2019/2020 Annual Catalogue.  The colours and layout really appealed to me.  The card base is Pool Party and the Pool Party stamped Swirly Frame rectangle was cut out using a Stitched Rectangle die.  I stamped the circle Swirly Frame image onto Crumb Cake CS using Soft Suede ink and used two circle dies to cut out the frame.  I stamped the birds image onto So Saffron CS using Soft Suede ink,  added colour with dry SU! watercolour pencils, cut out the image using a circle die and adhered it behind the Crumb Cake circle frame.  I stamped the 'Birch' background stamp in So Saffron ink onto So Saffron CS, adhered the panel to the card front and popped up the image circle.  I then added the flagged sentiment banner, two stamped and fussy cut flowers, some white tulle polka dot ribbon and a linen thread bow


Here's the inside and the envelope.  I coloured the single bird images using the dry watercolour pencils and added a little green underneath to ground the birds.


It has to be said this turned into a very full on afternoon, bordering on fraught and the ladies pleaded for the cards to be simple for the October class so I solemnly promised!  Unfortunately, circumstances mean I've had to cancel our October meeting which is really disappointing, but hopefully, we'll all be getting together again in November.

Supplies for poinsettia flower pot card:
Stamps: Creative Expressions Sue Wilson 'Shaded Poinsettia' set, Hero Arts 'Joyful Christmas Season' set
CS: SU! Cherry Cobbler, Garden Green & Whisper White, SU! Gold foil sheet

Patterned paper:  SU! 'Dashing Along' DSP
Ink: SU! Cherry Cobbler, Memento Tuxedo Black
Tools: Creative Expressions Sue Wilson 'Classic Poinsettia' die set, SU! Simply Scored, flower centre from Apple Blossom 'Christmas Wintry Additions' die set
 

Supplies for birds birthday card:
Stamps: SU! 'Free as a Bird', 'Swirly Frames' & 'Perennial Birthday' sets
CS: SU! Crumb Cake, Pool Party, So Saffron & Whisper White
Ink: SU! Soft Suede
Tools: SU! 'Layering Circles' & 'Stitched Rectangles' die sets
Embellishments & accessories: SU! watercolour pencils, white tulle polka dot ribbon, linen thread, Dimensionals