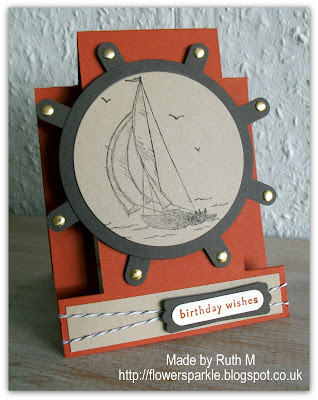
First up is a centre step fold card - which I've steered clear of 'cos they looked a tad tricky to me! But I saw LeeAnn's cards here and decided I would have a go - what a fab idea to make a ship's wheel using the Word Window punch! I'll admit my first attempt didn't turn out right but by my second try I'd got the hang of it. Basically a centre step fold is just a matter of 2 cuts and 7 scores - but you do need to score in the right places as I found out! I've CASEd LeeAnn's design pretty closely but I used Cajun Craze, Early Espresso, Crumb Cake and Very Vanilla as my combo. I used LeeAnn's measurements - apart from starting with a piece of 11" x 4 1/8" CS. This way I could get two cards from 1 sheet of A4 CS. I finished off the front by adding gold nailheads to the wheel.
Here's a side view of the centre step card.
I added a Crumb Cake panel inside the card and added a stamped compass and a sentiment.
A debossed and brayered card was next based on this lovely card made by Janice M. Cuttlebug folders are not a great size to fit on A6 size cards, they're not long enough and that can be very annoying. Cutting an embossed panel into 3 and matting onto a layer gets round this annoyance beautifully! I embossed a piece of Very Vanilla CS and then brayered Pretty in Pink ink over the debossed side of the CS. I cut the panel into 3, stamped the sentiment, added the ribbon and matted the panels onto a Night of Navy mat. I used a 1/4" circle punch to add the 3 dots.
The last card was CASEd from a fab design made by LeAnne, see her blog post here. Instead of using a flower die I substituted the SU! Blossom punch. I punched the flower shape out of dotty paper and trimmed it to size so it would fit on a Rich Razzleberry square mat layer. I then stamped the Dot, Dot, Dot stamp onto a piece of white CS with Baja Breeze ink and cut it so it was smaller than the dotty paper piece. I then popped up the dotty piaper piece over the stamped white piece and glued that to the Razzleberry mat. I taped a loop of the dotty razzleberry ribbon - wanted to keep the dotty theme going! - to the Razzleberry mat and added a punched flower with a silver brad to the centre. I didn't like the look of my square on an A6 size card so I opted for a 5 1/4" square card. I stamped the sentiment straight but then applied the image panel at an angle. I took a variety of sentiments from the Sincere Salutations set so the ladies could choose whichever one they wanted. A nice simple card to finish after the rigours of a centre step card and wrangling with a brayer LOL!
Supplies for centre step card:
Stamps: SU! Sail Away, 'Birthday Wishes' from SU! Wow Flowers set, compass from Tim Holtz 'The Journey' set, 'Enjoy Your Special Day' from Woodware 'Sentiments' clear set
CS: SU! Cajun Craze, Early Espresso, Crumb Cake & Very Vanilla
Ink: SU! Cajun Craze, Early Espresso & Crumb Cake
Tools: Circle Nestabilities dies, SU! Word Window & Modern Label punches, SU! Simply Scored
Embellishments & accessories: gold nailheads, SU! Early Espresso Baker's Twine, 3d foam pads
Supplies for debossed 'for you' card:
Stamps: 'for you' from SU! One of a Kind set
CS: Papermania cream A6 card blank, SU! Night of Navy
Ink: SU! Pretty in Pink & Night of Navy
Tools: Embossing folder from 'Friends Forever' Cuttlebug die and folder combo set, brayer, 1/4" circle punch
Embellishments & accessories: SU! Night of Navy grosgrain ribbon
Supplies for Thinking of You card :
Stamps: SU! Sincere Salutations set
CS: PaperMania square white card blank, SU! Rich Razzleberry
Patterned paper: Bo Bunny Ocean Double Dot
Ink: SU! Baja Breeze & Rich Razzleberry
Tools: SU! Blossom punch, Woodware flower punch, square Nestabilities die, paper piercer
Embellishments & accessories: SU! Rich Razzleberry dotted grosgrain ribbon, silver brads, 3d foam pads


1 comment:
OMG that ships wheel is ingenius!!! That is going to be cased for sure!!! As soon as the rest of my crafty goodies are unpacked I'm having a go! Would look great against the woodgrain background!
kelly xx
Post a Comment