Wednesday, 31 July 2013

Three Notepads & Pens - Inkspirational July Anything Goes Challenge

As there is a 5th Wednesday in July we have an Anything Goes challenge at Inkspirational for you this week - great fun, you can create anything you like!  I try to make a non card project on Anything Goes weeks, just for something a bit different.


It's sad but true, I'm at that age where if I don't write things down then things get forgotten!  I've identified where I need pen and paper to hand - my handbag, my craft desk and by the laptop - so I bought three notepads, made covers for them and decorated pens to match.  Hopefully, this means I won't be scrabbling around for pen and paper when I need it!

Here they all are together.


Here's the one I'm keeping in my handbag.  No 3D embellishments on this one as I don't want anything snagging as I take it in and out of my bag - although I couldn't resist adding some ribbon!  I made the cover by stamping the Going to Seed image in black ink onto a piece of Memory Box patterned paper and I added the black taffeta ribbon.  I rolled up a piece of the same patterned paper and inserted it into the clear pen barrel.  


This next notepad is kept on or around my craft desk and I deliberately made it very bright to make it easier to find amongst the crafty chaos!  I've used a green leafy patterned paper and I've added Primrose Petals ribbon.  I stamped the flowers in Strawberry Slush and Crushed Curry inks, punched them out with the Pansy punch, stamped the centres from another flower in the Flower Shop set, punched those out with a 1/2" circle punch and added 1/4" circles of CS over the top which I glossed with Crystal Effects.  Both flowers are popped up.  Again, I inserted rolled up patterned paper into the pen barrel but I made this pen a tad more fancy by adding two dahlia embellishments to the pen clip.


This last notepad is kept by the laptop.  I've used some beautiful Basic Grey paper, scalloped punched borders, die cut leaves, Prima flowers and a button to decorate the cover.  I'd run out of the clear barrelled pens so I've gussied up a Rich Razzleberry marker to accompany this notepad.  I just adhered a strip of the patterned paper to the pen - an idea I saw on page 67 of the UK SU! catalogue.  With double ended pens I ALWAYS uncap the wrong end first - so I added a button and a scrap of ribbon to the brush end of the marker so I know to uncap the journalling end of the marker to write in my notebook!


I hope you'll join in with our Inkspirational Anything Goes challenge, I'd love to visit your blogs to view your fab creations!

Supplies for notepad 1:
Stamps: Woodware 'Going to Seed' clear set

Patterned paper:  Memory Box Nightfall 'Woodland Path'
Ink: Memento Tuxedo Black
Embellishments & accessories: SU! Basic Black taffeta ribbon, Zebra Z Grip ballpoint pen, small notepad

 
Supplies for notepad 2:
Stamps:  SU! Flower Shop set
CS: SU! Whisper White

Patterned paper:  Magnolia Sweet Rainbow 'Summer Foliage'
Ink: SU! Strawberry Slush & Crushed Curry
Tools: SU! Pansy, 1/2" circle & 1/4" circle punches
Embellishments & accessories: SU! Primrose Petals stitched ribbon, Crystal Effects, Dahlia Embellishments, Dimensionals, Zebra Z Grip ballpoint pen, small notepad

 
Supplies for notepad 3:
CS: SU! Pool Party & Rich Razzleberry

Patterned paper:  Basic Grey Knee Highs 'Cat's Cradle'
Tools: SU! Little Leaves Sizzlits die & Eyelet Border punch,
Embellishments & accessories: Prima aqua flowers, SU! buttons, ribbon & Rhinestone Jewels, SU! Rich Razzleberry marker, small note pad


 photo ruthBF2.gif 


Monday, 29 July 2013

Fanciful Flourishes Warmest Wishes Birthday Card - House Of Cards July Photo Challenge

As there is a 5th week in July we are having a photo and any style goes challenge over at House of Cards.  Here's the inspiration photo.

http://yourdecoratinghotline.com/wp-content/uploads/2010/06/floral.bhg.orngwllprpss_Jazz7a.jpg 

I make cards along with the Cute and Fun and Classic and Elegant DTs at House of Cards so I could have made a card in either of those styles.  I chose Classic and Elegant as the photo lent itself more to that style in my view.  I've taken the orange wall with the gold leafy flourishes, the oval shape of the chair back plus the dark brown and white colours as the elements to use on my card.

I started by blending Distress Inks (Mustard Seed, Wild Honey and Spiced Marmalade) onto a piece of white CS and then I decided to try water stamping.  I spritzed the background stamp fairly liberally with water and stamped on top of my inked piece - wow, what a great effect!  I die cut the inked piece into an oval shape and added an Early Espresso mat oval.  I cut a white square panel, layered it onto a gold mirri card mat and adhered the oval.  I altered the colour of my lace ribbon by taping the length of ribbon down and brayering Wild Honey and Spiced Marmalade inks over the top.  I attached the ribbon and glued the panel to a 5 3/4" square Early Espresso card base.  I then die cut a Fanciful Flourish and Mini Fanciful Flourish from gold mirri card and glued those to the oval.  I loved the water stamping effect so I sponged another piece of white CS with the Distress Inks, water stamped the background and punched three flower shapes.  I edged each flower with Spiced Marmalade ink and attached the three flower layers together with a gold brad.  I popped up the sentiment and added the flower to the ribbon strip.  I punched two Espresso photo corners and a few flowers.  I shaped each flower and added gold nailheads to the centres to complete the card front.


Here's a close up photo of the water stamping - I love this effect!


For the inside of the card I cut a white panel, stamped the sentiment and grabbed the negative piece of gold mirri CS left over from die cutting the large flourish and used it as a stencil.  I sponged Mustard Seed, Wild Honey and Spiced Marmalade inks through the stencil and added more punched Espresso flowers. I sponged another piece of white CS with the Distress Inks, die cut the Mini Fanciful Flourish, glued it to the envelope flap and added another Espresso flower.


I'm not that keen on orange as a rule but I'm happy how this card turned out and I really enjoyed making this card even though I ended up with VERY inky hands!  

There will be inspiration on the House of Cards challenge blog throughout the week from the different style Design Teams. A different card style will be featured from Tuesday through to Friday as follows:
  • Cute & Fun on Tuesday
  • CAS on Wednesday
  • Classic & Elegant on Thursday
  • Shabby & Vintage on Friday
Please remember to check out all those lovely cards!  I'd love to visit your blogs to see your interpretations of the inspiration photo so I do hope you'll play along with us at House of Cards this week - everyone is welcome at our House!

REMINDER:  there's still time to enter our House of Cards giveaway, just a couple more days though, so if you'd like to be in with a chance of getting some crafty goodies you need to get your entries in pronto!  We have three giveaways based on region so make sure you link up to the correct giveaway for your part of the world.   Click HERE to get all the details and to enter.  Good luck!

Supplies:
Stamps: Penny Black 'Delicate Pattern' background stamp, SU! 'Blooming with Kindness' set, Hobby Art 'Sentiments' clear set
CS: SU! Early Espresso & Whisper White, thick white CS, gold mirri CS
Ink: Tim Holtz Ranger Mustard Seed, Wild Honey & Spiced Marmalade Distress Inks, SU! Early Espresso

Tools: Petite Oval Nestabilities dies, Cheery Lynn 'Fanciful Flourish' & 'Mini Fanciful Flourish' dies, SU! Boho Blossoms & Photo Corners punches, Ranger ink applicator tools & blending sponges, craft mat, water spritzer bottle, brayer, paper piercer, sponge dauber
Embellishments & accessories:  SU! Chantilly crochet trim, gold brad, gold nailheads, Dimensionals


 photo duckyruth2.gif

Saturday, 27 July 2013

Ornament Trio Season's Greetings Card - 52 {C}CT July Embellishment Challenge

We have a fun embellishment challenge for you at 52 {C}CT this week, Patricia has chosen stitching and you can use real or faux stitching.  Thank goodness Patricia is allowing faux - in my craft room it's faux stitching or no stitching LOL !


The SU! paper piercing templates make faux stitching so easy and ensure your stitches are even so they were a 'must use' tool for this card.  My card base measures 5 3/4" square and was made with Raspberry Ripple CS.  I die cut two Window Frame shapes, glued them to a Crumb Cake panel, laid the piercing template over the shapes and pierced around the outside.  I used an Early Espresso marker to add my faux stitches.  I stamped and die cut three ornaments, pierced and faux stitched hangers and popped the ornaments up.  I stamped the sentiment, layered the Crumb Cake panel onto an Early Espresso mat and glued it to the card front.  I attached two punched photo corners and completed the card front by adding some bling.


I die cut a Very Vanilla Window Frame shape for inside the card, stamped the sentiment and added more piercing and faux stitching.  I stamped and die cut three ornaments for the envelope flap and drew dots with an Early Espresso marker for hangers.


I hope you'll join us at 52 {C}CT for this fun challenge, I'm looking forward to seeing your seasonal stitchery!  Do check out the fab cards made by the other DT members to inspire you!

Supplies:
Stamps: SU! 'Ornament Keepsakes' set, 'Season's Greetings' from SU! 'Something for Christmas' stamp, Stampendous 'Christmas Cheer'
CS: SU! Raspberry Ripple, Crumb Cake, Early Espresso & Very Vanilla
Ink: SU! Primrose Petals, Raspberry Ripple, Early Espresso & Old Olive
Tools: SU! Window Frame & Holiday Ornaments Framelits dies, Photo Corners punch, Festive Paper Piercing Pack, paper piercer
Embellishments & accessories: SU! Rhinestone Jewels, Dimensionals


 photo FlowerLetterRuth.gif 

Friday, 26 July 2013

Colourful Cake It's Your Day Card

I recently coloured a stamped image with artist's coloured pencils and I really enjoyed the process.  I was keen to repeat the experience with a more challenging image and when I saw this beautiful cake stamp I thought it would be perfect. Of course, I didn't NEED to buy a new stamp - but it is SO pretty and it was a bargain price!

I stamped in Memento black ink onto Whisper White CS - one of the reasons I like about colouring with pencils is that you don't need to stamp on special paper or card - and coloured the image with my pencils.  I've layered the white panel onto Basic Black and Strawberry Slush mats and I added Daffodil Delight punched photo corners.  I stamped the flowers and leaves portion of the stamp again, coloured, fussy cut the image and popped it up.    I stamped the sentiment, glued the panel to the front of a 5 1/4" square card and added three blue gems.


Here's a close up of the cake.  It's a tough choice - do more stamping or bake a cake?!  It will have to be stamping for now as I have a lot of crafty preparation to do for next week and I'm behind with it - as per usual! 


I stamped the sentiment onto a die cut doily and popped up the flowers and leaves for inside the card.  More flowers and leaves went onto the envelope flap.


Supplies:
Stamps:  Dovecraft 'Cake' clear stamp, SU! 'Happiest Birthday Wishes' set, Hero Arts 'Fabulous Birthday'
CS: PaperMania square white card blank, SU! Strawberry Slush, Basic Black & Whisper White
Ink: Memento Tuxedo Black
Tools: SU! Photo Corners punch, Delicate Doilies Sizzlits die, Stamp-a-ma-jig
Embellishments & accessories: artist's coloured pencils, blue gems, SU! Dimensionals


 photo RoseRuth.gif 


Wednesday, 24 July 2013

Summery Flowers Birthday Card - Inkspirational July Sketch Challenge (#30)

We have a sketch challenge for you this week at Inkspirational, and a great sketch it is too!  I think this is such a versatile layout, it will work for both squares and rectangles and you can keep it CAS or go a bit more fancy with it.  I rotated the sketch and made a 5 3/4" square card. 


My friend and neighbour Kath asked me to make a birthday card for an old friend of hers - who used to live in the house that Owen and I live in now!  I went with a floral theme (no surprise there!) and used pretty, summery colours - Crisp Cantaloupe, Primrose Petals and Pear Pizzazz - with some white, Espresso and Raspberry Ripple thrown in.  I stamped the flourish from the Everything Eleanor set onto Whisper White CS a few times using Pear Pizzazz ink.  I used the flower stamp from the SU! Morning Meadow set that matches the Pansy punch and inked a few flowers with Crisp Cantaloupe ink and then inked the edges with Primrose Petals ink using a sponge dauber.  I then made two slightly darker flowers by inking in Primrose Petals ink, stamping off once and then edging with Raspberry Ripple ink.  I computer generated the sentiment using the Lobster Two font and cut two scalloped Early Espresso borders using the Large Scallop Edgelits die.  The patterned paper is a scrap of Pear Pizzazz DSP I found in my stash.  I attached a strip of Primrose Petals ribbon, tied a separate bow and glued that over the top.  I popped up the flowers on the white panel and added jewel centres.  I then punched more flowers for the Pear Pizzazz patterned paper panel and had to add jewel centres to those too!  
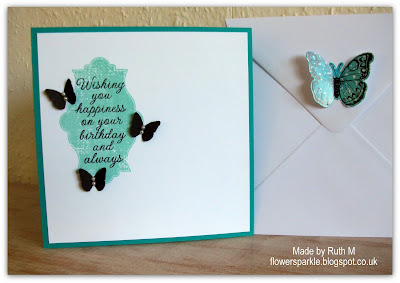

Here's the inside and envelope - with more flourishes and flowers!


I really hope you'll try this wonderful sketch and take part in our challenge at Inkspirational this week, I'd love to pop by your blogs to see your interpretations!  The other DT members will have fab cards on show to inspire you and our Weekend Warrior, Sandie, will post a card on Saturday too!

Supplies:
Stamps: SU! 'Everything Eleanor' & 'Morning Meadow' sets, Hero Arts '???'
CS: SU! Primrose Petals, Crisp Cantaloupe, Early Espresso & Whisper White

Patterned paper:  SU! Pear Pizzazz DSP
Ink: SU! Crisp Cantaloupe, Primrose Petals, Raspberry Ripple & Pear Pizzazz
Tools: SU! Pansy, Boho Blossoms & Itty Bitty flower punches, Large Scallop Edgelits die, sponge daubers
Embellishments & accessories: SU! Primrose Petals stitched ribbon, Rhinestone Jewels, Dimensionals


 photo FlowerBoxRuth.gif 

Tuesday, 23 July 2013

Dotty Flowers Happy Birthday Card

My friend Kath asked me to make a personalised birthday card for her friend Gladys.  I'd recently seen this fab card made by Mynnette which I loved and I took the opportunity to CASE her card. It was too hot for heat embossing though, I just couldn't bear to use my heat tool, I stamped the flowers in black ink instead!

I started off by stamping flowers and leaves onto Bo Bunny Double Dot papers and fussy cut them all out.  I computer generated the sentiment using the Grand Hotel font and cut that out with a flag die.  I embossed Marina Mist CS with the Honeycomb folder, Rose Red CS with the Lacy Brocade folder and glued the two panels to a 5 1/4" square white card base.  I cut a slit in the spine of the card so I could thread Rose Red seam binding ribbon around the card and I added Marina Mist grosgrain ribbon over the top.  I curled the leaves and glued them to the card front and popped up the flowers and sentiment flag.


Here's the inside and the envelope with a sentiment and more popped up dotty flowers. 


Supplies:
Stamps: Hero Arts 'Sew Me Jewel Flowers' clear set, Penny Black 'Lovely Day'
CS: PaperMania 5 1/4" square white card blank, SU! Marina Mist, Rose Red & Whisper White

Patterned paper:  Bo Bunny Double Dot 'Raspberry', 'Frost' & 'Avocado'
Ink: Memento Tuxedo Black, SU! Rose Red
Tools: SU! 'Honeycomb' & 'Lacy Brocade' embossing folders, MFT Fishtail Flags Stax die
Embellishments & accessories: SU! Rose Red seam binding ribbon, Marina Mist grosgrain ribbon, Dimensionals


 photo CatGingerRuth.gif


Monday, 22 July 2013

Goose Tag Birthday Greetings Card

I just loved the SU! Wetlands stamp set when I saw it in the new catalogue - there's something so appealing about those little sandpipers and the sentiments are fabulous!  I needed to make a birthday card for our friend Alan and I thought this set would be perfect for a masculine card.

I sponged inks onto white CS to represent sky and ground and stamped the grass and sentiment.  I stamped the goose on a separate piece of CS and added colour with pencils.  I die cut a So Saffron tag, trimmed the white piece to size, rounded the corners and glued it to the tag.  I fussy cut the goose and popped him up.  I extended his legs to the bottom of the tag with a black marker.  I embellished the tag with ribbon, a button and linen thread.  I sponged a strip of white CS, stamped the birds a few times, stamped some grass and added some speckles to the ground.  I made a 5 3/4" square Old Olive card base and glued the strip under a Marina Mist scalloped punched border.  I stamped the text, postmark and passport stamp on the right side of the card, stamped the chevron strips, fussy cut them, glued them to the card and popped the tag up over the top.


Here's a close up of the goose.  The images in the set have a loose, sketched design and the pencils seemed to be just right to add a bit of soft colour.  I like the effect and have rediscovered a love of colouring with pencils, I'll be doing more of it!


I cut a white panel for inside the card, sponged the bottom, stamped the birds and added speckles.  I die cut a window frame shape, used the negative space as a template, sponged on So Saffron ink and stamped the sentiment over the top.  More sandpipers made it onto the envelope flap.


It's Alan's birthday today - hope he and Jan like the card!

Supplies:
Stamps: SU! 'Wetlands', 'French Foliage' & 'Itty Bitty Backgrounds' sets, PaperMania Urban Stamps 'Air Mail' set, Stampendous 'Sending Wishes' cling stamp
CS: SU! Old Olive, So Saffron, Marina Mist & Whisper White
Ink: Memento Tuxedo Black, SU! So Saffron, Old Olive, Soft Sky, Marina Mist, Soft Suede, Baked Brown Sugar, Basic Black marker
Tools: SU! Two Tags die,  Window Frames Framelits die, Dotted Scallop Ribbon Border punch, circle punches, Stamp-a-ma-jig, sponges, sponge daubers
Embellishments & accessories: artists coloured pencils, SU! Marina Mist grosgrain ribbon, Old Olive button, linen thread, Dimensionals


 photo ruthspiralcat.gif 


Saturday, 20 July 2013

Snowflake Merry Christmas Card - 52 {C}CT July Recipe Challenge

Patricia has chosen a wonderful recipe to follow for this week's 52 {C}CT challenge.  We want to see one ribbon, two patterned papers and 3 gems.


I went to my Christmas papers storage box first, had a good rummage and selected two papers from the Echo Park Winter Wishes range.  I realise the blue paper looks plain but there IS a subtle pattern on there - honest!  I used a plain curved border die to cut the two papers and some Perfect Plum CS and I layered these on the bottom of an A6 landscape Perfect Plum card base.  I've used my very old, but very lovely, SU! Snowflakes stamp set.  I stamped the largest snowflake in Perfect Plum ink on Whisper White CS and used square Nestie dies to cut it out plus a mat layer.  I've popped the snowflake panel up and I added three blue gems to the snowflake centre.  I stamped the sentiment, cut it out with a label die, punched a hole and added it to the gingham ribbon. 


Here's the inside and the envelope with a sentiment, more curved borders and snowflakes.


Recipe challenges are great fun and Patricia's recipe is fabulous, I really enjoyed it!  I hope you'll take the opportunity to add another Christmas card to your stash by taking part in the 52 {C}CT challenge this week, I'd love to see what you come up with!  The other DT members have great cards on show to inspire you so do please go and check those out!

Supplies:
Stamps: SU! 'Snowflakes' set, Hero Arts 'Very Merry Christmas' clear set
CS: SU! Perfect Plum & Whisper White
Ink: SU! Perfect Plum & Marina Mist
Tools: Square Nestabilities dies, plain die from Spellbinder's Card Creator Borderabilities A2 Curved Border One die set, Spellbinder's Labels Trio die, Crop-a-dile, 1 1/2" & 1 3/4" circle punches
Embellishments & accessories: teal gingham ribbon,  PaperMania blue gems, 3D foam tape


 photo ruth3.gif 

Friday, 19 July 2013

SU! Best Of Flowers Cards - For Margaret

This is my second post for today and is especially for my friend Margaret from card group.  Last month at card group we made this card using the SU! Best of Flowers set.


I knew Margaret was interested in the set so I also made cards with the other stamps in the Best of Flowers set as examples for her to look at.  Silly me, I forgot to take the other cards with me to card group so I told Margaret I would post the cards on my blog so she could see them.  I had only made the card fronts so I put the cards in my "To be Completed" box - and then promptly forgot all about them!  I'm SO sorry Margaret - but, finally, here are the cards for you to see!

This card is  made with Very Vanilla CS and measures 4 1/4" square - the image panel is a tad over 2 1/4" square.  I applied Daffodil Delight and Calypso Coral inks and then stamped the daisies in Early Espresso ink twice - once full strength and another stamped off once.  I also stamped the sentiment in Espresso ink.  I edged the panel with Calypso Coral ink and popped it up onto Espresso and Coral mat layers.  I haven't stamped inside but I did sponge, stamp and punch a circle element for the envelope flap.

 
 The next card uses the hydrangea image from the set.  This is a side opening Rose Red A6 card.  I stamped the French Script background stamp in Smoky Slate ink onto Whisper White CS - after stamping off once first.  Over the top of the background I then stamped one hydrangea in Smoky Slate ink and two in Rose Red ink and I die cut the images into three squares measuring a tad over 1 1/2" square.  I layered the white squares onto light and dark grey mats.  I embossed lines onto the card front using the Simply Scored tool, glued the squares to the card front and glued the white sentiment strip.  To make the circle embellishments I punched six 3/8" circles, stacking two together for some dimension and I then covered the circles with Crystal Effects so they're glossy.


 Here's a closer view of one of the white panels so you can see the subtle background stamping and the beautiful hydrangea image better.


Here's the inside and the envelope.


When I took my cards out of the "To be Completed" box and saw the card I'd made using the floral spray image from the set I didn't really like the card all that much.  I thought I could do better so I started afresh and made this card!  The floral spray image is very pretty - it reminds me of toile.  I stamped the image a few times onto the label in Marina Mist ink - after stamping off once first.  I inked the edges of the label in Marina Mist ink and stamped the sentiment in Early Espresso ink.  I added punched flowers and brads to the label, die cut a Top Note shape, embossed it with the Fancy Fan folder and popped the label up onto the Top Note shape.  I made a shabby stacked flower by stamping the floral spray image onto Crumb Cake CS a few times in Espresso ink and I cut 3 flowers out with the Pansy punch.  I spritzed the back of each flower with water, scrunched them up a few times and when they were dry I sponged the edges with Espresso ink.  I die cut Espresso leaves and attached the flower layers together with a Marina Mist flower shaped brad.  I made a side opening Crumb Cake A6 card base, added the Espresso stitched ribbon and glued the Top Note shape to the card front.  I completed the card front by adding a jewel to the flower brad centre.


Here's a closer view of the shabby flower.

 
Here's the inside and the envelope.


Here's a closer view of the floral spray image - SO pretty!


Hope this helps you make up your mind about the Best of Flowers set Margaret - so sorry you had to wait so long!

Supplies for Very Vanilla card:
Stamps: SU! 'Best of Flowers' set, 'Thank You' from SU! 'Blooming with Kindness' set
CS: SU! Calypso Coral, Early Espresso & Very Vanilla
Ink: SU! Daffodil Delight, Calypso Coral & Early Espresso
Tools: Square Nestabilities dies, circle punches, sponges & sponge dauber
Embellishments & accessories:  Dimensionals


Supplies for Rose Red card:
Stamps: SU! 'Best of Flowers' & 'Curly Cute' sets,  'French Script' background stamp, Hobby Art 'Sentiments' clear set
CS: SU! Rose Red, Basic Gray, Smoky Slate & Whisper White
Ink: SU! Rose Red & Smoky Slate
Tools: Square Nestabilities dies, 3/8" circle punch, SU! Simply Scored
Embellishments & accessories: SU! Crystal Effects


Supplies for Crumb Cake card:
Stamps: SU! 'Best of Flowers' set, 'Thanks so much' from SU! 'Simply Sketched' set
CS: SU! Crumb Cake, Marina Mist, Early Espresso & Whisper White
Ink: SU! Marina Mist & Early Espresso
Tools: SU! Top Note die, Apothecary Accents Framelits die, Little Leaves Sizzlits die, Fancy Fan embossing folder, Pansy punch, Itty Bitty flower punch, paper piercer, sponge daubers, water spritzer bottle
Embellishments & accessories: SU! Early Espresso stitched ribbon, Early Espresso brads, Marina Mist flower shaped brad, Rhinestone Jewel, Dimensionals


 photo FlowerRuth.gif 


Bright Butterflies & Flowers Thinking Of You Card

Poor Michelle from the Card Grotto is ill at the moment so I sent her this bright, cheery card.  Michelle, a true CAS queen, designs beautiful, clean and fresh cards with lots of white space.  I know she loves butterflies so I kept all of these things in mind when I made this card for her.

I've used Bermuda Bay CS for the A6 card base - Bermuda Bay has rapidly become a favourite colour for me!  I punched a fancy corner in the white panel and stamped the sentiment.  I die cut the trellis from Crumb Cake CS. The trellis is lovely and delicate and cuts out beautifully but as it's so fine it's a beggar when it comes to applying glue and sticking it down!  I stamped flowery butterflies from the Papillon Potpourri set, punched them out and layered them over butterflies punched from CS.  I used the Beautiful Wings Embosslits die to cut out the Daffodil Delight butterflies.  I then punched flowers, gave them a bit of shaping and layered them together.  To complete the card front I sprinkled some gems onto the flowers and butterflies.


 Here's a closer view of the layered stamped and punched butterflies.


For inside the card I cut a white panel and punched the decorative corner.  I then layer stamped the butterflies and sentiment and added a die cut butterfly and gem.  I stamped, punched and layered a Melon Mambo butterfly for the envelope flap.  It's miserable feeling poorly but when you're battling the heat as well it seems worse I think.  I hope this card brightened Michelle's day a little bit and that she feels better very soon!


Supplies:
Stamps:  SU! 'Papillon Potpourri' & 'Sassy Salutations' sets
CS: SU! Bermuda Bay, Crumb Cake, Melon Mambo, Daffodil Delight & Whisper White
Ink: SU! Bermuda Bay, Melon Mambo & Daffodil Delight
Tools: Memory Box Trellis Border die, SU! Beautiful Wings Embosslits die, SU! Elegant Butterfly, Bitty Butterfly & Boho Blossoms punches, Woodware flower punch, Fiskars Scallop corner punch
Embellishments & accessories: PaperMania Aqua gems


 photo LPDruthbutter.gif 


Wednesday, 17 July 2013

Wax Paper Resist Butterfly Birthday Card - Inkspirational July CASE Challenge (#29)

It's time for the monthly CASE challenge over at Inkspirational and we have a stunningly beautiful card made by Ellen, the Inkspirational challenge blog co-owner, as our CASE inspiration. Ellen's blog post for the card can be found here.


Well, my goodness, there are SO many things you can take from this card as inspiration, I was spoilt for choice!  When I first checked out the card I had to investigate the wax paper resist technique straight away as I'd not tried that before.  I gave it a go and I loved the effect!  So I lifted the the wax paper resist technique, I used the same butterfly stamp,  I've used a wonky panel, a sentiment flag banner, lace ribbon, a flower element and pearls!  So, basically, I lifted pretty much everything - although I did make a square card and I used different colours for my version!

My 5 3/4" square card base was made with Bermuda Bay CS.  The background panel was made using the wax paper resist technique and I sponged Evergreen Bough and Salty Ocean Distress inks over the top.  I trimmed the panel to size and layered it onto a black mat.  I have a tutorial for the technique on my Tutorials tab up at the top.  I stamped the butterfly onto an excess piece of the panel using black StazOn ink and die cut the butterfly.  I glued the sentiment banner, popped up the black lacy square at an angle and glued the butterfly body flat but popped up the wings.  I added a strip of white lace ribbon, attached two aqua Prima flowers to the panel with a black brad and glued the panel to the card front.  I love those elegant pearly flourishes Ellen has used on her card but as I don't have any I opted to add a die cut flourish corner instead.  I punched two black butterflies and added small pearls to the bodies and added more pearls to finish off the card front.


Here's the inside and the envelope.  I stamped the label from the SU! Everything Eleanor set in Pool Party ink before stamping the sentiment over the top.  I added punched butterflies inside but another wax paper resist butterfly went onto the envelope flap.


I enjoyed CASEing Ellen's gorgeous card very much indeed, the discovery of the wax paper resist technique was a great bonus as I really love it - huge thanks to Ellen!   I hope you will take up the Inkspirational challenge to CASE Ellen's card - and I hope you enjoy it as much as I did!

Supplies:
Stamps: Hero Arts/Sizzix 'Antique Flowers & Butterflies' stamp & die combo set, 'Birthday Greetings' from SU! 'Wetlands' set, SU! 'Everything Eleanor' set, Hobby Art 'Sentiments' clear set
CS: SU! Bermuda Bay, Pool Party, Basic Black & Whisper White, Ranger Glossy Paper, Reynolds Cut-Rite wax paper
Ink: Memento Tuxedo Black, Jet Black StazOn, SU! Pool Party, Ranger Tim Holtz Evergreen Bough & Salty Ocean Distress Inks

Tools: Lacy Square Nestabilities die, butterfly die from Hero Arts/Sizzix 'Antique Flowers & Butterflies' stamp & die combo set, Cuttlebug 'Vintage' 2" x 2" die set, Martha Stewart butterfly punch, square punch (to make flag banner), Ranger ink applicator tool & sponges, craft mat, iron
Embellishments & accessories: Woodware self adhesive white lace ribbon, Prima flowers, PaperMania black brad, SU! pearl jewels, Dimensionals


 photo ButterflyFlutterRuth.gif 


01 09 10