Showing posts with label Telescoping Circles card. Show all posts

Thursday, 3 October 2013

Telescoping Circles Thank You Card - HOC September Photo Challenge

As we have a 5th Monday in September we're having a photo inspiration challenge this week at House of Cards.  Cards from each of our different style DTs will be featured on the blog throughout the week so do please check them out!  Here's the photo we'd like you to take your inspiration from.  Leaves, flowers, gorgeous autumnal colours, stripes - there's lots of goodness to take from this photo!


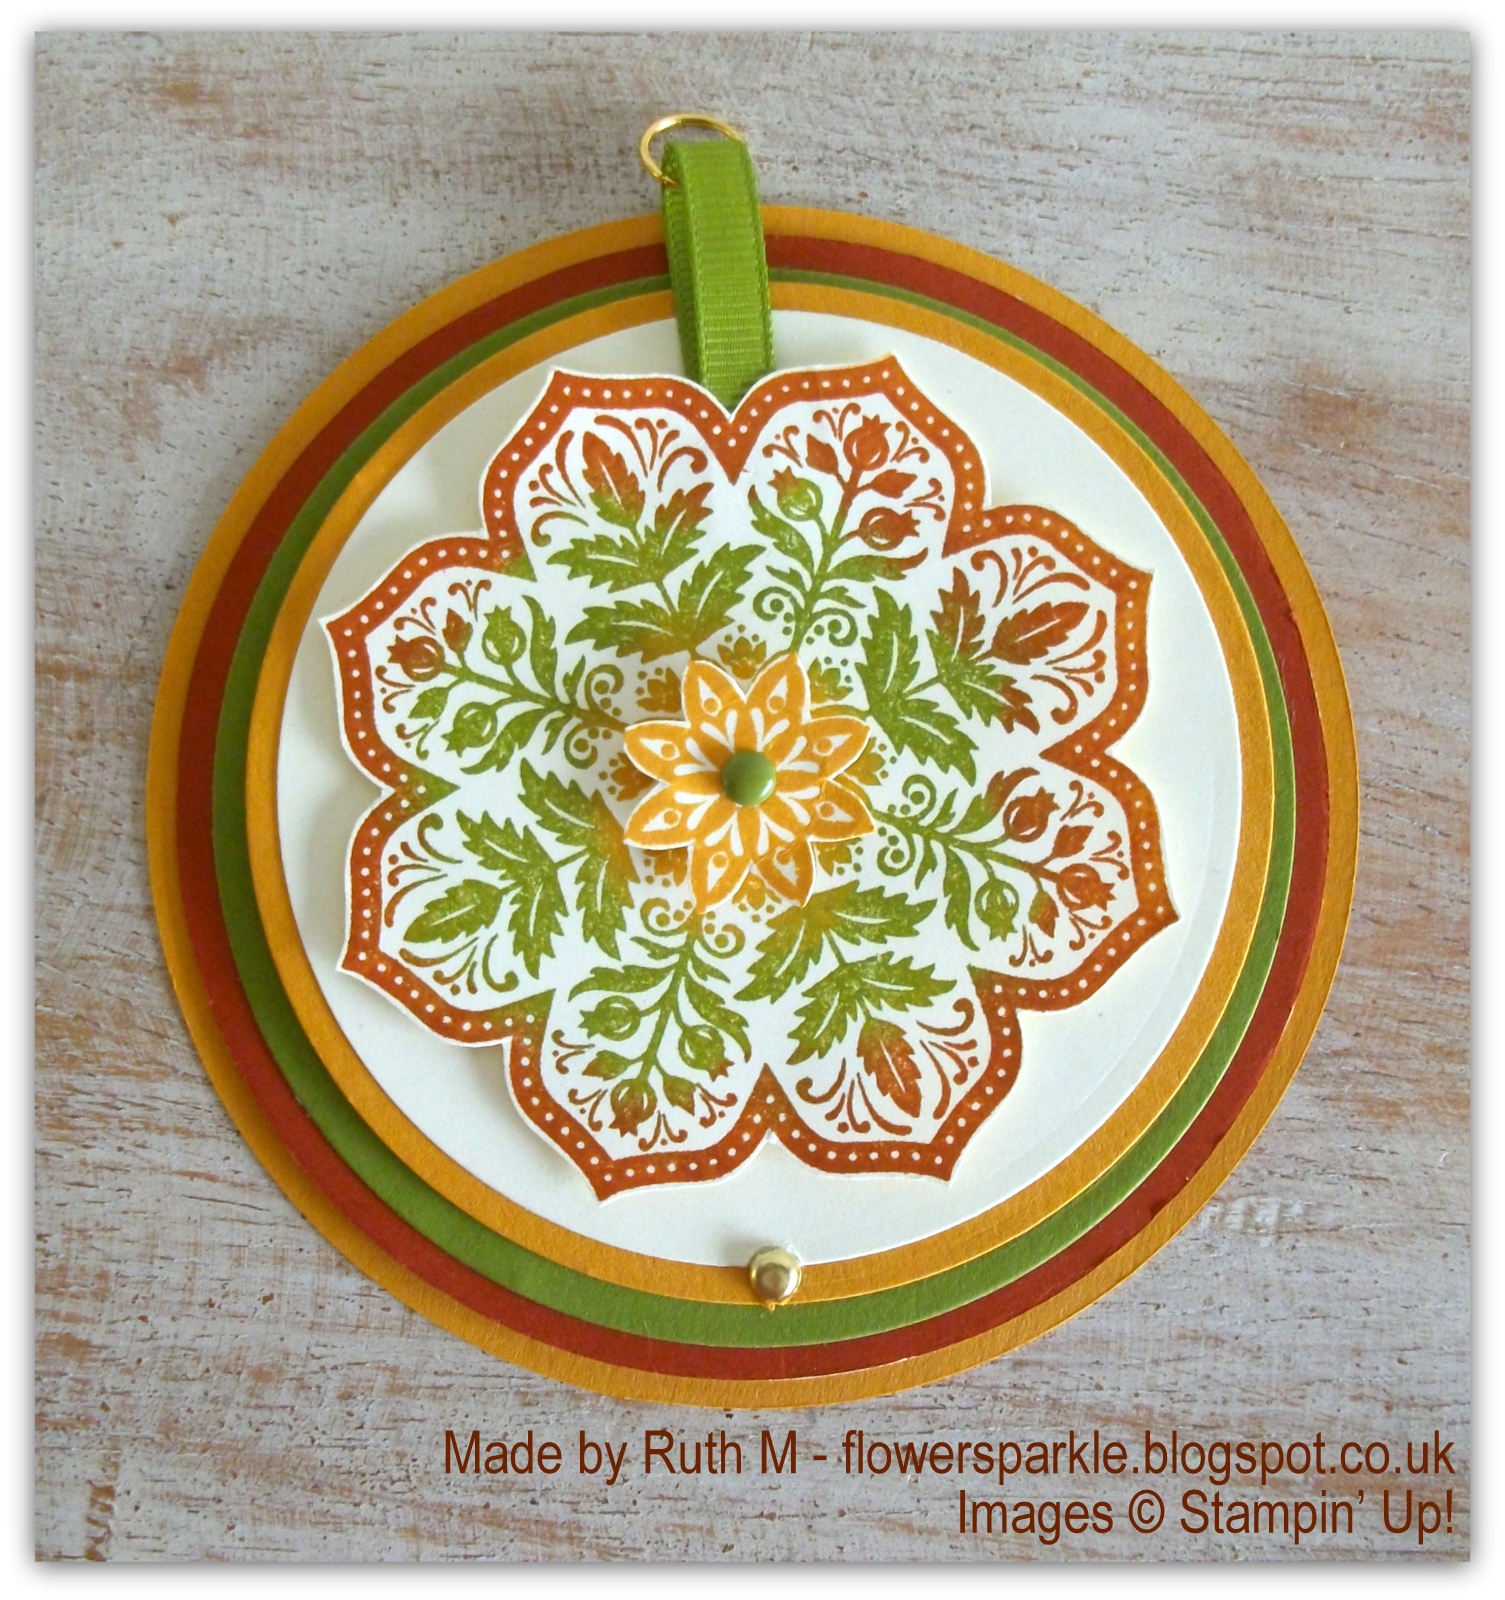
I've made a Classic & Elegant style autumnal telescoping circle thank you card.  I've used the ever so lovely SU! Day of Gratitude stamp set and a colour combo of  Cajun Craze, More Mustard, Old Olive and Very Vanilla.  Telescoping circle cards are fun and easy to make, Barb Mullikin has a fab video tutorial here if you'd like to check it out and have a go yourself.  

Here's the card all telescoped up ready to place in the envelope.  The largest circle is 4" so the card fits into a 4 1/4" square envelope.  I inked the stamp with More Mustard ink first, added Old Olive and Cajun Craze inks using sponge daubers, fussy cut it and attached a ribbon pull tab on the back.  I popped it up on the Very Vanilla circle.  I stamped a More Mustard centre separately, fussy cut it, added an Old Olive brad and popped it up. 


Here's the card with two of the circles revealed.  I stamped the leaf image onto Very Vanilla CS after stamping off twice and stamped the sentiment over the top in Cajun Craze ink.  I cut the sentiment piece out with a Grommet Tag die and matted onto a larger Cajun Craze Grommet Tag.  I glued More Mustard patterned paper to the Old Olive circle, glued the tag and added Cajun Craze Candy Dots to the Very Vanilla tag.  


Here's the telescoping circles card fully open.  I added a gold jump ring to the ribbon tab so that the card can be hung up if desired.  I stamped and fussy cut the leaves and glued them to the Very Vanilla circle which is where I wrote my message.


I covered the flap of the envelope with the More Mustard patterned paper to finish off.


So that's what I made - now it's over to you and I'd love to come and see your creations!   You can use any card making style, just make sure you link up on this post here.  Everyone is welcome at our House!

Supplies:
Stamps: SU! 'Day of Gratitude' & 'Wetlands' sets
CS: SU! Cajun Craze, More Mustard, Old Olive & Very Vanilla

Patterned paper:  SU! Spice Cake DSP
Ink:  SU! Cajun Craze, More Mustard & Old Olive
Tools:  Sizzix Circle #1 die, circle Nestabilities dies, Spellbinder's Grommet Tags dies, paper piercing tool, Stamp-a-ma-jig, sponge daubers
Embellishments & accessories:  SU! Old Olive grosgrain ribbon, Old Olive brad, Cajun Craze Candy Dots, gold brads, gold jump ring, SU! Dimensionals


 photo ruthBF2.gif 


Thursday, 6 September 2012

September 2012 Card Group Projects

It was our 'crafternoon' today, our monthly card group get together.  Only two cards this month as they're a bit time consuming.  The ladies asked if they could make a trees reflection card again and I was happy to oblige as it's such a wow card to make.

To make the trees panel I first stamped the line of trees towards the top of the Whisper White panel, then I stamped the line of trees onto a piece of acetate (using black StazOn ink), flipped the acetate over so it was ink side down, carefully positioned it underneath my first stamped row of trees and then went over the acetate with my brayer using firm pressure.  When you remove the acetate you should see an upside down row of trees with a paler impression which acts as the reflection.  Next I punched two 1" circles to act as masks for the moon.  I put repositionable glue on the back and placed the circles where I wanted my moons to be and then got busy sponging.  I sponged the ground first, applying River Rock and then Always Artichoke inks with sponge daubers - I used long strokes with the dauber rather than patting the dauber down, that way you don't get the circle shapes from the end of the dauber - been there, done that!  I then used sponges to apply the blue inks - Bashful Blue, followed by Not Quite Navy and then Night of Navy, just for the sky, to finish.  I edged the panel with Night of Navy ink applied with a sponge dauber and peeled off the moon masks.  I stamped the sentiment, matted the trees panel to a square of Always Artichoke CS and applied the square to the front of a 5 1/4" square white card.  This card design is versatile, it doesn't have to be a Christmas card, so I took other sentiment stamps so the ladies could choose what they wanted.


Card two was a telescoping snowman card.  These are such fun cards to make and I thought the ladies would love making these!  There's lots of die cutting and a bit of punching involved to get all the pieces you need and then it's an assembly job finished with a bit of embellishing.  The card fits into a 5 14" square envelope.  I used Nestabilities dies for my circles, a square Nestie die for the hat - trimmed down a bit and the top corners rounded - and a Labels Trio die for the hat brim.  The edges of the white circles were sponged with Baja Breeze ink.  I cut out a Pumpkin Pie triangle shape for the carrot nose, sponged the edges with Cajun Craze ink, used a 1/4" circle punch for the eyes and an 1/8" circle punch for the mouth bits.  I sponged Pretty in Pink ink to give him rosy cheeks, added white gel pen highlights to the eyes and popped the nose up.   I stamped 3 buttons using a stamp from the SU! Button Button set onto Real Red CS, punched them out with a 1/2" circle punch and they went on the middle circle.  For the bottom circle I stamped snowflakes in Baja Breeze ink and the lovely 'Snowflakes are snowmen waiting to happen!' sentiment.   I added some gingham ribbon to the hat and taped a loop of silver cord behind so that the card can be hung up.  I saved the piece of black CS when I trimmed the square to make the hat, I rounded the corners of the piece and glued it to the back of the hat to cover up the taped loop so the back looks nice and neat.

Here he is telescoped up.  We're having to have some work done to our house at the moment so we've got various workmen around and about.  The head builder popped in for a chat and a cup of tea just as I had placed this card on the table ready to take this photo.  I handed him his mug of tea and he promptly placed it on my card 'cos he thought it was a coaster - he didn't have his glasses on!  Luckily, the mug was drip free so no damage done! 


This photo shows him opened out. 


There's a video tutorial here on Barb's blog if you'd like to see how to put a telescoping card together.  The wonderful idea for the telescoping snowman card came from a card I saw on Becky's Inking Idaho blog  post here if you'd like to check that out.

Supplies for trees reflection card:
Stamps: SU! Lovely as a Tree & Four the Holidays sets
CS: PaperMania square white card blank, SU! Always Artichoke & Whisper White, acetate
Ink: Black StazOn, SU! Bashful Blue, Not Quite Navy, Night of Navy, River Rock & Always Artichoke
Tools: brayer, 1" circle punch, Stamp-a-ma-jig, sponges & sponge daubers


Supplies for telescoping snowman card:
Stamps: SU! Button, Button set, Butterfly Kisses 'Frosty' clear set, PSX 'Snowflake Medley'
CS: SU! Basic Black, Whisper White, Pumpkin Pie & Real Red
Ink: Memento Tuxedo Black, SU! Baja Breeze, Pretty in Pink, & Cajun Craze, white gel pen
Tools: Plain & scalloped circle Nestabilities dies, square Nestability die, Spellbinder's Labels Trio die, corner rounder punch, 1/8", 1/4" & 1/2" circle punches, paper piercer, sponge daubers
Embellishments & accessories: silver brads, red gingham ribbon, silver cord, 3d foam pads


Photobucket


Saturday, 28 July 2012

Telescoping Circles Snowman Card - 52 {C}CT July Embellishment Challenge

This week at the 52 {C}CT blog we have an embellishment challenge for you and the embellishment is brads.


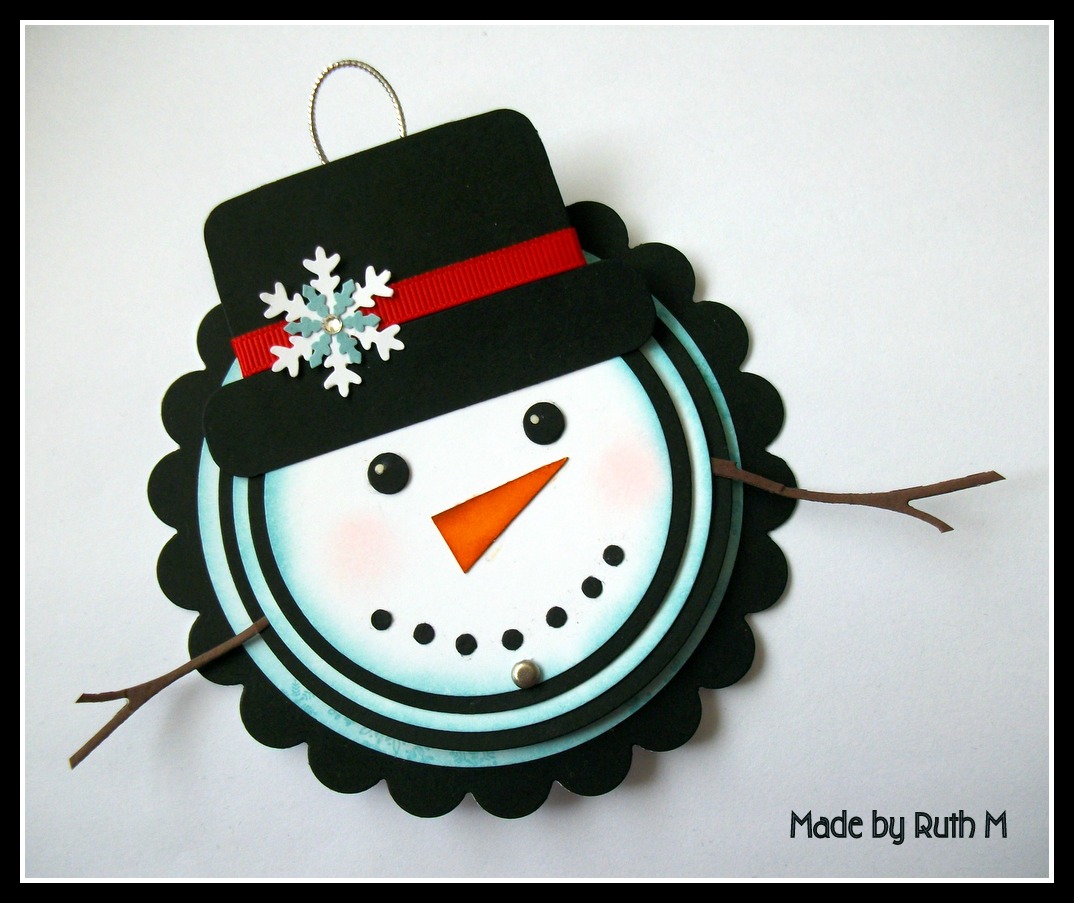
 I chose to make a telescoping circles card because brads are important to the 'mechanics' of this style of card - plus a snowman telescoping snowman card is just so much fun to make!  I also incorporated a decorative brad - the snowflake on his hat is a ribbon brad.

Barb Mullikin has a video tutorial for a telescoping circles card on this post if you'd like to check that out.  The fab snowman idea came from Becky Roberts at her Inking Idaho blog and her written tutorial can be found here on this post.  I made this card for my hubby last Christmas and I've kept to the same design more or less - although I haven't bothered with the twiggy arms this time, they're a tad too spindly and delicate!

I've used plain and scalloped Nestability dies for the snowman circles.  The hat was made using a square Nestie die shape (I trimmed it to a rectangle and rounded the top corners) plus a Spellbinder's Labels Trio die for the brim.  The nose was snipped from an SU! Petite Pennants punched shape.  The eyes are 1/4" circles and the smile was made with a handheld 1/16" circle punch.  The buttons (from the SU! Button, Button set) were punched with an 1/2" circle punch. I sponged each white circle with Bashful Blue ink and sponged rosy cheeks on the face.  I used turquoise gingham ribbon threaded through a ribbon brad to dress up his hat and to make a ribbon pull.  I added a knot of ribbon to the snowflake brad, popped up the nose and stamped the snowflakes and sentiment on the bottom circle to finish off the front.

Here he is telescoped.

  
And here he is opened out.


I covered the brad prongs up at the back to make things neater - and it's also safer if the card is to be given to a little one!  I glued a white scalloped circle to the back of the black one and that's where I will write my message.  I stamped snowflakes and then the sentiment over the top and sponged the edges.


More snowflakes were stamped on the envelope flap, I added the charming 'Snowmen fall from heaven unassembled'  saying and sponged the edges of the flap to finish off.  I hope you'll play along with our brad challenge this week - don't forget to check out the fab cards from the other DT members!


Supplies:
Stamps: Hero Arts 'Think of Christmas',  PSX 'Snowflake Medley', Stampendous 'Heavenly Snowmen', SU! 'Button, Button' set, Hero Arts 'Very Merry Christmas' clear set
CS: SU! Basic Black, Whisper White, Pumpkin Pie & Tempting Turquoise
Ink: Memento Tuxedo Black, SU! Bashful Blue, Pretty in Pink, & Cajun Craze, white gel pen
Tools: Plain & scalloped circle Nestabilities dies, square Nestability die, Spellbinder's Labels Trio die, SU! Petite Pennants punch, corner rounder punch, 1/16", 1/4" & 1/2" circle punches, paper piercer, sponge daubers
Embellishments & accessories: silver brads, turquoise gingham ribbon, Woodware snowflake ribbon brad, 3d foam pads


Photobucket

Friday, 23 December 2011

Telescoping Circles Snowman Card

I saw a fab telescoping circles snowman card on this blog post a while ago and knew I wanted to make one myself but then it slipped out of my mind.  Well, after I'd written out and posted or delivered all my cards I came across this card again in my faves folder and was disappointed that I hadn't got round to making one this year.  However, I always leave my hubby's Christmas card 'til last and I hadn't made it yet so I decided he would get a telescoping circles snowman card!

I used circle Nestie dies for the snowman, a square Nestie die for the hat - trimmed and top corners rounded, a Labels Trio die for the hat brim, a trimmed Petite Pennant shape for the nose and small circle punches for the eyes and mouth.  This photo shows him telescoped up ready to be popped into the envelope.


This photo shows him open ready to be hung up.  I sponged each white circle with Baja Breeze ink, added some Pretty in Pink sponging to give him rosy cheeks and I sponged the edges of the nose with Cajun Craze ink.  For his twiggy arms, I used a Marianne die cut, trimmed the shapes and glued them behind the white circle before gluing that down to the black circle.  I added ribbon and punched snowflakes with a rhinestone to dress up his hat.  I gave him red buttons and stamped the bottom circle with snowflakes and the sweet "snowmen fall from heaven unassembled" sentiment.  I formed a loop out of silver cord, punched two 3/4" black circles, sandwiched the cord between the circles and glued it to the back of the hat so we could hang the card up for display.  Alternatively, you could add some magnet tape to the back for another display option.


I glued a white scalloped circle behind the black one so I could stamp a sentiment and write my message there.


Of course, I had to stamp the envelope!  I also added some snowflakes punched from brushed silver CS to finish off.  I had so much fun putting this card together!  It certainly isn't the most sophisticated card I've made for Owen, I did think it was probably more suited to a child than a grown man - but I love it anyway and so does Owen!


Supplies:
Stamps: Stampendous 'Heavenly Snowmen', PSX Snowflake Medley, SU! Button Button, Four Frames & Best Yet sets
CS: SU! Basic Black, Whisper White, Riding Hood Red & Pumpkin Pie
Ink: SU! Baja Breeze, Cajun Craze & Pretty in Pink, Memento Tuxedo Black, white gel pen
Tools: Circle & square Nestabilities dies, Spellbinder's Labels Trio die, Marianne garden branch die, SU!  Petite Pennants punch, small circle punches, Woodware snowflake punches, Crop-A-Dile Corner Chomper, paper piercer, sponge daubers
Embellishments & accessories: SU! Real Red grosgrain ribbon, rhinestone,  brads


Photobucket

Thursday, 11 August 2011

Flower Fancy Telescoping Circles Thank You Card

I saw a telescoping circles card a while ago and made a mental note to try one out.   They're great fun and easy to put together too!  If you'd like to have a go there is a video tutorial here on Barb's blog.  I wanted to send a thank you card to Sharon, the sweet lady that let me use her USA address for some eBay.com purchases.  I used one of my eBay sets, Flower Fancy, and got to work with circles to make a telescoping card for Sharon.  I chose a cheery colour combo of Melon Mambo, Pink Pirouette and Wild Wasabi. 

Here's the telescoping circles card closed.


Here's circle 2 revealed.


And here's the card fully opened out.  The third circle is where I wrote my message.


I then stamped some flowers and leaves on the front of the envelope.  I do love two-step stamping sets and this Flower Fancy set is definitely a fave!


Supplies:
Stamps: SU! Flower Fancy set, sentiment from Stampendous Agapanthus Thank You clear set
CS: SU! Melon Mambo, Pink Pirouette, Wild Wasabi & Whisper White
Ink: SU! Early Espresso, Pink Pirouette, Melon Mambo & Wild Wasabi
Tools: Scalloped & plain circles Nestabilities dies, Stamp-A-Ma-Jig, sponge daubers
Embellishments & accessories: brads, pale pink ruffled ribbon, SU! Dazzling Diamonds


Photobucket
01 09 10