Wednesday 27 February 2019

Tropical Thank You Gatefold Card

Sharon Armstrong at Tx Stampin' Sharon created a lovely batch of thank you cards featuring the SU! Painted Seasons bundle (a Sale-A-Bration item).  The Painted Seasons stamp set and the matching DSP have designs for all four seasons of the year so Sharon made a batch of four seasonal thank you cards.  Here is Sharon's blog post which includes a link to a YouTube video.  I loved the use of patterned paper and the fancy fold.  Whilst I've just received my own Painted Seasons bundle I decided to CASE Sharon's cards using stamps, dies and patterned paper from the SU! 'Tropical Escape' suite of products.  The fab card design will work so well with any patterned papers - and I definitely have a lot that need using up!

Here's the card and envelope together.


Here's the card.  I've used a colour combo of Granny Apple Green, Shaded Spruce, Melon Mambo and Whisper White.  When stamping the images I used a mix of first, second and third generation stamping to get a variety of colours for the leaves and flowers.  I've popped the three flowers up on Dimensionals.


Here's the inside of the card.  The darker pink flower is popped up.


Here's the envelope.  I was determined to use the leafy background die from the 'Tropical' Thinlits die set as I so wanted to see how it turned out!  I ran the die through my Big Shot, trimmed the piece to size, cut a piece of the patterned paper a smidge smaller than my die cut piece and glued them together.  I thought it looked nice in the corner of the envelope but I wanted to add something else to bring in some Melon Mambo.  I made a flagged banner and added a die cut label shape which is where I'll write the card recipients name.  This card is going to a friend and customer who also purchased the Tropical Chic stamps and dies.  I do hope she likes her new goodies and gets some inspiration for using them from the card I made!  Huge thanks to Sharon for sharing her project and for inspiring me!

Supplies:
Stamps: SU! 'Tropical Chic' set
CS: SU! Granny Apple Green, Shaded Spruce, Melon Mambo & Whisper White

Patterned paper: SU! 'Tropical Escape' 6"x6" DSP pack
Ink: SU! Granny Apple Green, Shaded Spruce & Melon Mambo
Tools: SU! 'Tropical' & 'Petals & More' Thinlits die sets, SU! 'Banner Triple' punch
Embellishments & accessories: SU! Dimensionals

Ruth


Sunday 24 February 2019

Monochrome Dandelion Happy Birthday Card

The SU! 'Dandelion Wishes' stamp set is so pretty and it's been sitting in my craft room waiting to get inked up for a few weeks now.  I took a look at Pinterest to get some inspiration and found this card made by Becky at Scrappin' and Stampin' in GJ that really attracted my attention.

It looked simple but stunning, quick to make and I love the black and white monochrome look.  I CASEd Becky's card and here's my version.  My card measures 5 1/2" square.  I stamped in VersaFine Onyx Black ink, added clear embossing powder over the top and heat set with my heat tool.  After I'd adhered my three white strips I popped up the black mat layer.  You can't tell from the photo but there's a lovely shimmer on the dandelion seed heads as I went over them with my clear Wink of Stella pen.


Simple stamping on the inside of the card and on the envelope flap to finish off.  What a lovely sentiment and a beautiful font!


Supplies:
Stamps: SU! 'Dandelion Wishes' set, Hobby Art 'Happy Birthday'
CS: SU! Basic Black & Whisper White (thick)
Ink: VersaFine Onyx Black

Tools: heat tool
Embellishments & accessories: SU! clear embossing powder, clear Wink of Stella pen, SU! Dimensionals

Ruth


Friday 22 February 2019

Mug with Tea Bags Cello Bag Gift & Tag

If I have time I like to make a little something to place in the Slimming World Slimmer of the Week basket - it's nicer than a tin of baked beans or a banana I think!  I found a really pretty watercolour floral mug in a charity shop and I bought it home and filled it with a selection of Twinings tea bags.

I placed the mug in a cello bag, added some ribbon and a tag - job done, a pretty addition to the basket!


Here's a closer look at the tag.  I used my MFT 'Blueprints 14' die set, some MFT watercolour patterned paper and the Waltzingmouse Stamps 'Say It With Style' sentiments stamp set - such a gorgeous font!  The ribbon is Polka Dot Tulle from SU!  I popped the flower and the flower centre up on foam Dimensionals.  The lady that won the basket of goodies was very happy and appreciative which was lovely!


Supplies:
Stamps: Waltzingmouse Stamps 'Say It With Style' set
CS: SU! Whisper White (thick)

Patterned paper: MFT 'Watercolor Wash' 6" x 6" paper pad
Ink: Memento Grape Jelly
Tools: MFT 'Blueprints 14' die set, Crop-A-Dile
Embellishments & accessories: SU! white Polka Dot Tulle ribbon, Dimensionals

Ruth

Wednesday 20 February 2019

Blue Butterflies Birthday Card - #RRCB104

Tic tac toe challenges are really fun and that's what this week's Retro Rubber Challenge has given us.


I've chosen the first vertical line of butterflies, stripes and blue - and I opted to include the middle square of birthday also.  The Hero Arts 'Antique Flowers & Butterflies' stamps and dies combo set plus some other Hero Arts stuff that have been in my stash for about eight years got an outing for this card.  I am working on a craft room destash as I know I have too much craft stuff but these products definitely ain't leaving my stash any time soon! 

I stamped the striped background in SU! Balmy Blue ink and the butterflies and sentiment were stamped in SU! Night of Navy ink.  I added some Balmy Blue ink to the die cut butterflies and edged them with Night of Navy ink using sponge daubers.  The Balmy Blue sentiment label is popped up - I meant to add two rhinestones to the label but I forgot before I took the photo, I will definitely add the sparkle to the label later on!  I folded the butterfly wings up, glued the bodies flat to the card but placed half a Dimensional foam pad under each wing with the backing paper left on so that the wings stay popped up.


I used the 'Canvas Stripes' background stamp again but this time I stamped off once to get a paler colour, I stamped the sentiment in Night of Navy ink and cut out the sentiment using a rectangle die.  I glued a strip of Night of Navy CS to the left hand side of the inside of the card, glued the sentiment in place and added a small butterfly.  A large stamped and die cut butterfly was added to the envelope flap to finish off.


So, so happy to have spent some time in my craft room today, that's what a day off from work is all about!  I have the next few days off as well so hoping to get inky again soon!  Many thanks to the folks at the Retro Rubber Challenge blog, it's wonderful that they give us the opportunities to use our older stamps, it's exciting to get new supplies but it's lovely to use my oldies but goodies!

Supplies:
Stamps: Hero Arts 'Antique Flowers & Butterflies' stamps & dies combo set, Hero Arts 'Canvas Stripes' background stamp, Hero Arts 'Sending You Love' & 'Yummy Treats' sentiments sets
CS: SU! Night of Navy & Whisper White (thick and regular)
Ink: SU! Balmy Blue & Night of Navy
Tools: butterfly dies from Hero Arts 'Antique Flowers & Butterflies' stamps & dies combo set, Hero Arts 'Small Tag Frame' die set, Marianne Design 'Basic Stitch Passepartout Rectangle' die set, sponge daubers
Embellishments & accessories: SU! Dimensionals

Ruth

Wednesday 13 February 2019

February 2019 Card Group Projects

Last Thursday we got together for our first card group meeting of 2019.  It was a very happy afternoon and it was so nice to welcome Mo back to the group and so lovely to see Pam after her recent illness.

We've made reflection technique cards at card group before here and here.  The end result is always stunning but it's fair to say it's time consuming and can get a bit fraught if things go awry!  How we did it was to stamp a row of trees on the panel, stamp the row of trees using black StazOn onto a piece of acetate, flip the acetate over so the image is upside down, position it carefully underneath the trees previously stamped on the panel and then use a brayer to transfer the ink from the acetate to the panel.  The ink comes out paler so looks like a reflection.  We then used punched circle masks for moons and sponged inks onto the scene.

I asked the ladies if they remembered the reflection technique and a lot of them remembered and also remembered that it could get tricky!  Then I said we were making a reflection card so they needed to concentrate and keep their wits about them as they knew things could go pear shaped.  My ladies soon discovered that I was just messing with them as the Inkylicious stamp I used for the card already has the reflection included as part of the image - ingenious!

I inked the panel with Distress Inks in Wild Honey, Faded Jeans and Dusty Concord using ink duster brushes and stamped the pines image in Black Soot Distress Ink.  I layered the panel on a black CS mat and stamped the sentiment underneath - very simple, and not at all fraught!  This card is a nice gender neutral or masculine design.


Just simple stamping on the inside and the envelope flap. 


The second card features attractive die cut leaves and some great texture through the use of a  woodgrain embossed panel.  The colour combo is SU! Soft Seafoam, Granny Apple Green and Very Vanilla.  I spritzed the Very Vanilla panel with water before embossing with the 'Woodgrain' folder.  I stamped the sentiment after I'd die cut the flagged banner.  I found a pack of pretty shell buttons in my stash that I've been hoarding for years and I decided it was time to actually use them!  I threaded some Old Olive Linen Thread through the buttonholes and attached the button with a glue dot.


Here's the inside of the card and the envelope.


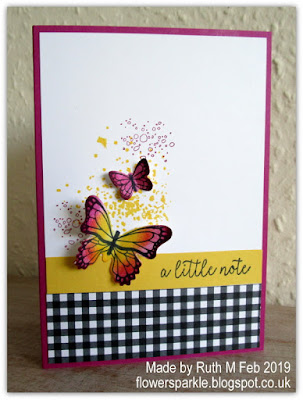
Card three uses the new SU! 'Butterfly Gala' stamp set and the matching 'Butterfly Duet' punch.  I saw this fab video made by Patty Bennett in which she showed how to add colour to the butterflies with sponge daubers - so easy and effective!  I used SU! Daffodil Delight and Berry Burst inks, using both inks to colour the large butterfly and just Berry Burst ink to colour the small butterfly.  After gluing the gingham paper and the Daffodil Delight sentiment strip to the white panel I stamped two images from the SU! 'Artisan Textures' stamp set a couple of times and then adhered the punched butterflies in place - making sure to fold the wings up for some dimension.


Here's the inside of the card and the envelope.  I'd kept the piece of CS that I'd punched out the stamped butterflies from to one side and then I used that as a mask so I could add colour to the small butterflies on the black and white patterned paper strip for the front of the envelope.  I just held the mask in place and added colour to the butterflies by gently dabbing the daubers. 


Supplies for reflected trees card:
Stamps: Inkylicious 'Reflections - Blue Hills Pine' set, Personal Impressions 'Medium Everyday Messages' set , Stampendous 'Sending Wishes' stamp

CS: SU! Basic Black & Whisper White (thick & regular)
Ink: Ranger Tim Holtz Wild Honey, Faded Jeans, Dusty Concord & Black Soot Distress Inks
Tools: Inkylicious ink duster brushes


Supplies for leafy friend card:
Stamps: SU! 'Flourishing Phrases' & 'Needle & Thread' sets
CS: SU! Soft Seafoam, Granny Apple Green  & Very Vanilla
Ink: SU! Granny Apple Green
Tools: SU! 'Woodgrain' embossing folder, SU! 'Flourish' Thinlits & 'Stitched Shapes' Framelits die sets, MFT 'Fishtail Flags Stax' die set
Embellishments & accessories: SU! Old Olive Linen Thread, Papermania shell buttons, water spritzer bottle


Supplies for butterflies a little note card:
Stamps: SU! 'Butterfly Gala' & 'Artisan Textures' sets
CS: SU! Berry Burst, Daffodil Delight  & Whisper White

Patterned paper: SU! 'Botanical Butterfly' DSP pack
Ink: SU! Berry Burst & Daffodil Delight,  Memento Tuxedo Black
Tools: SU! 'Butterfly Duet' punch

Ruth

Sunday 3 February 2019

Inked Circles Oriental Just A Note Card

My ink duster brushes haven't been used in a while and I decided to use them on a card for our next card group meeting.  So I got out a few brushes, some Distress Ink pads and my sadly neglected Inkylicious Mountain Valley Sun Moon stencil set and had a play.

I dusted Wild Honey, Picked Raspberry and Dusty Concord inks through the stencil to get my overlapping circle design, stamped the bamboo image over the top and stamped the sentiment using Black Soot Distress Ink.  I tore the right hand edge to add a bit of interest and glued the panel to the front of a black A6 sized card base.


The Inkylicious 'Oriental Awakening' stamp set includes a gorgeous Japanese maple image and I stamped that on the panel inside the card and on the envelope flap.


Whilst I was deciding which supplies to use for the card I came across the Inkylicious 'Reflections - Blue Hills Pine' stamp set in my stash and I realised I'd never used it.  I immediately rectified that and it will be that card I made that will be a February card group project.  Card making is a wonderful hobby with so many techniques, it's lovely that we have so many choices to create our card designs!

Supplies:
Stamps: Inkylicious 'Oriental Awakening' set, SU! 'Flourishing Phrases' set
CS: SU! Basic Black & Whisper White
Ink: Ranger Tim Holtz Wild Honey, Picked Raspberry, Dusty Concord  & Black Soot Distress Inks
Tools: Inkylicious Mountain Valley Sun Moon stencil set

Ruth
01 09 10