Tuesday 27 June 2017

Fluttering Butterfly Thanks Card

The SU! 'You Move Me' bundle became a 'must have' item for me after I saw it used during an OnStage presentation video.  It's so unusual, such a clever design and just fascinating to see the wings of the butterfly and hummingbird flutter!  SU! have a 'You Move Me' Bundle video on YouTube if you'd like to check that out.  The first project that Brandy shows in the video also uses the 'Mini Treat Bag' Thinlits die set and I loved how that made a great pocket for the card to slip into, so, of course, I had to add that to my order too!

My box of new SU! goodies arrived just as I was heading out the door to go to a meeting at work.  As soon as I returned home I unpacked the box, sorted out my customer orders and then hotfooted it to my craft room to play with the 'You Move Me' bundle and the 'Mini Treat Bag' dies.  I knew I wanted to make a thank you card using some of the new In Colors and this is what I came up with.


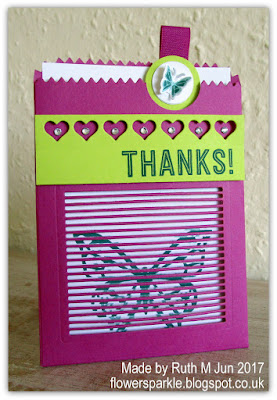
Here is the card and the Mini Treat Bag 'pocket'.  I die cut a partial circle from the pocket and added a pull tab circle element to the card so that the card would be easy for the recipient to pull out.


Here's a closer look at the pull tab - how sweet is that stamped and die cut butterfly?!


This is the back of the card where I chose to write my message.


What a fab, fun project - and I'm happy to say it was well received!

Supplies:
Stamps: SU! 'You Move Me'  set
CS: SU! Berry Burst, Lemon Lime Twist, & Whisper White

Patterned paper: SU! 'Fresh Florals' DSP
Ink: SU! Tranquil Tide
Tools: SU! 'Move Me' & 'Mini Treat Bag' Thinlits dies, Nestabilities circle die, circle punches
Embellishments & accessories: SU! Berry Burst Finely Woven Ribbon, rhinestone jewels, Dimensionals

Ruth


Saturday 24 June 2017

Marbled Background & Floral Sprig Happy Birthday Card - #mixitupmonday

Helen has chosen a fab colour combo for this week's Mix It Up Monday challenge.  I do love brights and black together!


When I went to my craft room to create a card I knew I'd have to use my new SU! 'Marbled' background stamp as I've been wanting to ink it up for a while.  So this card started with the Tempting Turquoise tone on tone panel and the design progressed from there.  I made a 5 3/4" square card base using Whisper White thick CS.  I've used the SU! 'Number of Years' set for the main image panel - I love the pretty floral images!  I popped up the stamped and die cut 'Birthday' banner.  I used the smallest 'Layering Squares' die to cut two squares, one from Berry Burst CS and one from Lemon Lime Twist CS, I cut the two squares in half and adhered the triangle shapes to the image panel.  To finish the front I sprinkled on a few rhinestone jewels.


More pretty floral stamping decorates the inside of the card and the envelope flap.  Creating this card allowed me some lovely, much needed, crafty 'me time' which I enjoyed immensely!  


Supplies:
Stamps: SU! 'Marbled' background stamp, SU! 'Number of Years' & 'Birthday Blossoms' sets
CS: SU! Tempting Turquoise, Berry Burst, Lemon Lime Twist, Basic Black & Whisper White (regular & thick)
Ink: SU! Tempting Turquoise, Berry Burst & Lemon Lime Twist, VersaFine Onyx Black
Tools: SU! 'Large Number' & 'Layering Squares'  Framelits die sets
Embellishments & accessories: SU! Berry Burst Finely Woven Ribbon, Rhinestone Jewels, Dimensionals

Ruth


Wednesday 21 June 2017

Floral Congrats Card

Here is a card I made for someone who has just been promoted - and the someone loves pink so I took the opportunity to use the new 'Powder Pink' In Color!  I paired the Powder Pink with Night of Navy for a strong contrast.  I was very happy to get to use the gorgeous 'Congrats' sentiment from the SU! 'Double Take' set, I love the shadow effect!  I shaped the flowers and popped them up.  I added three teeny tiny Night of Navy punched butterflies and sprinkled on some rhinestone jewels to complete the card front.


Here's the inside of the card.


I made an envelope with some Powder Pink paper from the 'Fresh Florals' DSP stack and popped up a die cut name label.


Supplies:
Stamps: SU! 'Flower Shop', 'Petite Petals' & 'Double Take' sets, magazine freebie 'Sincere Sentiments' set
CS: SU! Powder Pink, Night of Navy & Whisper White

Patterned paper: SU! 'Fresh Florals' DSP stack
Ink: SU! Powder Pink & Night of Navy
Tools: SU! 'Pansy' & 'Petite Petals' punches, Martha Stewart butterfly punch, Envelope Punch Board, Stamp-A-Ma-Jig, Memory Box 'Bistro Label' & 'Chadwick Label' dies
Embellishments & accessories: SU! rhinestone jewels, Dimensionals

Ruth

Sunday 18 June 2017

Upsy Daisy For You Card

The new SU! daisy products I got recently reminded me that I had an old, long retired SU! stamp set called 'Upsy Daisy' in my stash.  I got it ages ago from ebay, hadn't used it and I'd made a mental note to get inky with it soon.  I was in desperate need of some crafty therapy after a particularly trying day so I retreated to my craft room and made a nice, easy card using my long neglected daisy stamp.  I used a simple layout, a simple colour combo of Old Olive and Daffodil Delight and just enjoyed creating.

I stamped the row of daisies twice in Old Olive ink - once full strength and then again without re-inking.  I trimmed my white panel to size, added the panel and the patterned paper to a mat layer of Daffodil Delight CS, added the ribbon and glued the whole panel to the front of an A6 sized Old Olive card base.  I stamped the sentiment and added three Daffodil Delight Candy Dots to finish the front.


I really love the yellow and green large daisy paper in the 'Delightful Daisy' DSP pack but thought the pattern was too large and overpowering to be used on the card front.  Instead, I opted to use it to decorate the envelope flap and after trimming off the excess triangular pieces of paper I wondered if I could use one of the pieces to decorate the inside of the card.  I had a bit of a play and decided to go for it!  Here's the inside and envelope.


Supplies:
Stamps: SU! 'Upsy Daisy' & 'Blooms & Wishes' sets
CS: SU! Old Olive, Daffodil Delight & Whisper White

Patterned paper: SU! 'Delightful Daisy' DSP
Ink: SU! Old Olive
Embellishments & accessories: SU! Daffodil Delight ribbon, Daffodil Delight Candy Dots

Ruth

Friday 16 June 2017

Eclectic Happy Birthday Card - #mixitupmonday

I left work at lunchtime today which meant I had some time to craft.  I managed to play with this week's Mix It Up Monday colour combo from Helen's All Things Stampy blog again this week so I'm popping in to share my card.  I did find this one a bit of a challenge but I got there in the end!


I used Fresh Fig ink (stamped off once) to create the Burlap background and I stamped the sentiment in full strength Fresh Fig ink.  I stamped and die cut the flower and leaves and added a bit more So Saffron ink to the flower using a sponge dauber.  I added Fresh Fig patterned paper and a Tranquil Tide strip and I cut a Tranquil Tide mat layer.  I adhered the panels on the wonk and popped up the flower.  I used the 'Beautiful Wings' Embosslits die to cut two Fresh Fig butterflies - I know this die is long retired but it's not leaving my stash any time soon!  I rounded two corners of the card and added rhinestone jewels to the butterflies to finish the front.


Here's the inside and the envelope with more of the Fresh Fig patterned paper plus a favourite oldie but goodie retired sentiment stamp.  


Supplies:
Stamps: SU! 'Oh So Eclectic' & 'Blooming With Kindness' sets, 'Burlap' & 'Stylized Birthday'
CS: SU! So Saffron, Fresh Fig, Tranquil Tide & Whisper White

Patterned paper: SU! 'Fresh Florals' DSP stack
Ink: SU! So Saffron, Fresh Fig & Tranquil Tide
Tools: SU! 'Eclectic Layers' Thinlits dies, 'Beautiful Wings' Embosslits die, Crop-A-Dile Corner Chomper, sponge dauber
Embellishments & accessories: SU! rhinestone jewels, Dimensionals

Ruth


Garden In Bloom Joy Fold Birthday Card & Gift Card Envelope

My good friend Jan celebrated her birthday last Tuesday and this is the card and gift card envelope I made for her.  I tried a new fun fold called a Joy Fold - well, it's new to me anyway, the idea has been around for years and I've always wanted to make one, I honestly don't know why it's taken me so long!

I chose to work with the pretty SU! 'Garden in Bloom' stamp set and papers from the 'English Garden' pack of DSP.  Here is the card together with the envelope.


The card base was made with Early Espresso and Old Olive CS.  I used Blushing Bride, Rose Red, Old Olive, Daffodil Delight and Early Espresso inks.  I stamped the leaves onto the white panel but stamped the flowers separately, fussy cut them and popped them up.  I used a clear Wink of Stella pen to add a touch of shimmer to the bee's wings and I popped up the bee circle element.  Here's the card on its own - the corner of the Old Olive panel tucks behind the popped up bee circle to keep the card closed.


Here's the card open.  


Here's a closer look at the sentiment panel inside.


Here's the envelope - I couldn't resist putting a cute bee on the flap!  


One of the birthday gifts I gave to Jan was a gift card and I decided to make an envelope for it.  When you use the Envelope Punch Board with a diagonal striped paper you get an envelope with straight stripes!  I added die cut grosgrain ribbon strips and popped up a die cut name label.


I popped up a pretty flower on the back of the envelope to finish.  A very happy project to make!


Supplies:
Stamps: SU! 'Garden in Bloom' set
CS: SU! Early Espresso, Old Olive, Blushing Bride, Rose Red & Whisper White

Patterned paper: SU! 'English Garden' DSP
Ink: SU! Early Espresso, Old Olive, Blushing Bride & Rose Red
Tools: SU! Envelope Punch Board, 'Lots of Labels' & 'Stitched Shapes' Framelits die sets, Memory Box 'Grosgrain Ribbons' die set, circle punches
Embellishments & accessories: SU! rhinestone jewels, Dimensionals

Ruth

Wednesday 14 June 2017

Lift Me Up Set Of Birthday Cards & Pen - CRUK Tombola Prize

Wilko are keen to do their bit to support various charities which I think is brilliant.  Each Wilko store supports a different charity each year and the Burgess Hill store where I work is now supporting Cancer Research U.K.  I'm always very happy to get involved with charity fundraising, but I'm especially happy if it's for Cancer Research U.K. as that's a cause very close to my heart.   I'm sure everyone has a family member or friend that has been affected by this dreadful disease.  My hubby Owen had a cancerous brain tumour many years ago which was successfully operated on and treated and we are both so, so grateful for that and we have supported this charity ever since.

Our fundraising weekend at Wilko Burgess Hill consisted of a cake sale, tombola, static bike ride and a guess the number of sweeties in a jar competition.  My friend Eileen and I were outside the store selling the cakes, tombola tickets and competition entries.  We also took our turns on the static bike and cheered everyone else on while they were having a turn.  It was great fun and we raised a lot more than our target so we were absolutely delighted!

Owen and I baked a few goodies to sell and I also donated a few prizes for the tombola.  For one of the tombola prizes I decided to make a set of six birthday cards - based on this set of cards I made earlier in the year.  As I was rather pushed for time I simplified the design for this set of cards and I opted for a portrait orientation rather than landscape this time, just to make a bit of a change.  Here are all 6 of the cards.


Here is a closer look at the front of just one of the birthday cards.


This pic shows how I decorated each card inside and each envelope.  I used the same colour on the insides and envelopes to match whichever colour hot air balloon was on the card front. 


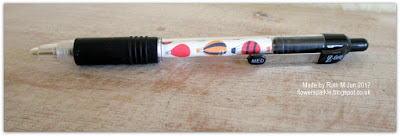
 After finishing the cards I thought it would be fun to gussy up a pen to go with the cards.  It was a bit of a faff getting the rolled up paper into the barrel but I got there in the end!


Here are the cards and pen in the cellophane bag all ready to go.


Here's a closer look at the tag I tied to the top of the bag.


A very satisfying project, I enjoyed making this immensely!

Supplies:
Stamps: SU! 'Lift Me Up' set
CS: SU! Night of Navy, Peekaboo Peach, Watermelon Wonder & Whisper White
Ink: SU! Mint Macaron, Night of Navy, Peekaboo Peach & Watermelon Wonder

Patterned paper: SU! 'Carried Away' DSP
Tools: SU! 'Up & Away' Thinlits die set, 'Stitched Shapes' & 'Layering Squares' Framelits die sets, Sizzix ' Rounded Tags' Framelits die set
Embellishments & accessories: SU! Mint Macaron sheer linen ribbon, Dimensionals

Ruth

Monday 12 June 2017

Water Drops & Dragonfly Friend Card

This lovely card made by Cathy Roffey that I saw on Pinterest recently sparked my interest.  It also reminded me that I had bought the Inkylicious 'Water Rain Drops' stamp set ages ago and it was sitting in my stash, neglected and unused.  This going to work malarkey interferes terribly with my crafting opportunities!

I was determined to CASE Cathy's card so the first chance I got to spend time in my craft room I dug out the stamp set and enjoyed playing.  I created the background by applying Broken China and Peeled Paint Distress Inks to a panel of white CS using ink duster brushes.  I then stamped the water drops image twice using Memento Tuxedo Black ink.  I added white highlights to the drops with Picket Fence Distress Paint applied with a small paintbrush.  I die cut the dragonfly twice - once from SU! Basic Black CS and again using vellum CS, layered the two shapes together, glued the dragonfly in place and added some pale green gems to the body.  I stamped and die cut the sentiment label, popped it up and added a couple more pale green gems.


Here's a closer look.


Some simple stamping inside and on the envelope flap completed my card.  I'm very happy I finally inked up a stamp from the beautiful Inkylicious 'Water Rain Drops' set! 


Supplies:
Stamps: Inkylicious 'Water Rain Drops' set, SU! 'Awesomely Artistic' & 'Flourishing Phrases' sets
CS: SU! Basic Black & Whisper White (regular & thick), vellum
Ink: Memento Tuxedo Black, Ranger Tim Holtz Broken China & Peeled Paint Distress Inks
Tools: SU! 'Detailed Dragonfly' Thinlits & 'Project Life Cards & Labels' Framelits die sets
Embellishments & accessories: PaperMania gems 

Ruth

Friday 9 June 2017

Bright Floral Sending Wishes Card - #mixitupmonday

As I mentioned in yesterday's post, Helen Read at All Things Stampy has a brilliant collection of 50 SU! In Color colour combos.  Helen is planning to use each of her colour combos and is running a weekly Mix It Up Monday challenge that folks can play along with.  I was struck by the bright and cheery combo Helen has chosen for this week - even though it uses orange which is not a fave of mine! - and I made a card this afternoon.


A good friend at Wilko, Nicola, recently announced she has a new job so she will be leaving in a few weeks.  I love Nicola to bits and will miss her SO much, she is so bright and bubbly, a real fun person.  You can guarantee if us two are together there's a lot of laughter and quite often some mischief going on!  This bright cheery colour combo was perfect to use to make a card for Nicola to wish her all the best in her new job.

I cut a panel of Whisper White CS, added a strip of Berry Burst 'Fresh Florals' DSP and layered the panel onto a Lemon Lime Twist mat.  I added some Pumpkin Pie grosgrain ribbon and adhered the whole panel to the front of an A6 sized Berry Burst card base.  I stamped pretty flowers and leaves using the SU! 'Garden In Bloom' two step stamping set.  I used Pumpkin Pie, Bermuda Bay, Berry Burst and Lemon Lime Twist inks, stamping off once first for the solid flowers and leaves but I stamped the outline images using full strength inks.  I stamped the sentiment in Bermuda Bay ink.  I fussy cut the flowers and leaves, popped up the flowers and added clear faceted gems to the flower centres.  


Here is the decorated inside of the card.


I had lots of fun trying to include all four colours on the envelope, it looked like Lemon Lime Twist wasn't going to feature until I spied the box of bitty bows on my desk!  The 'ribbon' is Pumpkin Pie CS cut using a Memory Box 'Grosgrain Ribbons' die.  I had to dig deep in the stash for the Pumpkin Pie CS, it is the original pack I first bought as a Stampin' Up! customer when SU! started selling in the UK many years ago - and I have most of the sheets left in the pack!  I usually need a nudge to use any orange in my projects, I'm never going to love it enough for orange to be a 'go to' colour for me, it will always be an 'OK in small doses' colour for me!   I really did enjoy this colour combo though - many thanks to Helen!


Supplies:
Stamps: SU! 'Garden in Bloom' & 'Butterfly Basics' sets
CS: SU! Berry Burst, Lemon Lime Twist, Pumpkin Pie & Whisper White

Patterned paper: SU! 'Fresh Florals' DSP
Ink: SU! Berry Burst, Lemon Lime Twist, Pumpkin Pie & Bermuda Bay
Tools: SU! 'Lots of Labels' & 'Stitched Shapes' Framelits die sets, Memory Box 'Grosgrain Ribbons' die set
Embellishments & accessories: SU! Pumpkin Pie grosgrain ribbon, clear faceted gems, Bermuda Bay Candy Dots, In Color Bitty Bows, Dimensionals

Ruth


Thursday 8 June 2017

June 2017 Card Group Projects

A week later than planned - it's been a busy and stressful week! - here are the three cards we made at our June card group meeting.  Making these cards gave me the opportunity to use all five of the new SU! 2017 - 2019 In Colors.  This selection is my favourite In Color collection so far, I've found some previous colours a bit too challenging for me!

For the first card I used Berry Burst ink to create a watercolour wash background.  I cut a square of watercolour paper, applied water to it with a paintbrush, patted the Berry Burst ink pad onto a ceramic tile, picked up the colour from the tile with a wet paintbrush and washed the colour over the watercolour paper square.  Once the square was dry I inked the edges with Berry Burst ink applied with a sponge dauber.  I made a 5 1/4" square card using Whisper White thick CS and added mat layers of Lemon Lime Twist and Island Indigo.  I adhered the Poppystamps 'Happy Birthday Floral Frame' die cut and sprinkled on a few rhinestone jewels to finish.


Here is the inside of the card and the envelope.  When I first saw the In Colors on line I wasn't sure I was going to like Lemon Lime Twist but as soon as I saw it 'in the flesh' I loved it, a really happy colour!  I added a strip of the 'Fresh Florals' Lemon Lime Twist DSP, stamped the sentiment in Berry Burst ink and added a simple punched flower to the envelope flap.


For card two I used a colour combo I found on Helen Read's All Things Stampy blog.  Helen has created the most fabulous collection of 50 SU! In Color colour combos which can be viewed on this blog post.  Wow, what an impressive resource, well done and huge thanks to Helen!  I chose the combo of Lemon Lime Twist, Island Indigo, Fresh Fig and Flirty Flamingo - plus I sneaked in a bit of Powder Pink too!

I made an A6 sized Fresh Fig card blank and added a strip of Whisper White CS that I'd stamped using my MFT 'Burlap' background stamp in Powder Pink ink.  I only bought this stamp recently and maybe I should have held off until the new SU! annual catalogue came out 'cos SU! now sell a burlap background stamp!  It is different though, the SU! stamp has the frayed edges as part of the design, so I won't feel at all bad about having two burlap background stamps in my stash!  I absolutely love how Lemon Lime Twist looks with Island Indigo and I'd used that combo for my mat layers on card one.  So the squares for this card were cut out from the mat layers of card one - nifty and frugal eh?!  I stamped two daisies in Flirty Flamingo ink, punched them out, offset them, added a Fresh Fig stamped and punched daisy centre and popped up the flower.  I punched some small Lemon Lime daisies, put small Island Indigo dots in the centres, shaped them and glued the cluster of three daisies in place.   


Here's the inside and the envelope.  A Fresh Fig stamped sentiment, a bit of Powder Pink stamped burlap and a line drawn with an Island Indigo marker decorates the inside.  A larger Lemon Lime and Island Indigo punched daisy adorns the envelope flap.


I need to have more crafty time to experiment with Tranquil Tide colour combos - and to visit Helen's colour combos for inspiration!  Tranquil Tide is the one I'm finding a tad tricky, I love it in monochrome or paired with Pool Party (or the recently retired Mint Macaron).  When I put Tranquil Tide against So Saffron though I was instantly smitten - I seem to have developed a love for So Saffron recently!  I rotated the layout I'd used for card two to a portrait orientation and used a rectangle focal image instead of a square one.  I adore the soft look you get with the images from the SU! 'Blooms and Wishes' stamp set when you use the stamping off - or second generation stamping - technique, you achieve a lovely water coloured effect.  I stamped three blooms and centres on the rectangular panel, stamped an extra one on a scrap piece of CS, fussy cut that one out and popped it up.  A simple design but a pretty result I like to think!


Here's a closer look at the pretty blooms.


Here's the inside and the envelope.


What a lovely, happy, relaxed afternoon it was - a perfect way to spend a day off from work!

Supplies for card one:
Stamps: Inkylicious 'Wonderful Day'
CS: SU! Lemon Lime Twist, Island Indigo, Whisper White thick, watercolour paper 

Patterned paper: SU! 'Fresh Florals' DSP stack
Ink: SU! Berry Burst
Tools: Poppystamps 'Happy Birthday Floral Frame' die, paintbrush, ceramic tile, sponge dauber
Embellishments & accessories: SU! rhinestone jewels


Supplies for card two:
Stamps: SU! 'Daisy Delight' & ''Butterfly Basics' sets, MFT 'Burlap' stamp
CS: SU! Fresh Fig, Lemon Lime Twist, Island Indigo & Whisper White
Ink: SU! Flirty Flamingo, Powder Pink, Island Indigo & Fresh Fig
Tools: SU! 'Layering Squares' Framelits die set, various size circle punches, Woodware daisy punches

Embellishments & accessories: SU! Dimensionals

Supplies for card three:
Stamps: SU! 'Blooms & Wishes' set
CS: SU! So Saffron, Tranquil Tide & Whisper White

Patterned paper: SU! 'Fresh Florals' DSP stack
Ink: SU! So Saffron & Tranquil Tide
Embellishments & accessories: SU! Dimensionals


Ruth

01 09 10