Sunday 31 October 2021

Snowflakes Tag 'Tis The Season Card

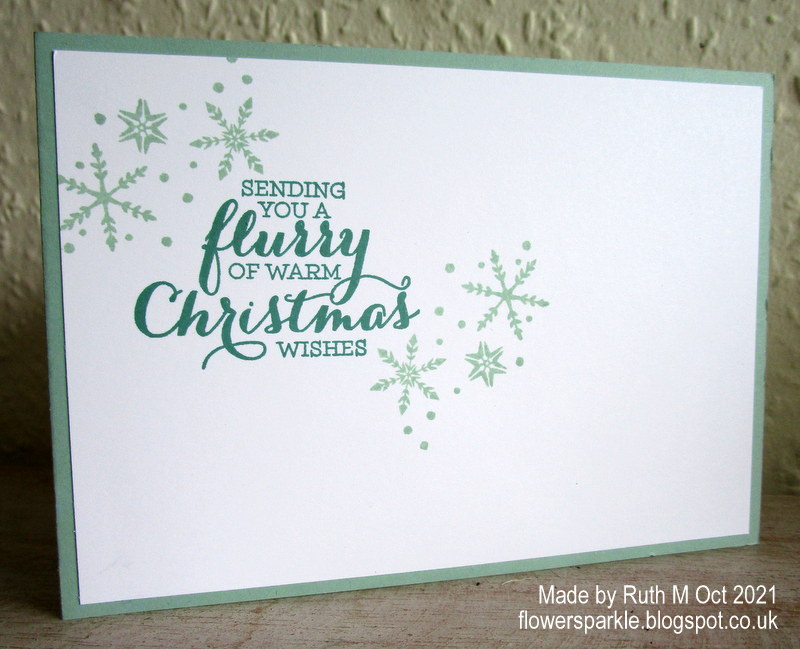
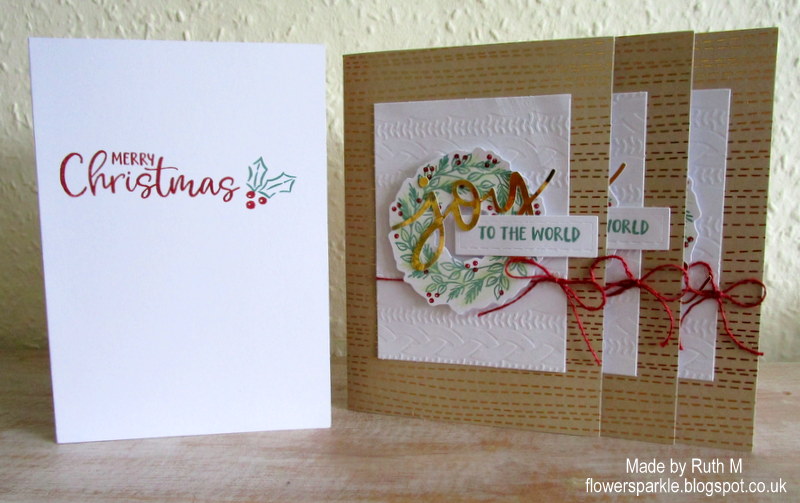
I wanted to use my snowflakes 3D embossing folder again so that's why this card came about.  Here's the card and envelope together.


The snowflakes 3D embossing folder is designed to fit in the SU! Mini Die Cut & Embossing Machine so it's not wide enough to emboss a panel of CS which will cover a whole card front.  I couldn't get a design with a layout that I was happy with using just the narrow panel, I decided I needed to cover the whole card front.  Therefore, I embossed a second panel, cut it to size, glued the two panels in place and covered the join with a strip of sparkly silver CS.  

My idea was to add sparkly snowflakes to a dark coloured tag so I played with the idea a bit before choosing to apply a wash of colour to a panel of watercolour paper.  Using a wide flat water painter I wet the panel of watercolour paper and added Misty Moonlight and Gorgeous Grape inks.  I blasted my panel with a heat tool to dry it and die cut the largest label shape from the SU! 'Seasonal Labels' die set.  I die cut several snowflakes, glued them in place on the label and turned my label into a tag with a hole and hole re-inforcer.  I glued on the stamped sentiment, added Gorgeous Grape sheer ribbon to the tag and popped the tag up on Dimensionals.


Here's the inside of the card.  The 'May Your Season Sparkle' is such a fab sentiment and I always add a sparkle element when using it.  I die cut the snowflakes swirl from the sparkly silver paper.  The SU! 'Snowfall' die set is retired but I love the dies in this set and will continue to use it.  I must admit I have a lot of retired SU! snowflake stuff, I love snowflakes so much I just can't part with my favourites!


Here's the envelope with more dies from the 'Snowfall' die set.


Supplies:
Stamps: SU! 'Christmas To Remember' & 'Snowflake Wishes' sets
CS: SU! Gorgeous Grape, Misty Moonlight & Basic White, watercolour paper
Patterned paper: SU! 'Be Dazzling' 6" x 6" specialty DSP
Ink: SU! Gorgeous Grape & Misty Moonlight 
Tools: SU! 'Wintry' 3D embossing folders set, 'Seasonal Labels', 'Snowfall' & 'Tailor Made Tags' die sets, water painter brush
Embellishments & Accessories: SU! Gorgeous Grape sheer ribbon, Dimensionals

Ruth

Saturday 30 October 2021

Snowflake Circle Merry Christmas Card

Snowflakes are one of my favourite motifs for Christmas and winter cards so it's hard for me to resist snowflake products!  I just got the SU! 'Wintry' set of 3D embossing folders which has a snowflakes folder and a pine boughs folder.  I've paired my new snowflakes embossing folder with one of the beautiful iridescent snowflake embellishments and added some sparkle for a festive touch.  Here's the card and envelope together.


Oh my word, the snowflakes embossing folder is so pretty and as it's a 3D folder the embossed detail is amazing! I glued the embossed strip across the front of the Mint Macaron card base and added strips of sparkly silver paper at the top and bottom.  I stamped the sentiment in Just Jade ink, die cut it out with a stitched rectangle die and slid it under the Mint Macaron die cut circle.  I punched out two circles - one  Mint Macaron CS circle and a smaller sparkly silver circle.  I glued the circles to the centre of the snowflake and popped the snowflake up on Dimensionals.


Here's the inside of the card.


Here's the envelope with a stamped and punched snowflakes element on the flap.


Supplies:
Stamps: SU! 'Flurry of Wishes' & 'Snowflake Wishes' sets 
CS: SU! Mint Macaron & Basic White
Patterned paper: SU! 'Be Dazzling' 6" x 6" specialty DSP
Ink: SU! Just Jade & Mint Macaron 
Tools: SU! 'Wintry' 3D embossing folders set, 'Layering Circles' & 'Rectangle Stitched' die sets, circle punches
Embellishments & Accessories: SU! 'Wonderful Snowflakes', Dimensionals

Ruth

Friday 29 October 2021

Trees & Snowflakes Merry Christmas Card

I had some stamped trees left over from the baby wipe technique card  I made a while back so I created another card.  This time I made the card landscape oriented instead of portrait.  Here's the card and envelope together.


The A6 size card base is made with Just Jade CS.  I die cut a piece of patterned paper with a stitched rectangle die, stamped small snowflake clusters on top with Mint Macaron ink and matted that onto a layer of Shaded Spruce CS.  I die cut the snowbank, stamped the sentiment in Shaded Spruce ink and glued the snowbank in place.  I then applied glue to the die cut trees and tucked them underneath the snowbank.  To complete the card front I added three die cut sparkly snowflakes.


Here's the inside of the card with a sentiment and snowflakes.


Here's the envelope with some pretty snowflake patterned paper added to the flap.  This card doesn't have anything popped up on Dimensionals so will be a great card to send in the post.


Supplies:
Stamps: SU! 'Christmas to Remember', 'Holly Jolly Wishes', 'Snowflake Wishes' & 'Winter Woods' sets
CS: SU! Mint Macaron, Shaded Spruce & Basic White
Patterned paper: SU! 'Snowflake Splendor' DSP, 'Be Dazzling' 6" x 6" specialty DSP
Ink: SU! Just Jade, Mint Macaron & Shaded Spruce ink refills, Mint Macaron & Shaded Spruce ink pads
Tools: SU! 'In the Woods' & 'Snowfall' die sets, Claina Palmer 'A6 Double Stitched Nested Dies' set
Embellishments & Accessories: baby wipe

Ruth

Thursday 28 October 2021

Bright & Joy Christmas Cards

Here are two Christmas cards using the SU! 'Peace & Joy' stamp set and dies.  I've used the same colour scheme but there are just a couple of differences between the two cards


Here's the Joy card.  I stamped a background of images direct to the card base and I matted the white layer onto a panel of 'Be Dazzling' sparkly paper.  The sentiment pieces are popped up on Dimensionals.


For the Bright card I opted to stamp the background images on a panel of Just Jade CS which I glued to the Just Jade card base.  I added Real Red CS strips to the top and bottom of the white panel.  The stamped words are glued flat to the card but the die cut Bright element is popped up on Dimensionals.


Here's the inside of the Joy card.


Here's the inside of the Bright card.


Here are the envelopes for both cards.


Supplies:
Stamps: SU! 'Peace & Joy' set, Hero Arts 'Joyful Christmas Season' & 'Holiday Cheer' sets 
CS: SU! Just Jade, Real Red & Basic White
Patterned paper: SU! 'Be Dazzling' 6" x 6" specialty DSP
Ink: SU! Just Jade & Real Red
Tools: SU! 'Joy' die set, circle punches
Embellishments & Accessories: SU! Real Red rhinestone jewel, Dimensionals

Ruth

Wednesday 27 October 2021

Holly Deck The Halls Christmas Card

One afternoon I went into my craft room with no plan other than to tidy things away and to clear and clean my messy desk.  Unfortunately while tidying I got distracted when I came across a pile of patterned paper and some holly images stamped onto patterned paper.  Before I knew it I was creating a card and making more mess!

Here's the card and envelope together.


Here's the card.  I embossed the copper foil sheet with the 'Hammered Metal' 3D embossing folder.  The copper foil goes brilliantly with the foiled patterned paper!  I fussy cut the stamped holly leaves and berries and die cut some leaves using Old Olive CS and copper foil.  I stamped and die cut the sentiment element and then assembled the leaves and berries.  I adhered the patterned paper and Cherry Cobbler CS border at the bottom and added pinecone embellishments and a linen thread bow to my focal element to finish the front.


Here's a closer look at the focal element.


Here's the inside of the card.


Here's the envelope.


Supplies:
Stamps: SU! 'Christmas Gleaming' & 'Greatest Part of Christmas' sets
CS: SU! Cherry Cobbler, Mossy Meadow & Basic White
Patterned paper: SU! 'Brightly Gleaming' specialty DSP, 'Tis the Season' 6" x 6" DSP
Ink: SU! Cherry Cobbler & Mossy Meadow
Tools: SU! 'Hammered Metal' 3D embossing folder, 'Rectangle Stitched' & 'Forever Flourishing' die sets
Embellishments & Accessories: SU! linen thread, Mini Pinecone Embellishments, Dimensionals

Ruth

Tuesday 26 October 2021

Dahlias Thank You Kindly Card

This is a thank you card I made for a sweet friend using the SU! 'Delicate Dahlias' stamp set which was a Sale-A-Bration offering.  I also used the 'Timber' 3D embossing folder - which is amazing, I love it!

Here's the card and envelope together.


Here's the card.  I used Crumb Cake CS for the card base and I embossed a panel of Soft Suede CS with the 'Timber' 3D embossing folder.  I used a die from the 'All Dressed Up' set to cut a Mint Macaron CS strip and I glued that next to the pink polka dot patterned paper.  I stamped the flower and leaves using Petal Pink and Mint Macaron inks.  I stamped the sentiment in Soft Suede ink.  I die cut the tag using dies from the 'Tailor Made Tags' set.  I added ribbon and linen thread and popped the tag up.  I sprinkled on a few champagne rhinestones to finish the front.


Here's the inside of the card.  The SU! Distinktive style stamps give such lovely detailed images!


Here's the envelope.  While I had the 'Tailor Made Tag' dies out I used one to create a name label.


Supplies:
Stamps: SU! 'Delicate Dahlias' set
CS: SU! Crumb Cake, Mint Macaron, Soft Suede & Basic White
Patterned paper: SU! 'Bird Ballad' DSP
Ink: SU! Mint Macaron, Petal Pink & Soft Suede 
Tools: SU! 'Timber' 3D embossing folder, 'All Dressed Up' & 'Tailor Made Tags' die sets 
Embellishments & Accessories: SU! linen thread, Blushing Bride Metallic Ribbon, champagne rhinestones, Dimensionals

Ruth

Monday 25 October 2021

Joy To The World Paper Pumpkin Kit Christmas Cards Wallet

Quite a while ago I bought the SU! 'Joy to the World' Paper Pumpkin kit.  The kit contained everything needed to create eight Christmas cards.  I finally got round to putting the cards together and once I'd finished I decided to package them up in a wallet so I can give the cards as a gift.  This will be a surprise early Christmas gift for one of my friends.

Here's the wallet of cards filled and tied up ready to be given.  I used Crumb Cake CS to make the wallet and I decorated the front with some elegant red patterned paper, floral elements from the 'Joy to the World' kit and a die cut label element.


Here's another view.


Here's a side view showing the cards and envelopes tucked inside the wallet.


Here's the wallet opened out with four cards and envelopes on each side.


Here are the two wreath Joy to the World cards.


Here are the two wreath Sending Peace cards.


Here are the four floral Merry Christmas cards.


Here's how I stamped the insides of the Joy to the World and Sending Peace cards.


Here's how I stamped the insides of the floral Merry Christmas cards.


The envelopes had a decorative printed liner inside.  


I made this card wallet a few months back but that was to hold six cards.  I used the same method to create this wallet but I had to tweak the measurements to make it large enough to hold the eight dimensional cards.  I'd already put the cards together and made them fairly dimensional before I decided to make the wallet.  I'll know better next time - if I remember!

Ruth

Sunday 24 October 2021

Floral SU! Gift Voucher Card & Envelope

Lesley asked me to make a Stampin' Up! gift voucher that she could give to Wendy as a birthday gift and I was very happy to oblige!  I know how much Wendy loves the 'Expressions in Ink' patterned paper so I definitely had to use that on the project!

Here's the card and envelope together.


Here's the card front.  Such a bright and cheery colour combo!  I used stitched rectangle dies to cut out the patterned paper and Shaded Spruce layers and before I adhered those to the card I added a strip of the Shaded Spruce ribbon.  I used dies from the 'Tailor Made Tags' die set to create the tag element and I added a white baker's twine bow.  I stamped the sentiment in Shaded Spruce ink, cut the words apart and glued them to the Pale Papaya tag.  I popped up the tag and added some pretty In Color jewels to embellish.


Here's the inside.  I stamped onto the printed voucher, rounded the corners and added a pocket for the gift voucher to slide into.


Here's the envelope.  After making the envelope with the gold stripes paper I went mad and added some floral paper to the flap!  A popped up name label finished off the project.


Supplies:
Stamps: SU! 'Artistically Inked' set
CS: SU! Pale Papaya, Polished Pink, Shaded Spruce & Basic White
Patterned paper: SU! 'Expressions in Ink' specialty DSP
Ink: SU! Pale Papaya, Polished Pink & Shaded Spruce
Tools: SU! 'Rectangle Stitched', 'Tailored Tags' & 'All Dressed Up' die sets, Envelope Punch Board, Sizzix 'Card, Fancy Frame Flip-Its #2' die set, Crop-A-Dile Corner Rounder
Embellishments & Accessories: SU! Shaded Spruce argyle satin ribbon (from retired 'Wonder of the Season' ribbon combo pack), white baker's twine, In Color jewels, Dimensionals

Ruth

Saturday 23 October 2021

Two Baby Wipe Technique Christmas Cards

After the no internet issue I was laid very low with a nasty virus so no crafting or blogging got done.  I've just about started to get some energy back and hopefully I can catch up on things.  

My lovely friends Lesley and Wendy came over on World Card Making Day to try the baby wipe technique and today I'm sharing the cards I designed for them to make.  The baby wipe technique is where you place drops of ink onto a baby wipe to create a custom made ink pad.  You place your stamp on the baby wipe instead of on an ink pad and stamp as normal.  If you use a few colours you get a lovely multi toned effect.  

Here's the first card and envelope together.  I love this technique with snowflakes!


Here's the card.  I used Balmy Blue, Highland Heather and Misty Moonlight inks to create my baby wipe ink pad.  I've used old, retired, but much loved snowflake stamp sets for this card.  The card base and sentiment label were made with Highland Heather CS, the square panel is Misty Moonlight CS and the background panel was made using 'Snowflake Splendor' DSP.  I popped up the snowflake and added a blue gem embellishment to the centre.


Here's the inside of the card.  This sentiment is so perfect for snowflake cards!


Here's the envelope.


Here's the second card and envelope together.


For this card I chose to use three shades of green ink - Mint Macaron, Just Jade and Shaded Spruce - to create a trees card.  I stamped a few trees directly onto a panel of 'Snowflake Splendor' DSP and then stamped and die cut a separate tree.  I die cut a snow bank, glued that in place and then popped up the die cut tree.  I stamped the sentiment in Shaded Spruce ink and added some sparkly die cut snowflakes.


Here's the inside of the card.  I was very happy with the multi toned trees I achieved with the green ink colours I chose!


Here's the envelope.


As usual, we had such a lovely time together and another crafty day is planned!

Supplies for snowflake card:
Stamps: SU! 'Festive Flurry', 'Flurry of Wishes' & 'Frosted Foliage' sets
CS: SU! Highland Heather, Night of Navy & Basic White
Patterned paper: SU! 'Snowflake Splendor'
Ink: SU! Balmy Blue, Highland Heather & Misty Moonlight ink refills, Night of Navy ink pad
Tools: SU! 'Festive Flurry', 'Stitched Shapes'  & 'Rectangle Stitched' die sets, Claina Palmer 'A6 Double Stitched Nested Dies' set
Embellishments & Accessories: baby wipe, SU! blue self adhesive gems, Dimensionals

Supplies for trees card:

Stamps: SU! 'Winter Woods' & 'Christmas to Remember' sets
CS: SU! Just Jade & Basic White
Patterned paper: SU! 'Snowflake Splendor' DSP, 'Be Dazzling' 6" x 6" specialty paper
Ink: SU! Just Jade, Mint Macaron & Shaded Spruce ink refills, Shaded Spruce ink pad
Tools: SU! 'In the Woods' & 'Snowfall' die sets
Embellishments & Accessories: baby wipe, SU! Dimensionals

Ruth

01 09 10