Monday 29 November 2010

CAS Pastel Tree Merry Christmas Card

Today's CAS95 challenge on Splitcoast Stampers is to use flower accents on a card.  I decided to make a pastel Christmas card using silk poinsettias.  The card measures approx. 15 cms square.  The pink tree is a Craftwork Cards die cut shape which I embossed with the Victorian Fleur folder.  I went over the embossing with my Quickie Glue Pen and added Crystal ultrafine glitter.  I tore white CS for my snow at the bottom but I used the negative shape from the Sizzix Swirly Decorative Strip die for my snow flurry at the top of the card.  I've also added glitter to these two elements.  I threaded the button with silver lurex ribbon before attaching it to the flower centre.  The flower was attached to the card with a large glue dot.


This photo shows the inside of the card and the envelope flap.  I used another piece of the negative die cut shape for the bottom.  I added glitter to this piece and to the snowflakes on the sentiment.

I love snowy Christmas cards but I have to say I don't want actual snow!  I'm not enjoying this bitterly cold weather we're having, I'm such a chilly mortal!


Supplies:
Stamps: SU! Contempo Christmas & Serene Snowflakes sets, Warm Wishes to You by Hero Arts
CS: SU! Bashful Blue, Pretty in Pink & Whisper White, pink Craftwork Cards die cut tree shape
Ink: SU! Bashful Blue
Tools: PaperMania 'Victorian Fleur' embossing folder, Sizziz 'Swirly' Decorative Strip die, Square Nestabilities dies, circle punches
Embellishments & accessories: PaperMania silk poinsettia flowers, PaperMania pale blue button, silver lurex ribbon, Quickie Glue Pen, Crystal ultrafine glitter, glue dots

Photobucket

Saturday 27 November 2010

Bird For You BRAK Card

This is a Birthday RAK card that will be winging its way to Australia later today.  I used SU! Rose Red CS - one of my fave colours - to make the side opening A6 size card.  I stamped the Bella Toile stamp on Whisper White CS in Old Olive ink.  I punched the bird wing out of Rose Red patterned paper.  I used the Crop-A-Dile to punch circles for the bird eye and flower centres.  Two more punches were used on the card, the Eyelet Border punch and, of course, my current fave Photo Corners punch.


After finishing the card front, I decorated the inside and the envelope flap.


Supplies:
Stamps: SU! Bella Toile background stamp, For You sentiment from SU! One of a Kind set, inside sentiment by Hero Arts
CS: SU! Rose Red, Old Olive & Whisper White

Patterned paper:  SU! Rose Red Prints Designer Series Paper pack
Ink: SU! Old Olive ink pad, SU! Rose Red & Old Olive marker pens
Tools: SU! Bird punch, SU! Photo Corners punch, SU! Eyelet Border punch, SU! 1 5/8" circle punch, SU! Scallop Circle punch,  EK Success flower punch, Crop-A-Dile
Embellishments & accessories: Anita's olive ribbon


Photobucket

Wednesday 24 November 2010

Asian Flowers Birthday Wishes - WMSC24

This is a birthday card I made for a friend and to enter into the WMSC24 challenge.  Here's the sketch:


I made a square card rather than rectangular, this sketch is versatile and easily works for both.  The card measures just a tad under 15 cms square and I used Perfect Plum CS for the base.  The patterned paper is from the Basic Grey Kioshi line.  After cutting my Labels Four shapes I applied Antique Linen distress ink to the white shape before stamping the branch.  The smaller flowers are stamped direct to the white panel but I stamped the larger flowers separately, cut them out and I've popped them up.  I've also popped up the white panel.

My SU! Photo Corners punch was used again, I love having this thing!  I punched small Mellow Moss corners and layered them onto large Pale Plum corners.  To finish off the front I added pearls to the flower centres and to the corners.


Then I decorated the inside of the card and the envelope flap.


Supplies:
Stamps: Waltzingmouse Stamps Asian Gardens set, inside sentiment from Penny Black
CS: SU! Perfect Plum, Mellow Moss, Pale Plum & Whisper White
Patterned paper: Basic Grey Kioshi 'Lilo'
Ink: SU! Mellow Moss, Memento Sweet Plum & Grape Jelly, Tim Holtz Antique Linen distress ink
Tools: Labels Four Nestabilities dies, SU! Photo Corners punch, circle punches
Embellishments & accessories: SU! Chocolate Chip taffeta ribbon, self adhesive half pearls, 3d foam pads


Photobucket

Tuesday 23 November 2010

Two Challenge Cards

Yesterday's CAS94 challenge on Splitcoast Stampers was to use sponging on your card.  That gave me a great reason to make another sparkly Santa with trees card.  I sponged Bashful Blue ink for the sky after using a punched circle mask for the moon.  I then edged the panel with Marina Mist ink.  I sprinkled ultrafine crystal glitter on the trees to finish.


Today's colour combo CC298 challenge was Chocolate, Cherry, Crumb Cake - well, I'm afraid I couldn't resist that!  I'm on a diet and all I could think of while making this card was the Black Forest muffin our local Waitrose used to sell.  It was a double chocolate chip  muffin with a gooey dark cherry filling - heavenly!  It's just as well for my diet that they don't sell them any more.

I decided to make a winter birthday card and I'll use this as a Birthday RAK card.  This owl stamp is from a clear set and the SU! classic inks don't work well with it.  So I ended up throwing some rhubarb in with the chocolate, cherry and crumb cake - Memento Rhubarb Stalk ink.  I stamped the frame, cut out the Labels Four Nestie shape and then stamped the sentiment and owl.  I embossed the Cherry Cobbler panel with the gorgeous Cuttlebug snow flurry folder.  Before gluing down the owl panel I attached a strip of Chocolate Chip satin ribbon. 

The colour combo challenge also had a "dessert option" which was to add a glaze.  I applied VersaMark ink to some Chocolate Chip CS and embossed it with clear embossing powder - I gave it a couple of coats - then I punched out a snowflake.  Oof, it was hard to punch out, I was a tad worried I might break my punch but it worked out fine.  It's hard to see in the photo but the snowflake is so glossy.  I've put a rhinestone brad in the centre.  To finish off the card front, I sprinkled clear gems on some of the snowflakes.


Then I decorated the inside and the envelope flap.


Supplies for Merry Christmas card:
Stamps: SU! Lovely As A Tree & Contempo Christmas sets, Santa & sleigh from All Night Media
CS: SU! Bashful Blue & Whisper White
Ink: SU! Bashful Blue & Marina Mist, Memento Tuxedo Black
Tools: SU! 1 1/4" circle punch, sponge, sponge dauber, Stamp-A-Ma-Jig
Embellishments & accessories: Crystal ultrafine glitter


Supplies for Birthday Wishes card:
Stamps: Inkadinkado Winter Birds clear set, Waltzingmouse Stamps Very Vintage Labels No. 4 clear set, Birthday Wishes sentiment from SU! Wow Flowers set, inside sentiment by Hero Arts
CS: SU! Chocolate Chip, Cherry Cobbler & Crumb Cake
Ink: SU! Chocolate Chip, Memento Rhubarb Stalk, VersaMark
Tools: Labels Four Nestabilities die, snowflake folder from Cuttlebug Winter Wonderland embossing folder set, Woodware snowflake punch, Sizzix Baroque die, circle punches, Stamp-A-Ma-Jig
Embellishments & accessories: SU! Chocolate Chip satin ribbon, SU! clear rhinestone brad, Anita's gem wheel


Photobucket

Monday 22 November 2010

Growing Green Cards

Here are two cards I've made using my new SU! Growing Green stamp set, I am loving this set!  The first card is a Crumb Cake A6 size and I used it to send a note to a friend.  I was inspired by the cards on page 56 of the UK SU! catalogue.  I loved the soft earthy tones.  One of the cards had ink spatters so I replicated that by using a speckled background stamp from the Itty Bitty Backgrounds set.  Just simple stamping and I paper pieced the flower by stamping on a piece of Bella Bleu paper.  I added some green dotty ribbon and a button threaded with linen thread.


The second card is a side opening A6 size made with Confetti White CS and I will use this as a Birthday RAK card.  I've done some distress sponging on this one.  I've cut a window out of the card front with a Labels Four Nestie die.  The sentiment panel is glued to a larger Crumb Cake Labels Four shape and is glued inside the card.  I've used different Bella Bleu papers for the sentiment panel and the flowers.  I've added some branches punched from the SU! Bird punch.  I then decorated a co-ordinating envelope by stamping the gorgeous fern stamp on the envelope front and then adding a strip of Bella Bleu paper.


Supplies for For You card:
Stamps: SU! Growing Green, Fresh Cuts & Itty Bitty Backgrounds sets
CS: SU! Crumb Cake & Whisper White
Patterned paper: SU! Bella Bleu Designer Series Paper pack
Ink: SU! Crumb Cake & Chocolate Chip
Embellishments & accessories:  My Mind's Eye Bloom & Grow ribbon, American Crafts green button, SU! Linen Thread


Supplies for Fabulous Birthday card:
Stamps: SU! Growing Green set, Fabulous Birthday by Hero Arts
CS: SU! Confetti White & Crumb Cake

Patterned paper: SU! Bella Bleu Designer Series Paper pack
Ink: SU! Crumb Cake, So Saffron, Not Quite Navy & Chocolate Chip
Tools: Labels Four Nestabilities dies, SU! Bird punch, sponge daubers
Embellishments & accessories: Glue dots


Photobucket

Friday 19 November 2010

Stamper's Ten November Make & Take Projects

Joanne held her Stamper's Ten November Make and Take evening on Tuesday.  It was such a fun night!  We made a card and a gift card/money holder.  Actually, I waited to make my card because I wanted to use coloured CS for my card base - plus I also wanted to add a couple of elements! 

I've borrowed the card my friend Jan made so I can show the card Joanne designed.  The background was made by stamping the top of the fir tree from the Lovely As A Tree set around the four sides of the card.


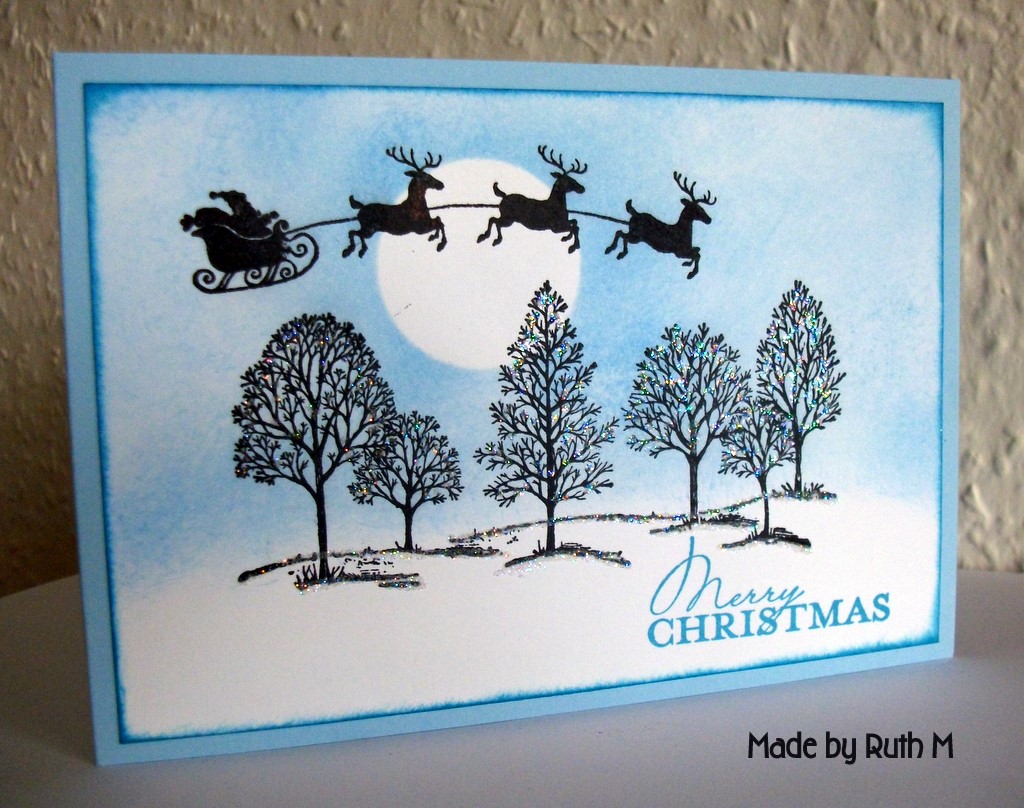
Here's my version using a Marina Mist card base, a Bashful Blue mat layer with added moon and Santa with reindeer.  I sponged Bashful Blue ink for the sky and then edged the panel with Marina Mist ink.  I don't have the Warm Wishes stamp and I had to stamp my trees lower down to make room for my Santa so I chose to use a skinny sentiment.  Joanne had used Early Espresso ink but I don't have that - yet - so I stamped with Chocolate Chip ink.


This is the inside of my card.


This is my version of the gift card holder.  Sad to say I lost concentration and so made a boo boo!  I stamped the Merry Christmas sentiment on the inside whereas it should have been stamped on the front.  So I stamped another bauble (the Cherry Cobbler one), punched it out and I've popped it up.  There's no mistakes right? - just an embellishment opportunity!

This is the front.  The bow is attached to the elastic cord and you slide it off to open the holder.  We used the Ornament punch to cut a bauble aperture in the front of the holder.  The snowflake element on the Olive bauble was stamped again and punched out with the largest flower on the Boho Blossoms punch.  Then we daubed  it with Champagne Mist Shimmer Paint which we also added to the punched Scallop Trim border.  The snowflake was popped up and a clear rhinestone added to the centre.


This is the inside.


This is the gift card holder fully open.  We used the Word Window and 1/2" circle punches to make the slot for the gift card/money to slide into.


Supplies for Season's Greetings card:
Stamps: SU! Lovely As A Tree set, Santa stamp by All Night Media, sentiments from Personal Impressions Christmas Messages clear set

CS: SU! Marina Mist, Bashful Blue & Whisper White
Ink: SU! Bashful Blue, Marina Mist & Chocolate Chip
Tools: 1 1/4" circle punch,  Spellbinders Labels Trio die, Woodware snowflake punch, Stamp-A-Ma-Jig
Embellishments & accessories: Crystal ultrafine glitter, Anita's gem wheel


Supplies for gift card/money holder:
Stamps: SU! Delightful Decorations & Occasional Greetings sets
CS: SU! Crumb Cake & Old Olive

Patterned paper: SU! Jolly Holiday Designer Series Paper pack
Ink: SU! Old Olive & Cherry Cobbler
Tools: SU! Ornament, Scallop Trim Border, Boho Blossoms, Word Window & 1/2" circle punches
Embellishments & accessories: SU! Old Olive striped grosgrain ribbon, SU! gold elastic cord, SU! Champagne Mist Shimmer Paint, SU! Basic Rhinestone, SU! Dimensionals


Photobucket

Wednesday 17 November 2010

Tree Merry Christmas Card

A Christmas card in traditional red, green and gold.  I love Christmas cards in non traditional colours but there's something timeless about red, green and gold that appeals too.  I even did some old school gold embossing.

The card is a side opening A6 size.  The patterned paper I've used is absolutely gorgeous, the holly is flocked.  I couldn't resist using the Photo Corners punch to cut out a fuzzy corner!  I stamped the pot separately, cut it out  and glued it over the top.  I used a Marvy marker to colour in the star at the top of the tree.


Supplies:
Stamps: SU! Contempo Christmas set
CS: SU! Cherry Cobbler, Old Olive, Chocolate Chip & Whisper White
Patterned paper: Flocked holly paper by Making Memories
Ink: SU! Old Olive, Memento Rhubarb Stalk,  Encore Metallic Gold, Marvy red marker pen
Tools: Rectangle Nestabilities dies, SU! Photo Corners punch
Embellishments & accessories: Gold embossing powder, gold lurex ribbon


Photobucket

Tuesday 16 November 2010

Thank You Card For Kevin & Peter - S10 Challenge Card

This is the challenge card I made with the supplies Joanne gave us Stamper's Ten group members this month.  I needed a masculine thank you card to send to Kevin and Peter and the colours seemed to work well for a masculine card so that's what I went with.  Joanne gave us CS in various colours, the stamped thank you element, the ribbon and a piece of Greenhouse Gala paper. 

I used my new Baroque die and I found the size of the shape better suits the front of US size cards than UK A6 size cards.  So I made my side opening card to measure 5 1/2" x 4 1/4".  Yes, the Photo Corners punch got used again!


This photo shows the inside of the card.


Supplies:
Stamps: SU! Just Believe & Vintage Vogue sets
CS: SU! Chocolate Chip, Baja Breeze, Pear Pizzazz & Whisper White
Patterned paper: SU! Greenhouse Gala Designer Series Paper pack
Ink: SU! Pear Pizzazz & Chocolate Chip
Tools:  Sizzix Tim Holtz Baroque die, SU! Photo Corners punch, X Cut heart punch

Embellishments & accessories: SU! Pear Pizzazz Stitched Poly ribbon

Photobucket

Monday 15 November 2010

Fern & Flower Birthday Wishes For Kath

Yesterday it was our friend Kath's birthday and this is the card I made for her.  I won a prize draw and I chose the SU! Growing Green set as my prize so I couldn't wait to ink my new goodies up!  I fell in love with that fern image as soon as I saw it in the catalogue, it's gorgeous.

I stamped the fern and flower in VersaFine Sepia ink on watercolour paper.  To colour I patted my SU! inkpads onto a ceramic tile and then used a waterbrush to pick up the colour.  I used Nestabilty dies for my layers and added a strip of Olive grosgrain ribbon.  Then I used my favourite new tool - the SU! Photo Corners punch.  I've been waiting 3 years for this punch and I'm so happy I have it now!  I love how it has 2 sizes, I've used the larger size corners here.  To finish off the card front, I popped up the flower and added 3 olive crystals to the image panel.


This photo shows the envelope flap and inside the card.


Supplies:
Stamps: SU! Growing Green set, Hero Arts Birthday messages clear set, inside sentiment by Penny Black

CS: SU! Old Olive, Rich Razzleberry & Pale Plum, watercolour paper
Patterned paper: SU! Cottage Wall Designer Series Paper pack
Ink: SU! VersaFine Vintage Sepia, SU! Certainly Celery, Old Olive & Rich Razzleberry
Tools: Square Nestabilities dies, SU! Photo Corners punch, circle punches, waterbrush
Embellishments & accessories: SU! Old Olive grosgrain ribbon, olive crystals, 3d foam pads


Photobucket

Saturday 13 November 2010

Baroque Birthday Wishes BRAK Card

This is a birthday RAK card I'll be sending out this month.  I used one of my fave colour combos - Olive, Eggplant and Vanilla.  I stamped the flowers from the One of a Kind set so that I could punch them out with the Boho Blossoms punch.  I've added pale purple gems to the flower centres.


I'm really enjoying working on the inside of my cards more these days.  Here's what I did inside and on the envelope flap.  I stamped the swirl off once before stamping on the Vanilla panel.


Supplies:
Stamps: SU! Baroque Motifs, One of a Kind & Sincere Salutations sets, inside sentiment by Penny Black
CS: SU! Elegant Eggplant, Old Olive & Very Vanilla
Patterned paper: SU! Old Olive Prints Designer Series Paper pack
Ink: SU! Old Olive & Elegant Eggplant
Tools:  SU! Boho Blossoms punch, SU! Scallop border punch
Embellishments & accessories: SU! Elegant Eggplant grosgrain ribbon, Anita's gem wheel


Photobucket

Thursday 11 November 2010

Baroque Merry Little Christmas Window Card

I saw a shaped window card on display at the Glitter Pot that Paula Pascual had made using the lovely My Mind's Eye 'I Believe' papers, some of Paula's stamps and the gorgeous Tim Holtz Baroque die.  What a beautiful shape that die is - I was lost as soon as I saw it, into my basket it went!  This is my version of Paula's card.  Very similar except Paula had a lovely curved sentiment banner on her card - I did try, oh my word, I tried but curved banners are NOT in my future it seems!  I gave up and went for a flat banner, it will mean the card is easier to post anyway!

I cut the bottom of the shape off so that the card will stand up.  I used Nestie dies to cut out the window and circles.  The Sage circle is popped up.  I added a button to the banner and a clear crystal to the flower centre to finish off the card.


Supplies:
Stamps: Personal Impressions Filled With Flowers & Christmas Messages clear sets

CS: SU!  Whisper White & Sage Shadow
Patterned paper: My Mind's Eye I Believe papers - 'Berries' & 'Trees'
Ink: SU! Chocolate Chip, Memento Rhubarb Stalk
Tools: Tim Holtz Sizzix Baroque die, circle Nestability dies
Embellishments & accessories: Button, clear crystal, 3d foam tape


Photobucket

Tuesday 9 November 2010

Bauble Trio Merry Christmas - WMSC22

This is the card I've made for the Waltzingmouse WMSC22 sketch challenge.  Here's the sketch:

As you can see I've been very literal and kept things very simple!  I thought of the bauble from Sewing Box Christmas as soon as I saw the sketch.  I dug out some well loved old Basic Grey Fruitcake and Figgy Pudding papers for my paper piecing.  I sponged the edges of the card with Antique Linen distress ink.  The sentiment stamp is on one line but I used a dewdrop pad and was easily able to ink the words separately to get the words on two lines inside my middle bauble. I found the green cord after rootling in my stash and thought it would be perfect as a line for my baubles.   


After finishing the card front I set to work on the inside and the envelope flap.


Supplies:
Stamps: WMS Sewing Box Christmas & Say It With Style sets, inside sentiment by Stampendous
CS: Textured white DL card blank
Patterned paper: Basic Grey Fruitcake & Figgy Pudding
Ink: Brilliance Pearlescent Chocolate, Tim Holtz Antique Linen Distress Ink
Tools: Labels Four Nestabilities dies, Fiskars fingertip knife, Inkssentials Blending Tool
Embellishments & accessories: Anita's olive ribbon, green cord, brad, glue dots


Photobucket

Monday 8 November 2010

CAS Bauble & Bow Merry Christmas

Today's CAS challenge on Splitcoast Stampers is a colour challenge - kraft, pink and olive with Marina Mist as optional.  I'm waiting to get my Marina Mist CS and ink so I stayed with kraft, pink and olive. 

I paper pieced the bauble, punched two holes in the card front and then tied the bauble onto the card with a ribbon bow.  So my bauble swings from the card.  I added the sentiment strip to finish off the card front. 


Then I couldn't resist decorating the inside of the card too.  It seemed very appropriate to use my bauble sentiment!


Supplies:
Stamps: Hero Arts Real Pine, Waltzingmouse Stamps Sewing Box Christmas set, Merry Christmas by Elzybells, inside sentiment by Stampendous
CS: SU! Crumb Cake, Pretty in Pink & Old Olive
Patterned paper: SU! Merry Moments Designer Series Paper pack
Ink: SU! Chocolate Chip & Old Olive
Tools: Small hole punch, Spellbinders Labels Trio die
Embellishments & accessories: Pink & brown striped ribbon, brads, Stamp-A-Ma-Jig


Photobucket

Saturday 6 November 2010

Gingerbread Man and Bauble Merry Christmas

I just love this gingerbread man stamp, he's so sweet!  This A6 size card is made with Creamy Caramel CS and I've used Ruby Red and Chocolate Chip as accent colours plus a strip of olive ribbon and some Olive snowflake patterned paper.  I stamped the sentiment circle with the pine bough stamp in Caramel ink after stamping off once first.


This photo shows what I did inside the card.


Supplies:
Stamps: Hero Arts Real Pine, Hero Arts Merry Christmas, SU! Hung Up On the Holidays set, inside sentiment by Penny Black
CS: SU! Creamy Caramel, Ruby Red, Chocolate Chip and Whisper White
Patterned paper: SU! Merry Moments Designer Series Paper pack
Ink: SU! Old Olive, Creamy Caramel, Ruby Red & Chocolate Chip
Tools: Circle punches, circle and long rectangle Nestabilities dies, Stamp-A-Ma-Jig
Embellishments & accessories: Anita's olive ribbon


Photobucket

Thursday 4 November 2010

November 2010 Card Group Projects

Today was our card group day and another fun day was had by all!  They are such a great group!  These are the final card group Christmas cards for this year. 

The first card is a side opening A6 size.  I cut out an oval using a die to make a mask for the sponging.  Certainly Celery ink was sponged in the oval.  The line of trees was stamped in Old Olive but stamped off once first.  The fir tree was stamped full strength in Olive.  The beautiful script Merry Christmas was stamped in Chocolate Chip.  I used a 1" circle punch but only punched out half a circle for the doodad on the side.  I've added a gold self adhesive nailhead.


The second card uses the lovely SU! Serene Snowflakes set and a fresh turquoise, red and white colour scheme.  This is a 4" square card.  Simple stamping, layering and sponged edges here and a ribbon loop added for a bit of interest.  The snowflake has a red brad in the centre.


The last card uses this gorgeous glittery holly paper.  I really wanted to let the paper take centre stage so I didn't cover it up too much.  This is another side opening A6 size card.  I stamped the cream tag with the Fine Flourish background stamp in Garden Green ink after stamping off twice first and then I stamped the Noel in Bravo Burgundy.  I edged the tag with Burgundy ink.  I've then mounted the cream tag to a larger Garden Green tag.  I used linen thread to tie the tag around the Olive ribbon and added a button.  To finish off the card front I've added two Olive photo corners.


As the Burgundy CS is very dark to write a message on I've added a stamped Vanilla oval inside the card.  I edged the outside of the oval with Burgundy ink.  The sentiment was stamped in Garden Green and then I coloured the holly leaves and berries with Olive and Burgundy marker pens.


Supplies for trees card:
Stamps: SU! Lovely As a Tree set, Waltzingmouse Stamps Say It With Style set
CS: SU! Certainly Celery, Old Olive, Chocolate Chip and Very Vanilla
Ink: SU! Certainly Celery, Old Olive & Chocolate Chip
Tools: Nellie Multiframe oval die, 1" circle punch, Stamp-A-Ma-Jig, sponge
Embellishments & accessories: self adhesive gold nailhead


Supplies for snowflake card:
Stamps: SU! Serene Snowflakes & Best Yet sets
CS: Anita's 4" square white card blank, SU! Tempting Turquoise, Real Red & Whisper White
Ink: SU! Tempting Turquoise
Tools: Square & rectangle Nestabilities dies, paper piercer, sponge dauber
Embellishments & accessories: Red grosgrain ribbon, red brad


Supplies for Noel card:
Stamps: SU! Fine Flourish stamp, Hero Arts Noel stamp, inside sentiment by Stampendous
CS: SU! Bravo Burgundy, Garden Green, Old Olive & Very Vanilla
Patterned paper: KandCo Christmas Cheer Holly Glittered Paper
Ink: SU! Garden Green & Bravo Burgundy ink pads, Old Olive & Bravo Burgundy marker pens
Tools: Sizzix Scallop Tag die, Sizzix Photo Corners #2 die, Nellie Multiframe oval die, sponge dauber
Embellishments & accessories: SU! linen thread, button


Photobucket
01 09 10