Showing posts with label Card group. Show all posts

Friday, 27 March 2020

March 2020 Card Group Projects

I'm finally getting around to sharing the cards we made at our March card group meeting.  We didn't know it at the time but we do now know that was our last card group meeting for some time.  Obviously, this is very sad, disappointing news but it is essential that we follow the rules around the coronavirus pandemic.  We're all in this together and we will pull through and come out on the other side!

For the first card I followed a very basic card layout - a square and a rectangle placed on an A6 sized card base.  I used the SU! 'Beautiful Friendship' stamp set and the colour combo is Old Olive, Gorgeous Grape and Whisper White.


I wanted to show that you can step up the design of a card using the same layout.  I made a second version of the card where I cut the white layer into 4 squares, sponged the edges with ink and popped the squares up on a larger mat layer.  I also popped up the sentiment rectangle after sponging the edges with ink.  To step things up further I added clear Wink of Stella pen to the flower parts so there's a lovely shimmery sparkle.


Here's the two cards side by side.


Here's a closer look where you might just be able to see the shimmer!


Here's the inside and envelope. 


For the second card I've used an Altenew poppy stamp set that came free with a magazine.  I'm ashamed to say that I've had the magazine for a few months but hadn't read it let alone used the stamps!  I stamped the solid background image in Poppy Parade ink, the detailed portion in Real Red ink and then the outline and centre image in VersaFine Onyx Black ink which I also used to stamp the sentiment.  I used a die from the SU! 'Switched So Sweetly' die set to cut out a pretty scalloped rectangle and I popped that up over a black CS panel placed on the card front on the wonk.  To finish off the front I added three gold sequins.


Here's the inside and envelope.


For the final card I used some very striking patterned paper which is from the SU! 'See a Silhouette' DSP pack. This card measures 5 1/4" square.  I matted the patterned paper onto a layer of Night of Navy CS and then popped up the pretty sentiment label shape.  I punched a flower using the SU! 'Small Bloom' punch from Poppy Parade CS, shaped it, glued it to the label and added a rhinestone jewel to the centre.


Here's the inside and the envelope.


It was a lovely afternoon and I really do hope all the ladies stay safe and well and that it won't be too long before we can resume our card group meetings!

Supplies for hydrangea card:
Stamps: SU! 'Beautiful Friendship' & 'Perennial Birthday' set
CS: SU! Gorgeous Grape, Old Olive & Whisper White
Ink: SU! Gorgeous Grape & Old Olive
Tools: Sponge dauber
Embellishments & accessories: SU! clear Wink of Stella pen, Dimensionals


Supplies for poppy card:
Stamps: Altenew 'Layered Poppy' set, free with issue 194 of Simply Cards & Papercraft magazine, SU! 'Birthday Blooms' set
CS: SU! Poppy Parade, Basic Black & Whisper White

Patterned paper: SU! 'Petal Passion' DSP
Ink: SU! Poppy Parade, Real Red, VersaFine Onyx Black
Tools: SU! 'Stitched So Sweetly' die set
Embellishments & accessories: gold sequins, SU! Dimensionals


Supplies for square small bloom card:
Stamps: SU! 'Sending You Thoughts' & 'Lots of Happy' sets
CS: SU! Night of Navy, Poppy Parade & Whisper White thick

Patterned paper: SU! 'See a Silhouette' DSP
Ink: SU! Night of Navy
Tools: SU! 'Stitched So Sweetly' die set, 'Small Bloom' punch
Embellishments & accessories: SU! rhinestone jewels, Dimensionals

Ruth


Tuesday, 11 February 2020

February 2020 Card Group Projects

When preparing for the February card group meeting I was inspired by cards and layouts designed by Dena Rekow from the Creativity Cave.  Having a sketch layout in place really makes a card design come together quickly and easily and that is incredibly helpful when crafting time is limited.  This months designs are quick and simple with no fancy folds or techniques and so I decided we'd have time to include a fourth card.   

I absolutely loved the SU! 'Positive Thoughts' stamp set as soon as I saw it in the mini catalogue and I bought it straight away.  I was chuffed to bits when SU! later released matching dies for the stamp set!  Dena made this card design using Pacific Point but I wanted to try it in a different colour.  You need to stamp the butterfly three times without re-inking to get the different shades and to achieve a really successful result it's better to stamp using a deep, intense colour and I chose Lovely Lipstick.


Here's the inside and the envelope.  I stamped off the beautiful maidenhair fern image twice before stamping it on the inside panel and stamped it full strength on the envelope flap.


I CASEd another Dena design for this card.  The pretty punched flowers and the abundance of white space give a really fresh feel to the card.  The card base is Smoky Slate and the mat layer is Bermuda Bay.  I stamped the top flower in Bermuda Bay ink and the two other flowers in Pool Party ink.  After punching the blooms I shaped them, glued them to the card front and added a rhinestone jewel to each bloom centre.


Here's the inside and the envelope.


This next card features a layout perfect for patterned paper.  The 'Tropical Oasis' paper pack is gorgeous and I thought the palms and cars design was ideal to make a masculine card.  The patterned paper is a 3" x 3" square - perfect for maximising the use of a full 12" x 12" sheet if you batch make a bunch of cards!  The card base is Early Espresso and the mat layer is Pear Pizzazz CS that has been embossed using the Coastal Weave 3D embossing folder.


Here's the inside and the envelope.


One of Dena's January layouts really appealed to me, it's very simple but has loads of potential I think.  For this card I've stripped it down to the bare essentials but I can show this card that I made a  little while ago which steps the layout up a few notches.  I took my tablet along so I could show the ladies photos of different card samples of the design. I took some different patterned paper from the same pack that had toadstools and leaves on it so the ladies could choose which pattern they wanted.  The toadstool paper was the favourite!

I punched eight 1" circles from a floral patterned paper but flipped two circles over to show the patterned side when I glued the circles down.  I stamped the sentiment and that was the front completed, so quick and easy. 


Here's the inside and the envelope.  The flower image is from the SU! 'Painted Seasons' stamp set which co-ordinates with the patterned paper I used to punch out the circles for the card front.  I stamped in Poppy Parade ink, full strength for the envelope flap but stamped off twice for inside the card.


Sometimes a flat design is needed if you want to pop something in the post and none of the four cards have popped up elements.  Of course, all four cards can be stepped up and made more dimensional and fancy - the beauty of a basic simple design is that it is a stepping off point!  

Supplies for butterflies card:
Stamps: SU! 'Positive Thoughts' & 'A Wish for Everything' sets
CS: SU! Lovely Lipstick & Whisper White
Ink: SU! Lovely Lipstick
Tools: SU! 'Stitched Rectangles' die set


Supplies for blooms card:
Stamps: SU! 'Thoughtful Blooms' & 'Sending You Thoughts' sets
CS: SU! Bermuda Bay, Smoky Slate & Whisper White
Ink: SU! Bermuda Bay, Pool Party & Smoky Slate
Tools: SU! 'Small Bloom' punch
Embellishments & accessories: SU! rhinestone jewels


Supplies for palms & cars card:
Stamps: SU! 'Timeless Tropical' set, Stampendous 'Sending Wishes' stamp
CS: SU! Early Espresso, Pear Pizzazz & Whisper White

Patterned paper: SU! 'Tropical Oasis' DSP
Ink: SU! Early Espresso & Pear Pizzazz 

Tools: SU! 'Coastal Weave' embossing folder, M&C Boutique stitched rectangle die

Supplies for punched circles card:
Stamps: SU! 'Painted Seasons' & 'Perennial Birthday' sets
CS: SU! Whisper White thick 

Patterned paper: SU! 'Painted Seasons' DSP
Ink: SU! Early Espresso & Poppy Parade
Tools: SU! 1" circle punch

Ruth

Friday, 17 January 2020

Merry Christmas Ornament Vellum Card

Every year I make a batch of Christmas gift tags to be used for the card group Secret Santa presents.  Some years I set homework by asking the ladies to make a card using their gift tag and I remembered this year!  Of course, I think it's only fair that I make a card with my tag!

Here's the gift tag.


I was inspired to make this 'card within a vellum card' after watching a YouTube video.  I like the idea a lot but I will say it takes quite a bit of card stock if you're fussy about covering up any adhesive - vellum being see through does present an adhesive visibility issue!

I made an A6 sized vellum card, made a smaller card using SU! Shaded Spruce CS and adhered that inside the vellum card.  I adhered a panel of patterned paper to the front of the Shaded Spruce card and decorated the front of the vellum card with the popped up ornament.  I made some slight alterations to my tag by adding on a few things - some extra red rhinestone jewels, a gold glitter ornament topper and some striped ribbon and sequin trim.


Here's a photo showing the 'card within a card' layout.


Here's the inside of the card with a stamped sentiment, patterned paper and a sprinkle of gold sequins.


Here's the back of the card with a panel of Shaded Spruce CS covering up the adhesive.


Here's the envelope where I simply covered the flap with the red patterned paper.


I was very happy to see that a few of the ladies brought along their homework - they'd all done a wonderful job, I forgot to take photos though!

Supplies:
Stamps: Hero Arts 'Very Merry Christmas' set
CS: SU! Shaded Spruce & Whisper White, Gold Glimmer Paper, vellum CS

Patterned paper: SU! 'Dashing Along' DSP
Ink: SU! Shaded Spruce
Tools: M&C Boutique holly ornament die from The Works, circle Nestabilities dies
Embellishments & accessories: SU! striped ribbon, gold mini sequin trim, Real Red rhinestone jewels, Dimensionals, gold sequins

Ruth

Saturday, 28 December 2019

One Sketch Layout - Nine Christmas Cards

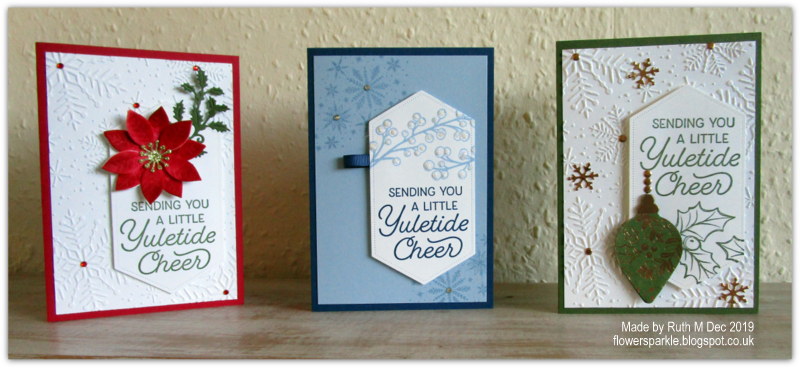
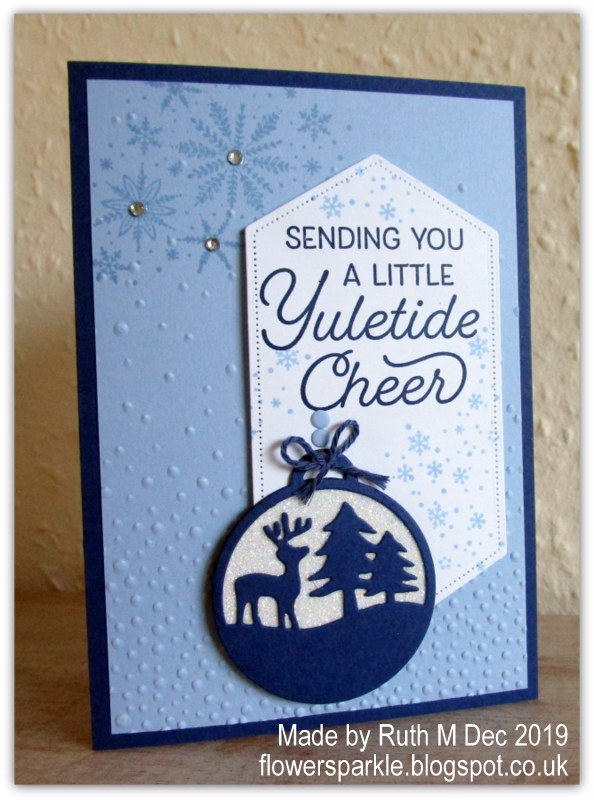
Following a card layout makes a card come together quickly and easily and that's very welcome at Christmas!  I made nine cards for my card group ladies using one sketch layout.  I kept the same sentiments and used the same 'Nested Label' die cut shape. 

Here are all nine cards.


Here is a group of three cards.


A second group of three cards.


The last group of three cards.


Card one.


Card one inside and envelope.


 Card two.


Card two inside and envelope.


Card three.


Card three inside and envelope.


Card four.


Card four inside and envelope.


Card five. 


Card five inside and envelope.


Card six.

 Card six inside and envelope.


Card seven.


Here's a closer look at the poinsettia.  I used a technique where you stack layers of single ply napkins plus one CS layer (the CS layer goes at the bottom) before die cutting a shape.  Once the shapes have been die cut you add colour using water and your chosen medium - I used Real Red and Cherry Cobbler inks from a re-inker bottle applied using an Aquapainter.  You then need to let the shapes dry completely before assembling.  I loved the velvet like finish and the different colour shading - some of the napkin layers needed to be glued together and I wasn't keen on that aspect!  I'm glad I tried the technique but it's not something to do if you're pressed for time and you need to make quite a few.


 Card seven inside and envelope. 


Card eight.


Card eight inside and envelope.


Card nine.

 Card nine inside and envelope.


 It was great fun to use the same layout with different colours, techniques, supplies and embellishments to end up with nine different cards!

Ruth

Thursday, 7 November 2019

November 2019 Card Group Projects

Unfortunately, circumstances meant we had to cancel our October card group meeting so it was especially nice to see everyone at group this afternoon.  I just can't believe we've only got one more group left in 2019!

The cards we made at the September card group meeting proved a tad challenging and the ladies pleaded with me for "simple cards next time".  So, a month later than originally planned, I'm sharing the three simple cards I designed for them.

I went to The Works - I don't go in there very often but when I do I make a beeline for the dies and other crafty supplies.  I can't seem to visit The Works without picking up a couple of dies because they are such a bargain, I just can't resist!  On this visit I came across a roll of Santa's belt ribbon and I thought it would make a cute and simple Christmas card.  I wrapped a section of the ribbon around a square of Real Red CS that I'd embossed with the SU! 'Subtle' embossing folder, layered that onto a mat of Basic Black CS and added black punched circles to act as buttons. I thought the sentiment was ideal for this Santa coat card as it's what Saint Nicholas says at the end of "The Night Before Christmas", the poem written by Clement Clarke Moore.  After stamping the sentiment I added three red rhinestone jewels.


The 'Subtle' embossing folder adds such a nice touch of texture!  I layered a few circle punched shapes together to add dimension to the buttons.


Here's the inside of the card and the envelope.


The second card features a holly wreath die I also picked up from The Works.  I cut the bow portion of the die separately from Real Red CS, snipped it and glued it over the top of the Mossy Meadow wreath shape.  I lifted the holly leaves up a bit for some dimension and added pearls to embellish.  I absolutely love the mixed fonts of the 'Christmas Greetings' sentiment!


Here's a closer look at the wreath, the detailing on the holly leaves is fab!


I used some long retired SU! patterned paper to decorate the inside of the card and the envelope.


The final card is a birthday card - although with different sentiments it could become a Christmas card! A good design for a male too I think!  I finally used my SU! 'Painted Seasons' goodies (stamps, dies and patterned paper) that I got during Sale-A-Bration at the beginning of the year.  The card base is Crumb Cake, the mat layer is Soft Suede and the plain CS strip is Poppy Parade.  I stamped the pine cones in Soft Suede ink, the leaves in Call Me Clover ink and the sentiment in Poppy Parade ink.  The pine cone on the left is popped up on Dimensionals.


Here's the inside of the card and the envelope.


Every year at card group we exchange Secret Santa gifts and I make the tags to go on the presents and distribute them at the November meeting.  This year I've used a pretty holly ornament die that - surprise, surprise, I got in The Works! 

I die cut the ornament in SU! Shaded Spruce CS and adhered a Whisper White CS circle behind the ornament shape.  One of my Nestabilities circle dies was the perfect 3 1/4" size - what a result!  I added red rhinestones as holly berries and tied on red and white baker's twine to complete the tags.

Here's the pile of tags.


Here's just one tag.  I love the font of the merry Christmas plus the detail on the holly leaves!  


As a bit of fun I put names in a hat and held a draw for two prizes - one each of the holly wreath die and the holly ornament die.  Can't wait for next month and the Secret Santa pressies, that's always fun!

Supplies for Santa coat card:
Stamps: SU! 'Greatest Part of Christmas' & 'Christmas Traditions' sets

CS: SU! Real Red, Basic Black & Whisper White
Ink: Memento Tuxedo Black
Tools: SU! 'Subtle' embossing folder, heart from SU! 'Trim Your Stocking' die set, SU! circle punches, SU! 'Christmas Traditions' punch
Embellishments & accessories: Santa belt ribbon from The Works, SU! red rhinestone jewels, Dimensionals


Supplies for holly wreath card:
Stamps: SU! 'Greatest Part of Christmas' set
CS: SU! Mossy Meadow, Real Red & Whisper White

Patterned paper: SU! 'Season of Cheer' DSP
Ink: SU! Mossy Meadow
Tools: M&C Boutique holly wreath die from The Works, circle punches
Embellishments & accessories: white pearls, red pearls


Supplies for pine cones birthday card:
Stamps: SU! 'Painted Seasons' & 'Perennial Birthday' set
CS: SU! Crumb Cake, Poppy Parade, Soft Suede & Whisper White

Patterned paper: SU! 'Painted Seasons' DSP
Ink: SU! Call Me Clover, Poppy Parade & Soft Suede
Tools: SU! 'Four Seasons' & 'Stitched Rectangles' die sets
Embellishments & accessories: SU! Dimensionals


Supplies for gift tags:
Stamps: none
CS: SU! Shaded Spruce & Whisper White
Ink: none
Tools: M&C Boutique holly ornament die from The Works, circle Nestabilities die
Embellishments & accessories: red & white baker's twine, SU! red rhinestone jewels

Ruth
01 09 10