Showing posts with label Home Decor. Show all posts

Saturday, 20 March 2021

Butterflies Peg Frame

I had to go to Brighton for my Covid vaccination and I took a trip to Poundland while I was there as I do love a good look round a pound shop!  I found a peg frame and thought it would be ideal for the gorgeous SU! 'Butterfly Bijou' patterned papers.  

I cut patterned paper pieces to size, added Glitter Enamel Dots to two panels and pegged the panels in place.  For the central panel I used two butterflies die cut from a sheet of patterned paper.  I shaped the wings and added clear Wink of Stella for a touch of shimmer.  What a quick and easy home decor project!


Here's a closer look at the centre panel.  The shimmer doesn't show in the photo but it's beautiful in real life!


Ruth

Sunday, 15 November 2020

Poppies Frame Home Decor Piece

A couple of weeks back my Slimming World consultant, Lisa, was trying hard to motivate and encourage us during a Zoom meeting and she came out with this snappy little slogan "nourish to flourish".  A few days after I found this chunky photo frame in a charity shop and I thought it would be ideal to upcycle as a home decor piece featuring the slogan.

I rummaged through my patterned paper stash to find some pretty paper and I settled on some poppies so that determined what to use to decorate the outside of the frame.  This project provided a fantastic opportunity to use my SU! 'Playful Alphabet' dies.  I cut the letters using Early Espresso CS and some Foam Adhesive Sheets which mean the letters are dimensional immediately - I love that!  The 'Poppy Moments' die set has some leaves to go with the poppy blooms but I chose to use a leaf die from the 'Stitched Leaves' die set instead.  I used large glue dots to fix the poppies to the frame.


Supplies:
Stamps:none
CS: SU! Early Espresso Granny Apple Green, Poppy Parade & Real Red 
Patterned paper: SU! 'Peaceful Poppies' DSP
Ink: none
Tools:SU! 'Playful Alphabet', 'Poppy Moments' & 'Stitched Leaves' die sets
Embellishments & Accessories: SU! Foam Adhesive Sheets, large glue dots

Ruth

Wednesday, 8 April 2020

Floral Embroidery Hoop Decor Item

Towards the back of the Stampin' Up! 2020 mini catalogue on page 66 there is a 'One Concept Four Ways' article, it's great.  The article has five different projects and shows how to make a card, gift package, decor item and a scrapbook page within each project using a variety of SU! products. One of the items on the page is a decorated embroidery hoop made using gorgeous papers from the 'See a Silhouette' pack of DSP.  It really caught my eye and I've wanted to have a go at making one myself for ages.  As I'm on holiday from work this week I had some time to get in the craft room.

I was on a video call with my friend Lesley and I told her I was going to make it and she suggested adding bees to it, well what a great idea!  After fussy cutting flowers and leaves I placed them on the hoop using glue dots.  I then sandwiched clear monofilament thread between stamped and die cut bees and adhered the thread behind the flowers.


Here's a closer look at the bees.  I coloured the stripes with a dark Mango Melody Stampin' Blends pen and added shimmer to the wings with some clear Wink of Stella.


What a happy project to work on and a very cheerful item to have hanging up in our living room!

Supplies:
Stamps: SU! 'Honey Bee' set
CS: none

Patterned paper: SU! 'See a Silhouette' DSP pack
Ink: SU! Dark Mango Melody Stampin' Blends marker
Tools: SU! Paper Snips for fussy cutting
Embellishments & accessories: embroidery hoop clear monofilament thread, SU! glue dots, clear Wink of Stella pen

Ruth


Tuesday, 19 November 2019

Tree Frame Home Decor

I do love a good rummage around a charity shop and on a recent visit I came across a fun tree photo frame that caught my eye.  I immediately thought of placing some pretty patterned papers in the circle apertures.  It was absolutely filthy but a bargain so I brought it home and gave it a thorough cleaning.

As the frame was tree shaped I decided that papers from the SU! 'Bird Ballad' pack would be ideal.  I have circle dies that are the perfect size for the apertures so it was quick and easy to cut out the papers.


Here's a closer look at the circle apertures.


What a sweet little project to work on.  It will be very easy to replace the patterned papers so I can change things up any time for a bit of variety!

Ruth

Thursday, 3 January 2013

Two Non Card Christmas Projects - Lantern Tag & Owl Frame

Today I'm sharing two projects I made before Christmas - a gift tag and a decorated frame.  I was in my LSS looking at dies and I fell in love with the lantern die as soon as I clapped eyes on it.  I just knew I wanted it - maybe because I have rather a thing for candles, tealights, lanterns and so forth.   My friend Lesley was with me and she liked it too but said "but what would you do with it?"  The first thing that came into my head was gift tags and when I said that there was an "ooooooh" between us and two pairs of hands reached for the lantern dies!  I rang Lesley later that day to excitedly report that I'd made a lantern tag and she replied "so have I!"  So often we buy crafty stuff and wait ages to use it but us two that day could NOT wait to get busy with that die!

I started off by cutting one black shape and then cut a piece of  Very Vanilla CS to fit behind the lantern.  I sponged Scattered Straw and Wild Honey Distress Inks onto the vanilla CS, die cut another black lantern and sandwiched the sponged panel between the two black lanterns.  I punched a holly branch and added some red nailheads for berries.  I punched a small hole at the top of the lantern and threaded some sparkly gold thread through.  I bought a bright red gift bag to put Owen's presents into and I tied this tag to one of the handles - it looked lovely against the red bag!   


I stamped and sponged a panel to go on the back so I could write a message.


The idea for this next project started when I picked up the cream frame in a charity shop and I thought it would be great to decorate with Christmassy patterned papers.  I handed the frame to Owen to hang onto until I was ready to pay and he gave me a look - I said "I've got plans for that!" and his response was a very sarcastic "yeah, right!"  OK, so yes, I do have a collection of things I've bought or kept 'cos I have plans for them and no, a lot of the time it doesn't happen!  Anyway, that response obviously stung me into action 'cos a few days later I had hung this frame up as part of our Christmas decor!

I chose the lovely SU! Snow Festival DSP papers and first cut out three squares to go behind the apertures.  I then covered the top, bottom, front and sides of the frame with patterned paper pieces I'd cut to size - I even mitred the corners!  I then applied clear gloss varnish over the patterned paper to keep the frame durable.  I dressed the frame up with some Gumball Green ribbon.  Finally I added a rhinestone to the snowflake on the owl's belly and a dome sparkle sticker to the hat - on the outside of the glass.


Here's a close up of the owl. 


Owen was very surprised when he saw it - probably amazed that I'd actually done something with the frame I'd bought!  We both really like our new Christmas frame, it certainly added a bit of Christmas cheer and it was a very happy project to work on!

Supplies for lantern tag:
Stamps: Penny Black 'Beautiful Season'
CS: SU! Basic Black, Old Olive & Very Vanilla
Ink: Scattered Straw & Wild Honey Distress Inks, Memento Tuxedo Black
Tools: Marianne Creatables Lantern die, Martha Stewart Holly Branch punch, small circle punch, sponges
Embellishments & accessories: red nailheads, gold thread


Supplies for owl frame:
Patterned paper  SU! Snow Festival DSP
Embellishments & accessories: 3 aperture photo frame, SU! Gumball Green stitched satin ribbon, glitter dome sticker, rhinestone jewel, clear gloss varnish


Photobucket

Wednesday, 28 November 2012

Sparkly Snowflake Candle

I'm sharing a non card project today.  I recently bought a Sizzix set of snowflake dies, the set has a snowflake shape, a large snowflake wreath shape and a plain circle frame.  I thought the snowflake wreath shape would be perfect to place around a pillar candle and I planned to make a few as gifts.  I was anxious to try my idea out - well, I was certainly anxious after trying it!  It was a nightmare getting the wreath to cut out, I was losing the will to draw breath by the time I managed to get a Whisper White shape out!  I really wanted a silver wreath but no way, no how, could I get any silver CS to cut out - even getting a Whisper White CS shape to cut was horrendous!  I know the tension on Big Shot machines varies and I do have problems cutting the more intricate dies with my machine.  Some of the Memory Box intricate shapes are a definite no-no for my machine.  I tried various sandwiches, used a Cuttlehug metal plate, shims, brand new cutting pads and wrestled with my Big Shot 'til my muscles hurt but it was SO tough getting a shape to cut.  With that, the time it took, the waste of CS plus the wear and tear on plates I won't be trying this particular die again!  I'm so disappointed as I love snowflakes and I really wanted to do lots with the snowflake wreath die - hey ho, at least the circle frame and snowflake shape cut out OK!  I'll pass the wreath die onto my friend Jan to see how she gets on with using it in her machine.  If Jan succeeds I'll ask her nicely if she can cut some shapes out for me if I give her the CS!

Anyway, I punched out a few silver mirror CS snowflakes, dotted them here and there on top of the white wreath, added rhinestones to the centres and laid the wreath on a plain glass candle plate. 


Then I set to work prettying up the pillar candle.  I die cut a snowflake from silver mirror CS and attached it to a strip of SU! Silver Glimmer Paper with a large rhinestone brad.  I then pushed the brad prongs into the candle to hold the sparkly strip in place while I taped the strip together at the back.  Here's the candle on the plate ready to be lit.  As the candle is large I'm hoping only the centre wax will melt and I won't get any wax drips down the sides - we'll have to wait and see! 


Supplies:
CS: SU! Whisper White & Silver Glimmer paper, silver mirror CS
Tools: Sizzix 'Frame, Snowflake' Framelits die set, snowflake punches
Embellishments & accessories: Dovecraft large rhinestone brad, SU! Rhinestone Jewels


Photobucket

Tuesday, 10 April 2012

Everyday Enchantment Frame

I just love the gorgeous Everyday Enchantment papers.  I covered this chest of drawers with a couple of the papers a while ago and now I've decorated a frame.  The Glitter Pot have large frames with sheets of 12" x 12" paper inside as you enter the shop and in the refreshment room and I've always liked how they look.  We needed a cosmetic fix to cover a hole in a wall and when I saw this 3 panel frame in Wilko I knew it would be perfect!

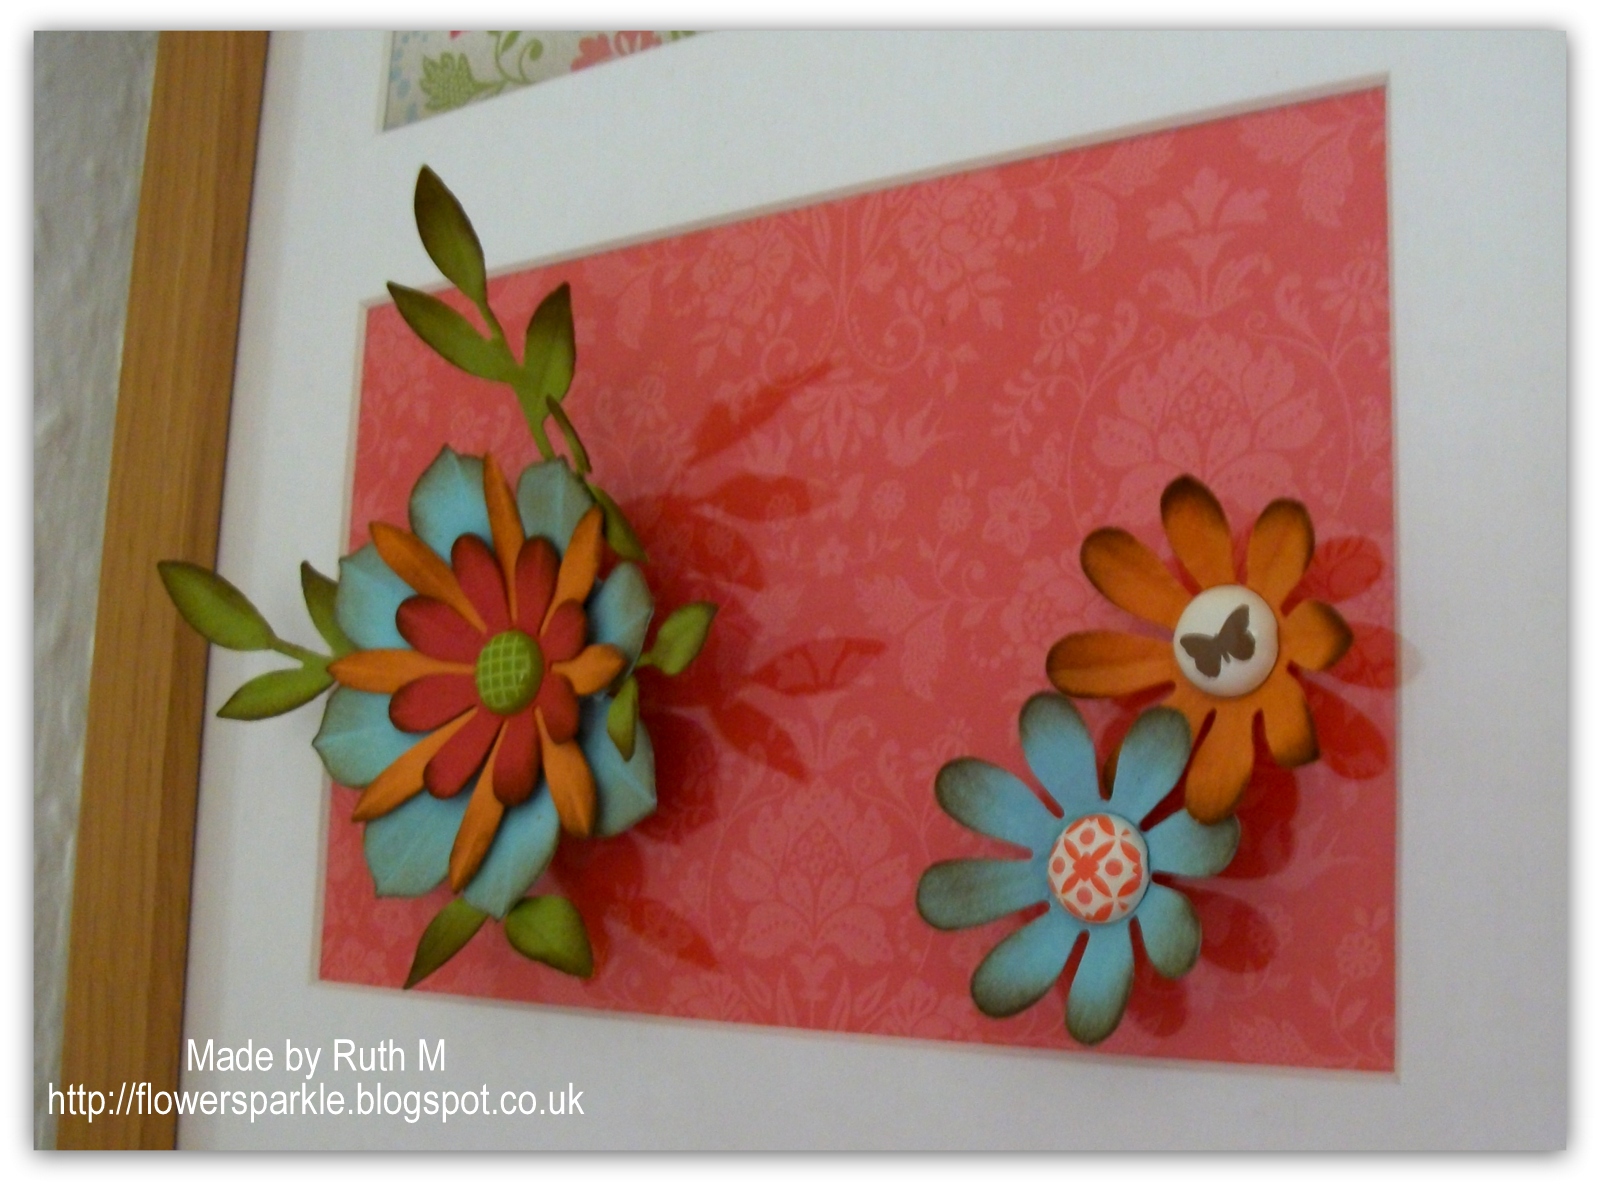
I put pieces of my fave papers inside the frame a week or so ago and hung the frame up.  I knew I wanted to put some flowers on the centre panel and I wanted my Blossom Party die so badly but hubby made me wait until my birthday.  Saturday morning I dashed off upstairs to my craft room and had a very happy time die cutting, shaping and sponging away!  I like the frame so much better now I've added the flowers - that naked centre panel was bothering me no end!


Here's a close up of the centre panel.  I've used some luscious contraband Everyday Enchantment brads for my flower centres.  I attached the flowers to the frame with glue dots.  Should I get tired of this paper (at the mo, that seems unlikely!) or if I fall in love with a different selection of papers I can always change what goes in and on the frame - gotta love that!


Supplies:
Stamps: None
CS: SU! Ruby Red, Pear Pizzazz, Pool Party & Peach Parfait
Patterned paper: SU! Everyday Enchantment DSP
Ink: SU! Soft Suede
Tools: SU! Blossom Party Bigz die, Little Leaves Sizzlits die, DEET & moulding mat, paper piercing tool, sponge dauber
Embellishments & accessories: SU! Everyday Enchantment brads, glue dots


Photobucket

Monday, 12 March 2012

A Non Card Project - With Knobs On!

My friend Gill gave me a chest of drawers that had contained Sanctuary bath goodies.  I've trained my friends very well - they know not to throw boxes out until I've taken a peek to see if I can do anything with them!  This box is very sturdy and I was delighted to get it - but, my goodness, it was VERY orange!  I really love the flower and leaf designs but I couldn't leave the box as it was, I couldn't live with that much orange!

I saw this lovely chest of drawers recently that had been covered with SU! Spice Cake papers and I thought I would alter my chest with those papers too.  However, having recently got the utterly gorgeous Everyday Enchantment SAB papers I chose those to alter my chest.  I thought the colour scheme went so much better with the deep red carcase.  Originally I was going to cover the whole chest but I decided to just cover the drawer fronts and to add knobs to the drawers.  Quick and easy  - right?!

Wrong - who knew knobs could be so troublesome?!  The first lot I bought had to be taken back because the screws that came with the knobs weren't the right size so you couldn't fit the screw and knob together - no way, no how!  So then I chose these small wooden ones and at least the screws fitted - but they were very long.  Owen makes a trip to the shed to get some shorter ones - success - but they're still too long and my knobs are wobbly.  Owen says we need washers to sort this issue out so off he goes to the shops.  He was gone ages and when he came back he had no washers.  He'd managed to find some rubber discs but they didn't have holes in but he thought we could make our own holes.  I get  my trusty Crop-a-dile out and make all the holes, that thing cuts like butter!  So eventually, my knobs are on and they're not wobbly - yay!  Here's the finished result.


I couldn't decide which papers to use so I used two patterns.  This is now gracing a bookshelf holding all kinds of odds and ends and I love it!

Photobucket


Saturday, 15 January 2011

Winter Owl Candle Jar Wrap

Our friends Debbie and Mike gave us this lovely scented candle in a jar before Christmas.  It's scented with cherry and almond fragrance - yummy, it makes me want Bakewell tart each time I light it LOL!  It's a big candle and will last us a long time, it has a 100 hour burn time.  We used it over Christmas and before I lit it I decided to make a wrap for it.  I made it a winter themed wrap as opposed to a specific Christmassy one so I could keep it out after Christmas.

I wrapped olive snowflake paper around the body of the jar.  Nothing is adhered to the glass so that I can easily swap out the wrap if I want to.  I used Labels Four Nestability dies for the image and mat layers.  I punched holes in the olive mat and tied it onto the jar with vanilla ribbon.  I embossed the cherry mat with the Victorian Fleur embossing folder and popped it up.  After stamping the owl and die cutting the label shape, I edged the shape with olive ink and added an olive crystal to the centre of the large snowflake.  I've also popped up the owl layer.

For the lid, I die cut cherry and olive circles.  I stamped a large snowflake on vanilla CS, die cut it into a circle, edged the circle with ink and put an olive crystal in the centre.  The olive and snowflake layers are popped up.


Supplies:
Stamps: Inkadinkado Winter Birds clear set, My Cute Stamps Let It Snow clear set
CS: SU! Old Olive, Cherry Cobbler and Very Vanilla
Patterned paper: SU! Merry Moments Designer Series Paper pack
Ink: Memento ink in Rich Cocoa & Rhubarb Stalk
Tools: Labels Four & circle Nestabilities dies, PaperMania Victorian Fleur embossing folder, Crop-A-Dile
Embellishments & accessories: SU! Very Vanilla grosgrain ribbon, olive crystals, 3d foam pads


Photobucket
01 09 10