Showing posts with label Card-in-a-box. Show all posts

Wednesday, 11 March 2015

Four Cards For "Wooden It Be Good" Glitter Pot Class

Last Saturday I ran a "Wooden It Be Good" all day class at the Glitter Pot.  The class featured four cards made with faux wood effects using a woodgrain stamp and a woodgrain embossing folder.

I love a card with a dangly element so I had to include a personal favourite of mine - one of my dangly birdhouse tent card designs!  I inked the plain side of the X Cut Woodgrain folder with Gathered Twigs Distress Ink and embossed the front of the kraft card base - oh my giddy aunt, what a fab faux wood look that gives, so realistic!  I cut a circle aperture out of the card front - making sure to keep the cut out circle to use on a later card - and added a frame.  The kraft die cut birdhouse was stamped with the Hero Arts 'Designer Woodgrain' stamp using VersaFine Vintage Sepia ink and I inked the edges of the birdhouse with gathered Twigs Distress Ink.  Baker's twine was threaded through the hole and taped to the back of the card on the inside so the birdhouse dangles freely.  A piece of blue CS was added to the inside of the card and the front was embellished with die cut leaves, punched flowers, gems and gingham ribbon.  A few minutes before the class started I decided the card really should have a bird on it - so I quickly added a small black die cut bird to the birdhouse!


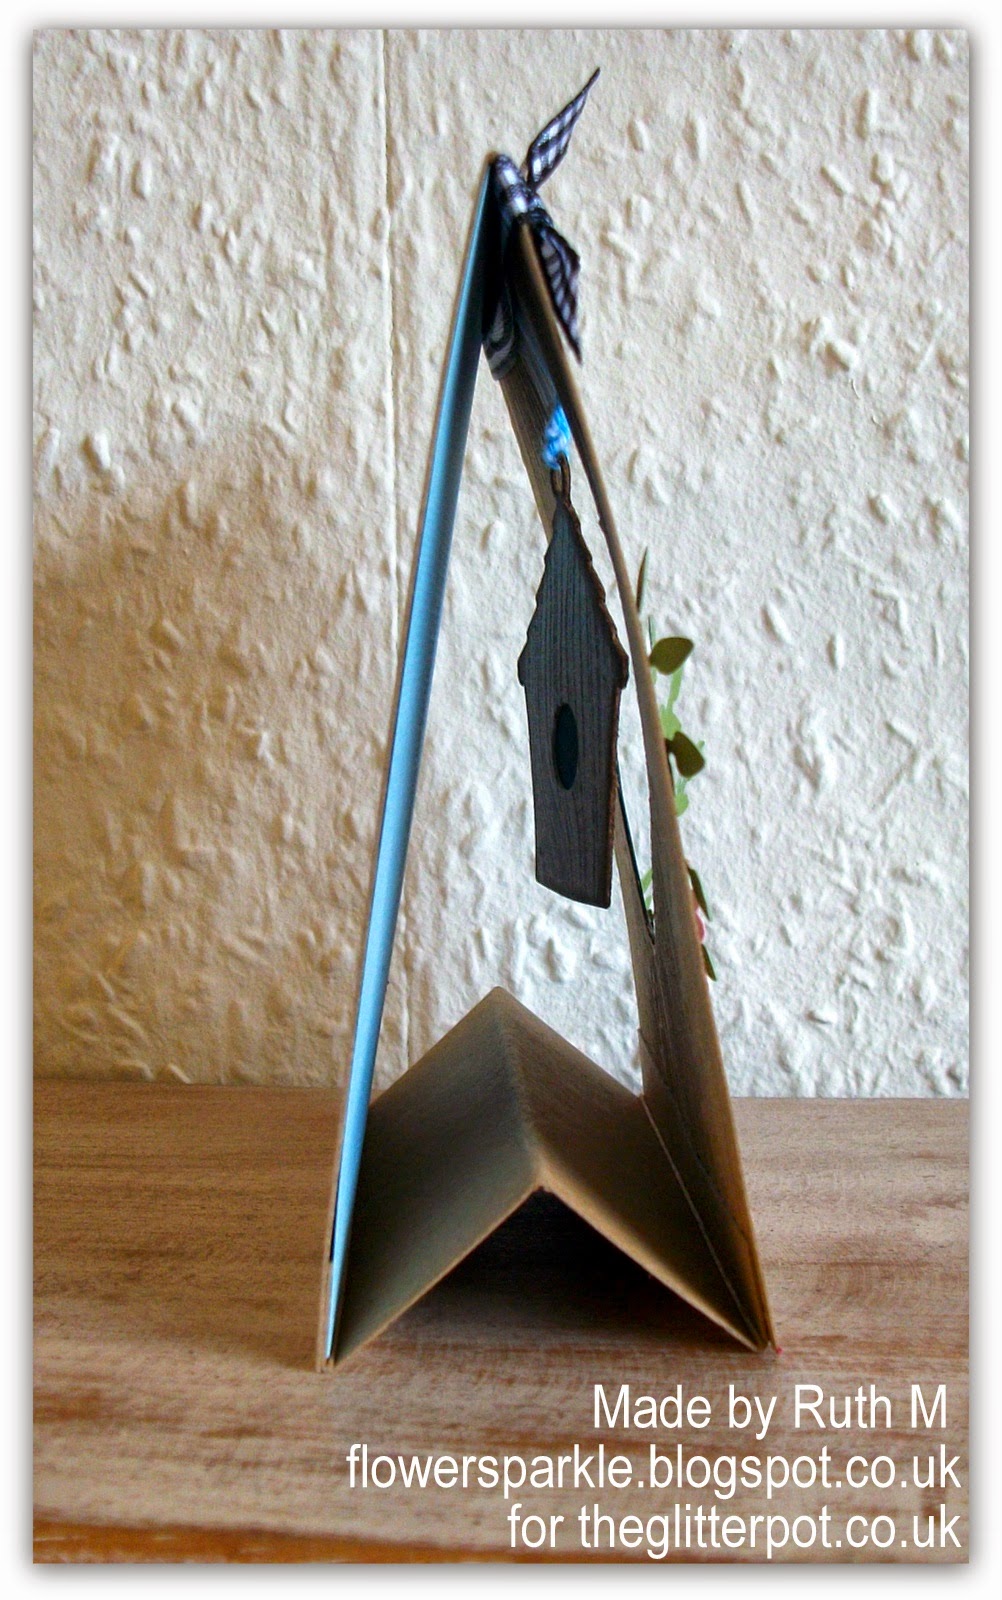
Here's a view of the card from the side showing the W shaped piece of CS I attached inside so that the tent card doesn't collapse when on display - that's a pet peeve of mine!

The second card was a simpler design of a wooden flower box with punched leaves and flowers.  I used a Smoothies ink blending sponge to apply Tumbled Glass Distress Ink to the front of the white card base and added a torn strip of green Core'dinations paper at the bottom.  I stamped a rectangle of kraft CS with the woodgrain stamp, trimmed it to size and used some offcut pieces for feet for the flower box.  Using an alcohol marker and ruler I drew lines to represent planks and added dots to look like nailheads.  The edges of the flower box pieces were inked with Gathered Twigs ink and then I glued the pieces to the card front.  Then it was time to get busy punching out leaves and flowers to fill the box.  I edged all the flowers with Victorian Velvet Distress Ink, shaped them and added a gem to each centre.


After lunch the class made two masculine cards featuring DIY tools made using a fab Leane Creatief set of dies.  The dies are a great size and have wonderful embossed detail to them.  I didn't emboss the shapes after I'd die cut them, I just added a shim when cutting and that helped the embossed detail stand out.  I made a card in a box design and placed the tools inside so it looks like a tool chest - I was really happy how that idea turned out!  I used kraft CS for the card in a box, stamped the Hero Arts Woodgrain stamp in Gathered Twigs ink and inked the edges with Walnut Stain ink.  I used silver mirri CS to cut the tools and used coloured CS for the screwdriver handles.  The blue handled screwdriver and the spanner are both popped up.  I added a flagged sentiment banner and the screw brads were the perfect finishing touch!


Here's another view so you can see the tools inside the box.


The final card uses the die cut circle left over from the dangly birdhouse tent card - a simple design with popped up tools and a few silver nailheads.


What a fun day - lots of laughs and some legendary home made rock cakes - add in crafting and that's a recipe for a perfect day!  I'm really having a blast running the classes at the Glitter Pot, I'm meeting some amazingly creative crafters who are very happy to share wonderful tips and ideas.  Many thanks to the lovely ladies who attended that day!  I must give a special shout out to Carol, Lesley and Wendy - my posse of supportive pals - posse sounds better than groupies which is what they called themselves LOL!  Big {{{{HUGS}}}} to you!

Supplies for dangly birdhouse tent card:
Stamps: Hero Arts Design Block 'Designer Woodgrain'
CS: Craftwork Cards kraft, Glitter Pot black, Bazzill 'Starmist', 'Sunshine' & 'Petunia', Core'dinations 'Amazon'
Ink: VersaFine Vintage Sepia, Gathered Twigs Distress Ink
Tools: X Cut 6" x 6" 'Woodgrain' embossing folder, Marianne Design 'Birdhouse Flowers' die & stamp set, Joy Crafts Vintage Flourishes 'Branch Leaves' die, Woodware 'Christmas Flower' multi punch, circle Nestie dies, sponge dauber, flower shaper & moulding mat
Embellishments & accessories: black & white gingham ribbon, blue & white baker's twine, PaperMania black gems 


Supplies for wooden flower box card:
Stamps: Hero Arts Design Block 'Designer Woodgrain'
CS: Woodware white Linen Effect, Craftwork Cards kraft, Bazzill 'Petunia', Core'dinations 'Amazon'
Ink: VersaFine Vintage Sepia, Tim Holtz Tumbled Glass, Victorian Velvet & Gathered Twigs Distress Inks, dark brown alcohol ink marker
Tools: Woodware 'Grass 1', 'Regular Flower' & 'Large Flower' punches, Creative Expressions 'Smoothies' ink blending sponge, sponge dauber, flower shaper & moulding mat
Embellishments & accessories: PaperMania clear gems


Supplies for tool chest card in a box:
Stamps: Hero Arts Design Block 'Designer Woodgrain', Woodware 'Happy Birthday'
CS: Craftwork Cards kraft, silver mirri card, Bazzill 'Bahama' & 'Raven'
Ink: VersaFine Vintage Sepia & Onyx Black, Tim Holtz Walnut Stain Distress Ink
Tools: Leane Creatief  'Tools' die set, paper piercer
Embellishments & accessories: Woodware Screw Brads, 3D foam pads


Supplies for wood circle & tools card:
Stamps: none
CS: Craftwork Cards kraft, Bazzill 'Raven' & 'Sunshine', silver mirri card
Ink: Tim Holtz Gathered Twigs Distress Ink
Tools: X Cut 6" x 6" 'Woodgrain' embossing folder, circle Nestie die
Embellishments & accessories: silver nailheads, 3D foam pads 


 photo RoseRuth.gif

Saturday, 21 February 2015

Flowers, Bees & Ladybirds Happy Birthday Card In A Box

A few weeks ago Angela and Janet came to my home to make two cards using the SU! 'Hardwood' stamp.  I showed them cards plus photos of cards I've made using this fabulous stamp and they particularly liked this card in a box.  The ladies asked if they could make one next time they came for a class.  They came on Thursday afternoon and this is the card I designed for them to make.  Not exactly the same design as my previous version, I've changed a few details.


This card in a box fits inside a C6 envelope and I used Crumb Cake CS for the base.  I stamped the Hardwood stamp onto the base using Soft Suede ink.  I rounded the corners and inked the edges with Soft Suede ink applied with a dauber.  The flowers and bees were stamped onto watercolour paper, coloured using inks and a waterbrush and cut out with their matching dies.  I used a clear Gelly Roll pen to add shimmer to the bees wings.  I attached the bees to strips of acetate so it looks like they're flying and buzzing happily amongst the flowers.  I stamped the sentiment, cut it out with a label die and popped up the die cut ladybird.

Here's another photo.


Here's the back of the card and the envelope.  I popped up the die cut ladybird - I love the open wings on this die cut shape, she looks all set to take to the air!


I wrote these instructions on how to make a card in a box if you'd like to check them out.   

Supplies:
Stamps: SU! 'Hardwood' background stamp, Hero Arts 'Flower Garden' stamps & dies combo set, 'Happy Birthday Wishes' from SU! 'Simply Sketched' set, 'good things' from an old Hero Arts set
CS: SU! Crumb Cake, Real Red, Basic Black & Whisper White, watercolour paper, acetate
Ink: VersaFine Onyx Black, SU! Pink Pirouette, Daffodil Delight, Crushed Curry, Melon Mambo, Pool Party, Bermuda Bay & Soft Suede, SU! Basic Black marker, Sakura clear Gelly Roll pen
Tools: dies from Sizzix 'Flower Garden' stamps & dies combo set, Elizabeth Craft Designs 'Ladybugs' dies set, label shape Framelits die from Sizzix Big Shot Starter Kit, water brush
Embellishments & accessories: SU! Dimensionals


 photo RoseRuth.gif


Monday, 28 April 2014

Birdhouses & Blooms Birthday Card In A Box

Yep, it's another card in a box!  I made this one for Lesley's birthday.  We have a great time when we're together at the Glitter Pot, our local craft shop, though we sometimes act the "terrible twosome" but I like to think we keep the staff entertained and amused!  The other issue about us being together is that we find things, point them out to each other, discuss what you could do with it and that invariably ends up with the item going in both our baskets!   I tell my hubby Owen "Lesley made me buy it!" and Lesley tells her hubby Dave that "Ruth made me buy it!"  It has been known that other customers in the shop have been roped in, influenced and encouraged by us as well!  So, it's all Lesley's fault that I now have a "thing" for birdhouses and so I had to include some on her card! 

This card in a box fits inside a 6 1/4" square envelope.  Monica has this wonderful video tutorial for this size of card in a box on YouTube HERE.  Monica uses metric measurements but I'm old school (or just old!) and prefer to work with imperial measurements.  So to make this card I placed a piece of Smoky Slate A4 CS into my Simply Scored board with the long edge at the top and scored at 2 3/4", 5 1/2", 8 1/4" and 11".  I turned the CS and scored at 2 3/4" and then I trimmed the piece to 6" tall.  I have a PDF document on my Tutorials page with instructions on how to make a card in a box.  I have recently updated it to include the measurements for this size of card in a box.  

My colour combo for this card is Smoky Slate, Basic Grey, Melon Mambo, Blushing Bride, Gumball Green and some black and white.  I stamped the Hardwood stamp over the card using Smoky Slate ink, cut about 1/2" off the flaps that fold down to make them shorter and I rounded the corners.  I then got busy, stamping, punching and die cutting to get flowers, foliage, birdhouses, birds, butterflies, a border and a sentiment label!  The Petite Petals flowers were stamped in Melon Mambo ink onto Blushing Bride CS before I punched them out.  This is the card after I'd finished assembling all my stamped, punched and die cut pieces and sprinkled on some iridescent gems.  Phew, it took a while!


Here's a view from the side. 


Here's a closer look at the top portion.


Here's the back panel where I left just enough room to write a message!


Went all out on decorating the front of the envelope too - Lesley's worth it!  I have to say I'm probably over these for the time being, they're great fun to make but very time consuming and my desk looked like a bomb site after I'd done.  It might be a while before I make another card in a box! 


Supplies:
Stamps: SU! 'Hardwood', SU! 'Petite Petals' set, 'Happy Birthday' from Hobby Arts, frame from Hero Arts 'Sending You Love' clear set
CS: SU! Smoky Slate, Basic Grey, Melon Mambo, Blushing Bride, Gumball Green, Basic Black & Whisper White
Ink: Memento Tuxedo Black, SU! Smoky Slate & Melon Mambo
Tools: SU! Simply Scored board, Paper Trimmer, Petite Petals punch & Beautiful Wings Embosslits die, Joy Crafts Vintage Flourishes 'Leaf 2' die, Poppystamps 'Meadow Leaf' & 'Carolina Birdhouse' die, Cheery Lynn 'Birdhouse with Lattice' die, Crafts Too 'Leafy Border 2' die, Memory Box 'Gold Finch', 'Resting Birds', 'Bistro Label' & 'Chadwick Label' dies, Hero Arts 'Small Tag Frame' die, Sizzix 'Lace Edging' Decorative Strip die, sponge dauber
Embellishments & accessories: PaperMania iridescent gems, SU! Dimensionals


 photo RoseRuth.gif


Wednesday, 16 April 2014

Easter Chicks Card In A Box & A Gift Bag

Yuck, I've been poorly the last few days with a tummy upset.  Despite not feeling 100% I was back in my craft room today making a gift bag to accompany an Easter card in a box.  I made the card a few days ago - it evolved as it went along and ended up being quite time consuming but it was a lot of fun to create!  This card is for our friends Jan and Alan.

I absolutely adore the chick from the SU! 'A Good Egg' stamp set, it really is so cute!  The chicks were stamped on watercolour paper and coloured with inks and a water brush.  I paper pieced the eggshells and fussy cut the trio of chicks.  I die cut leafy borders, clouds, butterflies, a banner and then punched grass and flowers and assembled.  The chick at the back and a couple of the clouds are popped up.


Some pics from different angles plus a close up of the box part.


Here's the back where I wrote my message.


Here's the envelope flap - yeah, I went a bit mad LOL!


This morning I used my Gift Bag Punch Board to make this gift bag to go with the card.  It's filled with Lindor chocolates - yum!  Because my tummy is still not right I didn't even sneak a chocolate for myself!


Supplies:
Stamps: SU! 'A Good Egg' & 'Wacky Wishes' sets

CS: SU! Pool Party, Daffodil Delight, Strawberry Slush, Wisteria Wonder, Lucky Limeade & Whisper White
Patterned paper: SU! In Color DSP, My Mind's Eye Collectable Journey Adventure
Ink: SU! Pool Party, Lucky Limeade, Daffodil Delight, Pumpkin Pie
Tools:  SU! Score Board & Trimmer, Poppystamps Fancy Clouds die, Crafts Too Leafy Border 2 die, SU! Beautiful Wings Embosslits die, MFT Fishtail Flags Stax die, X Cut Bloom nesting die, Martha Stewart grass border punch, Woodware multi flower punch, We R Memory Keepers Gift Bag Punch Board, 1 3/4" & 2" circle punches, Crop-A-Dile, water brush, sponge dauber
Embellishments & accessories: SU! Pool Party ruffled ribbon, white baker's twine, rhinestone jewels & Dimensionals


 photo RoseRuth.gif


Thursday, 3 April 2014

April 2014 Card Group Projects

It was our April card group meeting today and I designed 2 card in a box cards for the ladies to make.  I usually make 3 cards but as these are a bit more time consuming and fiddly I kept to 2.  One card is portrait oriented and the other is landscape oriented but both cards will fit inside a C6 envelope.

I have a PDF document with instructions on how to make both the portrait and landscape oriented card in a box  on my Tutorials page which can be found HERE.

First up is a bright and cheery flowery card in a box.  Lots of die cut flowers for this one! The base is Crumb Cake CS and the other colours are Coastal Cabana, Daffodil Delight, Melon Mambo, Wild Wasabi and Very Vanilla.  The Sizzix 'Bunch of Flowers' Thinlits set of dies was used to create the stems and flowers.  There are a few Poppystamps Meadow Leaf die cuts in there too.  Each flower was topped off with a 1/4" punched circle in the centre.


A side view showing the layered butterflies on the side flaps.  


A front on view.


Here's the back.


The next card is a bright and breezy hot air balloons card.  This is a landscape oriented card in a box.  There was a bit of trial and error with different measurements but after a few attempts I arrived at a result I was happy with.  You can get 2 of this version of the card in a box from 1 piece of A4 CS so that's good!  

Because this card in a box is not as deep as the portrait version I only placed one crossbar inside the box.  

 
I die cut 5 Night of Navy balloons and 5 Whisper White balloons.  Using the die as a stencil, I placed the white balloons in the die and applied inks with sponge daubers.  The colours are Elegant Eggplant, Lucky Limeade, Daffodil Delight, Pacific Point and Real Red.  I snipped off the white baskets and layered the white shapes over the Night of Navy shapes.  The eggplant balloon and the sentiment banner are popped up.  I stamped birds on white CS and die cut a few clouds with birds and some without.  I sponged each cloud with Marina Mist ink and glued them behind balloons - and 2 clouds went on the side flaps.


A side view.


A front on view.


Here's the back.

Supplies for flowers card in a box:
Stamps: SU! 'One of a Kind' & 'Happiest Birthday Wishes' sets
CS: SU! Crumb Cake, Coastal Cabana, Daffodil Delight, Melon Mambo, Wild Wasabi & Very Vanilla
Ink: SU! Crumb Cake & Coastal Cabana
Tools: SU! Score Board & Paper Trimmer, Sizzix 'Bunch of Flowers' Thinlits die set, Poppystamps 'Meadow Leaf' die, 1/4" circle punch, SU! Elegant Butterfly & Bitty Butterfly punches, SU! plain & scalloped oval punches, X Cut corner rounder punch, Stamp-a-ma-jig
Embellishments & accessories: yellow pearls, SU! Dimensionals 


Supplies for balloons card in a box:
Stamps: SU! 'Cheer & Wishes' set, Hobby Art 'Flock of Birds', Penny Black 'Great Day',
CS: SU! Marina Mist, Night of Navy & Whisper White
Ink: SU! Marina Mist, Night of Navy, Elegant Eggplant, Lucky Limeade, Daffodil Delight, Pacific Point & Real Red
Tools: SU! Score Board & Paper Trimmer, Memory Box 'Beautiful Balloon' die, Poppystamps 'Fancy Clouds' die, MFT 'Fishtail Flags Stax'  die, sponge daubers
Embellishments & accessories: SU! Dimensionals


 photo RoseRuth.gif

Friday, 28 March 2014

Hot Air Balloons & Clouds Card In A Box

So far, the card in a box designs I've made have all featured flowers and butterflies.  I needed a thank you card for a male and I wanted to make it a card in a box.  Well, flowers and butterflies weren't an option so I had to ponder for a while.  I bought the Memory Box Beautiful Balloon die recently and I decided I'd try the card in a box with that.  A little while ago I came across this wonderful video on YouTube from Pam Sparks featuring Memory Box embossable dies.  Huge thanks to Pam for the inspiration!  

I made the card base from Soft Sky CS first, rounded the corners with a punch and I then worked on my balloons.  I die cut 4 white and 4 black balloons and dry embossed the 4 white ones.  I applied ink to each white balloon with a sponge dauber while the die was still in place - I used Marina Mist, Old Olive, Daffodil Delight and Real Red inks.  I then stamped a dotty stamp over the balloons in matching inks, again keeping the die in place.  I glued the white balloons over the top of the black ones after snipping the white baskets off and I attached the balloons to the card base, popping up the blue and red balloons.  I die cut lots of clouds, inked the edges of each cloud with Marina Mist ink and applied them to the card.


A straight front on view.


View from the other side. 


A close up of the balloons.


Here's the back panel where I wrote my message.

The finished card fits inside a C6 envelope but I went the whole hog and made an envelope using the SU! envelope punch board and Marina Mist patterned CS.  I layered two die cut label shapes for a name label and added Marina Mist Candy Dots to finish off.  I'm chuffed to say this card was very well received - warm fuzzies all round!


Supplies
Stamps: SU! 'Made for You' & 'Curly Cute' sets, Hero Arts 'Cling Dots' background stamp
CS: SU! Soft Sky, Real Red, Basic Black & Whisper White

Patterned paper: Marina Mist dotty paper from SU! Polka Dot Parade DSP pack
Ink: SU! Marina Mist, Old Olive, Daffodil Delight & Real Red, Memento Tuxedo Black
Tools: SU! scoring board, trimmer & envelope punch board, Memory Box 'Beautiful Balloon', 'Puffy Clouds', 'Bistro Label' & 'Chadwick Label' dies, X Cut corner rounder punch, sponge daubers
Embellishments & accessories: SU! Marina Mist Candy Dots, Dimensionals


 photo RoseRuth.gif
 
01 09 10