Showing posts with label Pinwheel Tower Card. Show all posts

Monday, 31 January 2022

Hello Friend Pinwheel Tower Card

Last weekend Lesley and Wendy came over for a crafty day and I made two fancy fold cards for them to make.  The first was a Pinwheel Tower card featuring Sale-A-Bration goodies you can get for free with a qualifying SU! purchase - the 'Friendly Hello' stamp set and 12" x 12" DSP.  Here's the card and envelope together.


Here's a view from the top so you can see the pinwheel tower construction.  I have Pinwheel Tower Card instructions on my Tutorials page.


Here's the first pinwheel panel.  I used Petal Pink, Pool Party and Granny Apple Green Stampin' Blends alcohol markers to colour in the stamped images.  I fussy cut the flowers and leaves and popped them up.  I also fussy cut and popped up the Hello friend sentiment.  I used a Stampin' Blends marker to colour the dot above the i black.  It doesn't show up in the photo but the flowers are really shimmery because I added clear Wink of Stella to the petals.
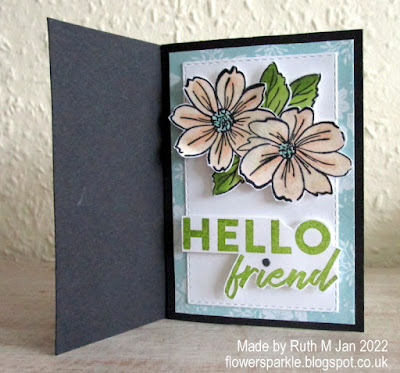

Here's the second panel.


Here's the third panel.


Here's the last panel for the sentiment.  I coloured the small flowers with a Pool Party Stampin' Blends marker.


Supplies:
Stamps: SU! 'Friendly Hello' set
CS: SU! Basic Black & Basic White
Patterned paper: SU! 'Friendly Hello' DSP
Ink: SU! Granny Apple Green, Memento Tuxedo Black, Stampin' Blends alcohol markers
Tools: SU! 'Stitched Rectangles' die set, paper trimmer with scoring blade
Embellishments & Accessories: SU! clear Wink of Stella pDimensionals

Ruth

Friday, 19 November 2021

Baby Boy Pinwheel Tower Card

Baby cards are rare for me but when I needed to make one I thought a Pinwheel Tower card would be great fun!  Instructions for making a Pinwheel Tower card sized to fit in a UK C6 sized envelope can be found on my tutorials page.   Adding in a wobble spring rocking horse makes it even more fun!  Here's the card and envelope together.


Here's a view from the top so you can see why this fancy fold is called a Pinwheel Tower card.


I've used a Sizzix baby die set which gave me options for elements on three panels so that was perfect. I made the card base from SU! Seaside Spray CS and I decorated the panels with patterned paper from the 'Penguin Playmates' and 'Snowflake Splendor' DSP packs.  The 'baby' is from the SU! 'Well Said' die set and the hearts and stars are from the SU! 'Mini Treat Bag' die set. The first panel has a wobble spring mounted rocking horse.  While I was assembling the horse I remembered I had some wood veneer paper in my stash which was ideal as the rocker at the bottom of the horse!  Some blue glitter jewels was my finishing touch for the first panel.


Here's the second panel.  The bib and babygrow are both popped up.


Here's the third panel.  The dungarees are popped up.  I used dies from the SU! 'All Dressed Up' set for the buttons.


Here's the fourth panel where I wrote my message.  I love that sweet sentiment from the SU! 'Bundle of Love' set!


Here's the envelope.  Because the card was fairly bulky with the wobble spring and dimension I used a gusseted envelope.  I popped up the name label.


Supplies:
Stamps: SU! 'Bundle of Love' set
CS: SU! Crumb Cake, Daffodil Delight, Misty Moonlight, Poppy Parade, Seaside Spray, Soft Suede & Basic White, 
Patterned paper: SU! 'Penguin Playmates' & 'Snowflake Splendor' DSP packs
Ink: SU! Misty Moonlight 
Tools: Sizzix 'New Baby #2' die set, SU! 'All Dressed Up', 'Mini Treat Bag', 'Rectangle Stitched', 'Tasteful Labels' & 'Well Said' die sets
Embellishments & Accessories: SU! Dimensionals, PaperMania glitter jewels, action wobble spring

Ruth

Monday, 8 November 2021

Christmas Pinwheel Tower Card

This is the second Pinwheel Tower Christmas card I've made. Instructions to make a Pinwheel Tower card sized to fit in a UK sized C6 envelope can be found here on my Tutorials page.  I love the colour combo in the SU! 'Whimsy & Wonder' patterned paper, it's unusual but very pretty for Christmas cards.  Here's the card and envelope together.


Here's a view from the top so you can see how the card is put together.


Here's the first panel of the card.  I fussy cut the ornament from the patterned paper, added some Blushing Bride baker's twine and popped the ornament up.  I also popped the sentiment label up.


Here's the second panel.


Here's the third panel.


Here's the fourth panel where I will write my message.  I added some self adhesive snowflakes as a finishing touch.


Here's the envelope.  I love the rainbow iridescence on the silver stripes!


Supplies:
Stamps: SU! 'Arrange a Wreath' set 
CS: SU! Evening Evergreen & Mint Macaron 
Patterned paper: SU! 'Whimsy & Wonder' 
Ink: SU! Evening Evergreen 
Tools: SU! 'Rectangle Stitched' die set 
Embellishments & Accessories: SU! Blushing Bride baker's twine, self adhesive enowflakes, Dimensionals

Ruth

Friday, 5 November 2021

Ornaments, Holly & Snowflakes Pinwheel Tower Card

Pinwheel Tower cards have been popping up online and I was keen to try one for myself.  I love that a Pinwheel Tower card has four panels and that it stands up beautifully for display but folds flat to go inside an envelope. Julie Davison has this blog post and I watched her fab YouTube video to find out how to make one.  I tweaked the measurements for a UK A6 sized card and I've given the information below.  Julie says in her video to make the tower using patterned paper rather than CS as that gives less bulk to the card so that's what I did.

Here's how I made an A6 sized Pinwheel Tower Card:

  • Cut CS or patterned paper 4 1/2" x 4 1/8.  On 4 1/2" side, score at 1", 2", 3" & 4". Glue the tab.
  • Cut four CS panels measuring 4 1/8" x 2 7/8".
  • Cut four patterned paper mat layers measuring 3 7/8" x 2 5/8" & glue to the CS panels.
  • Glue the four panels to the four tower sections.
  • Add any elements to decorate the card as desired.

I have added instructions to make a Pinwheel Tower card sized to fit in a UK sized C6 envelope here on my Tutorials page.

Here's the card and envelope together.


Here's a top view of the card so you can see how it's made.  Basically, you create a tower and adhere a panel to each of the four sides which gives the pinwheel shape.  I've used SU! Mint Macaron and Polished Pink CS with 'Whimsy & Wonder' specialty DSP to create my card.


Here's panel one.  I fussy cut the two ornaments and popped them up on Dimensionals.


Here's panel two.  I stamped holly from the 'Christmas Season' stamp set, die cut the shapes, snipped one holly berry off because I like three berries rather than four and popped up the leaves and berries.


Here's panel three.  The snowflake circle is popped up.  I added some iridescent self adhesive snowflake embellishments which go nicely with the holographic details in the patterned paper.


Here's panel four where I will write my message.  I die cut a tag with a hole re-inforcer, stamped the sentiment, fussy cut the present and ornament and popped those up.  I added Blushing Bride baker's twine to the tag and then popped up a Mint Macaron bow which I'd fussy cut from the patterned paper.


Here's the envelope.


What a fun card to put together, I enjoyed it so much I immediately made another one!

Supplies:
Stamps: SU! 'Christmas Season' & 'Itty Bitty Christmas' sets
CS: SU! Mint Macaron, Polished Pink & Basic White
Patterned paper: SU! 'Whimsy & Wonder' Specialty DSP
Ink: SU! Mint Macaron, Mossy Meadow & Polished Pink 
Tools: SU! 'Seasonal Labels' & 'Tailor Made Tags' die sets, circle punches
Embellishments & Accessories: SU! Blushing Bride baker's twine, Adhesive Backed Snowflakes, Dimensionals

Ruth

01 09 10