Showing posts with label Anniversary. Show all posts

Tuesday, 28 July 2020

Beachy Hearts 18th Wedding Anniversary Card

This 18th wedding anniversary card was made to order and the lady who ordered it told me "we love anything to do with the beach, sunsets, tranquility and two hearts linked is our thing!" so I had an excellent brief to follow when creating the card!

Here's the card and envelope together.


After musing for a while I came up with the idea of stamping beach scenes on two hearts which I could link by tying the two together.  The SU! 'Waterfront' stamp set was the ideal choice and after die cutting two hearts I got busy creating my scenes.  I started with the heart at the front and created the water first, masked that and then stamped just the top portion of the sun.  I inked the sun stamp with Mango Melody ink and added a touch of Real Red with a sponge dauber to get a rich, deep colour for a setting sun.  I masked the water again, applied Daffodil Delight and then some Flirty Flamingo inks for the sky using oval make up brushes and then I stamped the birds (from the 'High Tide' stamp set.)  On the background heart I stamped water again, a sandy beach, palm trees and a beach hut.  I used my Crop-A-Dile to punch holes in both hearts and I tied them together with linen thread tied in a bow.

I made a 5 3/4" square card base from Seaside Spray CS, cut a panel of Whisper White CS and added the wavy blue patterned paper and a narrow Night of Navy CS strip to the bottom of the panel.  I stamped the '18TH' in Night of Navy ink and fussy cut the numbers.  I stamped the words in Seaside Spray ink and cut the sentiment strip out using a fishtail flag die.  I popped the two hearts and the sentiment strip up on Dimensionals and added a banner and dot detail as a finishing touch.


Here's a closer look at the hearts.


Here's the inside of the card.  After stamping the wavy sentiment I die cut it using a matching die and  put more of the patterned paper at the bottom.  I brushed Daffodil Delight and Flirty Flamingo inks onto a scrap of Whisper White CS and punched two small hearts.


I used more of the lovely blue patterned paper to decorate the front and flap of the envelope and added a name label which I popped up.


It was a rainy, miserable day when I made this card - perfect crafting weather!  What a lovely time I had in my craft room creating this card - although clearing up wasn't exactly a breeze - and I just hope it's a hit with the anniversary couple!

Supplies:
Stamps: SU! 'Waterfront', 'High Tide' & 'Memorable Moments' sets, Apple Blossom 'Wavy Sentiments' set
CS: SU! Night of Navy, Seaside Spray & Whisper White

Patterned paper: SU! 'See a Silhouette' DSP pack
Ink: SU! Daffodil Delight, Early Espresso, Flirty Flamingo, Mango Melody, Mossy Meadow, Night of Navy, Real Red, Sahara Sand & Seaside Spray
Tools: X Cut 'Hearts' nesting dies set, MFT 'Fishtail Flags' Stax die set, SU! 'Heart to Heart', 'Banner' & 1/4" circle punches, Crop-A-Dile, Sizzix 'Card, Square Flip Its' die set, oval make up brushes, sponge dauber
Embellishments & accessories: SU! linen thread, Dimensionals

Ruth

Sunday, 3 May 2020

Rosy Anniversary Card

It seems people are having a hard time getting greetings cards during the Coronavirus lockdown.  A colleague at work asked me to make a 3rd wedding anniversary card for him to give to his wife and I was very happy to fulfil the request!

I used my MFT 'Blueprints 14' die set and one of the suggested sketch layouts - the bottom left one.  Having a layout to use really makes a card come together quickly and easily. 


Pink and green is a much favoured colour combo of mine and I've used SU! Lovely Lipstick, Blushing Bride and Granny Apple Green colours.  The pretty rose stamps are from the Clearly Besotted 'English Rose' multi step stamping set.  For the flowers I used Blushing Bride ink for the solid layer, stamped off once Lovely Lipstick ink for the next layer and full strength Lovely Lipstick ink for the final detailed layer. For the leaves I used Soft Seafoam ink for the solid layer, stamped off once Granny Apple Green ink for the next layer and full strength Granny Apple Green ink for the final detailed layer.

I used a Stamp-A-Ma-Jig to accurately position the stamped sentiment, fussy cut the leaves and roses and popped the roses up.  I added Granny Apple Green ribbon to the Lovely Lipstick mat layer before adhering that to the Blushing Bride layer which I adhered to a 5 1/2" square white card base.  To complete the front I added three Glitter Enamel Dots.


Here's the inside of the card and the envelope.  The three Blushing Bride hearts were cut out using the retired SU! 'Owl Builder' punch. 


Supplies:
Stamps: Clearly Besotted 'English Rose' set, SU! 'Memorable Moments' set, Apple Blossom 'Wavy Sentiments' set
CS: SU! Blushing Bride, Lovely Lipstick & Whisper White
Ink: SU! Blushing Bride, Granny Apple Green, Lovely Lipstick & Soft Seafoam
Tools: MFT 'Blueprints 14' die set,  SU! 'Owl Builder' punch
Embellishments & accessories: SU! Granny Apple Green ribbon, Stamp-A-Ma-Jig, Glitter Enamel Dots, Dimensionals

Ruth

Friday, 31 August 2018

Tarnished Foil Background With Leaf Cluster Anniversary Card

Today hubby and I are celebrating our wedding anniversary - 34 years, blimey!   I decided to try a technique I discovered recently - the Tarnished Foil technique.  Owen loves black and metallic cards so this seemed the perfect technique to use for his anniversary card!  I learned this technique from Lisa Curcio - her blog post is here where Lisa shares a fabulous video tutorial plus some lovely technique example cards.

Here's the card and envelope together.


There was some SU! 'Champagne' Foil Sheet in my stash which had never been used so I chose that and embossed a panel of the foil with the SU! 'Hexagons' 3D Dynamic embossing folder.  I followed Lisa's excellent instructions using SU! Black Archival ink, VersaMark and Copper and Silver embossing powders.  I was really pleased with the way the panel turned out, Lisa does promise that the technique is fool proof!

For the sentiment panel I stamped onto a die cut rectangle, stamped in VersaMark and heat embossed using Copper embossing powder.  I die cut two leaf clusters, one in black and one in Copper Foil sheet, leaving the pieces in the copper shape I removed the pieces from the black shape and glued it on top of the copper shape.  I popped up the leaf cluster and the sentiment rectangle.  To finish the front I added some copper metallic gems.


Here's a closer look at the tarnished foil panel.


Here's the inside of the card.  The sentiment is copper heat embossed and I added three Champagne Foil Sheet punched hearts.  Underneath I adhered a die cut black 'ribbon' using a Grosgrain Ribbon die and added a narrow strip of Copper Foil Sheet underneath.  I used the largest die in the Creative Dies Plus 'Nesting Rectangles Wonky Stitches' die set to cut the panel for inside the card.  I just LOVE that it fits A6 sized cards when the majority of die sets are more suitable for A2 sized cards!  I'm very happy about that - plus the bargain £5.49 price! 


Here's the front of the envelope with a popped up leafy cluster and a bookplate name label.  I added silver nailheads to the bookplate label.  It's fun to mix up metallics now and then!


Supplies:
Stamps: 'Sincere Sentiments' set free with Simply Cards & Papercraft mag #169, Clearly Besotted 'Brushed Greetings II' set
CS: SU! Basic Black & Whisper White, Foil Sheet in 'Champagne' & 'Copper'
Ink: VersaMark
Tools: SU! 'Hexagons' 3D Dynamic embossing folder, leaf cluster die from M&C Boutique, Creative Dies Plus 'Nesting Rectangles Wonky Stitches' die set, Sizzix Originals 'Bookplates' die, SU! 'Heart to Heart' punch
Embellishments & accessories: SU! silver & copper embossing powder, Dimensionals, Marianne Design metal adhesive gems, silver nailheads

Ruth


Friday, 1 September 2017

Embossed Silver Heart Happy Anniversary Card

I have been so ill with a nasty cough and virus for the last 2 weeks which meant that due to being completely wiped out and feeling really unwell I have done absolutely nothing at all.  It was our wedding anniversary this week and, of course, I wasn't prepared and hadn't made a card in good time.  Working on the 'better late than never' principle I finally managed to spend some time in my craft room to make a card for Owen.

The SU! Memories and More 'Color Theory Card Pack' proved really useful and enabled me to create the card without having to think too much, thank goodness!  Once I'd chosen the elements from the card pack I made a Berry Burst mini gift bag as an envelope and made a card base to fit inside measuring 5" x 3 1/2".  To decorate the gift bag envelope I die cut the heart border from a strip of white CS, adhered a piece of white CS behind and inlaid silver foil hearts into the strip.  I offset two 'for you' die cuts to give a shadow effect.  Here's the card and the gift bag envelope together.


Here's just the card.  I attached the circle paper panel to the background panel using brads before adhering the whole thing to the front of the card base.  I die cut a silver foil heart and embossed it with the 'Falling Petals' embossing folder.  I cut two plain white hearts as well and stacked all three hearts together for dimension and I popped up the heart.  I stamped and die cut the sentiment banner, offsetting a silver foil banner behind the white one and popped that up also.


Here's the inside of the card.


Late though it was, at least Owen got a hand made anniversary card!

Supplies:
Stamps: 'Happy Anniversary' sentiment from SU! 'Cheer and Wishes' set, 'All My Love'  from 'Sincere Sentiments' magazine freebie set
CS: SU! Berry Burst & Whisper White, SU! silver foil, SU! Memories & More 'Color Theory Card Pack'
Ink: SU! Berry Burst
Tools: SU! 'Falling Petals' embossing folder, 'Mini Treat Bag' Thinlits die set, paper piercer
Embellishments & accessories: silver brads, SU! Dimensionals

Ruth

Wednesday, 7 September 2016

Hearts Wedding Anniversary Spinner Card

Blimey, it's been a while, I've been too busy for crafting and blogging - which is NOT good!  I've popped in today to quickly share the card I made to give to my hubby Owen on our wedding anniversary last week.

I made this card a few weeks ago while I still had Lesley's SU! 'Sliding Star' Framelits die set on loan.  The kraft card base measures 5 3/4" square  and I used various papers from the Studio Light 'My Botanic Garden' 6" x 6" paper pad.  For the spinner element I layered two punched heart shapes together and I cut the track using the arch shaped die from the 'Sliding Star' die set.  To complete the card front I added some metal adhesive gems.


Here's the inside and the envelope.


Supplies:
Stamps: Stampendous 'Happy Anniversary', Clearly Besotted 'Brushed Greetings II' set
CS: SU! kraft & Soft Suede

Patterned paper: Studio Light 'My Botanic Garden' 6" x 6" paper pad
Ink: SU! Soft Suede
Tools: SU! 'Sliding Star' Framelits die set, X Cut 'Hearts' Nesting Dies set, sponge dauber
Embellishments & accessories: 3D foam tape, Marianne Designs metal adhesive gems 


 photo RoseRuth.gif

Tuesday, 9 December 2014

3rd Wedding Anniversary Kickstand Card

Kath asked me to make a wedding anniversary card for her son and daughter-in-law, David and Marie.  I made their wedding card and 1st and 2nd anniversary cards and it's lovely to be asked to make a card for their third anniversary!

I decided on a kickstand card as I haven't made one of those in a while.  I cut a 5 3/4" square piece of white pearly CS and embossed it with the elegant Embossalicious 'Splendour' 6" x 6" embossing folder.  I cut a 10 1/2" x 3 3/4" strip of black CS as the kickstand and scored it at 5 3/4".  I stamped the heart onto a piece of Authentique lace design paper, stamped three dotty flowers on the reverse side of the paper and fussy cut the heart and flowers.  I die cut solid and outline Lorelai Leaf shapes, layered the outline over the solid and glued it to the heart.  I used a black Sharpie pen to fill in the dots on the flowers, shaped each flower, stacked the three layers and popped the flower up.  I computer generated the sentiment using the Grand Hotel font, printed it out onto the lacy paper, cut it into a strip, matted it onto a larger strip, glued it onto the black kickstand and glued the kickstand to the white square to form the card base.  I rounded some corners, popped up the heart, added three punched flowers and a die cut and embossed bitty bow.  I sprinkled on some black and clear gems to complete the front. 


Here's a photo of the kickstand card from a different angle.


I cut a piece of white CS to go inside as a sentiment panel, added some strips at the bottom, stamped the 'With Love' and added three punched hearts. 


The Authentique lacy paper is absolutely beautiful and I used it to make an envelope.  I layered two die cut shapes to make a name label and added two clear gems.  I'll be delivering this to Kath later today and I hope it gets a favourable response!


Supplies:
Stamps: PaperMania Sew Lovely heart stamp (freebie with DoCrafts Creativity magazine), Woodware 'Dotty Flowers' set, Personal Impressions 'Medium Everyday Messages' set
CS: white with a hint of silver Centura Pearl CS, SU! Basic Black

Patterned paper: Authentique Classique Elegant Nine 
Ink: VersaFine Onyx Black
Tools: Embossalicious 'Splendour' 6" x 6" embossing folder, PoppyStamps 'Lorelai Leaf' & 'Lorelai Leaf Outline' dies, Sue Wilson 'Classic 3D Itty Bitty Bows' die set, Woodware multi flower punch, X Cut large corner rounder punch, Envelope Punch Board, flower shaping tool & moulding mat
Embellishments & accessories: black gems, SU! rhinestone jewels, Dimensionals, 3D foam tape


 photo RoseRuth.gif


Monday, 8 September 2014

Silver Wedding Anniversary Card

Within the space of a week our friends Gill and Brett celebrated their 25th (silver) wedding anniversary, our friends Debbie and Mike had their 24th wedding anniversary and Owen and I celebrated our 30th (pearl) wedding anniversary.  We all got together last Sunday for a celebratory afternoon tea party at our place.  We had champagne to start, followed by sandwiches, sausage rolls, scones and cake - plus tea of course!  I loved getting my dainty bone china crockery out along with my 3 tier cake stand and matching teapot!  I don't enjoy washing it up though - I think I hold my breath the whole time as I'm worried I might drop and break something!  I made a spiced orange cake (it's Mary Berry's Whole Orange Spice Cake recipe) which I've made a couple of times before but this time I put some icing on the top as well as inside and I sprinkled on a few crushed pecans.  So before we get on to the card I made, here's a photo of the cake.  I'm pleased to say it came out very moist and tasty!


So, onto the card I made for Gill and Brett.  I recently made a wedding card using the Splendour embossing folder and the Ornately Framed stamp and I decided to use them again and go with the same layout - a good decision when you don't have a lot of time to create!  I embossed a 5" square of Brushed Silver CS with the Splendour folder, added three strips of narrow silver ribbon and glued the panel to the front of a 5 1/4" square Brushed Silver CS card base.  I stamped the frame, sentiment and '25' in Smoky Slate ink and fussy cut the frame and the numbers.  I popped up the frame, die cut two sparkly hearts, glued them together, popped them up and also popped up the numbers.  To complete the front I added a beautiful Crystal Sparkler embellishment.  


For inside the card I cut a white CS panel, stamped two elegant flourishes and the sentiment.  I made an envelope using textured Smoky Slate CS and used fancy brads and white twine to make an office envelope style closure. 


Here's the front of the envelope with a name label, two more die cut hearts and two rhinestones.


Supplies:
Stamps: Penny Black 'Ornately Framed' cling stamp, '25' from SU! 'Memorable Moments' set, 'With Love' from SU! 'Field Flowers' set,  IndigoBlu 'Vintage Flourish Dinkie' stamp, Stampendous 'Happy Anniversary'
CS: SU! Brushed Silver CS, Silver Glimmer Paper & textured 12" x12" Smoky Slate CS, IndigoBlu White Perfect Stamping Card

Patterned paper: sparkly striped paper from DCWV 'Twinkle Glints' CS Stack
Ink: SU! Smoky Slate
Tools: Embossalicious 'Splendour' embossing folder, Sizzix Basic Shapes die from Big Shot Starter Kit, SU! Envelope Punch Board, Spellbinder's 'Grommet Tags' die set, paper piercer
Embellishments & accessories: Creative Expressions 'Crystal Sparkler', SU! Silver 1/8" ribbon, Filigree Designer Brads, white baker's twine, rhinestone jewels, Dimensionals


 photo RoseRuth.gif


Wednesday, 18 June 2014

Vase & Hearts Anniversary Card

I've swapped some crafty goodies (on a temporary loan basis) with my friend Angela and the flower vase stamp is from a set of hers.  I stamped it onto watercolour paper with VersaFine black ink, heat embossed it with clear powder, coloured the image with a variety of ink colours and a water brush and fussy cut it. I left the image out on my desk for a couple of days and then my friend Kath asked me to make an anniversary card for her son Ian and his wife Jan.   I decided to incorporate my ready-to-go image on that card!

The card base is made with Rose Red CS and measures 5 1/4" square.  I die cut a large Pink Pirouette heart, dry embossed it with the Cuttlebug Victoria folder and lightly brayered Rose Red ink over the top.  I die cut two more hearts, one in Brushed Gold CS and the smallest heart in Pink Pirouette CS.  The gold and pink hearts plus the vase are popped up.  I computer generated the sentiment using the Lobster Two font, die cut it with a tag frame die and popped it up.  I punched and shaped three small flowers, added those to the card and placed a rhinestone in each flower centre.  To complete the card front I sprinkled on a few gold sequins.


Here's the inside and the envelope with more hearts, flowers and a sentiment.


Supplies:
Stamps: PaperMania Just to Say 'Get Well Soon' clear set, SU! 'Sweetheart' set, 'With Love' from SU! 'Field Flowers' set
CS: SU! Rose Red, Pink Pirouette, Whisper White & Brushed Gold
Ink: VersaFine Onyx Black, SU! Rose Red, Pink Pirouette, Blushing Bride, Crushed Curry, Calypso Coral, Crumb Cake, Lucky Limeade & Smoky Slate
Tools: X Cut Heart Nesting Dies, Cuttlebug 'Victoria' embossing folder, Hero Arts 'Small Tag Frame' Framelits die, flower from SU! 'Itty Bitty Shapes' punch pack, SU! Full Heart punch, brayer, heat tool, water brush
Embellishments & accessories:  clear embossing powder, gold sequins, SU! rhinestone jewels, Dimensionals


 photo RoseRuth.gif


Monday, 2 June 2014

30th Wedding Anniversary Card - HOC June Blog Hop & Anything Goes Photo Inspiration Challenge

Hi, all!  It's time for an end of the term blog hop over at House of Cards and we have a super fun challenge AND tons of great prize opportunities for those of you who join in the fun!!! :)   There is also a DT call going on too!  You should have arrived here from MYNN - who has shared not one but three beautiful cards! If you haven't, please start all the way back at the House of Cards hop post and follow the list found in the body of the hop post!

Here's our photo inspiration~

Here are our fabulous sponsors~
Eclectic Anthology
Prize: $50 gift voucher to the shop.
FREE Vintage Flower Basket Graphics-free, vintage, flower, rose, graphics, basket, antique
Inspired By Stamping
Prize: $15 gift voucher to the shop.
Inspired by Stamping


Paper Sweeties

Prize: $20 gift voucher to the shop.


STAMPlorations

Prize: 5 stamps sets--your choice--from the shop.
Stitchy Bear
Prize: $10 gift voucher to the shop.


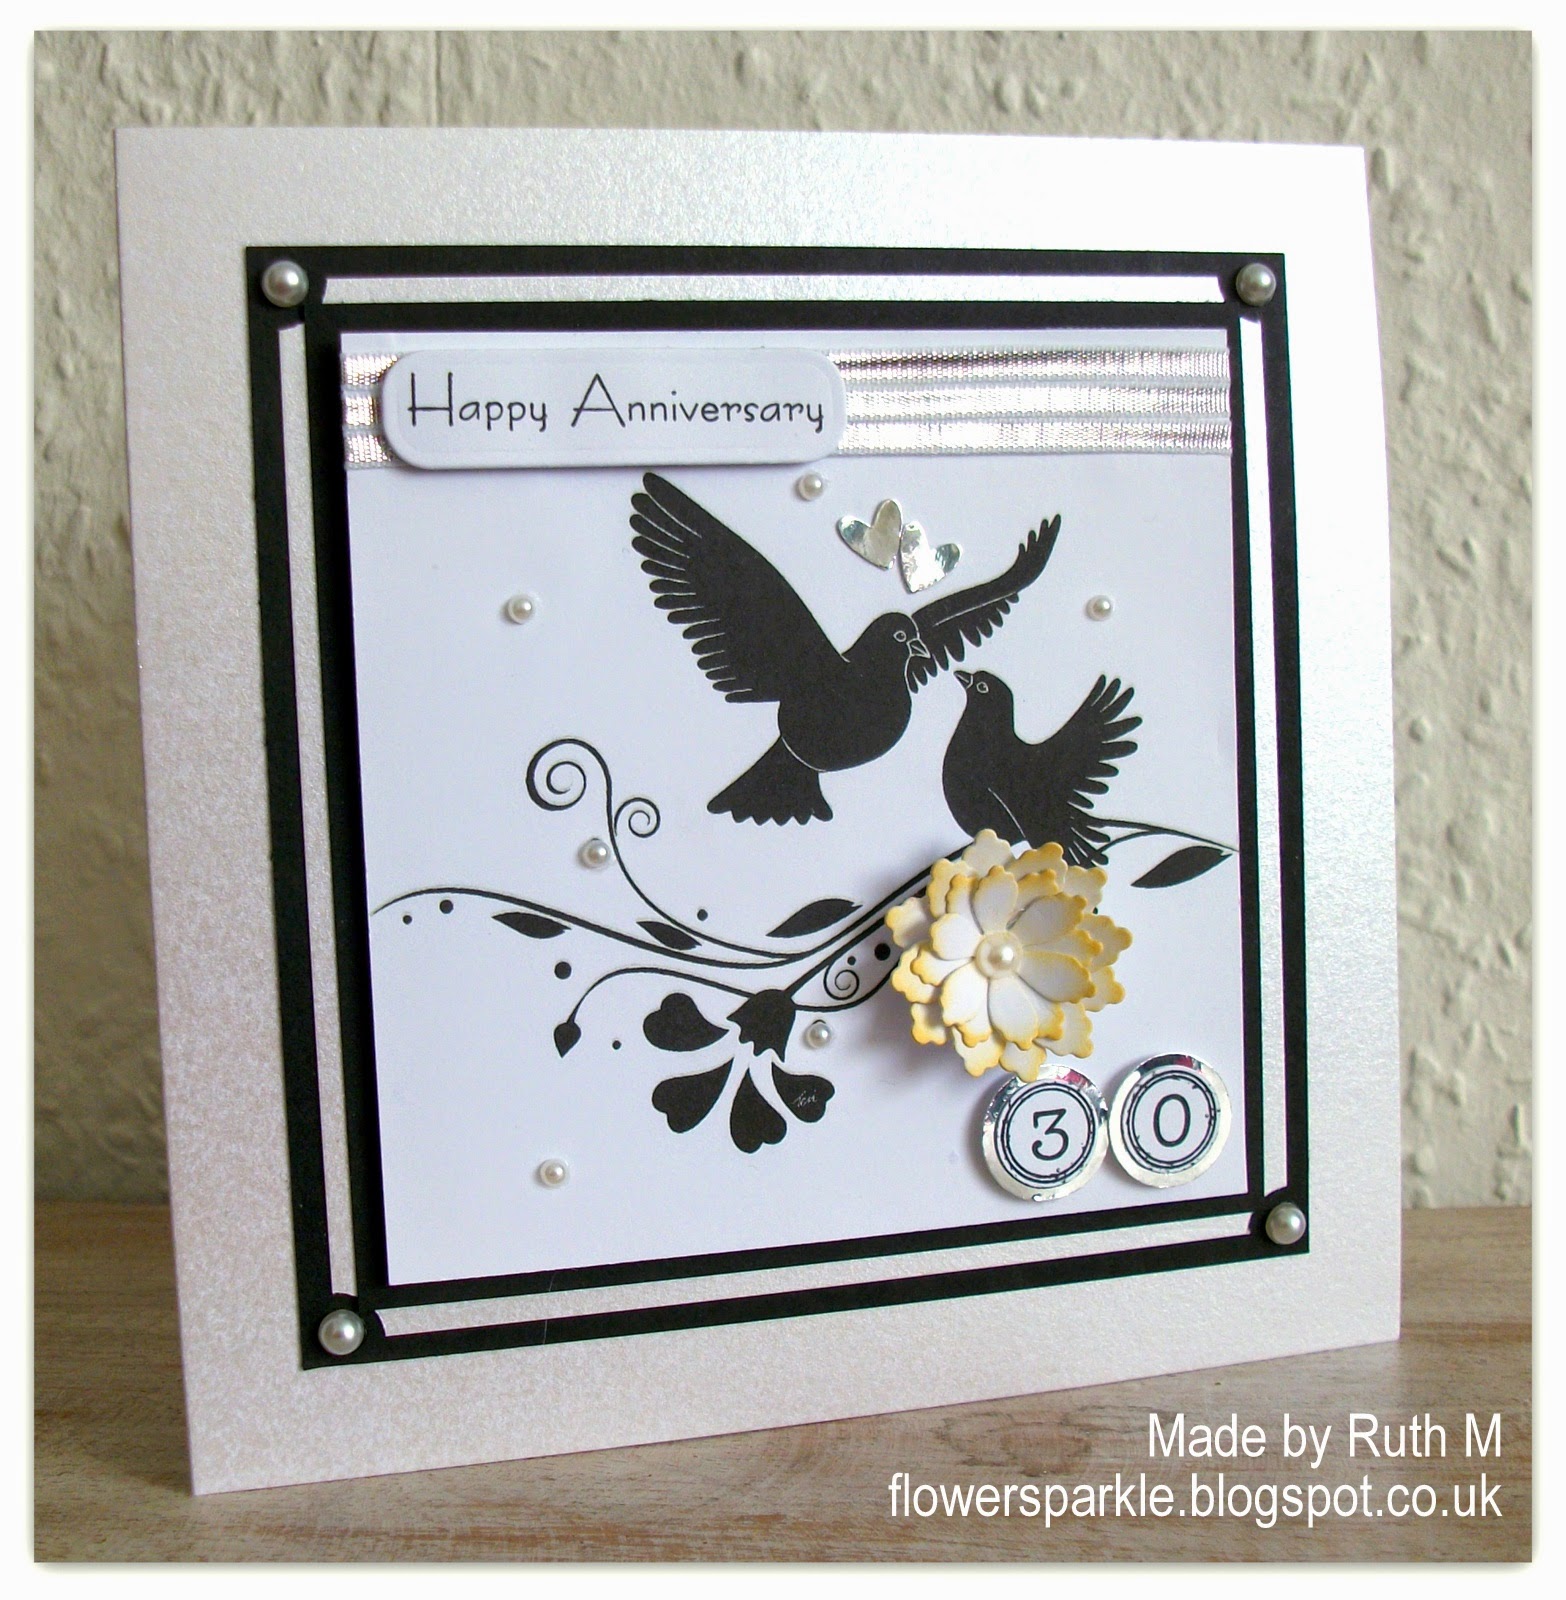
For my card I chose to be inspired by the black and white numbered jars, the metal basket and the flowers.  I've made a Classic and Elegant style 30th Wedding Anniversary card using a simple combo of black, white and silver - I used shiny silver mirri CS and shiny silver ribbon for a touch of glamour.  A pearl anniversary is celebrated at 30 years so I've included pearl CS and pearls in my design.

The card base is 5 3/4" square and was made from Centura Pearl white with a hint of silver CS.  I printed the beautiful Stitchy Bear 'Lovey Dovey Silhouette' digi image onto white CS, adhered 3 strips of narrow silver ribbon to the top of the panel and layered onto black and white pearl CS mats.  I punched the corners of the white pearl CS mat layer so that I could add pearls onto the black mat.  I stamped, punched and popped up the numbers.  I stamped and die cut the sentiment and popped that up also.  I die cut some white flowers and edged the petals with Scattered Straw Distress Ink.  I shaped the flower layers, glued the flower to the card and added a pearl to the centre.  I added 2 small punched silver hearts and sprinkled more pearls on the panel to complete the card front.  


Here's the inside and the envelope.  I stamped the decorative heart onto white CS using Smoky Slate ink and I stamped the sentiment over the top in black ink.  I layered onto a black mat and added 2 silver punched hearts.  For the envelope flap I used a circle Nestie die to cut out a portion of the Lovey Dovey Silhouette image and matted onto a larger black circle. 


Very sadly, this will be my last post for House of Cards as I'm now stepping down.  I've enjoyed the HOC experience so much and I'm so happy to have been a part of it!  If you'd like to design for HOC  now's the time to apply as there is a DT call going along with the Blog Hop!

Now get to hoppin'!  Your next stop is CORNELIA!  Wow, what a stunning and stylish CAS creation she has shared!  If you get lost along the way, you can always head back to the original blog hop post--and don't forget to link up a project at the House of Cards blog after completing the hop for an extra chance to win a mystery prize from one of our fabulous sponsors, too!


 photo RoseRuth.gif

Tuesday, 3 December 2013

Heart Flowers Anniversary Card

My friend Kath asked me to make a 2nd wedding anniversary card for her to give to her son and daughter-in-law.  My newly acquired heart flower dies seemed the perfect thing to use for an anniversary card together with the SU! Memorable Moments set.  I chose the pretty patterned paper first and chose the matching CS colours of Island Indigo, Baja Breeze, Riding Hood Red, Pink Pirouette and white.  The card measures 5 3/4" square.  The flowers and the '2nd' circle are all popped up and I sprinkled on a few rhinestones to complete the card front.


Here's the inside with a computer generated personal sentiment.


Here's the decorated envelope flap.


I really enjoyed making this and I'm happy to say Kath loved the card - I hope David and Marie liked it as well!

Supplies:
Stamps: SU! Memorable Moments set
CS: SU! Island Indigo, Baja Breeze, Riding Hood Red, Pink Pirouette & Whisper White

Patterned paper:  SU! 'Twitterpated' DSP
Ink: SU! Island Indigo & Riding Hood Red
Tools: Sizzix heart flower dies, SU! circle punches, MFT Fishtail Flags Stax die
Embellishments & accessories: SU! rhinestone jewels, Dimensionals


 photo ruthheart.gif 

Friday, 30 August 2013

Gold Pearl Embossed Hearts With Love Card

This is the Wedding Anniversary card I've made for my hubby Owen. It's fair to say things did not go smoothly and I made quite a lot of mess LOL!

I knew I wanted to add Perfect Pearls to an embossed CS piece.  I've done this in the past by inking inside the folder with VersaFine ink before embossing and then adding the Perfect Pearls powder.   However, I wondered if it would work if I inked inside the folder with VersaMark ink.  I gave that a try and it wasn't successful, there wasn't enough ink for the powder to stick to.  So I washed and dried my folder and thought while the brayer had VersaMark ink on it already I'd emboss another piece of CS and try brayering over the top of the raised embossing with VersaMark.  When I started brushing the gold Perfect Pearls powder over the top I could see it was a success!  Using VersaMark on your brayer leaves it very sticky - I washed it in warm soapy water and rinsed it off fairly quickly but it was still very sticky afterwards so I washed it again.  I stamped the 'With Love' in VersaMark onto Cherry Cobbler CS, brushed on more Perfect Pearls gold powder and punched out the heart.  After the pearlising I saw I'd ended up with gold pearly powder all over my craft mat and desk so when I'd finished brushing I took everything off my desk and cleaned up.

I made a Cherry Cobbler 5 1/4" card base and cut my pearly embossed panel to size and decided to add some Cherry Cobbler ribbon.  I remembered I had some metal ribbon sliders in my stash so I fished one of those out - hmmm, it was a gunmetally colour, not really suitable to go with my gold pearly look!  So I tried changing the colour of the slider by pressing it into the VersaMark pad and applying gold embossing powder.  Nope, not at all successful, my gold powder seems to have gone very dark and manky and I ended up with a horrible blobby mess.  After I'd thrown the blobby mess in the bin I accidentally turned on my heat tool and blew embossing powder all over my newly cleaned desk - ack!  So everything had to come off the desk again and a second clean up had to take place!

Really, the thing to do was give up and have a relaxing cup of tea!  However, I needed to get the card finished and photographed before Owen came home so I really needed to crack on!  So I carried on and completed the card without further incident - thank goodness!  I just taped the ends of the ribbon behind the embossed panel before gluing it to the card front.  I punched more hearts and accented the red one with a small Champagne Glimmer Paper heart and a row of rhinestone jewels.  Both of the large hearts are popped up. 


Here's the inside and envelope where I kept everything simple by doing just a bit of stamping and punching!   I stamped the 'Happy' onto the white panel, punched out a heart from Cherry Cobbler CS and then cut the CS with a 2 1/2" circle punch.  I layered the heart cut out circle over the 'Happy', stamped the 'Anniversary' and added three small Champagne Glimmer Paper hearts.  More punched hearts went on the envelope flap.  Phew, all done and in good time, now I can get the kettle on!


Supplies:
Stamps:  'With Love' from SU! 'Field Flowers' set, 'Happy' & 'Anniversary' from SU! Memorable Moments set
CS: SU! Cherry Cobbler, Champagne Glimmer Paper, Whisper White, IndigoBlu white Perfect Stamping Card
Ink: VersaMark, SU! Cherry Cobbler
Tools: Cuttlebug 'Acanthus' embossing folder, SU! 'Full Heart', 'Heart to Heart'  & 2 1/2" circle punches
Embellishments & accessories: Perfect Pearls 'Perfect Gold' powder, applicator brushes, SU! Cherry Cobbler scallop edged grosgrain ribbon, SU! Rhinestone Jewels, Dimensionals


 photo ruthheart.gif 


01 09 10