Wednesday 22 May 2019

Wonderful Friend Dragonfly Closure Card

How on earth I missed the dragonfly closure card from last year I do NOT know!  But better late than never, I've now seen Rachel Tessman's wonderful blog post and video and I couldn't wait to make my own dragonfly closure card!

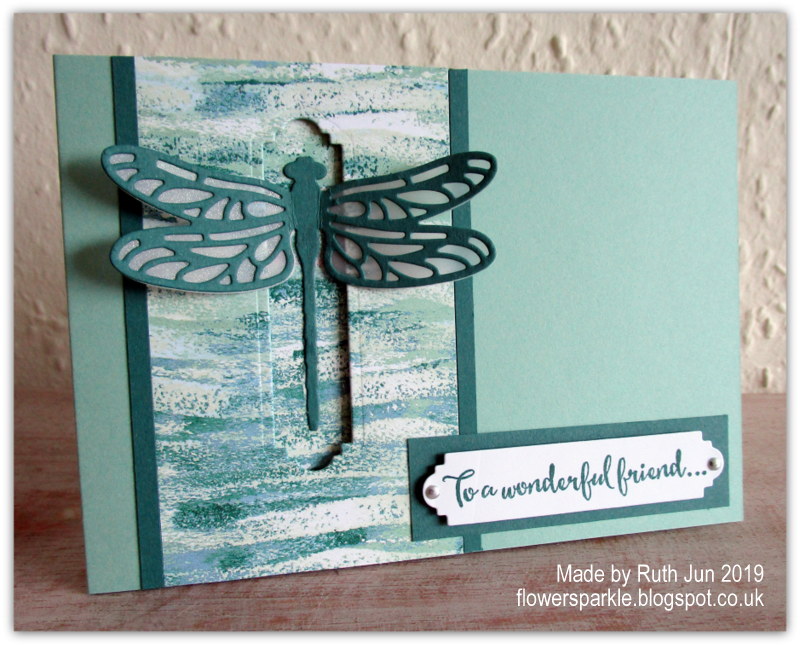
I needed to make a card for our wonderful friend Mike - we didn't get to see him on his birthday so I've made a friendship card for him.  I've used Mint Macaron and Tranquil Tide as my colour combo and the patterned paper is from the SU! 'Tranquil Textures' DSP pack.  I made a matching envelope to go with the card too.


After adhering the patterned paper strip to the front of the A6 sized card base I cut out a slot using the label die from the SU! 'Petals & More' Thinlits die set - it's the perfect size for the dragonfly!  I added mat layers of Tranquil Tide CS and 'Tranquil Textures' patterned paper inside the card.  I die cut the detailed dragonfly from Tranquil Tide CS, die cut a solid dragonfly from vellum CS, trimmed out just the wings, added shimmer to the wings using a clear Wink of Stella pen and I glued the vellum wings behind the Tranquil Tide dragonfly.  I added narrow Tranquil Tide CS strips on both sides of the patterned paper strip, stamped and die cut the sentiment label and popped that up over a mat of Tranquil Tide CS.  I applied glue to the dragonfly body only, glued it in place and then added two small silver nailheads to the sentiment label.


As the recipient opens the card the dragonfly wings disappear through the slot.


Here's a view of the inside of the card.  Usually you write on the right hand side panel but I added a sentiment mat layer to the left hand side.


Here's a closer look at the dragonfly panel.  I think the patterned paper looks like water which is very suitable for a dragonfly!


Here's a closer look at the inside sentiment panel - I really love the clean look of that sentiment font! 


Finally, here's the envelope I made using the envelope punch board.  I stamped tone on tone dragonflies on a piece of Mint Macaron CS, made a flagged banner and glued that to the envelope.  I stamped a dragonfly on a piece of Whisper White CS, cut it out with the Everyday Label punch and popped that up.  To finish I added two silver nailheads to the label.


I really enjoyed making this card and I understand you can make the same design of card using a butterfly or heart, for example.  I've made a butterfly version for our next card group meeting.

Supplies:
Stamps: SU! 'Dragonfly Dreams' set, inside sentiment from SU! 'Lots of Happy' card kit
CS: SU! Mint Macaron, Tranquil Tide & Whisper White

Patterned paper: SU! 'Tranquil Textures' DSP
Ink: SU! Mint Macaron & Tranquil Tide
Tools: SU! 'Detailed Dragonfly'  & 'Petals & More' Thinlits die sets, envelope punch board, 'Everyday Label' & 'Banner Triple' punches
Embellishments & accessories: SU!  Dimensionals, silver nailheads

Ruth

Monday 20 May 2019

Floral 80th Birthday Greetings Card

One of the ladies from my card group, Sue, celebrated her 80th birthday recently and this is the card I made for her.  Sue is SO lovely and I was absolutely amazed to find out she was 80 this year, I was convinced Val was winding me up when she told me!  My card group ladies are all fabulous and young at heart!

Here's the card and envelope together.


The card measures 5 3/4" square and I used Lovely Lipstick, Lemon Lime Twist and black as the colour combo.  I've based the design on this 50th birthday card I made a while back.  I stamped a subtle burlap background using Antique Linen Distress Ink and I stamped the ginkgo leaves in Lemon Lime Twist ink.  The flowers are from the SU! 'Stippled Blossoms' two-step stamping set and I stamped the solid backgrounds in stamped off twice Lovely Lipstick ink and the detailed images in full strength Lovely Lipstick ink.  After fussy cutting the flowers I shaped them a bit and glued them in place.  I die cut a stack of Whisper White '80' numbers, finishing with a gingham patterned 80, I inked the edges with Lemon Lime Twist ink and glued the numbers to a black scalloped square.  I stamped the 'TH', stamped and punched the sentiment banner and popped the black square up.


Here's the inside of the card.


I used pretty Lemon Lime Twist patterned paper from the SU! 'Fresh Florals' DSP pack to make an envelope.


Here's the front of the envelope.  I wrapped some black ribbon around the strip of Lovely Lipstick CS before adhering the strip to the envelope.  I added a faceted gem to the knot for a bit of glitz, popped up the label and added two flowers to complete the project.


Supplies:
Stamps: SU! 'Stippled Blossoms', 'Memorable Moments', 'Birthday Blooms' & 'Wetlands' sets, MFT 'Burlap Background', PTI 'Harvest Berries' set
CS: SU! Lovely Lipstick, Basic Black & Whisper White

Patterned paper: SU! 'Gingham Gala' 6" x 6" DSP pack, SU! 'Fresh Floral' DSP pack
Ink: SU! Lemon Lime Twist, Lovely Lipstick & Basic Black Archival, Ranger Tim Holtz Antique Linen Distress Ink
Tools: SU! 'Large Numbers' Framelits die set, SU! 'Rose Trellis' Thinlits die set, SU! 'Banner' Triple punch, Envelope Punch Board, Stamparatus, Stamp-A-Ma-Jig, sponge dauber
Embellishments & accessories: SU! black ribbon, clear faceted gem, Dimensionals

Ruth

Saturday 18 May 2019

Two Butterflies Thank You Magic Envelope Cards

Recently I came across this tutorial for a magic envelope card and after I'd watched Debs' fab video I had to have a go myself!  Such a clever idea, just a few scores and folds and the magic envelope card is done!  Not a great card for having on display I suppose but it's a bit different and that's always fun - and it's a brilliant way to use up patterned paper! 

I wanted to make two thank you cards for friends who ordered the SU! 'Butterfly Gala' bundle from me and I used that bundle plus the matching SU! 'Botanical Butterfly' DSP which they both also have to make the magic envelope cards.

I have a lot of retired SU! stamps and tools in my stash and every now and then I'm just SO glad I kept a particular item.  This card uses the diagonal scoring plate for the Simply Scored and the postage stamp image from the 'Fresh Vintage' set which is just perfect for this style of card!  After stamping the postage stamp images I cut it them out with a square Stitched Shape die and mounted them on larger black squares.  I used punches to make name labels which I mounted into larger black rectangles, I punched a teeny butterfly for each label and to finish I added Glitter Enamel Dots.

Here's card one.


Here's card one opened out.


Here's a closer look at the panel inside card one. 


Here's card two.


Here's card two opened out.


Here's a closer look at the panel inside card two.


Supplies:
Stamps: SU! 'Butterfly Gala' & 'Fresh Vintage'  sets
CS: SU! Highland Heather, Grapefruit Grove, Basic Black & Whisper White

Patterned paper: SU! 'Botanical Butterfly' DSP
Ink: SU! Highland Heather, Grapefruit Grove, Memento Tuxedo Black
Tools: SU! Simply Scored & diagonal scoring plate, 'Stitched Shapes' Framelits die set, 'Butterfly Duet', 'Everyday Label' & 'Pretty Label' punches
Embellishments & accessories: SU! Glitter Enamel Dots

Ruth

Thursday 9 May 2019

Three Thank You Cards For SU! Day Of Service 2019

On Wednesday 15th May Stampin' Up! are having a Day of Service and this year SU! have teamed up with the Wycombe Homeless Connection. Demonstrators have been invited to help with the task of making thank you cards and I was very happy to join in with the project. Here is some information:
The Wycombe Homeless Connection

At Wycombe Homeless Connection, we inspire hope and reignite ambitions by helping people understand their rights, find accommodation and keep their homes. Every working day, we provide advice and support to those facing homelessness at our support centre in High Wycombe. Every fortnight, we run legal drop-in sessions for those requiring legal aid to fight evictions. Every year, we run the Wycombe Winter Night Shelter, which acts as a life-saving measure for local rough sleepers by providing them with temporary accommodation during Britain’s bleakest months. With the help of a small, dedicated team of staff and an army of local volunteers, we lead the fight against homelessness in High Wycombe.

How Stampin’ Up! is going to support the Wycombe Homeless Connection

The Wycombe Homeless Connection has a large number of volunteers who give up their time to support the organisation throughout the year and it's time to say 'Thank You'. Our aim is to make approximately 400 thank you cards to be sent on to these wonderful people who give up their time.
SU! have asked that demonstrators make cards that will fit inside C6 envelopes which SU! will provide so there are no matching decorated envelopes from me this time!  I started off by making a daisy card.  I punched three daisies from Whisper White thick CS, stacked them together and added a hint of pink to the daisy by using a sponge dauber to add Powder Pink ink to the tips of the petals.  I punched a few 1/2" circles, one from Lemon Lime Twist Gingham Gala gingham paper and three from Lemon Lime Twist CS.  I stacked the circles together, inked the circle with Lemon Lime Twist ink and a sponge dauber, glued the circle in place and popped the daisy up.


Here's the inside of the card.


The gorgeous papers in the SU! 'Petal Promenade' DSP pack work brilliantly to make a quick card, all you need to add is a sentiment and some embellishments.  My colour combo is Fresh Fig, Sweet Sugarplum and Whisper White.  I popped the sentiment rectangle panel up.


Here's the inside of the card.  I just adore that beautiful roses image from the SU! 'Climbing Roses' set so after finishing this card I decided I just had to make another card using that stamp!


For the third card I kept to simple stamping and some die cutting.  I stamped the images on opposite corners of the card base and the 'Thank You' using full strength Fresh Fig ink.  For the rosy  background on the sentiment label I used stamped off once Fresh Fig ink.  I cut some Fresh Fig leaves using dies from the 'Rose Trellis' Thinlits die set, glued them to the label and then popped the label up.  Such a simple design but I really like how this card turned out!


More simple stamping of the beautiful rosy image decorates the inside of this third thank you card.

Last Monday was an unexpected day off from work for me and I was so glad to have the time to make these cards to contribute to the SU! project to support the Wycombe Homeless Connection!   

Supplies for daisy card:
Stamps: SU! 'Daisy Delight' set
CS: SU! Basic Black & Whisper White

Patterned paper: SU! 'Gingham Gala' 6" x 6" DSP pack
Ink: SU! Lemon Lime Twist, Powder Pink & Basic Black Archival
Tools: SU! 'Daisy' punch, 1/2" circle punch, sponge daubers
Embellishments & accessories: SU! Dimensionals


Supplies for floral paper card:
Stamps: SU! 'Climbing Roses' set
CS: SU! Fresh Fig, Sweet Sugarplum & Whisper White

Patterned paper: SU! 'Petal Promenade' DSP pack
Ink: SU! Fresh Fig & Sweet Sugarplum
Tools: SU! 'Rose Trellis' Thinlits die set
Embellishments & accessories: SU! Sweet Sugarplum glitter ribbon, Fancy Frost sequins, Dimensionals


Supplies for rosy design card:
Stamps: SU! 'Climbing Roses' set
CS: SU! Fresh Fig & Whisper White
Ink: SU! Fresh Fig
Tools: SU! 'Rose Trellis' Thinlits die set
Embellishments & accessories: SU! Dimensionals

Ruth

Thursday 2 May 2019

May 2019 Card Group Projects

I can't believe how quickly this year is going by!  The time for our monthly card group meeting  rolled around again and as usual I made three cards for the ladies to make.

The first card features the SU! 'Country Floral' embossing folder alongside the 'Petal Palette' stamp set - both beautiful products!  Last month Wendy asked about inking the inside of embossing folders so I said we'd do that as a project this time.  I absolutely love this bisque pottery technique I learnt years ago from Diana Gibbs.  The retired SU! 'Vintage Wallpaper' embossing folder works wonderfully but I wanted to try a 3D Dynamic folder and I chose the 'Country Floral' folder.  I took a variety of embossing folders with me so the ladies had options!

Whenever I use the bisque pottery technique I use a large panel and I don't like to cover up the design too much.  My colour combo is Lovely Lipstick, Crumb Cake and Very Vanilla.  I brayered the inside of the folder with Crumb Cake ink, embossed the Very Vanilla panel, added a strip of Lovely Lipstick CS and adhered it to the front of the card.  I stamped the images and sentiment, die cut them and popped them all up.


Here's the inside of the card and the envelope.


Dena Rekow from the Creativity Cave is such an inspirational card maker, I love her style, warmth and sense of humour!  Dena has a series called 'Simple to Stunning Sundays' where she makes a simple card, then steps it up a bit for a second card and then steps it up even more for a third card.  I loved the cards Dena made with the 'Rooted in Nature' set and I've CASEd the third card.  I glued a panel of SU! 'Wood Textures' DSP to the front of an Old Olive C6 sized card base.  I inked the tree canopy in Old Olive ink, used a Soft Suede marker to add colour to the tree trunk and die cut the tree.  I stamped the leaves onto the strip of wood textured paper using stamped off once Early Espresso ink, stamped the sentiment in full strength Early Espresso ink, added some Old Olive linen thread and popped the strip up.  I also popped the tree up.


Here's the inside and the envelope flap.


A little while ago I made this thank you card and I liked how it turned out so decided to use it as a card group project.  I've used SU! Grapefruit Grove, a new colour to me and I'm not usually a fan of orange but this is a pretty colour!  I do love the pop of black on this card!  The card base measures 5 1/4" square, it's been a while since we made a square card at card group.  

I've always loved Stampin' Up!'s two-step stamping flower sets but they require the use of a Stamp-A-Ma-Jig stamp placement tool which strikes dread into the heart of a lot of my ladies!  The flower and leaf stamps in the SU! 'Roses in Winter' stamp set are of a more abstract design so you don't need 100% perfect placement so there's no need for a stamp positioning tool.  I stamped the first layer of the rose using stamped off once Grapefruit Grove ink, stamped the second layer using full strength Grapefruit Grove ink and the third layer using full strength Watermelon Wonder ink.  I used stamped off once and full strength Granny Apple Green ink for the leaves.  I fussy cut the rose and leaves, glued the leaves behind the rose and popped it up. I stamped the sentiment, cut the words out using scissors and glued them to the card.  To finish the front I added three silver nailheads.


Here's the inside and the envelope.  To echo the gingham paper on the front of the card I've used a retired SU! 'Gingham' wheel stamp to decorate the inside and envelope.  I was always challenged using wheel stamps as wheels so I unmounted them from the rollers and mounted them on cling foam so I can use them as normal cling stamps!  I used the Stamparatus to stamp the gingham image so that if part of the design was missed it would be easy to repeat stamp to get a complete image.  I stamped directly to the front of the envelope but for the inside of the card I stamped on a strip of Whisper White CS, trimmed the strip to size and glued it in place.  I added a stamped and punched sentiment label to complete the inside of the card.


Supplies for Best Wishes card:
Stamps: SU! 'Petal Palette' set
CS: SU! Lovely Lipstick, Crumb Cake & Very Vanilla
Ink: SU! Lovely Lipstick & Crumb Cake
Tools: SU! 'Petals & More' Thinlits die set, 'Country Floral' 3D Dynamic embossing folder, brayer
Embellishments & accessories: SU! Dimensionals


Supplies for tree Happy Birthday card:
Stamps: SU! 'Rooted in Nature'  & 'Southern Serenade' sets, Stampendous 'Sending Wishes'
CS: SU! Old Olive & Whisper White

Patterned paper: SU! 'Wood Textures' 6" x 6" DSP stack
Ink: SU! Old Olive & Early Espresso, SU! Soft Suede marker
Tools: SU! 'Nature's Roots' Framelits die set
Embellishments & accessories: SU! Old Olive linen thread, Dimensionals


Supplies for rose Happy Birthday card:
Stamps: SU! 'Roses in Winter' set, inside sentiment from SU! 'Lots of Happy' card kit, MFT 'Label Maker Sentiments' set, SU! 'Gingham' wheel stamp
CS: SU! Basic Black & Whisper White

Patterned paper: SU! 'Gingham Gala' 6" x 6" DSP stack
Ink: SU! Grapefruit Grove, Granny Apple Green & Watermelon Wonder, VersaFine Onyx Black
Tools: SU! Stamparatus, 'Everyday Label' punch, circle punch,
Embellishments & accessories: SU! Dimensionals, silver nailheads

Ruth
01 09 10