Thursday 19 March 2015

Bunny Card & Gift Bag For 'Hoppy Easter' Glitter Pot Class

This afternoon I ran a 'Hoppy Easter' class at the Glitter Pot.  I fell in love with the adorable Woodware 'Hoppy Bunny' stamp as soon as I saw it and was thrilled to be able to feature it in a class at the shop!  I decided a Happy Easter card and a matching gift bag for some treats would be perfect projects for the class and the bunny heads just HAD to be put on wobble springs to ramp up the cute factor!  I enjoyed making these SO much - I knew I found the bunny totally appealing but I'm a tad concerned about how much I ended up loving the carrots LOL!

So here's the card and gift bag together.  After taking the photographs I decided to change the brads on the bag handle from round ones to sweet flower shaped ones!


The bunny was stamped four times (for two complete bunnies and two bunny heads) and fussy cut.  The whole bunny had to have surgery - the ears and part of the face were chopped off  (I know, so cruel!) so that those parts weren't visible when the head was wobbled on the spring.  I used ProMarkers to add some colour to the bunnies and to colour the carrots.  The bunny bodies are popped up on foam pads and then the heads were attached over the top with wobble action springs. 

Here's just the card on its own.   I glued one carrot flat and popped up the other two.


Here's the gift bag.  I used the We R Memory Keepers Gift Bag Punch Board to make the bag - but I altered the design a bit.  The punch board allows you to make a gusseted bag but I wanted a straight sided bag I could add a handle to.  So when I made the bag I omitted the triangle and side score lines on the sides of the bag and ended up with a straight sided bag - and when the handle is attached it's almost a basket.  I LOVE these WRMK Punch Boards and now I love my Gift Bag Punch Board even more now I realise it's got more versatility!  I used Doodlebug 'Dragonfly' CS for the handle and actually glued two strips of card together to make a stronger handle.


The bag was made with Doodlebug Easter Parade 'Darling Daisies' patterned paper and to add strength I cut and scored an inner sleeve made from the 'Dragonfly' card.  I glued the tab on the sleeve and simply slid it inside the bag.  I love that the sleeve not only strengthens the bag, it protects little (or big!) fingers from the brad prongs and it also looks neater!


All the ladies loved their cute bunny cards and bags and we had a very happy afternoon!

Supplies:
Stamps: Woodware 'Hoppy Bunny' & 'Easter Greetings' sets
CS: Glitter Pot thick white card,  black card, Doodlebug 'Dragonfly'

Patterned paper: Doodlebug Easter Parade 'Darling Daisies'
Ink: Memento Tuxedo Black, ProMarkers (Ice Grey 2, Sunkissed Pink, Grass, Mango & Burnt Orange)
Tools: WRMK Gift Bag Punch Board
Embellishments & accessories: Woodware flower brads & action wobble springs, 3D foam pads


 photo RoseRuth.gif

Two Colour Cards For Glitter Pot Class

This morning I ran a class at the Glitter Pot for two colour cards.  The cards featured just two colours - well, white plus one other colour.  As the cards were being made with just two colours I felt that simple designs would work best.   So nothing tricky, just some straightforward stamping, dry embossing and die cutting for a lovely relaxed morning class!

When I visited the shop to choose products for the class I was excited to see some new IndigoBlu stamps.  I love flower stamps and immediately fell for the 'Peony Posey' stamp when I saw it so I bagged that one to use on a class.  On closer inspection I decided that 'Peony Pony Posey' would have been a suitable name for the stamp as I spotted a horse lurking in the design which struck me as a bit strange!  I decided that I'd have to cover the pony portion up for the cards I made as a horse as part of a floral image is just too odd for me!  The rest of the image is so beautiful and the pony portion is only small so it's not a big deal!

Here's a photo so you can see the pony among the peonies!


For the first card I opted for a crisp combo of red and white.  I stamped the sentiment and used masking to give me a blank strip where I stamped the image.  I added a chipboard frame over the stamping - the frames are coloured on one side but are plain white on the reverse side and I applied VersaFine Satin Red ink to the white side using a Smoothie ink blending sponge.  I just dabbed with the sponge, no rubbing and I liked the mottled effect that gave.  I glued the frame in place and really liked that it extended beyond the card base so I left it like that.  Mind you, if you did want to place the card in a C6 envelope the excess would have to be cut off.  I added a small piece of Bazzill 'Lava' red CS to the overhanging part of the frame to hide the colour of the frame at the back and finished off by adding a few red gems to the sentiment.


For the second card I stamped the sentiment at the top and chose to stamp the floral image upside down so that the horse portion was towards the bottom left of the card.  I then covered the horse with a pretty popped up die cut butterfly - far more suitable than a horse I think!  I used VersaFine Deep Lagoon ink for stamping and cut the solid butterfly and antenna from  Bazzill 'Bahama' CS which is a perfect match for the ink.  


The third card features dry embossing, scuffing and a gorgeous die cut sentiment.  I embossed a piece of Worn Lipstick Tim Holtz Distressed CS with the Crafts-Too 'Cherry Blossom' embossing folder, scuffed the embossed area with a piece of sandpaper, added the ribbon and adhered the pink panel to the front of the white card base.  I added a touch of twinkle by applying Star Dust Stickles to the embossed Cherry Blossom flowers.  I die cut the Sue Wilson 'Best Wishes' sentiment and glued it in place, making sure to leave some of the flourishy parts without glue so there's a bit of dimension to the sentiment rather than it being glued completely flat.  I love the way that blossom drifts down from the trees and I added some punched and embossed flowers to represent drifting blossoms.  I used a fab Nellie Snellen punch and emboss system - you get two tools in the pack, a flower punch and an embosser.  You punch the flower and then place the shape in the recessed part of the embosser tool, press down the button and you end up with a sweet embossed flower.  I added clear gems to the flower centres to complete the card.


Here's a close up of the sweet punched and embossed flowers - I love the pretty shape and detailing as did all the ladies on the class!  It's best to use a thin lightweight card with the punch as it won't work well with thick card.


In the afternoon we had a 'Hoppy Easter' class to make an irresistible bunny card and matching gift bag so come back later to see that! 

Supplies for Birthday Wishes card:
Stamps: IndigoBlu 'Peony Posey' , Woodware 'Double Birthdays' set
CS: A6 white card base, Bazzill 'Lava'
Ink: VersaFine Satin Red
Tools: Creative Expressions 'Smoothie' ink blending sponge
Embellishments & accessories: Dovecraft Bright Spark Chipboard Frames, PaperMania red gems 


Supplies for Happy Birthday card:
Stamps: IndigoBlu 'Peony Posey', Woodware 'Double Birthdays' set
CS: A6 white card base, Bazzill 'Bahama', Woodware white linen effect card
Ink: VersaFine Deep Lagoon
Tools: Memory Box 'Cascadia Butterfly Trio' & 'Leavenworth Butterfly Trio' dies
Embellishments & accessories: 3D foam pads


Supplies for Best Wishes card:
Stamps: none
CS: A6 white card base, Tim Holtz Worn Lipstick Distressed Card, Woodware white linen effect card, Glitter Pot thin white card
Ink: none
Tools: Crafts-Too 'Cherry Blossom' embossing folder, Sue Wilson the Expression Collection 'Best Wishes' die, Nellie Snellen 'Small Punch & Emboss - Flower 1'
Embellishments & accessories: white satin stripe sheer ribbon, PaperMania clear gems, Star Dust Stickles, sandpaper 


 photo RoseRuth.gif

Monday 16 March 2015

Bluesy Bloomington Border Just For You Card

A card on display at the Glitter Pot really caught my eye recently, it was a simple design featuring the Memory Box 'Bloomington Border' die.  The card on display at the shop was made with a pink card base and a strip of pink patterned paper but I opted to go for blues on my card.

Using ink duster brushes I applied Salty Ocean and Peacock Feathers Distress inks to the front of an A6 white card base, added the dotty patterned paper plus a black CS strip.  I die cut the 'Bloomington Border' from 'Diamond' Bazzill Bling card so it's got a beautiful shimmer - lush!  After die cutting I sent the die back through my Big Shot with a tan mat and embossed the design.  I trimmed off a tad from the bottom of the card so that the die cut shape goes from top to bottom, popped up the shape and stamped the sentiment.


Here's a closer look at the pretty embossed detailing.


For the inside of the card and the envelope I applied ink to the die before cutting the shape from white CS.  I tried using Peacock Feathers Distress Ink first but I got a very patchy result, perhaps because the ink was tending to bead up on the die.  So next I patted my SU! Bermuda Bay ink pad over the die and got a lovely result with far better ink coverage.  I love how the ink transfers to the white card, what a great look!  I did some snipping and adhered the shapes, popping up one of the blooms inside.


Here's a closer look at the inked die cut shape.


Supplies:
Stamps: Personal Impressions Large Everyday Messages' set
CS: PaperMania white A6 card blank, Bazzill Bling 'Diamond', SU! Basic Black & Whisper White

Patterned paper: Bo Bunny 'Frost' Double Dot paper
Ink: VersaFine Onyx Black, Salty Ocean & Peacock Feathers Distress Inks, SU! Bermuda Bay
Tools: Memory Box 'Bloomington Border' die, Inkylicious Ink Duster Brush
Embellishments & accessories: Spellbinders tan embossing mat, 3D foam pads 


 photo RoseRuth.gif

Saturday 14 March 2015

Spring Window Just For You Card

Angela and Janet came for a card making afternoon last Thursday and Angela had asked if they could make a card using one of her new purchases - the Die-Namites 'Spring Window' die.  She dropped off the die to me a few days before our get together so I was able to have a play and design a card.  Once I'd cut the window out I thought placing the window in a room scene would work well so that's what I went with.

The card base is A6 sized and I adhered some pretty patterned paper at the top to represent wallpaper and I used my SU! Hardwood stamp to make wood panelling and a dado rail underneath.  I replaced the birdhouse on the die cut with a different birdhouse die cut shape which I cut out from the Hardwood stamped piece and glued into place.  Using an ink duster brush I applied Tumbled Glass and Faded Jeans Distress Inks to a piece of white CS, glued the window over the top and fussy cut the window shape.  Angela has an all white cat so I thought it would be fun to make the cat look like her Malachi!  I cut the cat portion of the die three times with white card, did some careful snipping and stacked the shapes together to add dimension.  With a sponge dauber I edged the cat with Smoky Slate ink and glued him into place.  Janet has a black cat, Charlie, so she opted to keep to a black cat on her card!  To complete the card front I stamped the sentiment in black ink - hmmm, it's always fraught stamping a sentiment on a card front right at the end but the stamping gods were smiling down on me and all went well!


I stamped some leafy swirls inside and on the envelope flap as I thought they complemented the leafy portion of the die cut shape.  Angela went a step further by stamping a leafy swirl on the front of the card in the bottom right corner which looked lovely!  


We had a happy afternoon and both ladies were very pleased with their cards.  They're coming to me again in a few weeks time and they've asked to make the dangly birdhouse tent card card I designed for my recent Glitter Pot class.  I said that was absolutely fine with me but I did ask if they were fed up of woodgrain as that has featured a lot in the cards they've made with me - they were quick to assure me they're still loving the woodgrain!

Supplies:
Stamps: Personal Impressions 'Large Everyday Messages' set, Woodware 'Leafy Swirls' set
CS: PaperMania A6 white card blank, SU! Crumb Cake, Basic Black & Whisper White 

Patterned paper: Bazzill 'Vintage Lace' 6" x 6" paper pack
Ink: SU! Soft Suede & Smoky Slate, VersaFine Onyx Black, Tumbled Glass & Faded Jeans Distress Inks
Tools: Die-Namites 'Spring Window' die, birdhouse from Marianne Design Creatables 'Ivy' die set, Inkylicious ink duster brushes, sponge daubers

 photo RoseRuth.gif


Friday 13 March 2015

Crossword 80th Birthday Card

A friend from choir, Jane, asked me to make a crossword themed 80th birthday card for her Aunt Jean.  Straight away I knew I'd want to write certain words in the grid so I knew I had to find a grid that contained 4, 5, 8 and 9 letter spaces.  Just as well I love crosswords myself and have quite a few crossword books, it took me ages to track down a grid with all those letter spaces but I found one eventually!

I scanned the grid, printed it onto Whisper White card and trimmed it to size.  I stamped a flourish image a few times using Crumb Cake ink, inked the edges with the same ink and layered the grid onto a black mat.  I made a 5 3/4" square Crumb Cake card base, stamped the flourish along the right hand side and embossed the images with white embossing powder.  I wrote in the words with a permanent marker and arranged a cluster of stamped and punched flowers and die cut leaves.  To complete the front I added some black striped organza ribbon.


Here's the inside and the envelope.  I haven't used that gorgeous flourish from the SU! 'Baroque Motifs' set for ages and it was lovely to ink it up again!


Jane was really, really happy with the card, she insisted on giving me more money than I'd asked for and she also gave me a bunch of pink tulips, what a sweetheart!  I certainly got warm fuzzies from that reaction to the card I'd created, what a lovely feeling!

Supplies:
Stamps: SU! 'Baroque Motifs', 'Flower Shop' & 'Petite Petals' sets, Penny Black 'Lovely Day'
CS: SU! Crumb Cake, Primrose Petals, Basic Black & Whisper White
Ink: VersaFine Onyx Black, VersaMark, SU! Crumb Cake & Strawberry Slush, black permanent ink marker
Tools: SU! 'Pansy' & 'Petite Petals' punches, Poppystamps 'Lorelai Leaf' & 'Lorelai Leaf Outline' dies, heat tool, sponge daubers
Embellishments & accessories: white embossing powder, black striped organza ribbon, SU! Dimensionals


 photo RoseRuth.gif


Wednesday 11 March 2015

Four Cards For "Wooden It Be Good" Glitter Pot Class

Last Saturday I ran a "Wooden It Be Good" all day class at the Glitter Pot.  The class featured four cards made with faux wood effects using a woodgrain stamp and a woodgrain embossing folder.

I love a card with a dangly element so I had to include a personal favourite of mine - one of my dangly birdhouse tent card designs!  I inked the plain side of the X Cut Woodgrain folder with Gathered Twigs Distress Ink and embossed the front of the kraft card base - oh my giddy aunt, what a fab faux wood look that gives, so realistic!  I cut a circle aperture out of the card front - making sure to keep the cut out circle to use on a later card - and added a frame.  The kraft die cut birdhouse was stamped with the Hero Arts 'Designer Woodgrain' stamp using VersaFine Vintage Sepia ink and I inked the edges of the birdhouse with gathered Twigs Distress Ink.  Baker's twine was threaded through the hole and taped to the back of the card on the inside so the birdhouse dangles freely.  A piece of blue CS was added to the inside of the card and the front was embellished with die cut leaves, punched flowers, gems and gingham ribbon.  A few minutes before the class started I decided the card really should have a bird on it - so I quickly added a small black die cut bird to the birdhouse!


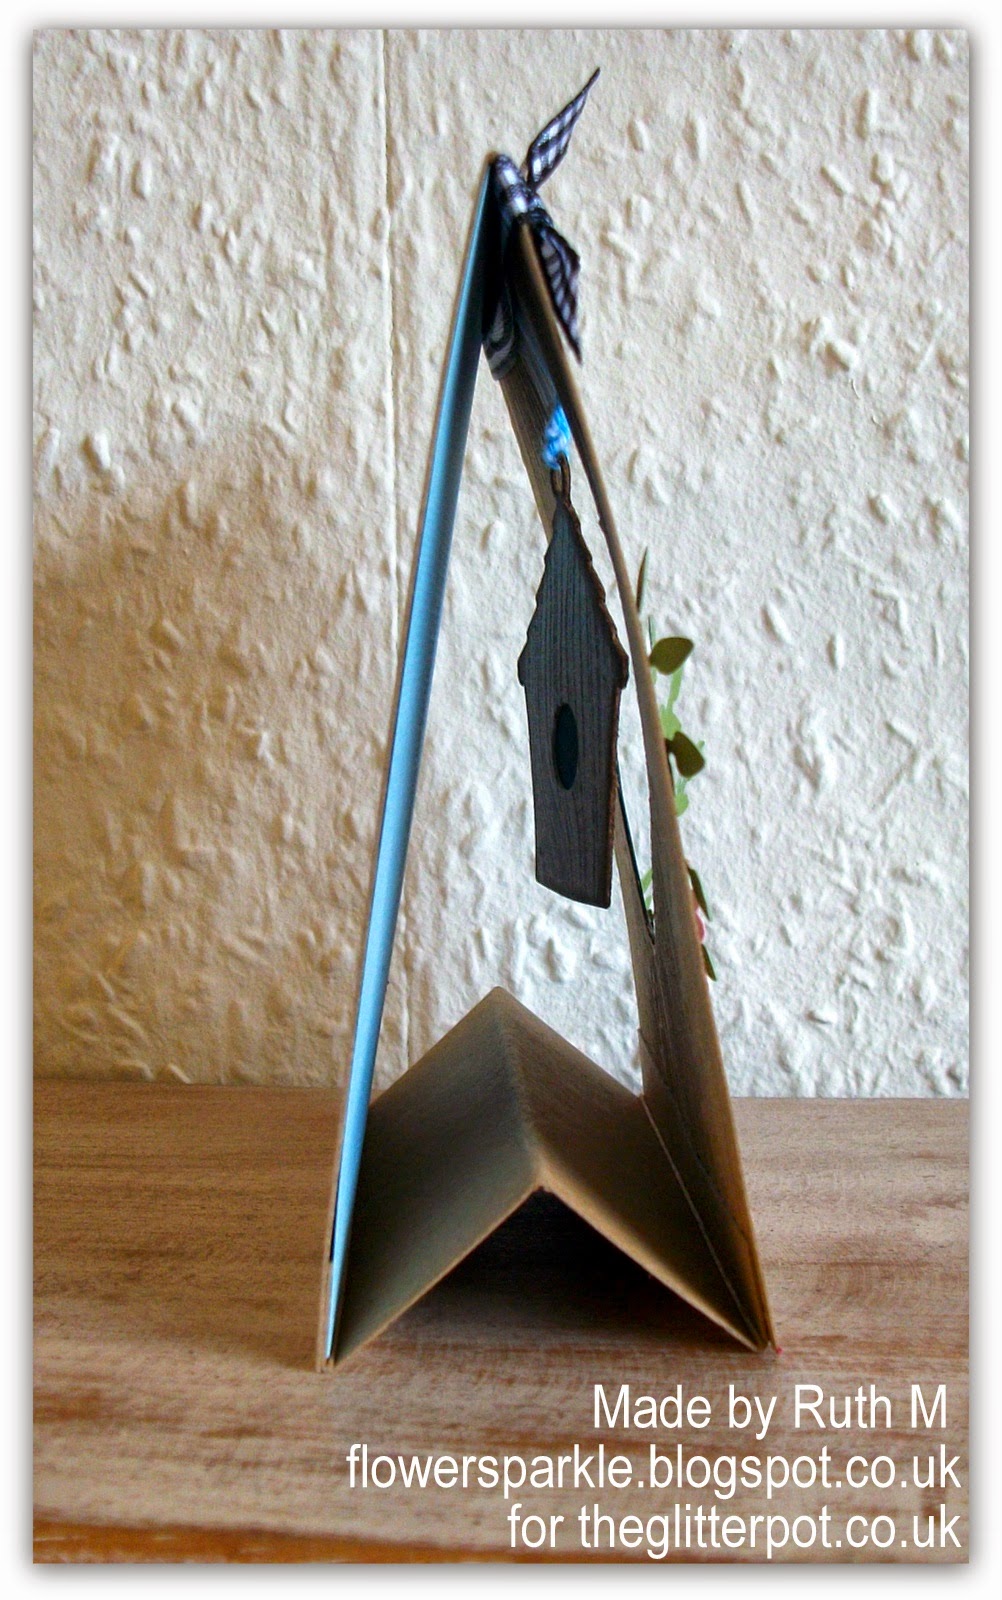
Here's a view of the card from the side showing the W shaped piece of CS I attached inside so that the tent card doesn't collapse when on display - that's a pet peeve of mine!


The second card was a simpler design of a wooden flower box with punched leaves and flowers.  I used a Smoothies ink blending sponge to apply Tumbled Glass Distress Ink to the front of the white card base and added a torn strip of green Core'dinations paper at the bottom.  I stamped a rectangle of kraft CS with the woodgrain stamp, trimmed it to size and used some offcut pieces for feet for the flower box.  Using an alcohol marker and ruler I drew lines to represent planks and added dots to look like nailheads.  The edges of the flower box pieces were inked with Gathered Twigs ink and then I glued the pieces to the card front.  Then it was time to get busy punching out leaves and flowers to fill the box.  I edged all the flowers with Victorian Velvet Distress Ink, shaped them and added a gem to each centre.


After lunch the class made two masculine cards featuring DIY tools made using a fab Leane Creatief set of dies.  The dies are a great size and have wonderful embossed detail to them.  I didn't emboss the shapes after I'd die cut them, I just added a shim when cutting and that helped the embossed detail stand out.  I made a card in a box design and placed the tools inside so it looks like a tool chest - I was really happy how that idea turned out!  I used kraft CS for the card in a box, stamped the Hero Arts Woodgrain stamp in Gathered Twigs ink and inked the edges with Walnut Stain ink.  I used silver mirri CS to cut the tools and used coloured CS for the screwdriver handles.  The blue handled screwdriver and the spanner are both popped up.  I added a flagged sentiment banner and the screw brads were the perfect finishing touch!


Here's another view so you can see the tools inside the box.


The final card uses the die cut circle left over from the dangly birdhouse tent card - a simple design with popped up tools and a few silver nailheads.


What a fun day - lots of laughs and some legendary home made rock cakes - add in crafting and that's a recipe for a perfect day!  I'm really having a blast running the classes at the Glitter Pot, I'm meeting some amazingly creative crafters who are very happy to share wonderful tips and ideas.  Many thanks to the lovely ladies who attended that day!  I must give a special shout out to Carol, Lesley and Wendy - my posse of supportive pals - posse sounds better than groupies which is what they called themselves LOL!  Big {{{{HUGS}}}} to you!

Supplies for dangly birdhouse tent card:
Stamps: Hero Arts Design Block 'Designer Woodgrain'
CS: Craftwork Cards kraft, Glitter Pot black, Bazzill 'Starmist', 'Sunshine' & 'Petunia', Core'dinations 'Amazon'
Ink: VersaFine Vintage Sepia, Gathered Twigs Distress Ink
Tools: X Cut 6" x 6" 'Woodgrain' embossing folder, Marianne Design 'Birdhouse Flowers' die & stamp set, Joy Crafts Vintage Flourishes 'Branch Leaves' die, Woodware 'Christmas Flower' multi punch, circle Nestie dies, sponge dauber, flower shaper & moulding mat
Embellishments & accessories: black & white gingham ribbon, blue & white baker's twine, PaperMania black gems 


Supplies for wooden flower box card:
Stamps: Hero Arts Design Block 'Designer Woodgrain'
CS: Woodware white Linen Effect, Craftwork Cards kraft, Bazzill 'Petunia', Core'dinations 'Amazon'
Ink: VersaFine Vintage Sepia, Tim Holtz Tumbled Glass, Victorian Velvet & Gathered Twigs Distress Inks, dark brown alcohol ink marker
Tools: Woodware 'Grass 1', 'Regular Flower' & 'Large Flower' punches, Creative Expressions 'Smoothies' ink blending sponge, sponge dauber, flower shaper & moulding mat
Embellishments & accessories: PaperMania clear gems


Supplies for tool chest card in a box:
Stamps: Hero Arts Design Block 'Designer Woodgrain', Woodware 'Happy Birthday'
CS: Craftwork Cards kraft, silver mirri card, Bazzill 'Bahama' & 'Raven'
Ink: VersaFine Vintage Sepia & Onyx Black, Tim Holtz Walnut Stain Distress Ink
Tools: Leane Creatief  'Tools' die set, paper piercer
Embellishments & accessories: Woodware Screw Brads, 3D foam pads


Supplies for wood circle & tools card:
Stamps: none
CS: Craftwork Cards kraft, Bazzill 'Raven' & 'Sunshine', silver mirri card
Ink: Tim Holtz Gathered Twigs Distress Ink
Tools: X Cut 6" x 6" 'Woodgrain' embossing folder, circle Nestie die
Embellishments & accessories: silver nailheads, 3D foam pads 


 photo RoseRuth.gif

Friday 6 March 2015

March 2015 Card Group Projects

Yesterday was our March card group get together and we all had a lovely afternoon!  The year seems to be speeding along with spring just around the corner, it's so lovely to see crocuses and primroses and I saw my first butterfly, a Red Admiral, in the garden on Wednesday!

Having recently rediscovered the fab triple time stamping technique for myself I reckoned it was time to introduce it to my card group ladies.  I chose Wild Wasabi, Melon Mambo and Very Vanilla as my colour scheme - such a bright and fresh combo!  I made an A6 sized Melon Mambo card base and trimmed it a smidgen so it was 5 3/4" wide.  Stamping and mat layers were cut as detailed below.

Very Vanilla stamping layers were cut to:
5 1/2" x 3 7/8"
4 1/2" x 2 7/8"
3 1/2" x 1 7/8"

Melon Mambo mat layers were cut to:
4 3/4" x 3 1/8"
3 3/4" x 2 1/8" 

I stacked the Very Vanilla layers together (held in place with removable tape), stamped the sentiment first and then stamped the leaves.  I glued the largest vanilla panel to the card front, matted and layered the remaining panels and glued those in place.  I stamped the smaller leaf image from the stamp set twice onto Wild Wasabi CS using Old Olive ink, fussy cut them and added them to the card along with pretty die cut flowers.  I placed a clear gem in the centre of each flower to complete the card front.


For inside the card and the envelope I simply stamped the large leaf image.


For card two I started off by making a Coastal Cabana A6 sized card base.  I embossed a piece of Whisper White CS with a frame folder, trimmed the piece to size and cut a piece of white CS to fit inside the frame.  Using a brayer, I applied Coastal Cabana ink to the inside of the 'Butterfly Kisses' folder and embossed the piece of white CS so that the background picked up the ink colour but the embossed butterflies remained white.  I glued the butterfly piece inside the embossed frame, added a strip of Early Espresso ribbon and glued the panel to the card front.  I stamped and punched the circle sentiment element and popped that up.


Sweet stamped and punched butterflies decorate the inside and envelope.


During the year we're making a number of one layer inked background and silhouette stamped cards which will form a set of cards that we'll then make a box for.  Last month we didn't add a card to our set of cards so I designed two cards for this month.  For the first card I used a circle die to cut an aperture and I applied Peacock Feathers and Peeled Paint Distress Inks through the aperture onto the card front using Inkylicious ink duster brushes.  I then stamped the maple image, the birds and the sentiment.  I'm very happy how the ink dusting turned out here, it gives a lovely cool and tranquil effect I think.  The ink duster brushes allow you to start with really soft and subtle colour and then you can keep to a soft and subtle look or build up the intensity of colour if you wish to - I LOVE the ink duster brushes for sure!


Here's the inside and envelope.


For the next card set card I used a rectangle shape and applied Seedless Preserves and Dusty Concord Distress Inks.  I stamped the Agapanthus Cluster image, followed by the sentiment - deliberately choosing a one line sentiment as I thought that would give better balance to the design.


Here's the inside and envelope.


Supplies for Best Wishes card:
Stamps: Woodware 'Geometric Leaves' set, Personal Impressions 'Large Everyday Messages' set
CS: SU! Melon Mambo, Wild Wasabi & Very Vanilla
Ink: SU! Melon Mambo, Wild Wasabi & Old Olive
Tools: First Edition 'Flowers' die set, shaping tool & moulding mat
Embellishments & accessories: PaperMania clear gems, removable tape, SU! Dimensionals


Supplies for to you from me card:
Stamps: 'to you from me' from SU! 'Best Yet' set
CS: SU! Coastal Cabana & Whisper White
Ink: SU! Coastal Cabana & Early Espresso
Tools: Crafts Too 'Scrollwork Frame' embossing folder, Crafts Concepts 'Butterfly Kisses' embossing folder, brayer, 1 1/4" & 1 1/2" circle punches
Embellishments & accessories: SU! Early Espresso stitched ribbon, SU! Dimensionals


Supplies for Happy Birthday card:
Stamps: Inkylicious 'Oriental Awakening' set, WaltzingMouse Stamps 'Say it with Style' set
CS: PaperMania white A6 card blank
Ink: VersaFine Onyx Black, Tim Holtz Peacock Feathers & Peeled Paint Distress Inks
Tools: circle Nestabilities die, Inkylicious Ink Duster Brushes

Supplies for Thank You card:
Stamps: Stampendous 'Agapanthus Cluster' cling stamp, WaltzingMouse Stamps 'Say it with Style' set
CS: PaperMania white A6 card blank
Ink: VersaFine Onyx Black, Tim Holtz Seedless Preserves & Dusty Concord Distress Inks
Tools: Memory Box 'Cross Stitched Frame Border' rectangle die, Inkylicious Ink Duster Brush


 photo RoseRuth.gif

Monday 2 March 2015

Leaves, Flower & Butterfly Triple Time Stamped Birthday Card

Recently I've made a few triple time stamped cards because of running a class at the Glitter Pot.  Before the class I hadn't done triple time stamping for ages but now I've rediscovered this fab technique and remember how much I enjoy it I just can't seem to stop!  So here's another triple time stamped card I just had to get out of my system!

I put removable adhesive tape on the back of the three white panels, stacked them together and stamped the 'Geometric Leaves' stamp a few times using Memento Bamboo Leaves ink and stamped the sentiment.  I used 'Amazon' Core'dinations paper for my mat layers, attaching the gingham ribbon strip before adhering the layers together.  I die cut flowers from the First Edition 'Flowers' die set, shaped them, stacked them and applied Glossy Accents to the circle in the centre.  I glued part of a swirl die cut and three leaves in place and then popped up the flower.  On the opposite corner I added a pretty die cut butterfly.  As I made this to go on display at the Glitter Pot there's no decorated inside and envelope.


The Geometric Leaves stamp I used on this card is perfect for triple time stamping - because it's fairly large you only have to stamp a few times to cover the panels.  I've used the stamps again on a triple time stamped card I've designed for my monthly card group so I'll be sharing that card later in the week.    

Supplies:
Stamps: Woodware 'Geometric Leaves' set, sentiment from Woodware 'Victorian Spray' set
CS: Glitter Pot thick white card, Woodware white Linen Effect card, Core'dinations 'Amazon'
Ink: Memento Bamboo Leaves, VersaFine Onyx Black
Tools: First Edition 'Flowers' die set, Crafts Too 'Swirly' die, Memory Box 'Fresh Leaves', 'Isabella Butterfly' & 'Pippi Butterfly' dies, flower shaping tool & moulding mat
Embellishments & accessories: black & white gingham ribbon, Ranger Glossy Accents, 3D foam pads 


 photo RoseRuth.gif

01 09 10