Showing posts with label Angela & Janet. Show all posts

Saturday, 14 March 2015

Spring Window Just For You Card

Angela and Janet came for a card making afternoon last Thursday and Angela had asked if they could make a card using one of her new purchases - the Die-Namites 'Spring Window' die.  She dropped off the die to me a few days before our get together so I was able to have a play and design a card.  Once I'd cut the window out I thought placing the window in a room scene would work well so that's what I went with.

The card base is A6 sized and I adhered some pretty patterned paper at the top to represent wallpaper and I used my SU! Hardwood stamp to make wood panelling and a dado rail underneath.  I replaced the birdhouse on the die cut with a different birdhouse die cut shape which I cut out from the Hardwood stamped piece and glued into place.  Using an ink duster brush I applied Tumbled Glass and Faded Jeans Distress Inks to a piece of white CS, glued the window over the top and fussy cut the window shape.  Angela has an all white cat so I thought it would be fun to make the cat look like her Malachi!  I cut the cat portion of the die three times with white card, did some careful snipping and stacked the shapes together to add dimension.  With a sponge dauber I edged the cat with Smoky Slate ink and glued him into place.  Janet has a black cat, Charlie, so she opted to keep to a black cat on her card!  To complete the card front I stamped the sentiment in black ink - hmmm, it's always fraught stamping a sentiment on a card front right at the end but the stamping gods were smiling down on me and all went well!


I stamped some leafy swirls inside and on the envelope flap as I thought they complemented the leafy portion of the die cut shape.  Angela went a step further by stamping a leafy swirl on the front of the card in the bottom right corner which looked lovely!  


We had a happy afternoon and both ladies were very pleased with their cards.  They're coming to me again in a few weeks time and they've asked to make the dangly birdhouse tent card card I designed for my recent Glitter Pot class.  I said that was absolutely fine with me but I did ask if they were fed up of woodgrain as that has featured a lot in the cards they've made with me - they were quick to assure me they're still loving the woodgrain!

Supplies:
Stamps: Personal Impressions 'Large Everyday Messages' set, Woodware 'Leafy Swirls' set
CS: PaperMania A6 white card blank, SU! Crumb Cake, Basic Black & Whisper White 

Patterned paper: Bazzill 'Vintage Lace' 6" x 6" paper pack
Ink: SU! Soft Suede & Smoky Slate, VersaFine Onyx Black, Tumbled Glass & Faded Jeans Distress Inks
Tools: Die-Namites 'Spring Window' die, birdhouse from Marianne Design Creatables 'Ivy' die set, Inkylicious ink duster brushes, sponge daubers

 photo RoseRuth.gif


Saturday, 21 February 2015

Flowers, Bees & Ladybirds Happy Birthday Card In A Box

A few weeks ago Angela and Janet came to my home to make two cards using the SU! 'Hardwood' stamp.  I showed them cards plus photos of cards I've made using this fabulous stamp and they particularly liked this card in a box.  The ladies asked if they could make one next time they came for a class.  They came on Thursday afternoon and this is the card I designed for them to make.  Not exactly the same design as my previous version, I've changed a few details.


This card in a box fits inside a C6 envelope and I used Crumb Cake CS for the base.  I stamped the Hardwood stamp onto the base using Soft Suede ink.  I rounded the corners and inked the edges with Soft Suede ink applied with a dauber.  The flowers and bees were stamped onto watercolour paper, coloured using inks and a waterbrush and cut out with their matching dies.  I used a clear Gelly Roll pen to add shimmer to the bees wings.  I attached the bees to strips of acetate so it looks like they're flying and buzzing happily amongst the flowers.  I stamped the sentiment, cut it out with a label die and popped up the die cut ladybird.

Here's another photo.


Here's the back of the card and the envelope.  I popped up the die cut ladybird - I love the open wings on this die cut shape, she looks all set to take to the air!


I wrote these instructions on how to make a card in a box if you'd like to check them out.   

Supplies:
Stamps: SU! 'Hardwood' background stamp, Hero Arts 'Flower Garden' stamps & dies combo set, 'Happy Birthday Wishes' from SU! 'Simply Sketched' set, 'good things' from an old Hero Arts set
CS: SU! Crumb Cake, Real Red, Basic Black & Whisper White, watercolour paper, acetate
Ink: VersaFine Onyx Black, SU! Pink Pirouette, Daffodil Delight, Crushed Curry, Melon Mambo, Pool Party, Bermuda Bay & Soft Suede, SU! Basic Black marker, Sakura clear Gelly Roll pen
Tools: dies from Sizzix 'Flower Garden' stamps & dies combo set, Elizabeth Craft Designs 'Ladybugs' dies set, label shape Framelits die from Sizzix Big Shot Starter Kit, water brush
Embellishments & accessories: SU! Dimensionals


 photo RoseRuth.gif


Thursday, 29 January 2015

Two Woodgrain Any Occasion Cards

Angela and Janet will be with me later on for an afternoon of card making.  The ladies requests were to use the SU! Hardwood stamp and to make two cards.  As they'll be making two cards I've kept to simple designs and straightforward techniques.

First up is this grid layout card featuring stamping, punching and die cutting - simples!  I stamped the Hardwood onto Crumb Cake CS with Soft Suede ink and was able to cut all four squares at the same time thanks to a 1 7/8" squares grid die.  I glued a Rich Razzleberry mat layer to the front of the 5 1/4" square cream card, inked the edges of each wood square and popped them up.  I stamped the butterflies with Rich Razzleberry ink onto Coastal Cabana CS, punched them out and glued them to the wood squares making sure to lift the wings up.  A stamped and punched circle element completed the card front.


Here's the inside and the envelope.


For card two, as with card one, I stamped the Hardwood stamp onto Crumb Cake CS with Soft Suede ink.  The wood grain detail looks stronger on this card because I re-inked my Soft Suede ink pad after making the first card.  I stamped the silhouette with VersaMark ink onto the wood panel and heat embossed with white powder - white heat embossing on kraft card is definitely a fave look of mine!  I trimmed the wood panel to size, inked the edges with Soft Suede ink, added the gingham ribbon and adhered the wood panel to a white CS mat layer.  I then adhered that layer to the front of an A6 Tempting Turquoise card base.  Blimey, it has been a LONG time since I've used turquoise - I think I fell in love with the newer blues from SU! and neglected Tempting Turquoise!  I stamped and punched the sentiment element, popped that up and sprinkled on a few turquoise gems to finish the front.


For the inside and envelope I stamped the gorgeous silhouette in Soft Suede ink.  I snapped this Hero Arts 'Wildflower Garden' set up from the ex demo/class sale section at the Glitter Pot - a beautiful bargain!  


Supplies for 'to you from me' card:
Stamps: SU! 'Hardwood' background stamp, 'Papillon Potpourri' & 'Best Yet' sets, Personal Impressions 'Medium Everyday Messages' clear set
CS: PaperMania cream square card blank, SU! Crumb Cake, Rich Razzleberry, Coastal Cabana & Very Vanilla
Ink: SU! Soft Suede & Rich Razzleberry
Tools: Sizzix 1 7/8" Squares Grid Works Thinlits die, SU! 'Elegant Butterfly' & 'Bitty Butterfly' punches, circle punches, sponge dauber
Embellishments & accessories: 3D foam tape


Supplies for 'Warm Wishes' card:
Stamps: SU! 'Hardwood' background stamp, Hero Arts 'Wildflower Garden' cling set, Personal Impressions 'Medium Everyday Messages' clear set
CS: SU! Tempting Turquoise, Crumb Cake & Whisper White
Ink: VersaMark, SU! Soft Suede
Tools: SU! plain & scalloped oval punches, heat tool, sponge dauber
Embellishments & accessories: white embossing powder, Woodware turquoise gingham ribbon, Kaisercraft turquoise gems, SU! Dimensionals


 photo RoseRuth.gif

Thursday, 20 November 2014

Window Tree Scene Warm Wishes Card

Back in October Angela and Janet used the SU! Lovely as a Tree set to make an inky scene card with me.  They wanted to see more examples of cards made using the set before they bought it so I showed them cards I had made plus I did a search for SU! Lovely as a Tree on Google images - wow, a LOT of examples came up!  One design in particular stood out for them - this beautiful window scene card made by Loll - and they asked to make something similar the next time they came round to make a card.  I said that as I happen to own a window die they definitely could make something similar!  So the ladies will be coming round this afternoon and they'll be making my CASEd version of Loll's lovely CAS card.

The A6 sized card blank was made with linen effect CS and I also used that for the window die cut shapes.  I made the scene by applying Memento inks to a piece of Whisper White CS using ink duster brushes.  I stamped the row of trees onto masking paper first and cut along the ground line underneath the trees.  I kept both the top and bottom pieces of the masking paper, I laid down the bottom mask first and inked the sky using Dandelion and Lilac Posies inks  I removed the bottom mask, laid down the top mask and inked the ground using Bamboo Leaves ink.  With the help of my trusty Stamp-a-ma-jig I stamped the row of trees in black ink.  I cut a piece of acetate to go behind the window and I trimmed the stamped panel to size.  I really liked Loll's way of stacking a few window die cuts together to add some depth and dimension and I originally stacked three windows together.  When I flipped the window over to apply adhesive I landed the front right on my mat where I'd been inking which resulted in inky smudges on my pristine white window so I ended up stacking a fourth die cut window!   I decided against making this a definite Christmas card and went with the 'Warm Wishes' sentiment so it can be used for any winter occasion. 

 
For the inside and the envelope I stamped the row of trees in Bamboo Leaves ink - stamping off once first - and then stamped the fir tree in full strength ink.


Supplies:
Stamps: SU! 'Lovely as a Tree' set, Crafty Impressions 'Medium Everyday Messages' clear set
CS: Woodware white linen effect CS, SU! Whisper White, Woodware 'Mask It' sheet, acetate
Ink: Memento Tuxedo Black, Dandelion, Lilac Posies & Bamboo Leaves
Tools: Poppystamps 'Grand Madison Window' die, Inkylicious ink duster brushes, Stamp-a-ma-jig
 

 photo RoseRuth.gif


Monday, 27 October 2014

Embossed Snowflake Floating Front Card

Angela and Janet are coming round tomorrow to make a Christmas card and I decided I'd show them how to make a floating front card.  I was given a Sizzix snowflake die and embossing folder set a few months ago and it occurred to me the large snowflake would make a good floating front card element.  

I cut a piece of Core'dinations CS, die cut and embossed the snowflake, scuffed the shape with sandpaper to bring out the embossed detail and glued a Night of Navy circle behind the snowflake shape.  I cut a piece of Whisper White CS to 11" x 5 1/2" and scored at 2 3/4", 5 1/2" and 8 1/4" to make the card base.  I cut some pieces of Authentique blue patterned paper which has a lovely ombre, graduated colour effect and adhered the paper pieces to three of the card base panels.  I  glued the snowflake to floating hinges (punched circles folded in half), placed a 3/4" navy circle in the centre of the snowflake and added the fancy embellishment.  To complete the card front I added four Night of Navy die cut photo corners.


For the back of the card I stamped a sentiment, added some punched snowflakes and made a punched circle and slit closure.  I simply stamped a snowflake border on the front of the envelope. Full instructions for making a floating front card can be found on my Tutorials page HERE. 


Supplies:
Stamps: Hero Arts 'Holiday Cheer' clear set, My Cute Stamps 'Let It Snow' set
CS: SU! Night of Navy & Whisper White, Core'dinations 'Harborside' CS

Patterned paper: Authentique Classique Elegant Ten
Ink: SU! Night of Navy
Tools: Sizzix 'Snowflake #4' Bigz die & embossing folder set, Nestabilities circle die, circle punches, X Cut snowflake punch, SU! Simply Scored board

Embellishments & accessories: SU! Frosted Finishes embellishment, jewel rhinestones, ultrafine sandpaper

 photo RoseRuth.gif


Tuesday, 7 October 2014

Winter Tree Scene Christmas Card

Angela and Janet came round yesterday afternoon to make a card and they'd told me they wanted to make a Christmas scene card.  They both have recently purchased the Inkylicious ink duster starter kit so I used the Memento ink colours that are included in the kit - along with a couple more.

The 5 3/4" square card is made with Rich Razzleberry CS and the mat layer is Brushed Silver CS.  For the scene I cut a panel of Whisper White CS and firstly applied Dandelion ink over the whole panel.  I punched a 1 3/4" circle for a moon mask, used repositionable tape to stick that down and used the duster brushes to apply more inks - Rose Bud, Danube Blue, Paris Dusk and Grape Jelly.  I dragged a couple of almost dry duster brushes (with the Grape Jelly and Paris Dusk colours) across the moon to add just a wispy hint of colour so the moon isn't quite so stark.  I used Tuxedo Black ink and the Inkylicious mountain/valley stencil to dust the hills at the bottom.  I then stamped the trees and the Santa's Sleigh image and inked the edges of the panel with Tuxedo Black ink using a sponge dauber.  I popped up the sentiment oval, adhered some punched snowflakes and added a rhinestone jewel to each snowflake centre.  I used a fine tip PVA glue bottle to dot glue over the trees and I sprinkled on Dazzling Diamonds glitter to add some sparkle.


Inside the card I stamped a sentiment layered over a stamped snowflake - I used Rich Razzleberry ink that had been stamped off for the snowflake.  I stamped three snowflakes on the front of the envelope to finish off.  Both Angela and Janet went home clutching their starter kits and were very happy with the cards they made.  I suspect they will be practising ink dusting quite a bit!


Supplies:
Stamps: SU! 'Lovely as a Tree', 'Best Yet' & 'Snowflakes' sets, Inkylicious 'Santa's Sleigh' set, Hero Arts 'Holiday Cheer' clear set

CS: SU! Rich Razzleberry, Whisper White & Brushed Silver
Ink: Memento Tuxedo Black, Dandelion, Rose Bud, Danube Blue, Paris Dusk & Grape Jelly, SU! Rich Razzleberry & Smoky Slate
Tools: Inkylicious ink duster brushes & mountain/valley stencil, SU! 1 3/4" circle punch, SU! plain and scalloped oval punches, Fiskars snowflake punch, X Cut tiny snowflake punch, sponge dauber

Embellishments & accessories: SU! Dazzling Diamonds glitter, rhinestone jewels, Dimensionals


 photo RoseRuth.gif


Thursday, 18 September 2014

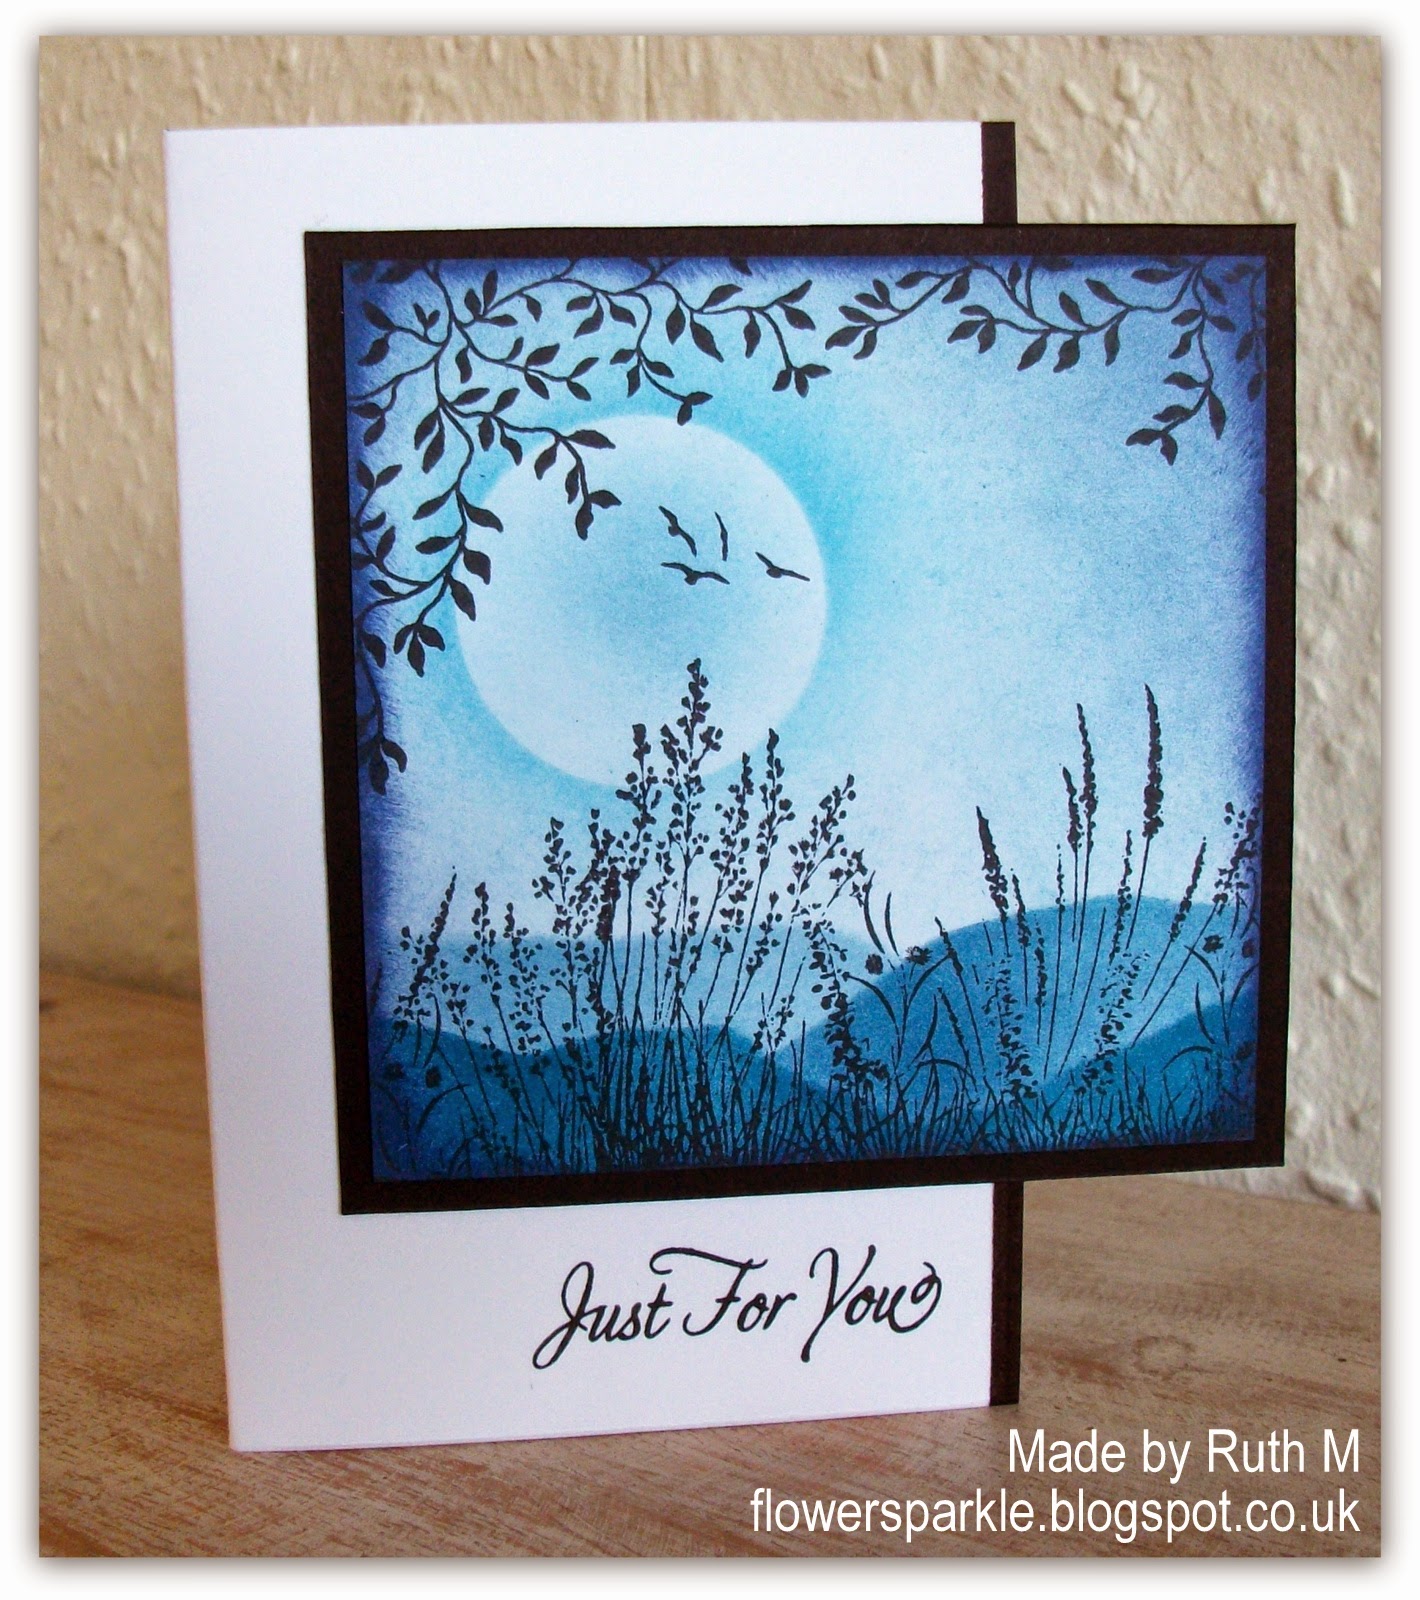
Two Inky Scene Just For You Cards - Brayer Vs. Ink Duster Brushes

Angela and Janet came round this afternoon to make a card and they'd asked if they could have another go at making a scene card using a brayer and torn paper.  Since discovering ink duster brushes I use those in preference to a brayer to make inky scenes and backgrounds.  Personally, I am SO much happier with the results I get using the brushes.  I decided I'd make a card with the brayer first and then make the same card again but using ink duster brushes.  I demoed both methods to the ladies and let them compare the two cards and decide on which method they wanted to use.  They both chose the ink duster brush method.

So here's the brayered card first.  I used a 1 1/2" punched circle for the moon mask and applied Soft Sky ink to the Whisper White CS square with the brayer.  Once I was happy with the ink coverage I removed the moon mask and used a piece of torn paper as a mask to add some hills at the bottom of the panel.  I started at the bottom and brayered Island Indigo ink, followed by Faded Jeans ink and lastly Marina Mist ink, moving the torn paper mask up a bit each time and holding it in place while brayering.  I stamped the silhouette images in black ink, inked the edges of the panel with Island Indigo ink using a sponge dauber and layered the panel onto a black CS mat.  I cut 2" off from the side of a 5 1/4" white square card base, drew a line with a black marker, stamped the sentiment and glued the scene panel to the card.


Here's the card showing the back as well as the cut off panel.


I decorated the inside and the envelope by stamping the Delicate Vines image a few times and added a bit of colour using inks and sponge daubers.


For the second card I switched from the brayer to ink duster brushes.  I tried using a duster brush with an SU! ink pad but it didn't work for me, I think the consistency of the SU! firm foam pads aren't ideal for picking up ink with a duster brush.  Therefore, when using ink duster brushes I'll stick to using Memento and Distress Inks. I dusted Memento Summer Sky ink lightly over the panel  first, then applied the moon mask, dusted on more Summer Sky ink, then Bahama Blue ink, followed by Faded Jeans ink and a bit of Chipped Sapphire ink.  At the time I bought my ink duster brushes I also bought the mountain and valley plastic stencil mask from Inkylicious and I used that on this card instead of torn paper.  The stencil is fab - it's double edged with valleys on one side and mountains on the other, you can flip it over to vary the mountain and valley shapes, it's made of durable plastic and is easy to clean (I just rinse it under the tap after I've finished).  I started at the bottom and applied Memento Teal Zeal ink, for the next lot of hills I used Faded Jeans ink and I also used Faded Jeans ink for the third lot of hills but I used less ink and a lighter touch when dusting.  Again I stamped the silhouette images in black ink but I edged the panel for this card with Chipped Sapphire ink.

For inside and the envelope I stamped the Delicate Vines image again but this time I added colour using the ink duster brushes and Bahama Blue and Faded Jeans inks followed by Chipped Sapphire ink applied with a sponge dauber.


Here's both cards side by side, the brayered card is on the left and the brushed card on the right.  I can see why the ladies chose the ink duster brush method.


There are some superb videos showing how to use ink duster brushes, Deby from Inkylicious has produced a video which can be found HERE showcasing her gorgeous scenes made with the starter kit.  Sally Holmes has made three videos demonstrating her use of the ink duster brushes and her scenes are breathtakingly beautiful!  Sally's YouTube video tutorials can be found HERE and Sally's blog can be found HERE.  I found the videos extremely helpful and I'm more confident about using the brushes now - I'm miles away from Deby's and Sally's standards and I can't get that clouds effect that Sally does!  However, I'm happy enough with the results I'm getting and I love that I can get more of a graded colour using the brushes, I don't get that look when I use a brayer, my brayered panels are much more flat.  Personally, I'll carry on using the duster brushes if I want to create a scene or background but my brayer will get an outing if I want to ink an embossing folder, add colour to a dry embossed panel or ink up a large background stamp! 

Supplies for brayered card:
Stamps: Inkylicious 'Picture Perfect' set & 'Delicate Vines' stamp, WaltzingMouse 'Say It With Style' set
CS: PaperMania square white card blank, SU! Basic Black & Whisper White
Ink: Memento Tuxedo Black, SU! Soft Sky, Marina Mist & Island Indigo, SU! Basic Black marker
Tools: brayer, 1 1/2" circle punch, sponge daubers, torn paper mask


Supplies for brushed card:
Stamps: Inkylicious 'Picture Perfect' set & 'Delicate Vines' stamp, WaltzingMouse 'Say It With Style' set
CS: PaperMania square White card blank, SU! Basic Black & Whisper White
Ink: Memento Tuxedo Black, Summer Sky, Bahama Blue & Teal Zeal, Ranger Tim Holtz Faded Jeans & Chipped Sapphire Distress Inks
Tools: Inkylicious ink duster brushes & valley/mountain stencil mask, 1 1/2" circle punch, sponge dauber


 photo RoseRuth.gif


Wednesday, 13 August 2014

SU! Peaceful Petals - A Trio Of Cards

My friend Angela lent me her SU! Peaceful Petals set and asked me if her and Janet could use the set the next time they came to me for a crafty afternoon.  It's a beautiful stamp set and I loved having a play with it!  I made this card, envelope and tag a little while ago and after looking at Pinterest for some Peaceful Petals inspiration I ended up making a further three cards!   The ladies came round yesterday and these are the cards they made.

First up is a very simple design where an image is stamped over a watercolour wash.  I used a water brush and inks to create my watercolour background, starting with Pool Party, then Coastal Cabana and ending with Bermuda Bay.  I wet the watercolour paper with plain water first and then just brushed on the colours.  Once that was dry, I stamped the image and sentiment using VersaFine Vintage Sepia ink.  I layered onto a Coastal Cabana CS mat and adhered that to the front of a white A6 card base.  Simple but I love the look!  This design was CASEd from cards made by Leonie Schroder who used a different stamp set but I figured the stem from Peaceful Petals would work equally well.


Here's the inside and envelope.  The stems were stamped using Coastal Cabana ink, full strength and stamped off once.


Card two features a clean look with lots of white space and a watercoloured bloom and leaves.  I glued a strip of Wisteria Wonder patterned paper to a square of white CS, drew a line above the paper with an Elegant Eggplant marker and stamped the sentiment.  I glued the white panel to an Elegant Eggplant mat layer which I glued to the front of a 5 1/4" square white card base.   I stamped the flower and leaves onto watercolour paper using VersaFine Onyx Black ink, used Elegant Eggplant and Wild Wasabi inks with a water brush to colour in the images and I fussy cut them.  A Basic Black marker was used to colour the centre of the bloom and the bloom is popped up.  This design is CASEd from this card made by Connie Babbert. 


Here's the inside and envelope.


Card three partners the Hardwood stamp alongside the Peaceful Petals set.  I stamped the Hardwood onto Crumb Cake CS in Soft Suede ink and added Early Espresso marker lines to emphasise the planking.  I inked the edges with Soft Suede ink and glued the wood piece to a panel of white CS. I used a Basic Black marker to draw lines at the top and bottom of the wood panel, I added the black and white baker's twine and glued the panel to the front of a Strawberry Slush A6 card base.  I punched a 2 1/2" circle from white CS, stamped the sentiment and glued the circle to the card.  I stamped flowers and the leafy stem onto watercolour paper with VersaFine Onyx Black ink and used Garden Green and Strawberry Slush inks with a water brush to colour the images.  I used Crushed Curry ink to colour the flower centres and added a bit of Soft Suede too.  I fussy cut the flowers and leaves, glued the leaves to the circle and popped the flowers up.  I CASEd this card, also made by Connie Babbert. 


Here's the inside and the envelope.


A full afternoon of card making and chatting - that's a great way to spend an afternoon!  Angela and Janet have booked themselves in for a return visit in a couple of weeks time.  Before they went home the ladies spent a little time looking at some of my cards on the laptop to decide what they wanted to make next time.  I sensed a pull between two cards and I suggested that I could make a mash up of the two designs, a compromise that everyone was happy with!  I enjoy revisiting past cards and changing them up and a mash up adds a fun dimension!

Supplies for card 1:
Stamps: SU! 'Peaceful Petals' set, Hobby Art 'Sentiments' clear set, Inkadinkado 'Nostalgia' clear set
CS: PaperMania A6 white card blank, SU! Coastal Cabana & Whisper White, watercolour paper
Ink: VersaFine Vintage Sepia, SU! Pool Party, Coastal Cabana & Bermuda Bay
Tools: water brush

Supplies for card 2:
Stamps: SU! 'Peaceful Petals' set
CS: PaperMania square white card blank, SU! Elegant Eggplant & Whisper White, watercolour paper

Patterned paper: Wisteria Wonder paper from old SU! In Colour DSP pack
Ink: VersaFine Onyx Black, SU! Elegant Eggplant, Wild Wasabi & Basic Black
Tools: water brush
Embellishments & accessories: SU! Dimensionals


Supplies for card 3:
Stamps: SU! 'Peaceful Petals' set & 'Hardwood' background stamp
CS: SU! Strawberry Slush, Crumb Cake & Whisper White, watercolour paper
Ink: VersaFine Onyx Black, SU! Strawberry Slush, Garden Green, Crushed Curry & Soft Suede
Tools: SU! 2 1/2" circle punch, water brush, sponge dauber
Embellishments & accessories: black & white baker's twine, SU! Dimensionals


 photo RoseRuth.gif


01 09 10