Showing posts with label Tent card. Show all posts

Thursday, 5 August 2021

Alcohol Ink Background Ornament Dangly Tent Card

Yes, another alcohol ink background card!  This time I tried traditional Christmassy colours and made a dangly tent card.  Here's the card and envelope together.


I made the card from Old Olive CS and cut a stitched rectangular aperture from the front.  I scribbled Dark Mango Melody, Dark Old Olive and Dark Real Red Stampin' Blends onto a panel of vellum and dabbed on 99% isopropyl alcohol with a flat paintbrush to create the background.  I taped the vellum to a sheet of Basic White CS, cut it to size and glued it to the back of my Old Olive tent card.  Although I'd used a Dark Real Red Stampin' Blend on the background, Real Red CS didn't look quite right so I used Polished Pink as my accent colour.  I die cut the solid ornament in Metallic Gold specialty paper and cut the fancy overlay ornament in Polished Pink.  I then added a gold topper and some gold cord and attached the ornament so it will dangle freely.  I stamped the sentiment in VersaMark and heat embossed with gold embossing powder, die cut it with a fishtail flag banner die and glued that in place.  To finish off the front I added some gold Gilded Gems.


Here's a closer look.


Here's a side view so you can see I added a W shaped CS piece which means the tent card will stand up better on display.


Here's the back of the card.  The sentiment stamps come from the SU! 'Peace & Joy' set.  I drew a line from the letter Y with a gold Sharpie, added an ornament, topper and a bow.  A bit busy for just a sentiment panel but at least it's fun!


Supplies:
Stamps: SU! 'Peace & Joy',& 'Tag Buffet' sets
CS: SU! Old Olive, Polished Pink & Basic White, Gold Metallic specialty paper, vellum
Ink: SU! Old Olive & Polished Pink, VersaMark, Dark Mango Melody, Dark Old Olive & Dark Real Red Stampin' Blends markers , gold Sharpie marker
Tools: SU! 'Delicate Ornament' & 'Mini Treat Bag' die sets, Claina Palmer 'A6 Double Stitched Nested Dies' set, MFT 'Fishtail Flags' Stax die set, SU! 1 3/4" circle punch, flat paintbrush
Embellishments & Accessories: 99% isopropyl alcohol, SU! gold embossing powder, gold cord & Gilded Gems

Ruth

Tuesday, 12 June 2018

June 2018 Card Group Projects

Last Thursday I got together with my ladies for the June card group meeting.  Two of the ladies are celebrating their birthdays in June so there were lots of pretty hand made cards to look at and gain inspiration from.  It always amazes us that all of the cards are so different!

Margaret had requested a dangly tent card and I was very happy to go along with that suggestion as I do love those!  For this card I've dangled a hot air balloon in the aperture against a sky backdrop.  I used a colour combo of Elegant Eggplant, Soft Sky and Berry Burst.  I made an A6 sized card base, cut out a square aperture plus a square frame.  I stamped the SU! 'Watercolor Wash' background stamp onto a panel of Whisper White CS using Soft Sky ink and stamped some clouds.  To make the dangly element I stamped and die cut two hot air balloons, sandwiched a length of clear nylon line between the two balloon shapes and taped the line above the aperture.  I popped up the stamped and die cut sentiment label.


Here's a side view of the card.  In order for a dangly tent card to stand up when on display I glue a W shaped piece of CS on the inside.  I cut a piece of CS to the width of the card x 3 1/2"  and score at 1/2", 1 3/4" and 3" and valley, mountain, valley fold to make a W shape.  I glue just the back piece inside first and then glue the inside panel in place.  I glue the front piece of the W shape to the card front when everything else has been finished.   


Here's the back of the card and the envelope flap.


Up next was a card featuring water stamping which is such a lovely technique, I don't do it often but I always enjoy it immensely when I do!  I applied Broken China and Dusty Concord Distress Inks to a piece of SU! Whisper White thick CS using ink duster brushes.  I then spritzed the old but beautiful SU! 'Vintage Lace' background stamp with water using a spritzer bottle - I gave it about twelve spritzes - and pressed the stamp to the inked panel, pressing firmly.  I used my heat tool to dry the panel, stamped the sentiment, added the rose die cut and glued the panel to the front of a Night of Navy A6 sized card.


Here's a closer look at the water stamped background.  I believe the technique is also known as ghosting.  It's almost as if colour has been bleached away.  I like to use Distress Inks for creating a background for water stamping because those inks blend beautifully and react with water.  You need enough water on the stamp to show a definite, discernible pattern but you don't want to spritz the stamp so much that it is dripping when you turn it down to stamp.  If you use too little water the resulting background pattern is very subtle.  It's so worth it to experiment to find the perfect water spritz to stamp ratio to get the effect you're looking for - it's great fun! 


Here's the inside of the card and the envelope flap.


For card number three I used the sponging mask technique shown by Esther Howard in this video.  It's such a clever way to make a mask and so easy!  I've CASEd Esther's card before and I couldn't resist making another version to teach the technique to my card group ladies!  I opted for a lovely Springtime colour combo of So Saffron and Granny Apple Green and added some Soft Suede.  I stamped the bird onto Crumb Cake CS, die cut and then popped the bird up.  I forgot to put Crumb Cake CS into the card kits and I didn't take any sheets of CS with me so the ladies had to stamp their birds onto Soft Suede CS - which looked equally good!  I did some tone on tone stamping on opposite corners of the card and added the pretty die cut shape underneath the image panel.  


Here's the inside of the card and the envelope flap.


Next time we're decorating a gift box and there'll be a black and white card - thanks to suggestions made by the group!

Supplies for dangly tent card:
Stamps: SU! 'Lift Me Up' set, SU! 'Watercolor Wash' background stamp, Hero Arts 'Yummy Treats' set
CS: SU! Berry Burst, Elegant Eggplant, Soft Sky & Whisper White
Ink: SU! Berry Burst, Elegant Eggplant & Soft Sky
Tools: SU! 'Up and Away' & 'Petals & More' Thinlits die sets, square Nestabilities dies, SU! 'Simply Scored'
Embellishments & accessories: SU! Dimensionals, clear nylon line


Supplies for water stamped card:
Stamps: SU! 'Vintage Lace' background stamp, SU! 'Happy Wishes' set
CS: SU! Night of Navy & Whisper White (regular & thick)
Ink: SU! Night of Navy, Ranger Tim Holtz Broken China & Dusty Concord Distress Inks
Tools: Wild Rose Studio 'Wild Rose' die, Inkylicious ink duster brushes, water spritzer bottle 


Supplies for leaves & bird card:
Stamps: SU! 'Petal Palette' set
CS: SU! So Saffron, Soft Suede & Whisper White, white copy paper for mask
Ink: SU! Granny Apple Green, So Saffron & Soft Suede
Tools: SU! 'Petals & More' Thinlits die set, Creative Expressions Smoothie ink blending sponge
Embellishments & accessories: SU! Dimensionals

Ruth

Wednesday, 11 March 2015

Four Cards For "Wooden It Be Good" Glitter Pot Class

Last Saturday I ran a "Wooden It Be Good" all day class at the Glitter Pot.  The class featured four cards made with faux wood effects using a woodgrain stamp and a woodgrain embossing folder.

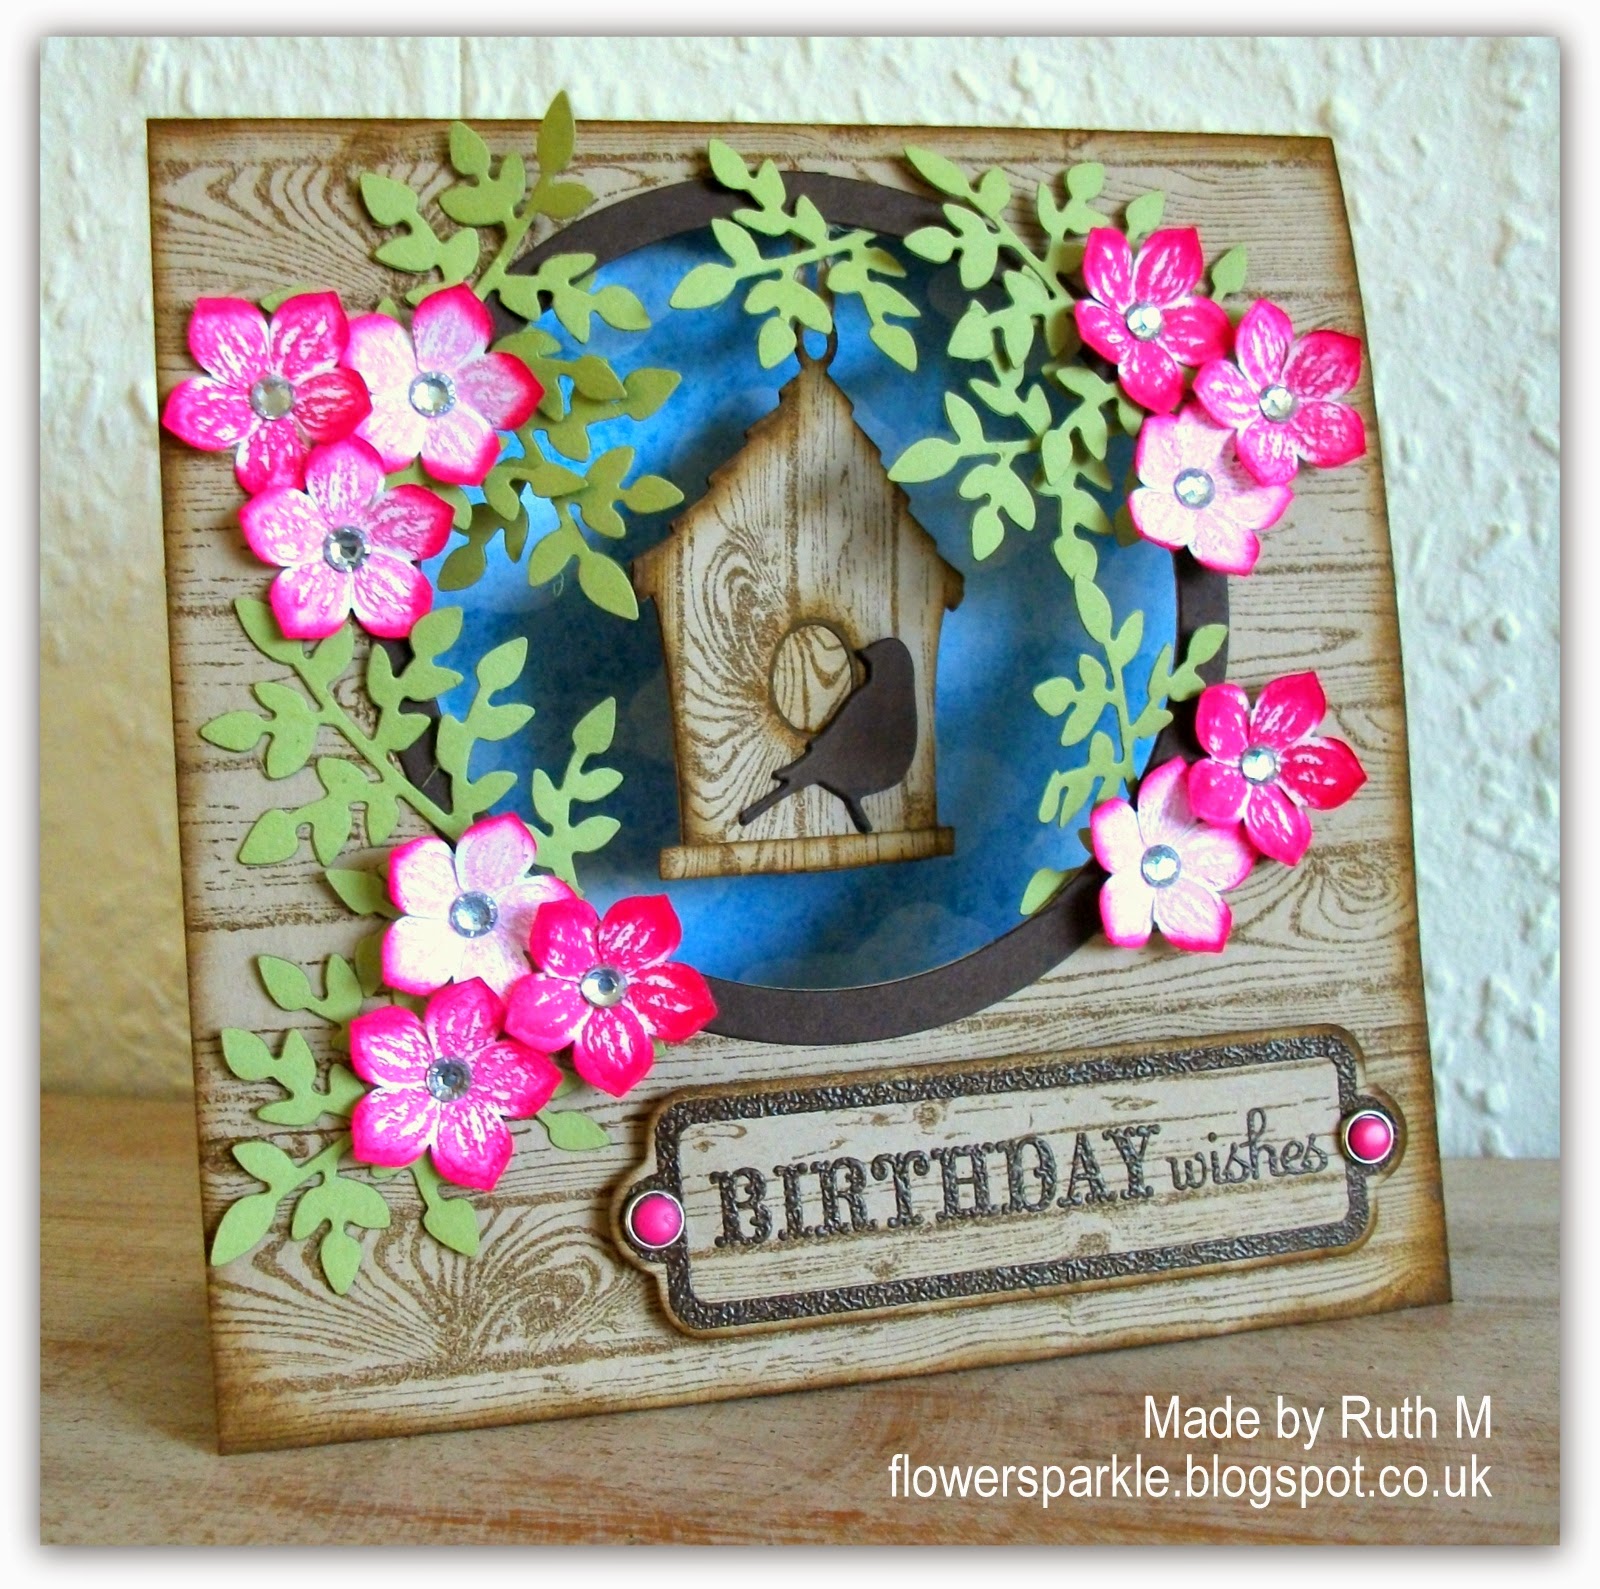
I love a card with a dangly element so I had to include a personal favourite of mine - one of my dangly birdhouse tent card designs!  I inked the plain side of the X Cut Woodgrain folder with Gathered Twigs Distress Ink and embossed the front of the kraft card base - oh my giddy aunt, what a fab faux wood look that gives, so realistic!  I cut a circle aperture out of the card front - making sure to keep the cut out circle to use on a later card - and added a frame.  The kraft die cut birdhouse was stamped with the Hero Arts 'Designer Woodgrain' stamp using VersaFine Vintage Sepia ink and I inked the edges of the birdhouse with gathered Twigs Distress Ink.  Baker's twine was threaded through the hole and taped to the back of the card on the inside so the birdhouse dangles freely.  A piece of blue CS was added to the inside of the card and the front was embellished with die cut leaves, punched flowers, gems and gingham ribbon.  A few minutes before the class started I decided the card really should have a bird on it - so I quickly added a small black die cut bird to the birdhouse!


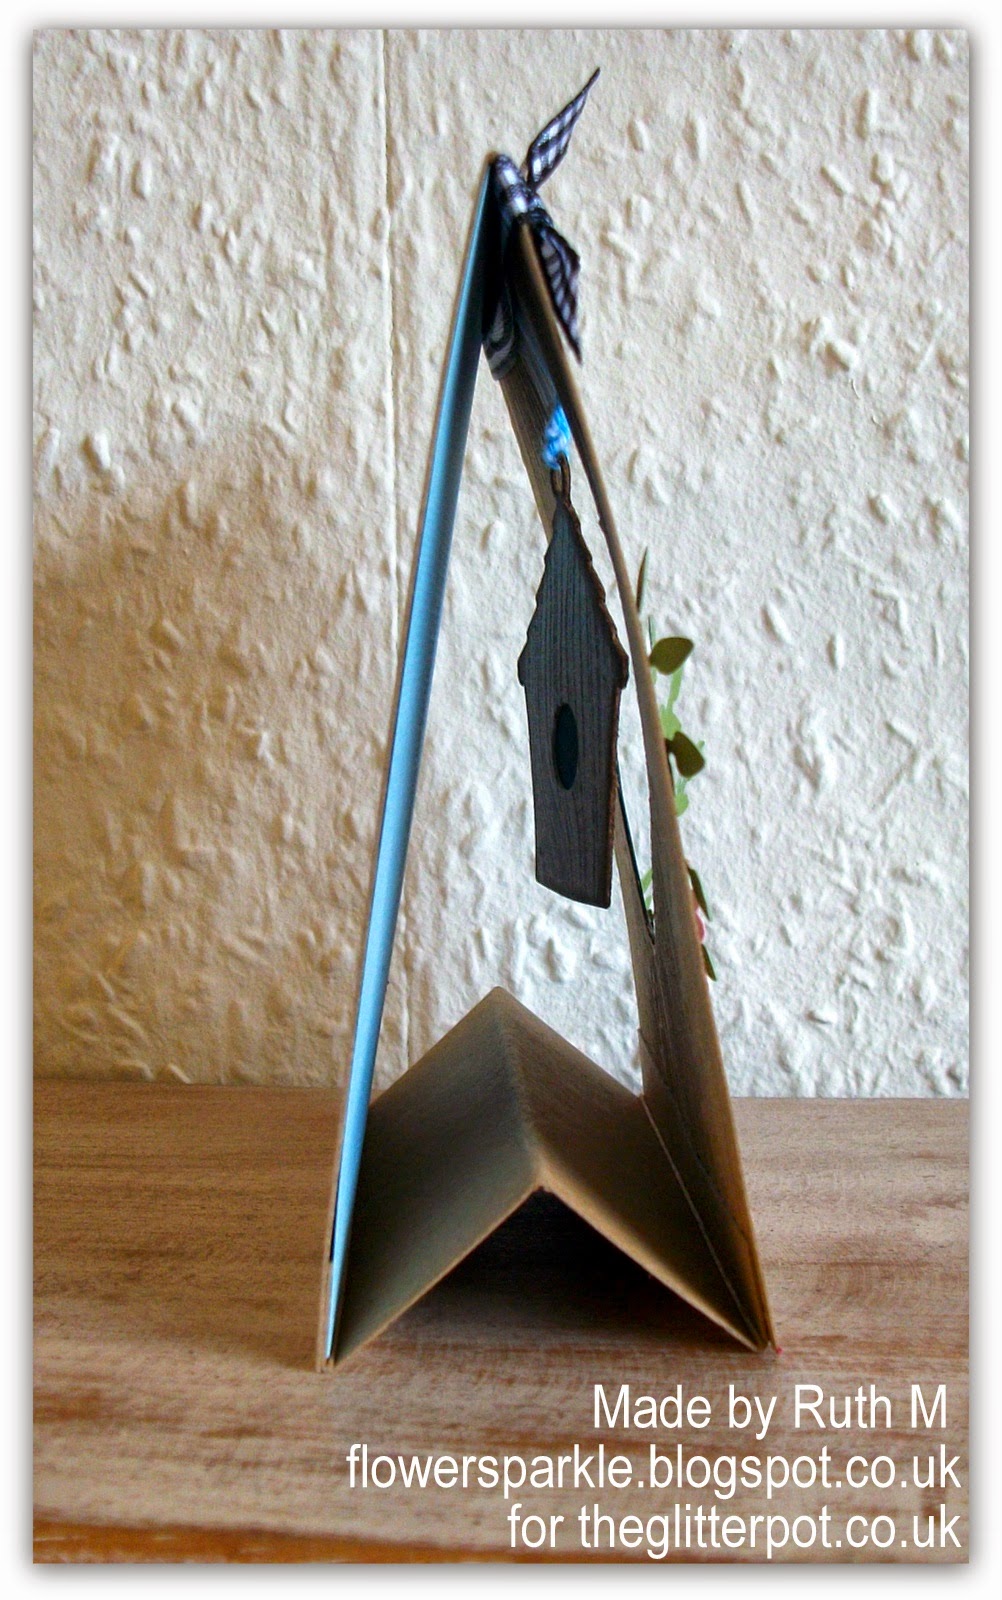
Here's a view of the card from the side showing the W shaped piece of CS I attached inside so that the tent card doesn't collapse when on display - that's a pet peeve of mine!


The second card was a simpler design of a wooden flower box with punched leaves and flowers.  I used a Smoothies ink blending sponge to apply Tumbled Glass Distress Ink to the front of the white card base and added a torn strip of green Core'dinations paper at the bottom.  I stamped a rectangle of kraft CS with the woodgrain stamp, trimmed it to size and used some offcut pieces for feet for the flower box.  Using an alcohol marker and ruler I drew lines to represent planks and added dots to look like nailheads.  The edges of the flower box pieces were inked with Gathered Twigs ink and then I glued the pieces to the card front.  Then it was time to get busy punching out leaves and flowers to fill the box.  I edged all the flowers with Victorian Velvet Distress Ink, shaped them and added a gem to each centre.


After lunch the class made two masculine cards featuring DIY tools made using a fab Leane Creatief set of dies.  The dies are a great size and have wonderful embossed detail to them.  I didn't emboss the shapes after I'd die cut them, I just added a shim when cutting and that helped the embossed detail stand out.  I made a card in a box design and placed the tools inside so it looks like a tool chest - I was really happy how that idea turned out!  I used kraft CS for the card in a box, stamped the Hero Arts Woodgrain stamp in Gathered Twigs ink and inked the edges with Walnut Stain ink.  I used silver mirri CS to cut the tools and used coloured CS for the screwdriver handles.  The blue handled screwdriver and the spanner are both popped up.  I added a flagged sentiment banner and the screw brads were the perfect finishing touch!


Here's another view so you can see the tools inside the box.


The final card uses the die cut circle left over from the dangly birdhouse tent card - a simple design with popped up tools and a few silver nailheads.


What a fun day - lots of laughs and some legendary home made rock cakes - add in crafting and that's a recipe for a perfect day!  I'm really having a blast running the classes at the Glitter Pot, I'm meeting some amazingly creative crafters who are very happy to share wonderful tips and ideas.  Many thanks to the lovely ladies who attended that day!  I must give a special shout out to Carol, Lesley and Wendy - my posse of supportive pals - posse sounds better than groupies which is what they called themselves LOL!  Big {{{{HUGS}}}} to you!

Supplies for dangly birdhouse tent card:
Stamps: Hero Arts Design Block 'Designer Woodgrain'
CS: Craftwork Cards kraft, Glitter Pot black, Bazzill 'Starmist', 'Sunshine' & 'Petunia', Core'dinations 'Amazon'
Ink: VersaFine Vintage Sepia, Gathered Twigs Distress Ink
Tools: X Cut 6" x 6" 'Woodgrain' embossing folder, Marianne Design 'Birdhouse Flowers' die & stamp set, Joy Crafts Vintage Flourishes 'Branch Leaves' die, Woodware 'Christmas Flower' multi punch, circle Nestie dies, sponge dauber, flower shaper & moulding mat
Embellishments & accessories: black & white gingham ribbon, blue & white baker's twine, PaperMania black gems 


Supplies for wooden flower box card:
Stamps: Hero Arts Design Block 'Designer Woodgrain'
CS: Woodware white Linen Effect, Craftwork Cards kraft, Bazzill 'Petunia', Core'dinations 'Amazon'
Ink: VersaFine Vintage Sepia, Tim Holtz Tumbled Glass, Victorian Velvet & Gathered Twigs Distress Inks, dark brown alcohol ink marker
Tools: Woodware 'Grass 1', 'Regular Flower' & 'Large Flower' punches, Creative Expressions 'Smoothies' ink blending sponge, sponge dauber, flower shaper & moulding mat
Embellishments & accessories: PaperMania clear gems


Supplies for tool chest card in a box:
Stamps: Hero Arts Design Block 'Designer Woodgrain', Woodware 'Happy Birthday'
CS: Craftwork Cards kraft, silver mirri card, Bazzill 'Bahama' & 'Raven'
Ink: VersaFine Vintage Sepia & Onyx Black, Tim Holtz Walnut Stain Distress Ink
Tools: Leane Creatief  'Tools' die set, paper piercer
Embellishments & accessories: Woodware Screw Brads, 3D foam pads


Supplies for wood circle & tools card:
Stamps: none
CS: Craftwork Cards kraft, Bazzill 'Raven' & 'Sunshine', silver mirri card
Ink: Tim Holtz Gathered Twigs Distress Ink
Tools: X Cut 6" x 6" 'Woodgrain' embossing folder, circle Nestie die
Embellishments & accessories: silver nailheads, 3D foam pads 


 photo RoseRuth.gif

Monday, 1 December 2014

Ho Ho Ho Dangly Tent Card

Almost a week since I last blogged - blimey!   I've had some exciting news which has kept me rather busy - I'm chuffed to bits to tell you that I'm now a demonstrator and class tutor for the Glitter Pot shop in Burgess Hill!  I am demonstrating at the shop on Saturday 6th December and the demo was to have been my first Glitter Pot gig.  However, I actually ran a class there last Saturday because the tutor due to run it, Alex, was poorly.  I had a blast on my first class, I had a friendly and fabulous group of ladies, huge thanks to Pat, 'cake' Lizzie, Amanda, Chris, 'glitter' Lizzie and Karen for giving me such a warm welcome and for making my first class such wonderful fun!  Huge thanks also to everyone at the Glitter Pot for their help, support, for looking after me and keeping me supplied on Friday with cups of tea, choccie biccies and encouraging words while I prepared for Saturday's class!

Awwww, it's such a shame for poor Alex, it was her Christmas party class so the ladies all bought in scrummy food and she missed out, I do hope she feels better very soon.  I'm hoping to still be tutoring at the Glitter Pot this time next year so I can have my very own Christmas party class! 

Anyway, today I'm sharing another Christmas card using a wooden shape - I really love using these at the moment and they are so perfect for dangling inside a tent card!  I used Lost Lagoon CS for the tent card base, cut an oval aperture and frame and decorated with pretty Kaisercraft 'Mistletoe' papers.  I coloured the wooden shape with a red ProMarker, added some rhinestones and suspended the shape in the aperture with some gold cord.  I die cut a red Santa hat and die cut the brim and bobble with Dazzling Diamonds Glimmer Paper for the essential seasonal sparkle!  I added the Lost Lagoon ribbon and popped up the Santa hat to complete the card front.


Here's the back of the card.


Using the Envelope Punch Board I made an envelope using a piece of 12" x 12" CS from the Kaisercraft 'Mistletoe' collection.  This photo shows the card and envelope together.  A very bright and cheery number I think!


Supplies:
Stamps: none
CS: SU! Lost Lagoon, Riding Hood Red & Whisper White, Dazzling Diamonds Glimmer Paper

Patterned paper: Kaisercraft 'Mistletoe' 6 1/2" x 6 1/2" paper pad, Kaisercraft 'Mistletoe - Holly' 12" x 12" paper
Ink: Cardinal Red ProMarker
Tools: Petite Ovals Nestabilities dies, Sizzix 'Phrase, Ho Ho Ho w/Santa Hat' Sizzlits die, Envelope Punch Board, Crop-A-Dile
Embellishments & accessories: SU! Lost Lagoon satin ribbon, gold cord, SU! rhinestone jewels, Dimensionals


 photo RoseRuth.gif


Tuesday, 11 November 2014

Dangly Wooden Ornament Tent Card - Merry Monday #134

This week's challenge at Merry Monday is to create a card with ornaments in silver/grey and blue - what a fab challenge and such a pretty photo!  My new favourite thing at the moment is wooden shapes.  A while ago I bought a pack of PaperMania Create Christmas 'Words' wood shapes - there are ten shapes in the pack and one is an ornament.  All the shapes in the pack have holes - to me that means they're crying out to be dangled in an apertured tent card - so that's what I made!


First I coloured the wooden ornament using a blue Sharpie pen and Brushed Pewter Distress Paint for the hanger part of the shape and I set that aside to dry.  I glued the patterned paper panel to the front of a 5 1/4" square cream card base, cut out the circle aperture and cut a Very Vanilla CS circle frame to go around the aperture.  I glued a panel of polka dot embossed Very Vanilla CS inside the card so it shows through the aperture.  I stamped the sentiment and heat embossed it with silver embossing powder, die cut the label shape and attached the label to the card using silver brads.  I punched a 1 3/4" circle of Silver Glimmer Paper, glued that to the back of the ornament and added rhinestone gems to the centre of the ornament.  I punched a hole above the aperture, suspended the ornament using silver cord and I covered the hole with a silver snowflake shaped brad.  I added three Very Vanilla punched snowflakes and placed a rhinestone gem in the centre of each one.


Here's a close up view of the dangly ornament.


I love suspending elements so that they dangle freely within an aperture cut into a tent card - what I don't love is that tent cards have a tendency to collapse while on display.  To ensure my tent cards stay up I always add a connecting piece of CS cut and scored into a W shape.  This photo shows the card at a different angle so you can see the W shaped CS connecting piece.


I always write my message on the back when I've made a dangly tent card.  Here's the back of the card with a silver heat embossed sentiment and a strip of patterned paper.  I added a line drawn with a metallic silver Sharpie pen above the paper strip.  I covered the flap of the envelope with patterned paper to complete the card.


Supplies:
Stamps: SU! 'Joyful Christmas' set, Hero Arts 'Holiday Cheer' clear set
CS: PaperMania square cream card blank, SU! Very Vanilla & Silver Glimmer Paper

Patterned paper: Bo Bunny Snow Day 'Flurries'
Ink: Encore Metallic Silver pigment ink, blue Sharpie pen, metallic silver Sharpie pen

Tools: Circle Nestabilities dies, Spellbinder's 'Grommet Tags' die, Cuttlebug 5" x 7" 'Polka Dots' embossing folder, snowflake punches, circle punches, heat tool, paper piercer
Embellishments & accessories: PaperMania Create Christmas Wooden Shapes 'Words' pack, Brushed Pewter Distress Paint, silver embossing powder, rhinestone gems, silver brads, snowflake shaped brad, silver cord


 photo RoseRuth.gif

Friday, 13 June 2014

Dangly Birdhouse Birthday Wishes Tent Card For Jan

When I was mulling over what card to make for Jan's birthday I remembered this dangly birdhouse tent card I made back in April and I thought that would be ideal.  The good thing about making a card to the same design you've used before is that you can address those "I wish I'd done...", "I wish I'd added...", "I wish I'd used..." thoughts that occur to you after you've made the original card.  Also, you should be able to create the second card quicker and in a more organised fashion - well, that's the theory anyway!   

I stamped the SU! Hardwood stamp in Soft Suede ink over the entire front of the Crumb Cake 5 1/4" square card base, cut the aperture and frame and glued cloudy paper on the inside.  I stamped the Hardwood stamp on a separate piece of Crumb Cake CS, stamped the sentiment, heat embossed it with Early Espresso powder and die cut the sentiment, birdhouse and three Early Espresso birds.   I edged the birdhouse, sentiment label and card front with Soft Suede ink, stacked the three bird shapes together for dimension and glued the bird to the birdhouse.  I made the birdhouse dangle by adding linen thread which I taped behind the aperture.  I die cut Pear Pizzazz leafy stems and adhered them around the aperture, gluing some on the inside and some on the outside.  I then stamped a flower from the Petite Petals set using Melon Mambo ink - stamping three times before re-inking to get different shades of pink.  After punching out the flowers, I snipped between each petal, sponged the edges with Melon Mambo ink, shaped them and glued them on.  I added brad bases with Melon Mambo Candy Dots to the sentiment label, popped that up and placed a rhinestone in each flower centre.  


Here's a closer view of the birdhouse - it tickles me no end to make it look like it's made of wood!


 Here's the back of the card with a sentiment, tiny butterflies, punched grass, flowers and a different wooden birdhouse.


Yet more wood on the envelope flap - anybody would think I love that Hardwood stamp - and yes, I do, muchly!  


Supplies:
Stamps: SU! 'Hardwood' stamp & 'Petite Petals' set, Hero Arts 'Sending You Love' & 'Yummy Treats' clear sets
CS: SU! Crumb Cake, Early Espresso, Pear Pizzazz, Pink Pirouette, Melon Mambo & Whisper White
Ink: SU! Soft Suede, Early Espresso & Melon Mambo
Tools: birdhouse die from Marianne Design Collectables 'Birdhouse Flowers' stamp & die combo set, circle Nestabilities dies, Hero Arts 'Small Tag Frame' Framelits die, Joy Crafts Vintage Flourishes 'Branch Leaves' die,  SU! 'Petite Petals' punch, Poppystamps 'Carolina Birdhouse' die, Memory Box 'Gold Finch' die, Martha Stewart grass border & multi butterfly punches, Woodware multi flower punch, sponge dauber
Embellishments & accessories: SU! linen thread, brad bases & Melon Mambo Candy Dots, rhinestone jewels, PaperMania tiny gems, SU! Dimensionals


 photo RoseRuth.gif 


Tuesday, 22 April 2014

Dangly Birdhouse Tent Card

I have a new "thing" - I can't seem to resist birdhouse dies!  My friend Lesley and I were in the Glitter Pot together and both of us had already put a Memory Box birdhouse die in our baskets.  Later on Lesley showed me a Marianne Collectables birdhouse die and stamp combo set before placing it in her basket.  I saw the hole at the top of the birdhouse and I immediately thought it would be fab to use to make a dangly tent card.  So that meant the item had to be placed in my basket too!

One of my favourite new craft stash items is the SU! Hardwood stamp, it is just wonderful!  I decided to make my birdhouse look like it was made of wood so I inked the Hardwood stamp with Soft Suede ink, stamped it onto Crumb Cake CS and die cut the birdhouse.  I cut a small strip from the stamped piece of CS, added that to the bottom of the birdhouse, die cut the bird and popped him up on thin foam pads.  Then I added linen thread to the birdhouse hole.  I made a 5 1/4" square Crumb Cake card base, stamped the Hardwood stamp on the front, stamped the sentiment and die cut a circle aperture and a frame.  I embossed Soft Sky CS with the SU! Cloudy Day folder, brayered Soft Sky ink over the top and glued the panel inside the card.  I taped the linen thread behind the aperture so the birdhouse freely dangles.  I die cut Old Olive leafy stems, glued them in place and punched Raspberry Ripple and Soft Sky flowers.  I shaped the flowers, glued them and added crystals to the flower centres.      


Here's a side view showing the W shaped CS piece I glued inside.  I always add these to the dangly tent cards I make so that the card stands up properly.  It really vexes me when top fold cards collapse!  To make a W shaped piece I cut a piece of CS to the width of the card x 3 1/2" and score at 1/2", 1 3/4" and 3". 


Here's the back of the card.


Here's the envelope flap.


I was really pleased how this card turned out and I really enjoyed putting it together!  I wanted to make a special thank you card for our very special friends Debbie and Mike.  They took us out to dinner on my birthday and bought me lovely gifts too.  They are true treasures indeed!  We went to their house on Easter Sunday for a scrummy roast dinner and I handed this card over then.  Happily, they loved it!

Supplies:
Stamps: SU! 'Hardwood', Hero Arts 'Friends are Treasures' cling set, Hero Arts 'Sending You Love' clear set
CS: SU! Crumb Cake, Soft Sky, Early Espresso, Raspberry Ripple & Very Vanilla
Ink: SU! Soft Suede, Soft Sky & Early Espresso
Tools: Circle Nestabilities dies, die from Marianne Design Collectables 'Birdhouse Flowers' die & stamp combo set, Memory Box 'Gold Finch' die,  Joy Crafts Vintage Flourishes 'Branch Leaves' die, Woodware multi flower punch, Hero Arts 'Small Tag Frame' Framelits die SU! 'Cloudy Day' embossing folder, brayer, sponge dauber
Embellishments & accessories: clear and iridescent Swarovski crystals, SU! Soft Sky Candy Dots, SU! Linen Thread, thin 3D foam pads 


 photo RoseRuth.gif 

Wednesday, 23 October 2013

Dangly Ornament Tent Card

I was very happy how this dangly snowflake tent card turned out.  I thought I'd try a similar card but this time with a dangly ornament instead of a snowflake.  I made the A6 sized card base with Pool Party CS, used circle dies to cut out the aperture and frame and adhered Winter Frost DSP to the back panel.  I stamped and die cut two Island Indigo ornaments, pressed one onto my VersaMark pad, sprinkled Iridescent Ice embossing powder over it and heat embossed.  I sandwiched silver ribbon between the two ornaments with Dimensionals and taped the ribbon ends behind the aperture.

The sentiment is from the SU! Teeny Tiny Sentiments set - but it isn't teeny 'cos I printed it from My Digital Studio (MDS) and so was able to enlarge the size!  MDS is so easy to use and I'm chuffed that the software came with stamp sets that I don't own in rubber format - like Teeny Tiny Wishes.  It's fab that I can choose colours and sizes for my images and sentiments too.  I finished off the front with a silver ribbon bow and rhinestones.  


Here's a closer look at the sparkly ornament.  I LOVE that particular ornament stamp, it's so gorgeous and elegant!


Here's the back of the card and the envelope.  Again I used MDS to generate the sentiment, using a beautiful greeting from the Delightful Dozen set - another set I don't own in rubber format but which was included in the software.  I added the ornament from the Something for Christmas set so it hangs from the swirl - perfect placement without the need for a Stamp-a-Ma-Jig!  A fab feature within MDS is the drop shadow - I added that to the sentiment and loved the end result.  A simple stamped and die cut ornament on the envelope flap completed the card. 


Supplies:
Stamps:  SU! 'Ornament Keepsakes' set, SU! 'Teeny Tiny Wishes', 'Delightful Dozen' & 'Something for Christmas'  MDS stamp brush sets
CS: SU! Pool Party, Island Indigo & Whisper White

Patterned paper:  SU! 'Winter Frost' DSP
Ink:  SU! Island Indigo, VersaMark
Tools:  Circle Nestabilities dies, SU! 'Holiday Ornaments' Framelits dies, SU! Simply Scored
Embellishments & accessories: SU! 1/8" silver ribbon, rhinestone jewels, Dimensionals


 photo DiamanteHeartsRuth.gif
01 09 10