Saturday 20 October 2018

Poinsettia Christmas Wishes Card

Many thanks to my lovely friend Jan who lent me her SU! 'Peaceful Poinsettia' bundle so I could try the stamps and dies out.  This card wasn't difficult but it was fiddly and time consuming - I didn't mind though, it was a dull Sunday afternoon and therefore perfect to while away some time crafting!

My colour combo is Merry Merlot, Shaded Spruce, Whisper White and a hint of gold sparkle.  I decided the leaves had to be green so I cut snippets of Shaded Spruce CS to adhere behind the Whisper White panel so that the colour showed through the cut out designs.  I then decided the berries needed to be red so I die cut the berries and inset the shapes - and then I did the same with the centre of the poinsettia as I decided that needed to be gold - yeah, fiddly and time consuming!  I stamped the sentiment (just LOVE that font!), cut it out with the Everyday Label punch, used the punch again to cut a Merry Merlot label, I cut that into two pieces, glued those behind the white label and popped the label up on Dimensionals.  I used the holly die from the 'Detailed Poinsettia' die set to cut some Gold Glimmer Paper dots which add a tad more sparkle.


Here's the inside of the card.  I die cut the Shaded Spruce sprigs and inset them and also inset two Gold Shimmer Paper dots.


Here's the envelope with the holly sprig decorating the flap.


I was very happy how the card turned out, I love the traditional, almost retro feel but I certainly wouldn't make multiples of this design!

Supplies:
Stamps: SU! 'Peaceful Poinsettia' set
CS: SU! Merry Merlot, Shaded Spruce & Whisper White, Gold Glimmer Paper
Ink: SU! Shaded Spruce
Tools: SU! 'Detailed Poinsettia' Thinlits die set
Embellishments & accessories: SU! Dimensionals

Ruth

Thursday 18 October 2018

Reindeer Circle Window Merry Christmas Card - #RRCB97

I checked out the latest challenge over at Retro Rubber and found it was this fun Tic Tac Toe challenge.  The reindeer image comes from an Inkadinkado Christmas stamp set that I've had since 2009.  I love that the Retro Rubber challenge encourages us to use those oldies but goodies in our stash!


I chose to work with the bottom horizontal line - animals, window and circles.  I did sneak the neutrals option in too as I chose Crumb Cake, Soft Suede, Early Espresso and Very Vanilla as my colour combo.  I made an A6 sized card base and stamped a tone on tone background over the top using a bubble wrap background stamp which ties in with the circles Tic Tac Toe option.  I also included the ribbon option although my ribbon is faux as I used a Grosgrain Ribbon die to cut my strip of Very Vanilla 'ribbon'.  I used circle punches for the sentiment and I popped that up on Dimensionals.  


For inside the card I cut a panel of Very Vanilla CS, stamped the lovely reindeer image in Soft Suede ink and trimmed the panel to size so that the large reindeer showed nicely through the circle window.  I stamped a sentiment onto a piece of Crumb Cake CS, cut it out with a stitched rectangle die, trimmed it down and glued it in place.


I stamped the reindeer image again and cut out just a portion using a circle punch and matted that circle onto a larger punched circle.


This will make a perfect Christmas card for a male - a rare addition to my Christmas card box!

Supplies:
Stamps: Inkadinkado 'Holiday Sentiments' set, Creative Expressions 'Bubble Wrap', Stampendous 'Merry Christmas', SU! 'Best Yet' set
CS: SU! Crumb Cake, Early Espresso & Very Vanilla
Ink: SU! Crumb Cake, Soft Suede & Early Espresso
Tools: Circle Nestabilities dies, SU! circle punches, Memory Box 'Grosgrain Ribbons' die set, M&C Boutique stitched rectangles die set
Embellishments & accessories: SU! Dimensionals

Ruth


Sunday 14 October 2018

Snowman Joyous Season Card

Another card created using leftover bits and pieces following my big craft room tidy up!  I used ProMarkers and a Night of Navy SU! marker to add colour to the stamped image, I fussy cut the snowman and popped him up behind a die cut snowbank.  I stamped the sentiment and then adhered the patterned paper and Whisper White CS strips plus the snowman panel.


Here's the inside and the envelope flap.


The My Cute Stamps 'Let It Snow!' set has such beautiful images, it is one of my most loved stamp sets, the snowflake border is especially gorgeous!  Here it is stamped on the front of the envelope.

Supplies:
Stamps: Snowman from Hero Arts 'Wonderful Christmas' set, Penny Black 'Joyous Season' stamp, inside sentiment from Hero Arts 'Miracle of the Holidays' set, My Cute Stamps 'Let It Snow!' set
CS: SU! Soft Sky, Night of Navy & Whisper White

Patterned paper: SU! 'Season of Cheer' DSP pack
Ink: SU! Night of Navy
Tools: MFT Die-namics 'Snow Drifts' die set
Embellishments & accessories: SU! Dimensionals

Ruth

Friday 12 October 2018

Distressed Dots & Snowflake Merry Christmas Card

My craft room was in dire need of tidying - lots of things needed putting away in their rightful places and there were piles of "stuff" that needed to be sorted out and dealt with.  I made myself get the job done before allowing myself to create a new project!  Among the piles of stuff there were some left over bits and pieces from various card group project kits and quite a few die cut shapes.  I was fairly ruthless and discarded most of it but I kept the card bases and any of the bits and pieces that I thought could be used to create a card quickly and easily.  After the tidying I was very happy to make a couple of cards using some of those leftover bits!

I die cut the distressed dots panel out of the Pacific Point card base using a die from the Tim Holtz 'Mixed Media' die set and popped up the die cut snowflake.  The sentiment label was already stamped and die cut and I edged it with Pacific Point ink using a sponge dauber and popped it up across the centre of the snowflake.


On the white panel for inside the card I stamped the lovely 'flurry of warm Christmas wishes' sentiment in full strength Pacific Point ink and stamped the snowflake cluster a few times using stamped off once Pacific Point ink.  I stamped the snowflake cluster twice and used circle punches to create the element for the envelope flap.


It was great to add another Christmas card to the box and I managed to get another one made that I'll share here soon!

Supplies:
Stamps: SU! 'Flurry of Wishes' & 'Perpetual Birthday Calendar' sets
CS: SU! Pacific Point & Whisper White

Ink: SU! Pacific Point
Tools: Sweet Dixie 'Large Swirly Snowflake' die, Spellbinders Labels Trio die set, Sizzix Tim Holtz 'Mixed Media' Thinlits die set, SU! 1 1/2" & 1 3/4" circle punches, sponge dauber
Embellishments & accessories: SU! Dimensionals

Ruth


Wednesday 10 October 2018

Jolly Season Snowman Shaped Edge Christmas Card

I was very intrigued when I discovered the Crafter's Companion Gemini stamp and die sets that create shaped edge designs.  I wanted to try a set and there are many designs to choose from but the cheery 'Snowman' set captured my heart!

Here's the card open clearly showing the shaped edge.  The set contains one clear stamp and two dies that cut out the right and left side of the snowman shape.  I used just one die to cut the left half of the snowman shape from the front of the Lost Lagoon A6 sized card base.  Once I'd stamped the snowman I used both dies to cut out the entire snowman shape - I cut using one die at a time so it took two passes through my Big Shot.  I coloured the stamped image using SU! inks and an Aquapainter and popped up the snowman, being careful to align him with the shaped edge of the card base.  I used masking to get two different ink colours on the sentiment.  I cut out the sentiment with a stitched rectangle die and added die cut snowflakes with rhinestone jewel centres to complete the card front.


I covered the entire inside back of the card base with a piece of Whisper White CS.  This photo shows the back panel of the card visible from the front.


I decorated the inside of the card and the envelope flap with a stamped sentiment and die cut snowflakes.. 


Such a happy, fun card to create!  This snowman may well feature on a card group card next month!

Supplies:
Stamps: snowman stamp from the Crafter's Companion Gemini 'Snowman' stamp & die set, Hero Arts 'Miracle of the Holidays' set
CS: SU! Lost Lagoon, Real Red & Whisper White
Ink: SU! Lost Lagoon, Real Red, Pumpkin Pie, Soft Suede & Smoky Slate
Tools: dies from the Crafter's Companion Gemini 'Snowman' stamp & die set, Poppystamps 'Valley Snowflakes' die, M&C Boutique stitched rectangle die set, snowflake dies from the Sizzix 'Christmas is Here' stamps & dies combo set (on the envelope), circle die, SU! Aquapainter
Embellishments & accessories: SU! rhinestone jewels, Dimensionals

Ruth


Friday 5 October 2018

October 2018 Card Group Projects

It was our October card group meeting yesterday and a very happy afternoon was had by all!  The ladies made two Christmas cards and a birthday card.  All three designs were based on cards we've made previously at card group.  I thought it would be fun to revisit some designs but shake things up a wee bit!

The first Christmas card features a lot of swirls!  I used the new and absolutely gorgeous SU! 'Swirls & Curls' embossing folder to create a background and felt compelled to carry on with a swirly theme!  The colour combo is Shaded Spruce, Mint Macaron and Whisper White - and that touch of Lovely Lipstick adds a punchy pop.   I know I haven't used the SU! 'Hang Your Stocking' stamp set and 'Christmas Stockings' die set enough and I was very happy to use these lovely but retired goodies  for this card.  I just love that new embossing folder and it looks great on both the embossed and debossed sides - I opted to use the debossed side for my card.  I used two square dies to create the Mint Macaron frame.  The swirly stocking is popped up on Dimensionals.


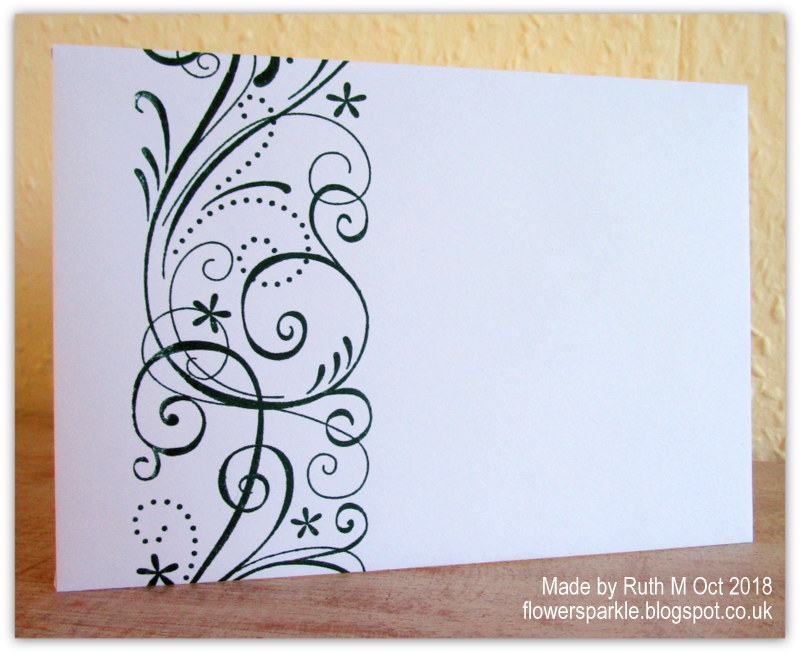
I've used a lovely swirly sentiment and a long retired SU! wheel stamp called 'So Swirly' to decorate the inside of the card.  


Here's the envelope front.


The second Christmas card was made using the fab and fun SU! 'Making Spirits Bright' stamp set, the matching 'Bulb Builder' punch and patterned paper from the 'All is Bright' DSP pack.  The colour combo is Cherry Cobbler, Garden Green and Whisper White.  The three light bulbs are popped up.


Here's a view of the inside of the card when it's opened.  Part of the card front is folded back to create a pocket which is perfect to hold a gift card or money.


Here's a closer look at the pocket part.  I glued the patterned paper piece to the scored panel, cut a half circle using a 1" circle punch and used narrow double sided tape at the top and bottom only to create the pocket.


For the inside panel I stamped the string of bulbs image, stamped the sentiment on a separate piece of CS, punched it out with the 'Everyday Label' punch and glued it inside.


I simply stamped the string of bulbs image again to decorate the envelope flap.


For the birthday card I've used the MFT 'Blueprints 18' die set.  Using various dies from the set makes creating a card a breeze as you get a layout sorted easily and quickly.  The colour combo is Lemon Lime Twist, Night of Navy, Soft Sky and Whisper White.  I made a Lemon Lime Twist A6 sized card base and I used dies to cut the patterned paper and Night of Navy panels - I trimmed them down a bit to better suit the front of the A6 sized card base.  I die cut the diagonal line of dots between the two panels and I stamped and die cut the sentiment banner.  I stamped and punched the flower using the SU! 'Petal Potpourri' stamp set and 'Flower Medallion' punch, snipped between the petals and did some shaping.  I die cut two leaves, glued them in place and popped the flower up.


I stamped a birthday sentiment inside and used a Tim Holtz 'Mixed Media' die to cut out the distressed dotty pattern - I thought that echoed the irregular dots on the patterned paper nicely.  Before gluing the white panel inside the card I adhered a piece of Night of navy CS to the back so that the dotty pattern showed up better.  I liked the navy showing through but a few of the ladies preferred to leave it as the lemon lime showing through.  For the envelope, I adhered a strip of the patterned paper to the front and added lines using a Night of Navy marker.


Supplies for stocking card:
Stamps: SU! 'Hang Your Stocking' set, SU! 'So Swirly' unmounted wheel stamp, Penny Black 'Beautiful Season' stamp
CS: SU! Mint Macaron, Shaded Spruce, Lovely Lipstick & Whisper White
Ink: SU! Mint Macaron  & Shaded Spruce
Tools: SU! 'Christmas Stockings' Thinlits, 'Layering Squares' & 'Stitched Shapes' Framelits die sets, SU! 'Swirls & Curls' embossing folder
Embellishments & accessories: SU! Dimensionals


Supplies for lights gift card holder card:
Stamps: SU! 'Making Christmas Bright' & 'Labels to Love' sets
CS: SU! Cherry Cobbler, Garden Green & Whisper White

Patterned paper: SU! 'All is Bright' DSP pack
Ink: SU! Cherry Cobbler, Garden Green  & Soft Suede
Tools: SU! Simply Scored, 'Everyday Label' punch, 1" circle punch
Embellishments & accessories: SU! Dimensionals


Supplies for flower 'for you' card:
Stamps: SU! 'Petal Potpourri' & 'Birthday Blooms' sets
CS: SU! Lemon Lime Twist, Night of Navy, Soft Sky & Whisper White

Patterned paper: SU! 'Naturally Eclectic' DSP pack
Ink: SU! Night of Navy
Tools: MFT 'Blueprints 18' die set, Sizzix Tim Holtz 'Mixed Media' die set, Memory Box 'Fresh Leaves' die set, SU! 'Flower Medallion' & 3/4" circle punches, MFT Die-namics 'Fishtail Flags' Stax die set, flower shaping tool
Embellishments & accessories: SU! Dimensionals

Ruth

01 09 10