Tuesday 30 March 2021

Floral Card & Matching Gable Box

I keep fancy fold instructions, examples and templates in a box and over the years I've been topping the box up and it's got rather full.  I decided to go through the whole box, right to the bottom and have a clear out.  Goodness me, I found some stuff lurking at the bottom that's been there for years!  I came across instructions to make a gable box using the old, long retired SU! Scallop Envelope die - which I still have.  They were rather sketchy instructions, not entirely complete.  I came across the box back in 2012 through Pauline's blog post HERE.  The link is still active so I revisited Pauline's post and made an example to go in my templates box and I just had to make an actual box too!  After finishing the box I felt I needed to make a matching card. 

Here's the card, envelope and box together.


Here's the gable box.  To make it you join together two die cut scallop envelopes and two strips of CS,  punch holes for handles and adhere together.  It's easy and makes a really attractive gift box I think.  I stamped the beautiful floral image repeatedly over my pieces using Highland Heather ink, rounded the top corners of the handle strips and punched circles for the handle. I used stamped off once Highland Heather ink to stamp a background for the sentiment label and stamped the sentiment in Gorgeous Grape ink.  I punched three Gorgeous Grape flowers from the 'Strawberry' builder punch, snipped between the petals and shaped them for dimension, glued them in place and added a purple Pastel Pearl to the centre of each flower.  I used dies from the SU! 'Stitched So Sweetly' die set to make the tag.  I popped up the Purple Posy label onto the Gorgeous Grape label and tied it to the box with SU! purple tricolor ribbon.  I popped a cellophane bag containing Cadbury Mini Eggs inside the box.


Here's a side view where you can see the scallop envelope shape.


Here's a back view showing the punched out circle handles.  


Here's a closer look at the tag.


After finishing the box I decided to give it to a friend who is going through an anxious time because of health concerns.  I wanted to accompany the box with a card with a positive message and the one I used from the 'Positive Thoughts' set is perfect.  I tied in all the elements I'd used on the box to make the card.  


Here's the inside of the card.


Here's the envelope.  I've used die cut shapes from the 'Messages' die to create the name label.  I popped up the Purple Posy shape.


A couple of days after I'd made these the SU! retiring list came out and I was shocked to see that 'Fancy Phrases' is on the list, that's the bad news!  The good news is that the card and box were very well received!  SU! may be retiring the set but it will be kept in my stash, that's for sure!  

Supplies:
Stamps: SU!  'Fancy Phrases' & 'Positive Thoughts' sets
CS: SU! Gorgeous Grape & Purple Posy 
Ink: SU! Gorgeous Grape & Highland Heather 
Tools: SU! 'Scallop Envelope' die, 'Messages' die, 'Stitched So Sweetly' & 'Stitched Rectangles' die sets, 'Strawberry' builder punch, 1 1/2" circle punch, Crop-A-Dile
Embellishments & Accessories: cello bag, SU! purple Tricolor Ribbon, Pastel Pearls, Dimensionals 

Ruth

Monday 29 March 2021

Green & Gold Leaves Birthday Card & Gift Box

I'm really taken with the sleeve handle boxes and I just had to make one featuring gorgeous leafy paper from the SU! 'Forever Greenery' DSP pack.  Once I'd made the bag I decided to go all out and make a matching card!  Here's the card, envelope and box all together.


The card measures 5 3/4" square and I used Shaded Spruce CS.  I die cut a strip of Pear Pizzazz CS using a stitched die from the 'Suit & Tie' die set and I glued that to the card base before adding the strip of ferns paper.  The gold foil elements are from the 'Forever Gold Laser-Cut Specialty Paper' pack.  I stamped the sentiment in Shaded Spruce ink onto Pear Pizzazz CS, cut it out with a stitched oval die and popped the shape up.  I finished off by adding some Gilded Gems.


Here's the inside of the card.  I popped up the sentiment rectangle.


Here's the envelope.


Finally, here's the sleeve handle box.  Circle or oval punches work well to make the handles but I dug out my old, retired SU! 'Word Window' punch to make the handle for this box.  


Supplies:
Stamps: SU! 'Forever Fern' & 'Fancy Phrases' sets
CS: SU! Pear Pizzazz & Shaded Spruce 
Patterned paper: SU! 'Forever Gold Laser-cut Specialty Paper' pack
Ink: SU! Shaded Spruce 
Tools: SU! 'Stitched Shapes', 'Stitched Rectangles', 'Stitched So Sweetly' & 'Suit & Tie' die sets, SU! 'Word Window' punch 
Embellishments & Accessories: SU! 'Gilded Gems' & Dimensionals 

Ruth

Sunday 28 March 2021

Purple Butterflies Birthday Wishes Card

Honestly, the SU! Butterfly Bouquet collection of products is just amazing, I love everything about it!  I know I love butterflies anyway so it was an easy sell to me but everything has been so well designed.  It is a total pleasure to create with these gorgeous products!

Julie Davison made a lovely masked butterflies card - shown on her blog HERE.  Julie has provided instructions on her blog post and there is also a YouTube video linked in the post.  I loved the technique and decided to CASE Julie's card.  I opted for a purple colour combo though.  Here's the card and envelope together.


Here's the card.  I stamped the butterflies in Highland Heather ink, masked the butterflies and applied Highland Heather ink using a blending brush.  I added a strip of the Natural Touch Specialty Paper and glued the panel to the front of a Gorgeous Grape card base.  I zigzagged some Gorgeous Grape sheer ribbon and popped up the sentiment label.  I finished off by adding a few Opal Rounds.


Here's the inside of the card.


Here's the back of the envelope.


Having put an address label on the front of the envelope for my last card I couldn't resist doing it again!


Supplies:
Stamps: SU! 'Butterfly Brilliance' & 'Fancy Phrases' sets
CS: SU! Gorgeous Grape, Purple Posy & Basic White
Patterned paper: SU! 'Natural Touch' Specialty Paper
Ink: SU! Highland Heather
Tools: SU! 'Brilliant Wings', 'Stitched Nested Labels' & 'Stitched Rectangles' die sets, blending brush
Embellishments & Accessories: SU! Gorgeous Grape sheer ribbon, Opal Rounds, Dimensionals

Ruth

Saturday 27 March 2021

Gold Foil Leaves Happy Birthday Card

Stunning Gold Laser Cut Specialty Paper is part of the SU! Forever Greenery suite and I've used some to make this birthday card. I've kept the card simple and haven't popped anything up as the card is being sent to the U.S.A. so needs to be mailing friendly.

Here's the card and envelope together.


Here's the card.  The card base is Mint Macaron and I adhered the gold foil piece to a panel of Shaded Spruce CS.  I added some Mint Macaron ribbon and adhered the sentiment label over the top.  The label is cut from the SU! 'Messages' die.  Simple yet classy I think!


Here's the inside of the card with some layered stamping on a stitched rectangle die cut panel.


I thought it would be fun to add a die cut rectangle as an address label to the envelope.


Supplies:
Stamps: SU! 'Forever Fern' & 'Peaceful Moments'  sets
CS: SU! Mint Macaron, Shaded Spruce & Basic White
Patterned paper: SU! 'Forever Gold' Laser-cut Specialty Paper
Ink: SU! Mint Macaron & Shaded Spruce
Tools: SU! 'Messages' die, Claina Palmer 'A6 Double Stitched Nested Dies' set
Embellishments & Accessories: SU! Mint Macaron ribbon 

Ruth

Wednesday 24 March 2021

Hydrangeas You Make Me Smile Card

The SU! 'Hydrangea Hill' patterned paper is just so pretty and I used parts of two different sheets to make this quick and easy card.  Here's the card and envelope together.


I cut a panel of the patterned paper, added a length of Gorgeous Grape sheer ribbon and attached the panel to a Seaside Spray A6 sized card base.  I stamped the sentiment in Misty Moonlight ink onto Purple Posy CS, cut it out with a die from the 'Stitched So Sweetly' die set and popped the shape up.  To complete the card front I added three coloured pastel pearls.


Inside the card is a white panel with a strip of patterned paper.


I decorated the envelope flap with some more of the patterned paper.


Such a simple card but a real pleasure to create for a lovely friend who always makes me smile!

Supplies:
Stamps: SU! 'Hydrangea Haven' set
CS: SU! Purple Posy, Seaside Spray & Basic White
Patterned paper: SU! 'Hydrangea Hill' DSP pack
Ink: SU! Misty Moonlight 
Tools: SU! 'Stitched So Sweetly' die set 
Embellishments & Accessories: SU! Gorgeous Grape sheer ribbon, Pastel Pearls & Dimensionals 

Ruth

Saturday 20 March 2021

Butterflies Peg Frame

I had to go to Brighton for my Covid vaccination and I took a trip to Poundland while I was there as I do love a good look round a pound shop!  I found a peg frame and thought it would be ideal for the gorgeous SU! 'Butterfly Bijou' patterned papers.  

I cut patterned paper pieces to size, added Glitter Enamel Dots to two panels and pegged the panels in place.  For the central panel I used two butterflies die cut from a sheet of patterned paper.  I shaped the wings and added clear Wink of Stella for a touch of shimmer.  What a quick and easy home decor project!


Here's a closer look at the centre panel.  The shimmer doesn't show in the photo but it's beautiful in real life!


Ruth

Tuesday 16 March 2021

Two Sleeve Handle Boxes

Julie Davison has provided quite a bit of inspiration for me lately and I loved these sweet little boxes she shared on this video.  Julie's blog post with a template can be found HERE. They're so easy to make and a bit different I think!  For the box, cut CS 5 1/2" x 7" and on the short side score at 1" and 4 1/2". Turn and score at 3" and 4".  To make the sleeve, cut patterned paper 2 1/2" x 12" and score at 5 1/2" and 6".  Use a punch to cut out a handle - a circle or oval punch is ideal.

I didn't plan on including one of these boxes in the online crafty session so I didn't make up kits but as I knew my friends would have CS and patterned paper I figured we could make one of them on the day if we had time.  

This is the box I made up in advance.  I used the SU! 'Paper Blooms' DSP with Night of Navy CS and dies from the 'Brilliant Wings' die set to make a butterfly shaped tag.


Here's a side view.


The patterned paper sleeve just slides over the box - an ingenious idea!  Here are the two separate pieces.


Here's a closer look at the butterfly tag.  I layered a Night of Navy fancy butterfly over a Seaside Spray solid butterfly, punched a hole and tied the tag to the handle with some Night of Navy grosgrain ribbon and some silver cord.  That grosgrain ribbon has been in my stash for many years!


On the day we had time to make a box so all three of us rummaged in our stashes and chose CS and patterned papers to make our boxes.  This time I used SU! Granny Apple Green CS with 'Berry Delightful' DSP to make the box.  I used Poppy Parade and Basic White CS with two dies from the 'Stitched So Sweetly' die set to make a tag.  I punched out a strawberry from a piece of the patterned paper and stamped and punched a top for my strawberry.  I punched a hole and tied the tag on with white baker's twine.  I stamped the sentiment in Shaded Spruce ink, popped up the strawberry, popped up the white die cut shape and added green Glitter Enamel Dots.


Here's a closer look at the tag.


As a little gift from me I sent my two friends a couple of choccy treats packaged in a patterned paper wrap with ribbon and a tag.  


Here's a closer look at a tag.


As I'd never crafted online in this way before I didn't know what to expect and how successful - or not -it would be.  I'm delighted to say it went really well!  What a lovely afternoon we had, of course it wasn't the same as getting together in person but we have to adapt in these times of Covid 19.  We thoroughly enjoyed ourselves and plan to do it again soon!

Supplies for sleeve handle boxes:
Stamps: SU! 'Sweet Strawberry' set
CS: SU! Night of Navy, Granny Apple Green, Poppy Parade & Basic White
Patterned paper: SU! 'Paper Blooms' & 'Berry Delightful' DSP packs
Ink: SU! Shaded Spruce
Tools: SU! 'Brilliant Wings' & 'Stitched So Sweetly' die sets, 'Strawberry' builder punch & 1 1/2" circle punch, paper trimmer, Crop-A-Dile
Embellishments & Accessories: SU! Night of Navy grosgrain ribbon, white baker's twine, silver cord, Glitter Enamel Dots, Dimensionals

Supplies for treat wraps:
Stamps: SU! 'Fancy Phrases' set
CS: SU! Basic Black & Flirty Flamingo
Patterned paper: SU! 'Flower & Field' DSP pack
Ink: SU! Flirty Flamingo, Memento Tuxedo Black 
Tools: SU! 'Stitched Shapes' die set, circle punch, Crop-A-Dile
Embellishments & Accessories: SU! white organdy ribbon, white baker's twine 

Ruth

Monday 15 March 2021

Two Daisy Flap Fold Cards

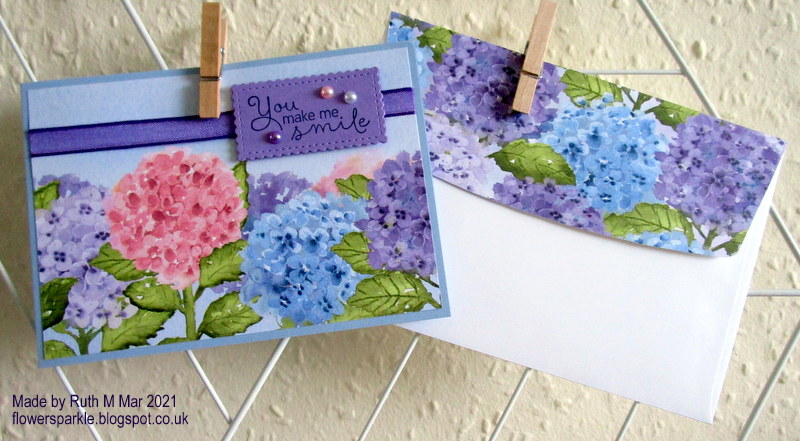
The third card I made for my friends to make on our online crafty session was a flap fold card.  I got the idea from watching this fab video from Julie Davison.  Another fancy fold card that's easy to make!  

As Julie is in the USA I adapted the measurements to better suit a UK A6 sized card.  Also, Julie used a 2 1/4" circle punch to cut out her circle on the card base but as I didn't have that size I used a 2" circle punch on my card.  I cut an A4 piece of CS in half lengthways, cut it to 11" and scored at 2 1/2" and 7 1/2".  That meant my card fitted into a C6 envelope.  I'm waiting for the 2 1/4" circle punch and when that arrives I may have to tweak the measurements if I use that size circle punch!


The gorgeous patterned paper is from the SU! 'Flower & Field' DSP pack which was a 2021 Sale-A-Bration offering.  I took colours from the paper to select my colour combo of Shaded Spruce, Pool Party, Blushing Bride and black.  I used 2", 1 3/4" and 1 1/2" circle punches plus the Medium Daisy punch on this card.  I punched 3 daisies, offset them, glued them together and edged the petals with Blushing Bride ink applied with a sponge dauber.  I placed a Perennial Essence Floral Centre embellishment in the middle of my daisy.  The 1 1/2" sentiment circle has Dimensionals placed just on the bottom half so that the flap can tuck behind the top of the circle.  I embellished the sentiment circle with three clear rhinestone jewels.


Here's the card fully open.


Here's a closer look at the sentiment panel inside.


Here's the envelope.


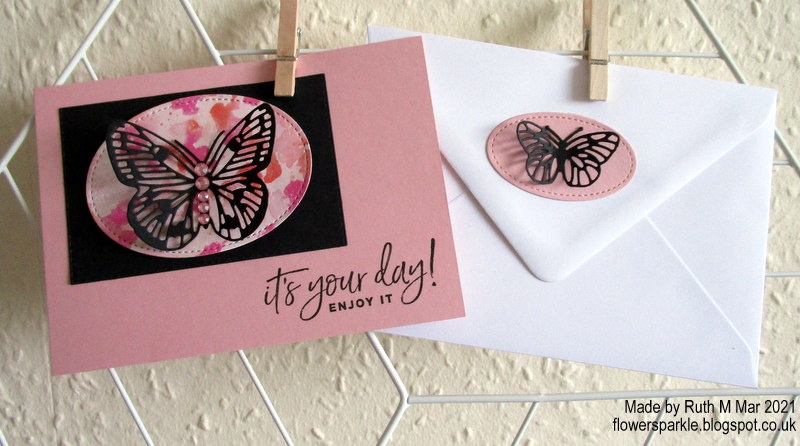
On the day I used different patterned paper from the SU! 'Flower & Field' DSP pack and my colour combo for this card is Flirty Flamingo, Bumblebee and black.


Here's the card.  I punched four 5/8" circles, glued them together and used that as my flower centre.  I edged the petals of the Bumblebee daisy with Mango Melody ink applied with a sponge dauber.  I embellished the sentiment circle with a cute ladybird embellishment.


Here's a closer look at the ladybird on the sentiment circle.


The card fully opened.


A closer look at the panel inside.  I originally stamped the sentiment in Flirty Flamingo ink, decided black would have been better and so I stamped in black on a scrap of Basic White CS, die cut a stitched rectangle and glued that over the top.


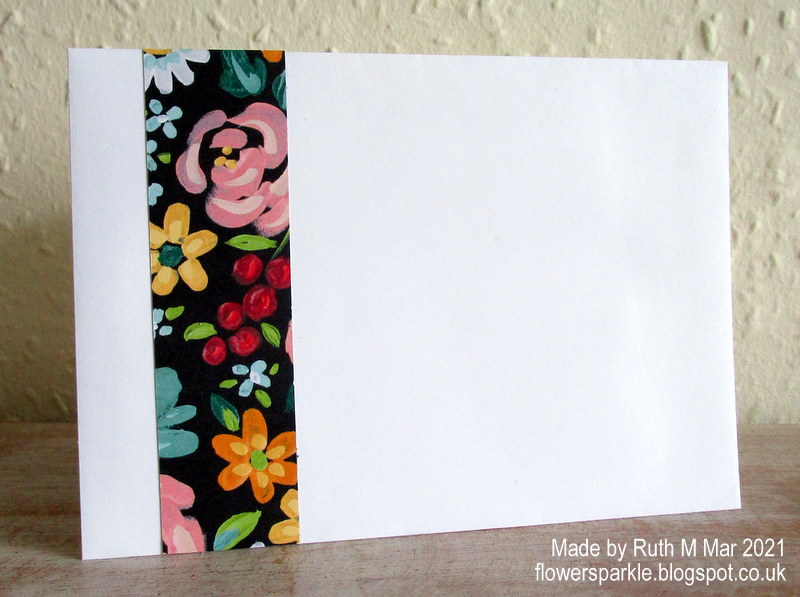
Lastly, here's the envelope for this card.


Supplies:
Stamps: SU! 'Fancy Phrases' & 'Peaceful Moments' sets
CS: SU!  Basic Black, Blushing Bride, Bumblebee, Flirty Flamingo, Pool Party, Shaded Spruce & Basic White
Ink: SU! Blushing Bride & Mango Melody, Memento Tuxedo Black 
Tools: SU! 'Stitched Rectangles' die set, 'Suit & Tie' die set (for stitched strip), SU! Medium Daisy, 2", 1 3/4" & 1 1/2" circle punches, paper trimmer, X Cut 5/8" circle punch, sponge daubers
Embellishments & Accessories: SU! Perennial Essence Floral Centre, Ladybug Trinkets, Rhinestone Jewels, Dimensionals

Ruth

Sunday 14 March 2021

Two Butterfly It's Your Day Birthday Cards

 Here are two more cards from my online crafty session with two friends.  We had patterned paper ovals left over from making the pop and flip cards earlier so we used them to make these cards.

Here is the first card and envelope I made in advance, using Just Jade.


A very simple card, just a stitched rectangle die shape, a popped up patterned paper oval, a fancy die cut butterfly and a stamped sentiment.  I added some frosted epoxy drop;ets to embellish the butterfly body.


Here's the inside with a stitched rectangle die cut white panel, a stamped off once Just Jade butterfly and a sentiment.


Here's the envelope with a Just Jade stamped and die cut butterfly layered on a black oval.


On the day I chose to make the card using Blushing Bride rather than Just Jade.


I used pink rhinestones to embellish this butterfly body.


Here's the inside.  I stamped the butterfly in full strength Blushing Bride ink.


For this envelope I used a black die cut fancy butterfly layered on a Blushing Bride die cut oval shape.


Supplies:
Stamps: SU! 'Butterfly Brilliance', 'Happiest of Birthdays' & 'Fancy Phrases' sets
CS: SU! Basic Black, Blushing Bride, Just Jade & Basic White
Patterned paper: SU! 'Butterfly Bijou' 6" x 6" DSP pack
Ink: SU! Blushing Bride & Just Jade, Memento Tuxedo Black 
Tools: SU! 'Brilliant Wings', 'Stitched Shapes' & 'Stitched Rectangle' die sets, Claina Palmer 'A6 Double Stitched Nested' die set
Embellishments & Accessories: SU! frosted epoxy droplets, Dimensionals, PaperMania pink rhinestones

Ruth

01 09 10