Monday 29 April 2013

Rosy Thinking Of You Shadow Box Card

Our dear friend Gill is going through a very difficult time right now and I made this card to say we're thinking of her and to let her know how much she means to us.  I really struggled with what to do at first but then I decided to make an unusual card and to make it pretty.  The SU! Stippled Blossoms set is perfectly pretty so I reached for that and made a shadow box card.  I love shadow box cards and it's been too long since I made one.  They're dimensional yet fold flat to go in an envelope and they're easy to make too.  There's a tutorial here on Splitcoast Stampers if you'd like to check it out.

I used Pool Party CS to make the card base.  The white inside piece was embossed with a brick folder.  I then reached for my Stamp-a-ma-jig and got busy stamping and fussy cutting.  I inked the solid flowers with Rich Razzleberry ink, stamping off twice on scrap paper before stamping onto my CS and I stamped the outline flowers with full strength Rich Razzleberry ink over the top.  I used Lucky Limeade ink stamped off once for the solid leaves and full strength Limeade ink for the outlines.  I made a frame for my circle aperture and after gluing that to the card front I popped up the roses.  I cut Bitty Butterflies from Pool Party and Rich Razzleberry CS and layered a vellum punched butterfly over each of them.  I glued the butterflies to the frame and added rhinestones to the bodies.


Here's a view from the top so you can see how the card is put together..


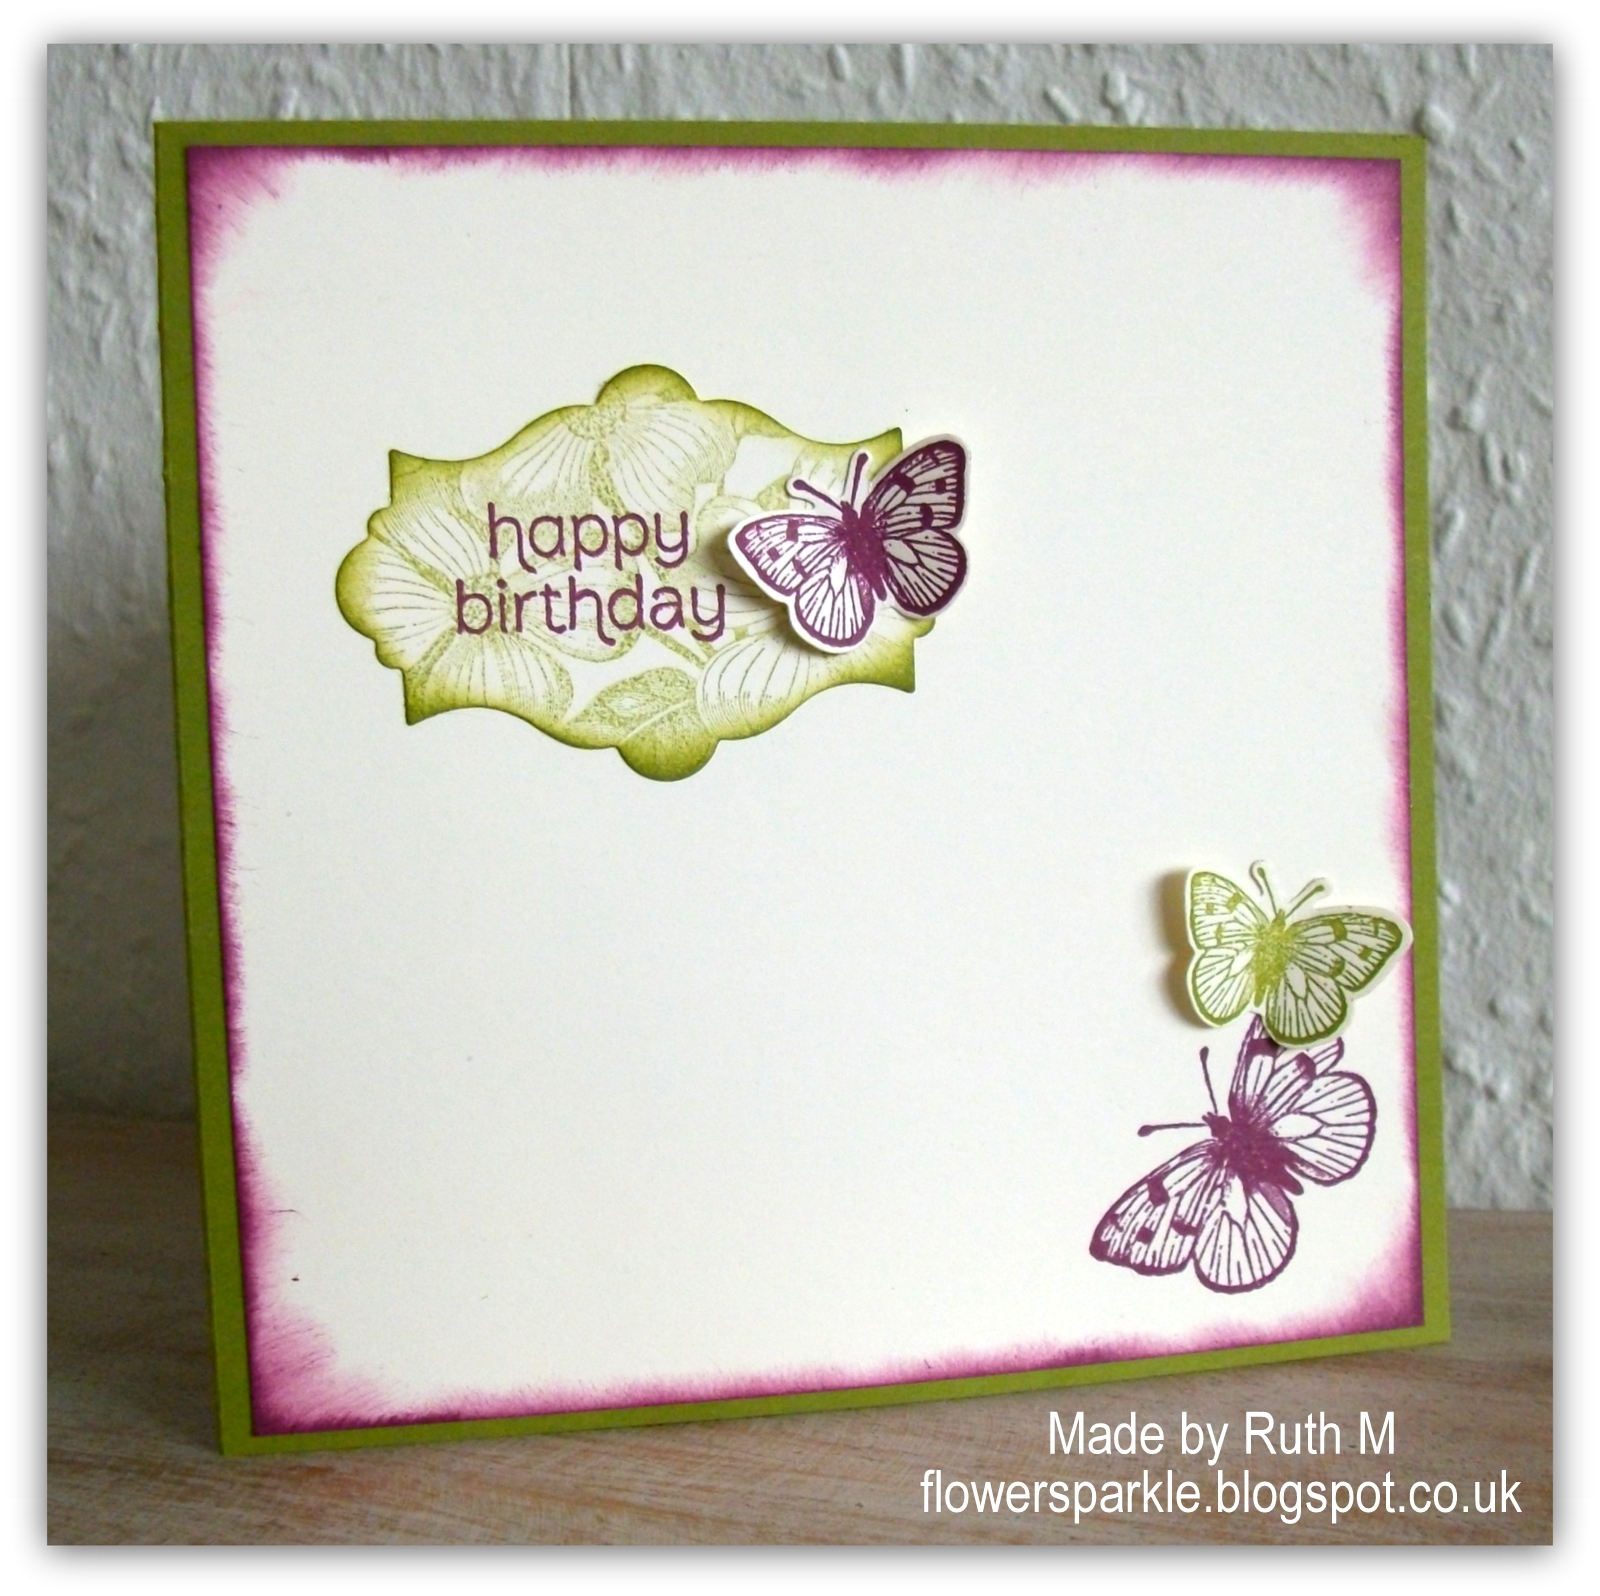
 I cut a white panel for the back of the card, stamped the sentiment and added stamped and fussy cut flowers and leaves.  I also added a small flower and leaf to the envelope flap.


Here's the front of the envelope with a rosy layered name label and a popped up large rose with leaves.


Supplies:
Stamps: SU! 'Stippled Blossoms', 'Sweet Essentials' & 'Four Frames' sets, Hobby Art 'Sentiments' clear set
CS: SU! Pool Party, Rich Razzleberry & Whisper White, vellum CS
Ink: SU! Rich Razzleberry & Lucky Limeade
Tools: Plain circle Nestabilities dies, Tim Holtz Brick embossing folder, SU! Decorative Label & Bitty Butterfly punches, SU! Simply Scored, Stamp-a-ma-jig
Embellishments & accessories: SU! Rhinestone Jewels, Dimensionals


 photo RoseRuth.gif

Saturday 27 April 2013

Flourish & Flower Just Because Card - Inkspirational Challenge # 17

This week at Inkspirational we have a sketch challenge for you.  I'm here with an end of the week encouragement post - if you haven't taken part in the challenge yet, you still have a few days (the challenge ends on Tuesday) so get creating!


I immediately thought of the SU! Flowering Flourishes set when I saw this layout picture.  I dug out a piece of pink paper from a Basic Grey paper pad that I've had in my stash for years.  I inked the image and sentiment in VersaMark and heat embossed them with Early Espresso embossing powder.  I cut out the pink panel with a scalloped rectangle die, layered that onto an Early Espresso mat and adhered that to the front of a Pink Pirouette A6 card base.  I wanted a large bloom at the side so I die cut a few flowers, added some shaping, attached them together with a pink rhinestone brad and adhered the bloom to the card front.


Here's the inside and the envelope with just some simple stamping.


I hope you can join in with our challenge this week, I'd love to pop by your blogs to see your fab creations!

Supplies:
Stamps: SU! 'Flowering Flourishes' & 'Vintage Verses' sets
CS: SU! Pink Pirouette, Early Espresso, Pool Party & Whisper White

Patterned paper:  Basic Grey 'Sultry' paper
Ink: VersaMark, SU! Early Espresso
Tools: scalloped rectangle Nestabilities die, SU! Blossom Party die, Birds & Blooms Sizzlits dies
Embellishments & accessories: SU! Early Espresso embossing powder, pink rhinestone brad


 photo ruth_catgrin.gif

Penguin On A Spring Christmas Card - 52 {C}CT Apr Technique Challenge

This week at 52 {C}CT we have such a fun technique challenge for you - punch art!


So, what is punch art?  For an example of punch art please visit this earlier blog post of mine to see how a snowman was made using various punches.  There are oodles of punch art examples around the web, if you search Google Images or Pinterest for 'punch art' you'll be spoilt for choice!

I chose to make a penguin made from the SU! Owl Builder punch - many thanks to Joanne for the instructions!


Once I'd assembled the penguin I decided I'd like to have an igloo on the card as well as some snowy ground.  To make the igloo I used my Circle Scissor tool to cut a semi circle and I stamped a brick wall over it in Baja Breeze ink.  For the entrance I stacked a few Large Oval punched shapes together and I sponged both shapes with Baja Breeze inks.  I tore Whisper White CS for snow, inked the edges and glued the igloo and snow to the card front.  I applied Cherry Cobbler Dazzling Details to the dots on my stamped and die cut tree and when that had dried I tucked the trunk behind the snow and popped up the upper part of the tree.  I thought the 'christmas cheer' sentiment was a good fit for this card!

I remembered I had some Christmas tree lights buttons in my stash.  I attached some to black wire and tried arranging some on the front of the igloo - hmmm, it may well have been easier to do that before I'd glued the igloo to the card!  So I decided to have the penguin hold a few lights instead as he hadn't been attached to the card yet.  I pierced holes in the penguin's flippers and threaded the wire through and taped the ends of the wire behind.  I then attached the penguin to the card on an action wobble spring - such a fun touch!  To finish off the front I added some small punched snowflakes with jewel centres.


Inside there's more snow, a sentiment and another glitter dotted tree.  Because of the wobble spring and the tree lights buttons this card is very dimensional and won't fit in a normal envelope.  I've used a C6 expandable envelope which has gusseted sides.  I've placed another tree onto punched circles and glued just the top of the circle to the narrow flap.  Once I've written the card and it's ready to be delivered I'll apply repositionable glue to the bottom half of the circle to keep the envelope closed.


I'll let you imagine the fun I had in my craft room putting this cheery card together!  I hope you'll join in with our Punch Art challenge this week and enjoy making your own cards as much as I did!  I look forward to visiting your blogs to see what you've made after you've got creative with your punches!

Supplies:
Stamps: SU! 'Sweet Essentials', 'Scentsational Season' & 'Wacky Wishes' sets, Penny Black 'Brick Wall'
CS: SU! Baja Breeze, Basic Black, Whisper White, Pumpkin Pie & Cherry Cobbler, Red Glimmer Paper

Patterned paper:  SU! Snow Festival DSP
Ink: Memento Tuxedo Black, SU! Baja Breeze, Gumball Green & Cherry Cobbler
Tools: EK Success Circle Scissor Plus tool, SU! Owl Builder punch, Dotted Scallop Ribbon Border punch, Extra Large Oval punch, SU! Holiday Collection Framelits die, Sizzix Banner Framelits die, Woodware small snowflake punch, circle Nestie dies, paper piercer, sponge dauber
Embellishments & accessories: SU! Cherry Cobbler Dazzling Details, Christmas tree lights buttons, black wire, jewel rhinestones, Woodware action wobble spring, Dimensionals


 photo mousyruth.gif

Friday 26 April 2013

Dress Friend Shaped Card

You know I love my Dress Up Framelits dies and I also love shaped cards and I've happily combined both for this card.  My friend Jan purchased the Dress Up Framelits dies after I'd showed her the dress cards I'd made and gushed about how utterly fabulous the dies were.  I popped this card into her goodie bag to thank her for the SU! order, to show her a way of making a dress and also to show how great the Itty Bitty Buttons are for embellishing a dress!

I joined two Rich Razzleberry Window Frame die cut shapes together to form the card base and I cut a smidgen off the bottom so the card will stand up nicely for display.  I embossed the Marina Mist shape with the Fancy Fan embossing folder and popped the plain white circle up over the top.  I assembled the three parts of the dress - the dotty dress and the extra bodice and skirt pieces - and added a strip of Marina Mist CS as a belt.  I punched out a Marina Mist Itty Bitty flower and adhered it to a clear Itty Bitty Button with Crystal Effects, pierced holes and threaded a thin strip of  Razzleberry CS through the buttonholes and glued the button to the belt.  I tucked the 'friend' label behind the popped up dress.  I stamped and punched three buttons and stacked the stamped ones onto a couple more punched circles so the buttons had more dimension, pierced holes and threaded CS strips through the buttonholes and added the buttons to the card.  I added a touch of sparkle with some rhinestones to complete the front.


Here's the inside and the envelope with more stamped and punched buttons.  I am very happy to report that Jan is having a great time playing with her Dress Up dies, I knew she'd love them!


Supplies:
Stamps: SU! 'Sweet Essentials' & 'Button, Button' sets
CS: SU! Rich Razzleberry, Marina Mist & Whisper White

Patterned paper:  SU! Polka Dot Parade DSP
Ink: SU! Rich Razzleberry & Marina Mist
Tools: SU! Window Frame & Dress Up Framelits dies, Fancy Fan embossing folder, Itty Bitty flower punch, Word Window punch, circle punches, paper piercer
Embellishments & accessories: SU! Itty Bitty Button, Crystal Effects, Rhinestone Jewels, Dimensionals


 photo BagSwingRuth.gif

Wednesday 24 April 2013

Doily & Butterfly Thank You Card Set

I whipped up this batch of four thank you cards to give to friends who placed a Stampin' Up! order with me.  I inked the Hello, Doily stamp with VersaMark, heat embossed with white embossing powder and cut the panel to 5" square.  I sponged Raspberry Ripple, Primrose Petals and Pretty in Pink inks from the centre of the doily outwards and then cut the 5" square into four 2 1/2" square panels.  I stamped each sentiment and layered each panel onto Whisper White and Raspberry Ripple mats and glued those to the Pretty in Pink 4 1/8" square card bases. To finish off the card fronts I added Pretty in Pink Beautiful Wings die cut butterflies, folded the wings up and added jewels.


I used the smallest doily from the Delicate Doilies set and stamped with Primrose Petals ink to decorate the insides and envelope flaps.  I hope the ladies all enjoy using their new goodies!


Supplies:
Stamps: SU! 'Hello, Doily' stamp, 'Blooming with Kindness' & 'Delicate Doilies' sets
CS: SU! Pretty in Pink, Raspberry Ripple & Whisper White
Ink: VersaMark, SU! Pretty in Pink, Primrose Petals & Raspberry Ripple
Tools: SU! Beautiful Wings Embosslits die, heat tool, sponges, Stamp-a-ma-jig
Embellishments & accessories: SU! white embossing powder, Rhinestone Jewels


 photo ruth10.gif

Tuesday 23 April 2013

Dogwood Especially For You Birthday Card

When I opened my pack of SU! Natural Composition Specialty DSP I was very happy to see a floral design that matches a dogwood stamp I have in a Hero Arts set!  The design on the paper is raised and glossy which makes it perfect for ink resist so that's what I started with for this card.

I sponged Rich Razzleberry ink over the piece of DSP, wiped off the excess with paper towel, sponged the edges of the panel with a sponge dauber and layered onto a mat of Crumb Cake CS.   I added the Crumb Cake taffeta ribbon, layered onto a Razzleberry mat and glued that to the 5 1/4" Old Olive card base.  I stamped the image twice, once in Old Olive ink and once in Razzleberry ink, I die cut both images, cut out just the Razzleberry flowers, popped them up and then popped the whole image up onto the card.  I added a stamped and die cut butterfly and popped up the oval sentiment to finish off the front.  


I cut and sponged a Very Vanilla panel for inside the card.  I stamped the dogwood image onto a separate piece of Vanilla CS with Old Olive ink stamped off once, stamped the sentiment over the top, cut it out with an Apothecary Accents die, sponged the edges and added a stamped and die cut butterfly.  I stamped a Rich Razzleberry butterfly direct to the panel and then added a smaller Old Olive stamped and die cut butterfly.


To decorate the envelope I simply stamped Rich Razzleberry dogwood images on opposite corners of the front of the envelope.  I love flower stamps but I'm not always drawn to botanical images but there is just something about this dogwood image that I find really appealing.  Finding that the DSP in the pack matched the image was a real bonus!


Supplies:
Stamps: Hero Arts 'Antique Flowers & Butterflies' stamp & die combo set, SU! 'Made for You' set
CS: SU! Old Olive, Rich Razzleberry, Crumb Cake & Very Vanilla

Patterned paper:  SU! Natural Composition Specialty DSP
Ink: SU! Old Olive & Rich Razzleberry
Tools: dies from Hero Arts 'Antique Flowers & Butterflies' stamp & die combo set, SU! Apothecary Accents Framelits die, SU! oval punch
Embellishments & accessories: SU! Crumb Cake taffeta ribbon, Dimensionals


 photo FlowerLetterRuth.gif

Saturday 20 April 2013

CAS Blooming Thanks For Your Kindness Card - CAS Colours & Sketches Challenge #21

What a fab colour combo the CAS Colours & Sketches challenge team have set this week, I just had to play along!  


 So while hubby was out mowing the grass I escaped to my craft room and took the opportunity to make a thank you card for a friend.  I've used a new stamp - the flower from the SU! Blooming with Kindness set.  I've used the sentiments from the set but hadn't got round to inking up the gorgeous flower.  My card base is 5 1/4" square and I cut a 5" square Whisper White panel to stamp on.  After stamping I dotted my VersaMark pen over the blooms and then heat embossed with Iridescent Ice embossing powder so there is some sparkle.  I inked the edges of the stamped panel with Pool Party ink.  I cut a notch in a length of Rich Razzleberry ribbon - the ribbon has dots on one side but I preferred to use the plain side - taped it to the stamped panel and added the Pool Party button.  I popped the panel up onto the card front.


 For inside the card I stamped a Pool Party bloom and stamped the sentiment over the top.


For the envelope I simply stamped three blooms on the front.


I was so pleased how quickly and easily this card came together, CAS doesn't always mean fast for me.  If I make a boo boo on a CAS card there is nowhere to hide and invariably I have to start all over again.  I'm happy to say no boo boos today - unlike yesterday.  I spent hours making a DT project card yesterday that included lots of stamping and fussy cutting and I had to use the Stamp-a-ma-jig a fair bit too.  I'd finished the front and was working on the panel for inside the card and I'd left stamping the sentiment 'til last.  Luckily I hadn't glued the panel down as I got a big inky splodge after stamping the sentiment.  So I started again, did everything in the same order, left the sentiment to the last (I never learn!) and I got another inky mark!  It turned out I'd somehow got ink on the underside of my Stamp-a-ma-jig handle.  A messy desk with open ink pads is really not a good idea - but with a clean handle my third attempt was fine!  Hmmmm, just patterned paper on the envelope for that card, no stamping - funny that!


Supplies:
Stamps: SU! 'Blooming with Kindness' set, Hero Arts 'Friends are Treasures' cling set
CS: PaperMania square white card blank, SU! Whisper White
Ink: SU! Rich Razzleberry, Primrose Petals & Pool Party, VersaMark pen
Tools: heat tool
Embellishments & accessories: SU! Iridescent Ice embossing powder, Rich Razzleberry ribbon, Pool Party button, 3D foam tape


 photo FlowerRuth.gif

Santa Collage Card - 52 {C}CT Apr Theme Challenge #16

It's time for a theme challenge at 52 {C}CT and this week we want to see Santa on your Christmas cards.


I've used  the Inkadinkado Santa Collage stamp which is a stylish and sophisticated image of Santa Claus I think.  I've used Cherry Cobbler, Crumb Cake and Very Vanilla as my colour combo.  After die cutting the shaped card I stamped the image, trimmed it to size, inked the edges and layered it onto a Cherry Cobbler mat.  I embossed the Crumb Cake panel with a snowflakes embossing folder and added a strip of Cherry Cobbler ribbon.  I've elevated the Santa panel (a posher way of saying I popped it up, elevated is what my friend Carol at card group always says!)    I then cut some Cherry Cobbler tulle, threaded it through a ribbon slider and hot glued that to the ribbon to finish the card front.  A simple card design but I'm happy how this turned out! 


I die cut a Very Vanilla piece for inside the card, inked the edges and stamped a sentiment and some snowflakes.  I love that retro font!


For the envelope, I stamped the snowflakes a few times across the front and added a punched square Santa image.


I do hope you'll add a Santa card to your Christmas card stash by playing along with our challenge this week - don't forget to check out the fab cards from the other DT members before you go off to create!

Supplies:
Stamps: Inkadinkado 'Santa Collage', Stampendous 'Christmas Wishes' clear set, PSX 'Snowflake Medley'
CS: SU! Cherry Cobbler, Crumb Cake & Very Vanilla
Ink: SU! Cherry Cobbler
Tools: Sizzix Bigz XL 'Card Fronts, A2 Eyelet & Ornate' die, snowflakes embossing folder from Cuttlebug 'Winter Wonderland' set, square Nestabilities die, hot glue gun, Stamp-a-ma-jig, sponge dauber
Embellishments & accessories: SU! Cherry Cobbler ribbon, Cherry Cobbler tulle, metal ribbon slider, Dimensionals


 photo RoseRuth.gif

Thursday 18 April 2013

Dress & Honeycomb 'Just For You' Card

I often leaf through my SU! catalogues and highlight card designs that I'd like to CASE - I don't always get round to actually making the cards though!  I love the 'I'm here for you' card on page 39 of the Spring/Summer catty - the aperture and honeycomb embossing really appealed to me.  I thought I'd make a version with - yes, a dress!  You know I love the Dress Up dies to the point of addiction!

I rummaged in my paper stash to find a suitable pattern for a dress and settled on a design from the Festival of Prints stack.  I die cut the dress and then made a matching cardie, adding teeny pearl details for a touch of luxury.  Then it was onto making the card.  The card base is Lucky Limeade and I glued a Marina Mist panel to the card front.  I embossed Very Vanilla CS with the honeycomb folder and also embossed some patterned paper pieces - that makes cutting out the paper hexagons easier!  I would love a hexagon punch to match this folder, that would be easier still!  I added Island Indigo patterned paper at the bottom, a Limeade CS strip and glued a few patterned paper hexagons to the honeycomb.  I then die cut the label aperture, popped up the panel, popped up the dress and added the sentiment label. 


Here's the inside and the envelope front with just some simple Island Indigo stamping.  I used the gorgeous flourish stamp from the Elements of Style set as that matches the green and vanilla patterned paper I used on the front.


Supplies:
Stamps: SU! 'Just Believe' & 'Elements of Style' sets
CS: SU! Lucky Limeade, Marina Mist & Very Vanilla

Patterned paper:  SU! Festival of Prints DSP stack
Ink: SU! Lucky Limeade & Island Indigo
Tools: SU! Dress Up Framelits dies, Labels Collection Framelits die, Honeycomb embossing folder, Word Window punch
Embellishments & accessories: pearl jewels, Dimensionals


 photo SparkleHeartRuth.gif

Wednesday 17 April 2013

CAS Pansies Happy Birthday Card - Inkspirational Apr CASE Challenge

This week at Inkspirational we have a CASE challenge for you and we'd like to see your versions of this very stylish card made by Hannelie.


Silhouettes and monochrome combos are favourites of mine and I could have taken a whole load of inspiration from this beautiful card.  I really love the layout and pretty lace so I chose those elements to CASE for my version.  The card measures 5 1/4" square and I kept to a CAS design.  I've used the Violet Border stamp set from Rubber Stamp Tapestry who are kindly sponsoring our April prize at Inkspirational - please check the challenge blog for details.  Many thanks to my sweet friend Lesley for the loan of the stamps!  

I die cut a white circle and stamped the foliage directly to the circle and stamped the sentiment.  I stamped the pansies separately, stamping three times before re-inking, fussy cut them and glued them on top.  I stamped two lace borders, fussy cut them, glued them to the card front back to back and covered the join with Old Olive ribbon.  I layered the white circle onto an Elegant Eggplant mat and popped that up.  I added a bow and applied Star Dust Stickles to the flower centres to finish off the card front.   


Here's the inside and the envelope.  More lacy goodness and a couple more of those sweet pansy flowers!


Please check out the other projects from the rest of the DT, they're sure to have some fab inspiration for you!  I hope you'll join in with our Inkspirational CASE challenge, I look forward to visiting your blogs to see your interpretation of Hannelie's lovely card!

Supplies:
Stamps: Rubber Stamp Tapestry 'Violet Border' set, SU! 'Made for You' set, 'Viola's Lace' wheel & 'Gossamer Lace' stamp, Penny Black 'Lovely Day'
CS: PaperMania white square card blank, SU! Elegant Eggplant & Whisper White
Ink: SU! Old Olive, Always Artichoke & Elegant Eggplant
Tools: Plain circle Nestabilities dies, circle punches
Embellishments & accessories: SU! Old Olive grosgrain ribbon, Star Dust Stickles


 photo CardFuchsiaRuth.gif

Monday 15 April 2013

Doily & Butterfly Thank You Card For Jan & Alan

It was my birthday last Sunday and I am very happy to report that I received some fabulous new crafty goodies as gifts!  Part of my gift from Jan and Alan was the Papillon Potpourri stamp set and the Elegant Butterfly punch.  Part of hubby's gift to me was the Hello, Doily stamp and the Blooming with Kindness set.  I managed to combine all of those new goodies onto this thank you card for Jan and Alan! 

I stamped the doily in Pool Party ink, cut the white panel to size and layered onto a Rose Red mat.  I wrapped Rose Red seam binding ribbon around the panel, tied a bow and glued the panel to a 5 3/4" square Pool Party card base.  I then die cut a Rose Red middle sized doily using the Delicate Doilies Sizzlits die.  When I first got this die I cut the doilies out of white CS and this middle sized shape reminded me of one of those plughole strainer type things you place in a sink -  yeah, that really did put me off it!  I don't think I'll ever shake that association if I use white CS but I'm OK with this Rose Red one LOL!  I blame my mother-in-law who took delight in ordering all kinds of weird and wonderful things from Betterware and Kleeneze catalogues!  Anyway, back to the card - I glued a Pool Party circle behind the doily and popped that up.  I stamped and punched a butterfly, punched a Pool Party CS butterfly and layered the two shapes together with a fancy brad.  To finish the front I stamped the sentiment in Rose Red ink.


I stamped and die cut a sentiment label for inside the card and added a stamped and punched bitty butterfly.


I placed another label on the envelope flap and added a stamped, punched butterfly with jewels.  I enjoyed myself immensely making this card - doilies, butterflies and two fave SU! colours, I was a happy stamper!


Supplies:
Stamps: SU! 'Hello, Doily' stamp, 'Papillon Potpourri' & 'Blooming with Kindness' sets
CS: SU! Pool Party, Rose Red & Whisper White
Ink: SU! Pool Party & Rose Red
Tools: SU! Delicate Doilies Sizzlits L die, Elegant Butterfly & Bitty Butterfly punches, 1 3/4"circle punch, Apothecary Accents Framelits die
Embellishments & accessories: SU! Rose Red seam binding ribbon, Filigree Designer Brad, Rose Red brad, Rhinestone Jewels, Dimensionals 


 photo ButterflyFlutterRuth.gif

Saturday 13 April 2013

Cherry Blossom & Butterfly Thanks Card - Inkspirational Challenge #15

I'm here with an end of the week encouragement post for the Inkspirational challenge # 15.  If you haven't taken part already - there's still time!  This week we have a pretty seasonal photo to inspire you.


I took the opportunity to ink up the lovely cherry blossom stamp from the SU! Easter Blossoms set and I used a blue, pink and brown combo.  My card measures 5 1/4" square and I made it from Bashful Blue CS.  I sponged Bashful Blue ink onto Whisper White CS, stamped the blossoms in Timber Brown StazOn ink and coloured the flowers with Regal Rose ink and a blender pen.  I stamped the sentiment and dotted each flower centre with an Early Espresso marker.  I layered the image panel onto an Early Espresso mat and added a Pretty in Pink die cut fancy border.  I glued patterned paper and a pink CS strip to the bottom of the card and popped the panel up.  I stamped and punched a butterfly and glued that to the image panel and added blue rhinestones to the fancy border.


Here's the inside and envelope.  This card was given to my friend and neighbour Kath to thank her for my birthday gifts.  Kath gave me a beautiful bookmark card, a gift voucher and made me a chocolate sponge cake - what a sweetheart!  I thought the "it was so nice of you to be so nice to me" sentiment was a good choice!


I do hope you can join in with our Inkspirational photo challenge this week, I'd love to pop by your blogs and see what you've made!

Supplies:
Stamps: SU! 'Easter Blossoms', 'Papillon Potpourri' & 'Thank You Kindly' sets, Hero Arts 'Friendship Messages' clear set
CS: SU! Bashful Blue, Pretty in Pink, Early Espresso & Whisper White

Patterned paper:  SU! Festival of Prints DSP
Ink: Timber Brown StazOn, SU! Bashful Blue, Regal Rose & Early Espresso
Tools: Memory Box Charlotte Border die, SU! Bitty Butterfly, 1 3/8" circle & 1 3/4" scallop circle  punches, Stamp-a-ma-jig, sponge & sponge dauber
Embellishments & accessories: blue rhinestones, 3D foam tape


 photo ruth10.gif

Snowman & Circles Gap Card - 52 {C}CT Apr Colour Challenge

We have this wonderful colour challenge for you this week at 52 {C}CT.  I love blue Christmas cards!


To start I chose a favourite Inkadinkado snowman stamp and I stamped him with Night of Navy ink.  I remembered I have a Sizzix Circles strip die that goes well with this stamp and I decided to use that to make a gap card.  I think gap cards are such fun and I haven't made one in a while.  I made a 5 3/4" square Bashful Blue card base and then cut a gap from the front.  I cut two Night of Navy circles die cut shapes and glued them back to back between the gap.  I think using two shapes gives a bit more strength and reinforces the gap.

Here's the card open on display where you can see the gap.


This next photo shows the card closed.  I glued a strip of white CS inside the card so it will show through from behind.  I added three punched blue snowflakes inside so they are visible through the large circular holes.  I then punched smaller white snowflakes and glued those to the front of the circles strip.  I layered the snowman panel onto a Night of Navy mat, glued that to the card and added a photo corner with a small punched snowflake.  I added three white snowflakes underneath the snowman panel and then added rhinestone jewels to each snowflake centre.  I applied Star Dust Stickles underneath the snowman for some sparkly snow.


Here's the inside.


For the front of the envelope I die cut another Night of Navy Circles strip and added punched snowflakes with jewel centres.


I really enjoyed putting this card together!  I hope you'll join us for this week's 52 {C}CT challenge, I'm looking forward to checking out your blue Christmas cards!  The other DT members will have fab cards to inspire you so please take a look at those before you go off and get inky!

Supplies:
Stamps: Inkadinkado 'Holiday Sentiments' clear set, Hero Arts 'Holiday Cheer' clear set
CS: SU! Bashful Blue, Night of Navy & Whisper White
Ink: SU! Night of Navy
Tools: Sizzix 'Circles' Decorative Strip die, SU! Photo Corners punch, Fiskars snowflake punch, Woodware tiny snowflake punch
Embellishments & accessories: Star Dust Stickles, SU! Rhinestone Jewels


 photo DiamanteHeartsRuth.gif

01 09 10