Thursday, 23 July 2015

'One Layout, Four Cards' Class Cards

Last Saturday I was at Martha & Daisy's in Burgess Hill to run another of my 'One Layout, Four Cards' classes.  A lovely bunch of ladies, crafting, chatting and laughing - I had a scrummy cake too - so a perfect day then!

First up is this very simple but elegant 'Hello' card.  I love black and white with a pop of bold colour and here I've used SU! Watermelon Wonder to add that vibrant touch.  I stamped the 'Bella Toile' background stamp onto a piece of Whisper White CS in black ink, cut the piece into three panels, turned the smallest piece over and stamped the 'Hello'.  I layered the pieces onto a mat of black CS and glued that to the front of the A6 card base.  I added black circles with slightly smaller Watermelon Wonder circles to complete the card front.  No popped up elements or bling on this card so it would be a great card for posting.


I stamped the 'Bella Toile' stamp again to decorate the inside and the envelope and used a black Sharpie marker to add black lines alongside the stamped images.  This beautiful SU! stamp is sadly retired but it will always be a favourite of mine!


Time for another retired item now, the SU! 'Dress Up' Framelits dies which I haven't used for ages.  I used papers from the Craftwork Cards 'Fab Fabrics' pack which were ideal.  I used narrow black ribbon as a belt for the dress and added a rhinestone.  I used a black pen to add stitch detail to the three rectangular panels and I popped up the dress and the sentiment circle.


Here's the inside and the envelope.  I popped up Card Candi dots in the centre of the punched flowers.


For the next card I changed from rectangular panels to ovals and a circle, opted for a shabby look and used tone-on-tone stamping plus layered stamping.  I stamped the IndigoBlu 'Rose Blush' stamp a few times onto Primrose Petals CS using Primrose Petals ink as a background.  I cut a large piece of Very Vanilla CS and stamped the 'Linen' background stamp in Frayed Burlap Distress Ink.  I stamped the 'Rose Blush' image and the sentiment over the top in Primrose Petals ink and die cut the shapes with Petite Oval Nestie dies.  I punched a 1 1/2" Chocolate Chip circle, punched the rose, then cut that out with a 1 1/4" circle punch, glued a 1 1/4" Primrose Petals punched circle behind and then glued that to the Chocolate Chip circle.  The ovals and the circle are all popped up and the Very Vanilla shapes are all edged with Frayed Burlap Distress Ink. 


Here's a closer look at the main oval panel - the Linen stamp is also a long retired SU! stamp but remains a firm favourite!  


Here's the inside and the envelope.


The fourth card stays with a shabby look and would make a great card for a man I think.  I used the lovely new SU! 'Vintage Leaves' stamp set with the matching 'Leaflets' Framelits dies plus the new Brick Wall embossing folder - I love using these items together!  Firstly I adhered a layer of Early Espresso CS to the front of a 5 3/4" square kraft card base.  I cut a panel of Very Vanilla CS, embossed it with the Brick Wall folder and lightly brayered Crumb Cake ink over the embossed panel.  I cut the panel into 3 pieces, stamped the sentiment, inked the edges with Soft Suede ink and glued the pieces in place.  I stamped and die cut the leaves, inked the edges with Old Olive ink, shaped them and popped them up.  I added gold nailheads over the top of punched Early Espresso CS circles to finish the front.


Here's the inside and envelope.


Supplies for 'Hello' card:
Stamps: SU! 'Bella Toile' background stamp, Personal Impressions 'Medium Everyday Messages' set
CS: SU! Watermelon Wonder, Basic Black & Whisper White
Ink: Memento Tuxedo Black, black Sharpie marker
Tools: circle punches

Supplies for 'to you from me' card:
Stamps: SU! 'Best Yet' set, Hero Arts 'Everything Wonderful'
CS: PaperMania white square card blank, SU! Basic Black & Whisper White

Patterned paper: Craftwork Cards 'Fab Fabrics' pack
Ink: Memento Tuxedo Black, black permanent ink pen
Tools: SU! 'Dress Up' Framelits dies, EK Success 'Retro Flower' medium punch, circle punches
Embellishments & accessories: SU! Basic Black 1/8" ribbon, Craftwork Cards Card Candi from 'Fab Fabrics' pack, SU! rhinestone jewel, 3D foam tape & pads


Supplies for 'birthday wishes' card:
Stamps: IndigoBlu 'Rose Blush', SU! 'Linen' background stamp, Personal Impressions 'Large Everyday Messages' set, SU! 'Birthday Blossoms' set
CS: PaperMania cream square card blank, SU! Primrose Petals, Chocolate Chip & Very Vanilla, SU! 12" x 12" Kraft CS
Ink: SU! Primrose Petals & Chocolate Chip, Ranger Tim Holtz Frayed Burlap Distress Ink
Tools: Petite Oval Nestabilities dies, Fiskars 'Rose' punch, 1 1/4" & 1 1/2" circle punches, sponge dauber
Embellishments & accessories: Woodware self adhesive white lace ribbon, Prima flowers, PaperMania black brad, SU! pearl jewels, Dimensionals


Supplies for 'Just Because' card:
Stamps: SU! 'Vintage Leaves' & 'Tin of Cards' sets
CS: SU! 12" x 12" Kraft CS, SU! Early Espresso, Old Olive & Very Vanilla
Ink: SU! Crumb Cake, Soft Suede & Old Olive
Tools: SU! 'Leaflets' Framelits dies, SU! 'Brick Wall' embossing folder, circle punch, sponge dauber
Embellishments & accessories: gold nailheads, 3D foam pads 


 photo RoseRuth.gif

Monday, 20 July 2015

Regal Striplet & Butterfly Circle Happy Birthday Card

My creating and blogging have had to take a back seat recently because I've started a new part time job.  Hopefully, once I'm more settled in and used to the shift schedules I'll become better at combining work and my hobby!  I'm off today and again on Thursday so I'll be spending time in my craft room for sure - although a serious tidy up is needed before I can start creating!

Today I'm sharing a card I made using the 'Regal' Striplet die and my new 'Embrace Beauty' stamp set - both are gorgeous products!  I've used new products but have relied on a tried and tested and favourite colour combo of Pool Party and Island Indigo.  Here's the card and the front of the envelope together.   I used both the inner and outer dies to cut a Pool Party Striplet shape, glued that over the top of an Island Indigo CS strip, glued it to the front of the envelope and added a rhinestone to the centre of the Striplet design.


I used the inner Striplet die to cut the shape twice from the Pool Party CS panel, glued that to an Island Indigo CS mat, cut a circular aperture out and added an Island Indigo CS frame. I used double sided adhesive sheet to apply Iced Snow Glitter Jewels to a piece of Pool Party CS and I glued that to the front of the 5" x 7" white card base.  With 3D foam tape I popped up the Striplet panel and I added decorative corner die cut shapes to each corner.  I stamped and punched the circular image and popped that up.  I fussy cut a butterfly, coloured the wings with a Pool Party marker and glued it over the top making sure to fold the wings up.  I added rhinestones to the butterfly body and to the die cut corners.  I stamped, die cut and popped up the sentiment label and added punched circles and aqua Creative Expressions Dazzlers. 


Here's a closer look at the circle aperture.  I love that glittery sparkle!


Here's the inside of the card and the back of the envelope.  I stamped, coloured and fussy cut two more butterflies to go inside the card and added a stamped, coloured and punched circle element to the envelope flap.  A fairly time consuming card but so worth it I think, I'm happy with the end result anyway!


Supplies:
Stamps: Taylored Expressions 'Embrace Beauty' set, Hero Arts 'Yummy Treats' set
CS: PaperMania 5" x 7" white card blank, SU! Pool Party, Island Indigo & Whisper White
Ink: SU! Island Indigo, SU! Pool Party marker
Tools: Sue Wilson 'Regal' Striplet die set, circle Nestabilities dies, Sizzix 'Charms, Fancy' Framelits die set, Die'sire Essentials 'Decorative Corner 1' die set, Memory Box 'Cross Stitched Frame Borders' die set, circle punches
Embellishments & accessories: 'Iced Snow' Cosmic Shimmer Glitter Jewels,  Creative Expressions Aqua Dazzlers, Woodware double sided self adhesive sheet, SU! rhinestone jewels, 3D foam tape


 photo RoseRuth.gif

Saturday, 11 July 2015

Brick Wall, Leaves & Butterflies Thanks Card

A Stampin' Up! delivery came recently and I couldn't wait to play with some of my new supplies!  I decided to combine the 'Brick Wall' embossing folder with the 'Vintage Leaves' stamp set and the matching 'Leaflets' Framelits dies.

I stamped the leaves onto Pear Pizzazz CS using Mossy Meadow ink and sponged the edges of each leaf with Mossy Meadow ink.  After embossing the Brick Wall pattern onto a panel of Whisper White CS I lightly brayered Crumb Cake ink over the top and edged the panel with Crumb Cake ink. I glued that to the front of an A6 card made with Thick Whisper White CS.  I stamped the 'THANKS' stamp from the 'Tin of Stamps' set - it's the perfect size to go inside a brick!  I shaped the leaves and adhered them to the card front, gluing some parts flat and popping other parts up on Dimensionals.  I stamped and punched the three Rose Red butterflies and glued those in place.  I added a linen thread bow to one of the leaves, placed a Rose Red Candy Dot on the knot and then added a small rhinestone.  I thought adding a few Crystal Effects dew drops to the leaves would be a nice finishing touch.  


Here's a closer look at the leaves - what gorgeous leaves they are too!  Hmmm, my Crystal Effects has gone a tad yellow so I need to replace my bottle, I have had it a very long time!  


For the inside and envelope I simply stamped some leaves in Mossy Meadow ink.  I'm VERY happy with my new supplies!


Supplies:
Stamps: SU! 'Vintage Leaves', 'Papillon Potpourri' & 'Tin of Cards' sets
CS: SU! Whisper White (Regular & Thick), Pear Pizzazz & Rose Red
Ink: SU! Crumb Cake & Mossy Meadow
Tools: SU! 'Leaflets' Framelits dies, 'Bitty Butterfly' punch, 'Brick Wall' embossing folder, Brayer, sponge daubers
Embellishments & accessories: SU! Linen Thread, Rose Red Candy Dot, Jewel Rhinestone, Crystal Effects, Dimensionals


 photo RoseRuth.gif

Thursday, 9 July 2015

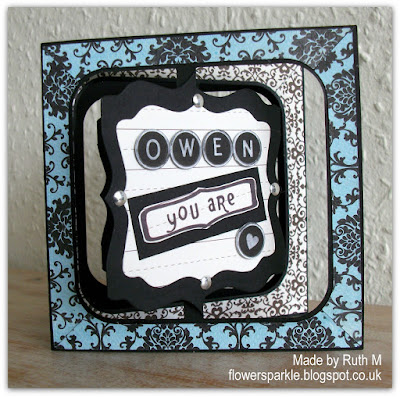
Just My Type Pivoting Accordion Birthday Card

Today is my hubby's birthday and I'm sharing the accordion card I made for him.


I knew I wanted to make an accordion card for Owen but I had no further idea beyond that so first I went looking for some patterned papers.  I chose a couple of Authentique patterns and on the back of one of the papers I saw the typewriter and text and I knew I could incorporate them into my card design.  Also I'd come across the typewriter key toppers while rootling in my paper stash so I was now up and running.  I cut the typewriter and words out separately so I could spread them out over the three accordion panels.  I stacked all the typewriter key toppers onto a couple of punched circles to give some dimension.  I embellished each accordion panel with four silver nailheads.


Here's a closer look at panel one.


Here's a closer look at panel two.


Here's a closer look at panel three.


Here's the back panel.  I used a Dymo labeller to make the sentiment.


I made an envelope with the gorgeous blue and black damask patterned paper, added a grey strip and finished with a popped up fancy tag name label.


I'm very happy to say that Owen loves his card and envelope!  We're off out shortly for a birthday brunch and then on Saturday evening we're out with friends for a yummy curry.

Supplies:
Stamps: none
CS: SU! Basic Black & Whisper White

Patterned paper: Authentique Crush 'Impression' & Authentique Classique 'Elegant Five' double sided papers
Ink: none
Tools: Elizabeth Craft Designs 'Accordion Fancy Label' & 'Fancy Frame Edges' die sets, 1/2" circle punch, corner rounder punch, Dymo labeller, Envelope Punch Board, Spellbinders Shapeabilities 'Fancy Framed Tags Two' die set
Embellishments & accessories: silver nailheads, SU! Dimensionals


 photo RoseRuth.gif

Tuesday, 7 July 2015

Ombre Floral Panel & Bow Many Happy Returns Card

I ummed and aahed about getting the Sue Wilson Canadian Collection Background die, I'd seen some lovely cards made with it but I wasn't 100% sure about it.  While I dithered it went out of stock at the Glitter Pot for a while but they had some in on my last visit to the shop and so one found its way into my basket.  Quite a few of my crafty buddies have this die and I was definitely encouraged to add it to my stash - you know who you are!

Margaret from card group used the die to make a lovely birthday card for Elizabeth and Margaret told me she had to use a larger card than she normally likes to use.  I don't use larger cards very often either so for my first card using the die I decided to cut out just a part of the design and place it on an A6 sized card base.  I've used the new SU! Thick Whisper White CS to make the card base - I'm so happy to have a thicker version of Whisper White to make card bases with, it's fabulous!  After cutting out a grid of 4 x 5 flower panels in Whisper White CS I cut strips of Soft Sky, Pool Party, Coastal Cabana and Bermuda Bay CS, glued those to a piece of Whisper White CS and glued the flower grid piece over the top.  I love the ombre effect of the background colours graduating from light to dark!  I layered onto a mat of Bermuda Bay CS, stamped the sentiment and glued the panel to the card front.  I die cut the bow shapes, layering Bermuda Bay Filigree Bow shapes over white Classic Bow shapes and glued the pieces in place.  I then added lots of deep aqua gems for that all important sparkle.  This Canadian Background die could severely deplete your bling stash - but the flower centres just cry out for a pearl or gem!


Here's the inside and the envelope.  The ribbon strip die from the Filigree Bow set makes a lovely border die I think.  I added a Pool Party filigree strip to the bottom of the stamped and die cut sentiment panels and added a Bermuda Bay filigree strip to the envelope front.  I die cut a fancy tag and popped that up on the front of the envelope as a name label.   


Here's a look at the card and envelope together.  I know it takes a bit of extra time and effort to decorate an envelope to match a card but I think it's worth it for the coordinated look you get.  In my view, it looks properly 'finished', it makes a hand made creation stand out even more from a shop bought card and it makes the recipient feel special! 


I die cut the whole Canadian Background die shape but only used part of it for this card so I have a smaller grid piece left over.  Stay tuned, another card using that piece will appear on the blog soon!

Supplies:
Stamps: Clearly Besotted 'Happy Birthday' set
CS: SU! Soft Sky, Pool Party, Coastal Cabana, Bermuda Bay & Whisper White (regular & thick)

Ink: SU! Bermuda Bay
Tools: Sue Wilson Canadian Collection 'Background' die, Finishing Touches Collection 'Classic 3D Bow' & 'Filigree 3D Bow' die sets, Memory Box 'Cross Stitched Frame' rectangle die set,  Spellbinders Shapeabilities 'Fancy Framed Tags Two' die set
Embellishments & accessories: PaperMania aqua gems, SU! Dimensionals


 photo RoseRuth.gif

Thursday, 2 July 2015

July 2015 Card Group Projects

It was our July card group get together today, it seems to have come round so quickly!  We had a very jolly day and were glad to be inside crafting as there was a thunderstorm and rain later in the afternoon!  Elizabeth is celebrating her birthday this month so we all gave her a hand made card and spent time admiring the different creations - that's one of my favourite things about running the group.  Elizabeth  gave everyone a home baked butterfly cake topped with a strawberry - and delicious it was too!

A chicken card was requested and I was very happy to oblige!  This is such a fun card to put together with simple stamping and paper piecing!  I stamped the chicken wire in Smoky Slate ink first, stamped the straw with Delightful Dijon ink and using a blender pen and more Dijon ink I added extra colour to the straw.  I inked the edges of the Whisper White panel with Soft Suede ink and layered it onto a mat of Real Red CS.  I added the gingham ribbon to the Lost Lagoon panel before gluing that to the front of the Real Red A6 card base.  I stamped and paper pieced the chicken and eggs, inked all the edges with Soft Suede ink and coloured the beak with a Pumpkin Pie marker.  I cut the 'Cluck Cluck' sentiment out with the SU! Word Window punch, popped that up and I also popped up the eggs.  I attached the chicken to the card with an action wobble spring so the chicken moves - hours of endless amusement!


Here's the inside of the card and the envelope.


At last month's card group meeting Elizabeth asked me for advice about designs for sympathy cards.  I must confess I've made so few of them and I personally would choose to send a 'Thinking of You' card  rather than a 'With Sympathy' card.  Anyway, after giving the matter some thought and considering what I would be comfortable designing for a sympathy card I came up with some guidelines.  This is what is suitable and appropriate for a sympathy card - in my view.  Everyone has different ideas, opinions and personal preferences of course, but here's the list of guidelines I'd choose to follow myself:
  • Use a soft, muted colour palette
  • Use a limited number of colours
  • Don't use black
  • Keep to a simple, uncluttered design and avoid fancy folds and busy patterns
  • Use classic, elegant images as opposed to cute images - nature images are great
  • Use textures to add interest rather than patterned papers and embellishments
  • Keep bling to a minimum
  • Be subtle, not showy, aim for a serene, tranquil look and feel without making the design sombre
Having come up with the list I felt it would be good to design a card using the guidelines.  I've used the very pretty Taylored Expressions 'Embrace Beauty' stamp set which has a collection of circular silhouette images plus several sentiments.  The set contains a 'With Sympathy' wording stamp but for my card I used 'Thinking of You' instead.  I took along the whole set and let the ladies choose which wording they wanted.  A stepped up version of this design could easily be made by adding extra layers, colours and some embellishments and it would be suitable for many more occasions.  

I've kept to a green and cream combo using SU! Pear Pizzazz and Very Vanilla.  I've used an embossing folder and some pretty crochet trim to add texture.  I cut out the stamped image with a circle die, layered it onto a larger Very Vanilla circle and popped it up.


As well as larger circular images, the 'Embrace Beauty' stamp set contains some smaller circular images so I used one of those to decorate the inside of the card and the envelope flap.  I cut out the stamped images with a 1 3/4" circle punch.


The last card features one of my newly acquired SU! stamp sets, the beautiful 'Birthday Blossoms' set.  Page 8 of the SU! catalogue has a photo of a lovely card made with the set and I decided to make my own version of it.  I fancied a pretty, summery, yellow and blue combo and I opted for Marina Mist as my blue.  I dug out some old, retired, SU! Barely Banana CS to make the A6 card base and I stamped the flower cluster image as a background in Daffodil Delight ink.  I stamped the leaves in Wild Wasabi ink, stamped the flowers and sentiment in Marina Mist and stamped a few random speckles in Crumb Cake ink.  I die cut the white banner shape and glued just a part of a Marina Mist banner behind so I could have a contrasting section at the bottom.  I added the strip of ribbon and glued the label to the card front.  I punched the three flowers, shaped them and popped them up.  I added a rhinestone jewel to complete the card front.  


Here's the inside of the card and the envelope.  I used stamped off once Daffodil Delight ink to stamp the flower cluster images and I stamped two more sentiments from the set in Marina Mist ink.


Supplies for chicken cluck cluck card:
Stamps: Woodware 'No Spring Chicken' set, Inkylicious 'Chicken Wire' background stamp
CS: SU! Crumb Cake, Lost Lagoon, Real Red, So Saffron & Whisper White

Patterned paper: Kaisercraft 'Mistletoe' paper pad
Ink: Memento Tuxedo Black, SU! Delightful Dijon & Soft Suede
Tools: SU! 'Word Window' punch
Embellishments & accessories: red & white gingham ribbon, Action Wobble Spring,  SU! Dimensionals


Supplies for bird & branch thinking of you card:
Stamps: Taylored Expressions 'Embrace Beauty' set
CS: PaperMania cream square card blank, SU! Pear Pizzazz & Very Vanilla
Ink: SU! Pear Pizzazz
Tools: Crafts Too 'Leafy Swirl' embossing folder, circle Nestabilities dies, 1 3/4" circle punch
Embellishments & accessories: SU! Victoria Crochet Trim, 3D foam tape


Supplies for flowers best day ever card:
Stamps: SU! 'Birthday Blossoms' set, speckle stamp from SU! 'Itty Bitty Backgrounds' set
CS: SU! Barely Banana, Marina Mist & Whisper White
Ink: SU! Crumb Cake, Daffodil Delight, Marina Mist & Wild Wasabi
Tools: Sizzix 'Banners, Fancy' Framelits die set, SU! 'Pansy' punch
Embellishments & accessories: SU! rhinestone jewel, Dimensionals


 photo RoseRuth.gif

01 09 10