A few Saturdays ago Jan and Wendy came to my place for a card making morning and this is the card I designed for them to make. It features inking the inside of an embossing folder, a technique that I don't use often but I always love the look when I do use it! I also used gilding waxes - these are wonderful - and I really love the smell of them!
Using a brayer, I inked the inside of the Vintage Wallpaper folder with Crumb Cake ink before embossing a piece of white CS - there's an excellent video tutorial for this technique by Diana Gibbs HERE, do check it out and have a go yourself! I applied Patina and Golden Light gilding waxes to some areas of the embossed panel, inked the edges with Soft Suede ink, matted the panel onto a Soft Suede layer and added the aqua crochet trim. I die cut three Pool Party flowers, snipped between the petals, scrunched them up quite a few times to make them shabby, edged each flower with Soft Suede ink and rubbed Golden Light wax onto the top flower. I die cut two Soft Suede leafy stems, applied the Golden Light wax to the leaves and adhered them to the panel. I stacked the three flower layers together and attached the flower to the panel with an SU! Antique brad - which I'd also rubbed with the golden wax. The panel was then adhered to a Pool Party A6 sized card base. I decided to leave off a sentiment for now, I may add one later when I come to use the card.
Here's a close up view. I do love how the Vintage Wallpaper embossing looks after the folder has been inked!
Here's the inside and the envelope. As the bloom on the card front is rather dimensional I've used a gusseted expanding envelope, it would have been a tight squeeze into a regular envelope!
I'd baked a coconut and lime sponge sandwich cake so we enjoyed slices of that with our cuppas. It received very high praise I'm happy to say but I hope Jan and Wendy don't expect a home baked cake every time LOL!
Supplies:
Stamps: Penny Black 'Majestic Composition' cling background stamp
CS: SU! Pool Party, Soft Suede & Whisper White, IndigoBlu white CS
Ink: SU! Crumb Cake & Soft Suede
Tools: PTI 'Beautiful Blooms II #1 Die Collection' dies, 'Leaf 2' Joy Crafts Vintage Flourishes die, SU! Vintage Wallpaper embossing folder, brayer, sponge dauber
Embellishments & accessories: Creative Expressions 'Patina' & 'Golden Light' gilding waxes, aqua crochet trim, SU! Antique brad, gold brad
Tuesday, 10 June 2014
Saturday, 7 June 2014
Robins Merriest Wishes Card - 52 {C}CT June Sketch Challenge
We always start a new month of challenges with a sketch at 52 {C}CT and here is the sketch we'd like you to use this week. It's a real goodie I think! You can substitute shapes, rotate the sketch and make a square or rectangular card - as long as the basic layout comes through to us, it's all good!
Supplies:
Stamps: Hobby Art 'Christmas Robins' clear set, Hero Arts 'Very Merry Christmas' clear set
CS: SU! Garden Green, Real Red & Very Vanilla, watercolour paper
Ink: VersaFine Onyx Black, SU! Garden Green, Real Red & Soft Suede, Signo white gel pen
Tools: Square Nestabilities dies, 1 1/2", 1 3/4" & 2" circle punches, heat tool, water brush
Embellishments & accessories: clear embossing powder, SU! 'Sleigh Bells' ribbon, Doodlebug 'Woodsy' Washi tape, Star Dust Stickles, 3D foam tape & Dimensionals
I made a 5 3/4" square card from Garden Green CS and glued Real Red CS strips to a Very Vanilla mat layer. Before gluing the layer to the card front I added strips of ribbon and I then got my Christmas Robins stamp set out and the fun started! Classic and elegant is my most used card style but every now and then I love to put a cute and fun card together. This was a joy to make, I smiled the whole time - who wouldn't working with those sweet images?! All the images were stamped in VersaFine Black ink onto watercolour paper, heat embossed with clear powder, coloured with inks and a water brush and fussy cut. The snowy stump, mistletoe berries and hat were sparkled with Star Dust Stickles. I used some woodgrain Washi tape to ground my large chubby robin - wow, finally used my Washi tape, I've had it for well over a year! Instead of adding a bow to my main image I added the stocking, tucking the top of the stocking's hanging loop between the square layers. I used foam tape to pop the square and stocking up - the large chubby robin is also popped up. I used a white gel pen to add highlights to the holly berries to complete the card front.
No fussy cutting for inside the card as I cut a panel of watercolour paper and stamped and coloured directly onto that. I do love stamping the little robin so he sits atop the snowy stump so that's what I used to decorate the envelope flap!
June as the 6th month means we're halfway through the year, all those playing along with us at 52 {C}CT regularly will already have a good sized Christmas card stash. To those people I'd say, very well done and keep up the good work!
I've shared this photo before on my blog but I think it's worth sharing again. 2012 was the first year I committed to making my Christmas cards all through the year. This was my Christmas card box at the beginning of December 2012, absolutely jam packed, I had more than enough cards and it was a great feeling!
To others who haven't started their Christmas card stash yet - I'd say what are you waiting for? Later in the year you'll be so very glad you started early so join in with our 52 {C}CT challenge this week and make a start on that festive card stash!
No fussy cutting for inside the card as I cut a panel of watercolour paper and stamped and coloured directly onto that. I do love stamping the little robin so he sits atop the snowy stump so that's what I used to decorate the envelope flap!
June as the 6th month means we're halfway through the year, all those playing along with us at 52 {C}CT regularly will already have a good sized Christmas card stash. To those people I'd say, very well done and keep up the good work!
I've shared this photo before on my blog but I think it's worth sharing again. 2012 was the first year I committed to making my Christmas cards all through the year. This was my Christmas card box at the beginning of December 2012, absolutely jam packed, I had more than enough cards and it was a great feeling!
To others who haven't started their Christmas card stash yet - I'd say what are you waiting for? Later in the year you'll be so very glad you started early so join in with our 52 {C}CT challenge this week and make a start on that festive card stash!
Supplies:
Stamps: Hobby Art 'Christmas Robins' clear set, Hero Arts 'Very Merry Christmas' clear set
CS: SU! Garden Green, Real Red & Very Vanilla, watercolour paper
Ink: VersaFine Onyx Black, SU! Garden Green, Real Red & Soft Suede, Signo white gel pen
Tools: Square Nestabilities dies, 1 1/2", 1 3/4" & 2" circle punches, heat tool, water brush
Embellishments & accessories: clear embossing powder, SU! 'Sleigh Bells' ribbon, Doodlebug 'Woodsy' Washi tape, Star Dust Stickles, 3D foam tape & Dimensionals
Wednesday, 4 June 2014
Wooden Planks & Roses 90th Birthday Card
I picked up this pretty roses mug for 50p at a local charity shop - while I was sipping tea in my craft room I decided to use it as inspiration for the 90th birthday card I needed to make!
To start with I stamped the SU! Hardwood stamp twice onto Crumb Cake CS using Soft Suede ink. I cut the images into strips to make planks, edged each plank with Soft Suede ink and glued the strips to another piece of Crumb Cake CS. I trimmed the panel to size, edged it with Soft Suede ink and layered it onto a Soft Suede CS mat. I used an Early Espresso marker to draw a few lines on the planks and added brads to represent nails in the planks. Before gluing the panel to a Primrose Petals CS mat I added the pretty crochet trim and adhered the panel to the front of a Crumb Cake 5" x 7" card base. I stamped and die cut the sentiment label and then got busy two step stamping the flowers and leaves. I fussy cut all the images and arranged them on the card front, popping up all the roses.
Here's the inside of the card.
I used the fab SU! envelope punch board and green Bo Bunny dotty paper to make an envelope. I then used the Sizzix 'Sweet Day' die Framelits set to make the 90 rosette and the bunting. I added punched and shaped flowers to the bunting and placed an iridescent gem in each flower centre. The rosette has a bit of a surprise - it's actually a badge! I used to love it as a kid when I got a birthday card with a badge on it and if I get to be 90 I'm sure I'd still a love a badge! I glued a brooch back to the circle using Glossy Accents, fixed the badge to a punched oval shape and attached the oval to the envelope using removable glue dots.
This card was for a remarkable and lovely lady called Margaret who attends my monthly card group. Each month she looks at the cards I've designed and there's a few good natured grumbles along the lines of "that looks complicated" or "challenging" but I've never stumped her yet! Margaret is a fine example to us all, she's cheerful, humorous and sets to with a will, she gets on with it and asks for help only if she really needs it. Margaret always tells me at the end of the afternoon how much she enjoyed the time. You really can't keep a good woman down and Margaret is indomitable! I thought Margaret's 90th birthday was an event worth celebrating so I baked a spiced orange cake and took that along for us all to share. I'm very glad to say my cake was very well received, it went down a treat with a cuppa!
Supplies:
Stamps: SU! 'Stippled Blossoms' & 'Memorable Moments' sets, SU! 'Hardwood' stamp, 'Birthday Wishes' from Hero Arts 'Friends are Treasures' cling set
CS: SU! Crumb Cake, Primrose Petals, Soft Suede, Pretty in Pink & Very Vanilla
Patterned paper: Bo Bunny 'Clover' Double Dot paper
Ink: SU! Soft Suede, Pretty in Pink, Primrose Petals & Lucky Limeade, Early Espresso marker
Tools: SU! 'Labels Collection' Framelits die, Hero Arts 'Small Tag Frame' die, SU! Envelope Punch Board, Sizziz 'Sweet Day' Framelits die set, 1 3/4" & 2" circle punches, Woodware flower punch, Stamp-a-ma-jig
Embellishments & accessories: SU! Victoria Crochet Trim, Vintage brads & Dimensionals, PaperMania iridescent gems, brooch back, Ranger Glossy Accents, removable glue dots
To start with I stamped the SU! Hardwood stamp twice onto Crumb Cake CS using Soft Suede ink. I cut the images into strips to make planks, edged each plank with Soft Suede ink and glued the strips to another piece of Crumb Cake CS. I trimmed the panel to size, edged it with Soft Suede ink and layered it onto a Soft Suede CS mat. I used an Early Espresso marker to draw a few lines on the planks and added brads to represent nails in the planks. Before gluing the panel to a Primrose Petals CS mat I added the pretty crochet trim and adhered the panel to the front of a Crumb Cake 5" x 7" card base. I stamped and die cut the sentiment label and then got busy two step stamping the flowers and leaves. I fussy cut all the images and arranged them on the card front, popping up all the roses.
Here's the inside of the card.
I used the fab SU! envelope punch board and green Bo Bunny dotty paper to make an envelope. I then used the Sizzix 'Sweet Day' die Framelits set to make the 90 rosette and the bunting. I added punched and shaped flowers to the bunting and placed an iridescent gem in each flower centre. The rosette has a bit of a surprise - it's actually a badge! I used to love it as a kid when I got a birthday card with a badge on it and if I get to be 90 I'm sure I'd still a love a badge! I glued a brooch back to the circle using Glossy Accents, fixed the badge to a punched oval shape and attached the oval to the envelope using removable glue dots.
This card was for a remarkable and lovely lady called Margaret who attends my monthly card group. Each month she looks at the cards I've designed and there's a few good natured grumbles along the lines of "that looks complicated" or "challenging" but I've never stumped her yet! Margaret is a fine example to us all, she's cheerful, humorous and sets to with a will, she gets on with it and asks for help only if she really needs it. Margaret always tells me at the end of the afternoon how much she enjoyed the time. You really can't keep a good woman down and Margaret is indomitable! I thought Margaret's 90th birthday was an event worth celebrating so I baked a spiced orange cake and took that along for us all to share. I'm very glad to say my cake was very well received, it went down a treat with a cuppa!
Supplies:
Stamps: SU! 'Stippled Blossoms' & 'Memorable Moments' sets, SU! 'Hardwood' stamp, 'Birthday Wishes' from Hero Arts 'Friends are Treasures' cling set
CS: SU! Crumb Cake, Primrose Petals, Soft Suede, Pretty in Pink & Very Vanilla
Patterned paper: Bo Bunny 'Clover' Double Dot paper
Ink: SU! Soft Suede, Pretty in Pink, Primrose Petals & Lucky Limeade, Early Espresso marker
Tools: SU! 'Labels Collection' Framelits die, Hero Arts 'Small Tag Frame' die, SU! Envelope Punch Board, Sizziz 'Sweet Day' Framelits die set, 1 3/4" & 2" circle punches, Woodware flower punch, Stamp-a-ma-jig
Embellishments & accessories: SU! Victoria Crochet Trim, Vintage brads & Dimensionals, PaperMania iridescent gems, brooch back, Ranger Glossy Accents, removable glue dots
Monday, 2 June 2014
30th Wedding Anniversary Card - HOC June Blog Hop & Anything Goes Photo Inspiration Challenge
Hi, all! It's time for an end of the term blog hop over at House of Cards and we have a super fun challenge AND tons of great prize opportunities for those of you who join in the fun!!! :) There is also a DT call going on too! You should have arrived here from MYNN - who has shared not one but three beautiful cards! If you haven't, please start all the way back at the House of Cards hop post and follow the list found in the body of the hop post!
Here are our fabulous sponsors~
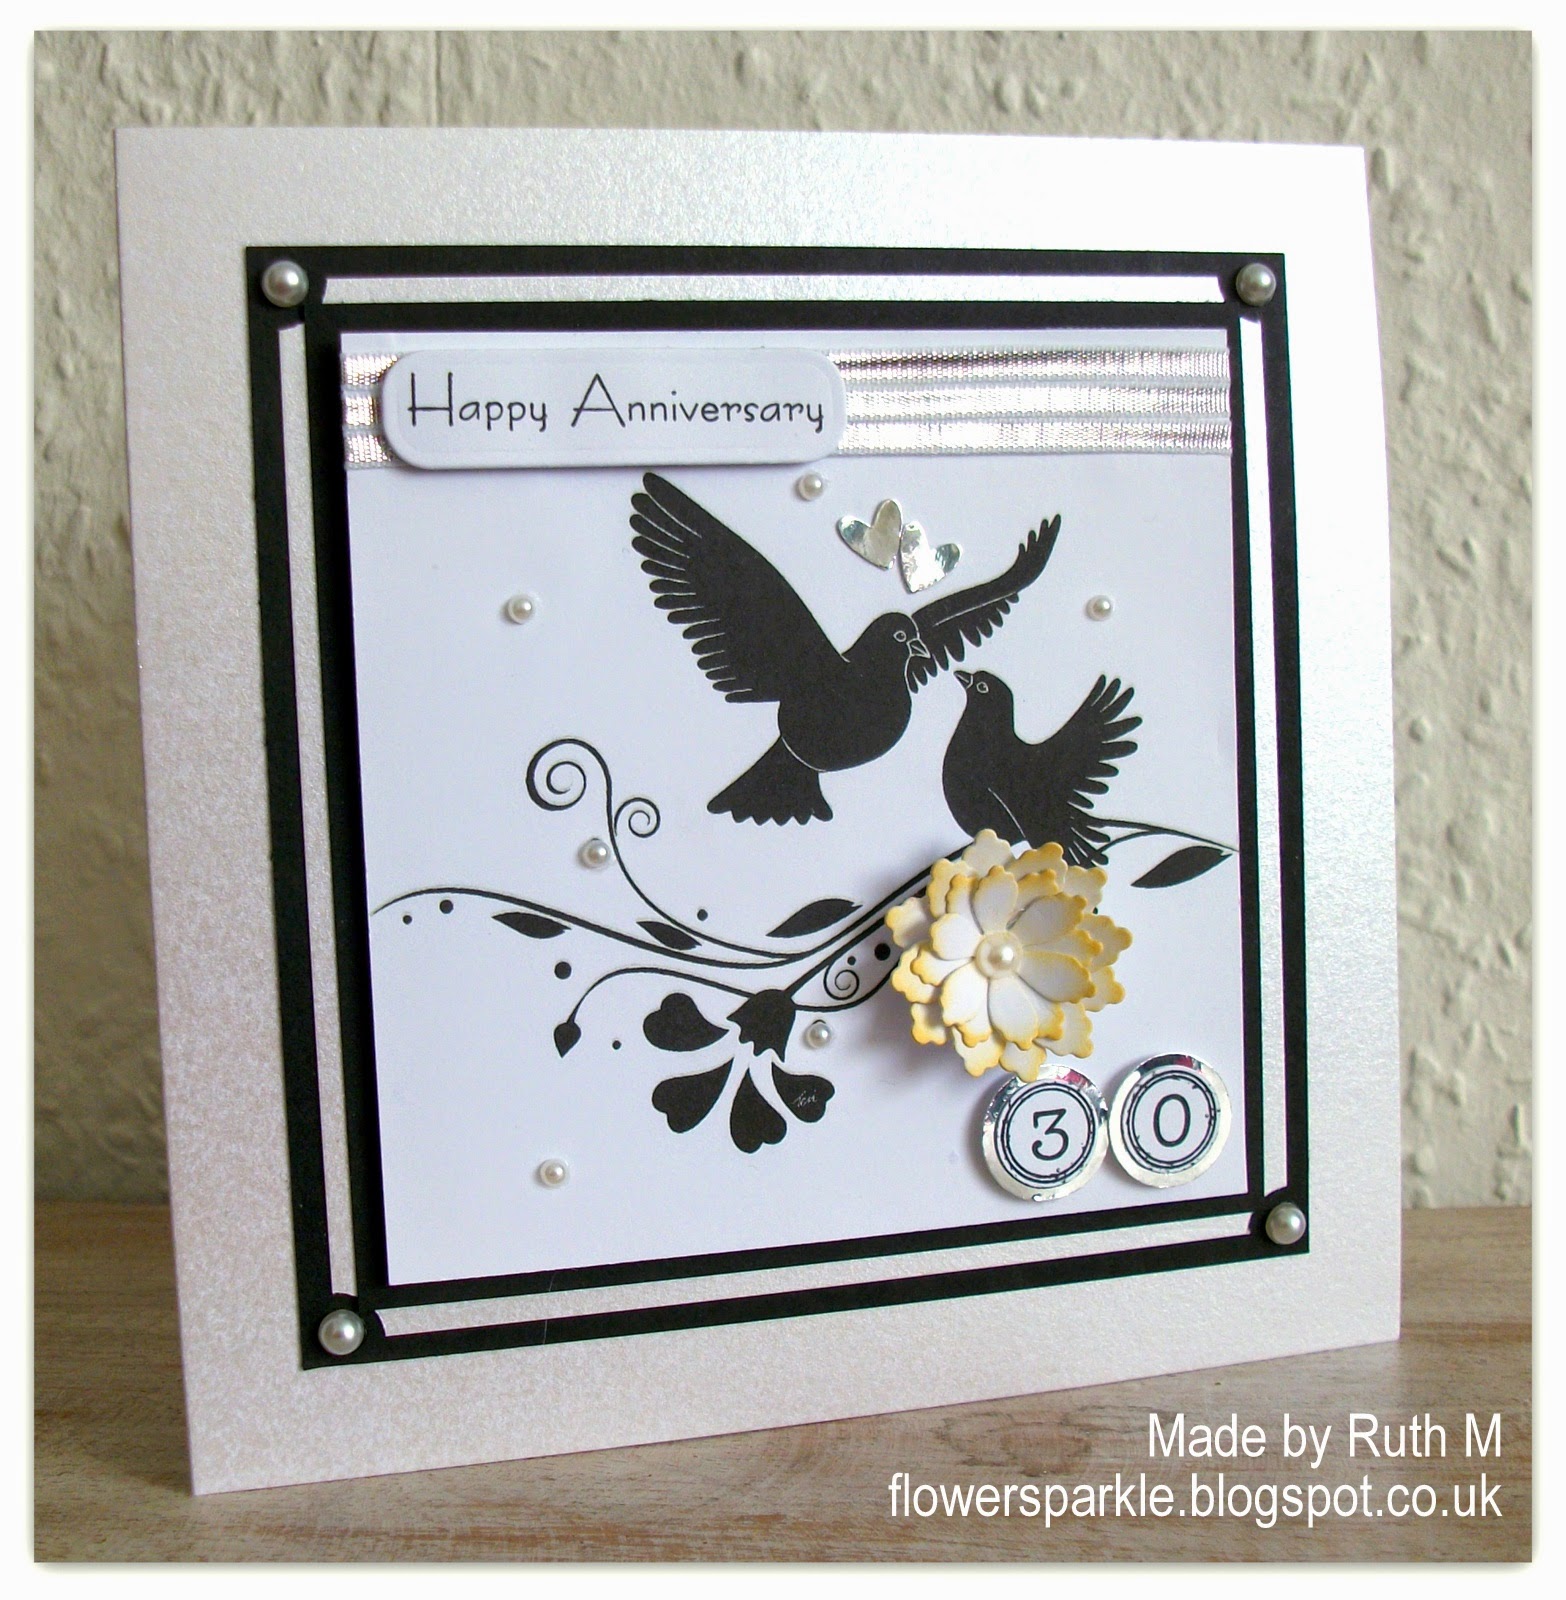
For my card I chose to be inspired by the black and white numbered jars, the metal basket and the flowers. I've made a Classic and Elegant style 30th Wedding Anniversary card using a simple combo of black, white and silver - I used shiny silver mirri CS and shiny silver ribbon for a touch of glamour. A pearl anniversary is celebrated at 30 years so I've included pearl CS and pearls in my design.
Here's the inside and the envelope. I stamped the decorative heart onto white CS using Smoky Slate ink and I stamped the sentiment over the top in black ink. I layered onto a black mat and added 2 silver punched hearts. For the envelope flap I used a circle Nestie die to cut out a portion of the Lovey Dovey Silhouette image and matted onto a larger black circle.
Very sadly, this will be my last post for House of Cards as I'm now stepping down. I've enjoyed the HOC experience so much and I'm so happy to have been a part of it! If you'd like to design for HOC now's the time to apply as there is a DT call going along with the Blog Hop!
Now get to hoppin'! Your next stop is CORNELIA! Wow, what a stunning and stylish CAS creation she has shared! If you get lost along the way, you can always head back to the original blog hop post--and don't forget to link up a project at the House of Cards blog after completing the hop for an extra chance to win a mystery prize from one of our fabulous sponsors, too!
Here's our photo inspiration~
Here are our fabulous sponsors~
For my card I chose to be inspired by the black and white numbered jars, the metal basket and the flowers. I've made a Classic and Elegant style 30th Wedding Anniversary card using a simple combo of black, white and silver - I used shiny silver mirri CS and shiny silver ribbon for a touch of glamour. A pearl anniversary is celebrated at 30 years so I've included pearl CS and pearls in my design.
The card base is 5 3/4" square and was made from Centura Pearl white with a hint of silver CS. I printed the beautiful Stitchy Bear 'Lovey Dovey Silhouette' digi image onto white CS, adhered 3 strips of narrow silver ribbon to the top of the panel and layered onto black and white pearl CS mats. I punched the corners of the white pearl CS mat layer so that I could add pearls onto the black mat. I stamped, punched and popped up the numbers. I stamped and die cut the sentiment and popped that up also. I die cut some white flowers and edged the petals with Scattered Straw Distress Ink. I shaped the flower layers, glued the flower to the card and added a pearl to the centre. I added 2 small punched silver hearts and sprinkled more pearls on the panel to complete the card front.
Very sadly, this will be my last post for House of Cards as I'm now stepping down. I've enjoyed the HOC experience so much and I'm so happy to have been a part of it! If you'd like to design for HOC now's the time to apply as there is a DT call going along with the Blog Hop!
Now get to hoppin'! Your next stop is CORNELIA! Wow, what a stunning and stylish CAS creation she has shared! If you get lost along the way, you can always head back to the original blog hop post--and don't forget to link up a project at the House of Cards blog after completing the hop for an extra chance to win a mystery prize from one of our fabulous sponsors, too!
Subscribe to:
Posts (Atom)