Tuesday, 18 November 2014

Flourish & Flowers Thank You Card

Right now, Christmas cards are my favourite style of card to make, I am having a lot of fun creating them!  I needed a thank you card though so I took a break from Christmas and returned to another favourite theme - flourishes and flowers.

I stamped the label and the flourish in Pistachio Pudding ink and I stamped the sentiment on the label in Mossy Meadow ink.  Using a Stamp-A-Ma-Jig I stamped the flourish again in Mossy Meadow ink, slightly offsetting the image so that it created a shadow effect.  I stamped the flowers using Blackberry Bliss ink - for the three smaller flowers I stamped three times without re-inking to get the different shades.  After shaping the flowers I glued them on the card and added rhinestone jewel centres.  The font of the 'Thank You' is gorgeous, I love how it echoes the swirls from the flourish.  I also love how the distressed look of the flowers echoes the distressed look of the label - little details maybe, but those little details can really tie a design together!


Here's the inside and the envelope.


Supplies:
Stamps: SU! 'Everything Eleanor', 'Flower Shop', 'Petite Petals' & 'Four You' sets
CS: SU! Very Vanilla
Ink: SU! Pistachio Pudding, Mossy Meadow & Blackberry Bliss
Tools: SU! 'Pansy' & 'Petite Petals' punches, Stamp-a-Ma-Jig
Embellishments & accessories: SU! rhinestone jewels 


 photo RoseRuth.gif


Thursday, 13 November 2014

Most Wonderful Time Of The Year Christmas Card - HOC Sketch 6 Challenge

I checked out the current House of Cards challenge recently and saw they had a wonderful sketch.   A couple of days ago I made a card where I cut out an oval aperture and the leftover patterned paper oval was still sitting on my desk so the oval shape in the layout was perfect for me!


The bright and cheery patterned paper comes from a Kaisercraft pad and some die cut shapes are also included in the paper pad.  I glued a strip of Lost Lagoon CS to the front of a 5 1/4" square white card base and added a die cut strip from the paper pad.  I matted the paper oval onto a larger oval of Riding Hood Red CS, glued that to the card and popped up the die cut sentiment label.  The paper is so pretty that I didn't want to cover it up too much.  I die cut the bells three times using silver mirri, black and Riding Hood Red CS, assembled the pieces to create the bells and covered the red ribbon with Glossy Accents.  I popped up the bells, added a gem to the centre of the ribbon bow and placed some red gems on the sentiment label to complete the card front.   


I just had to use more of that pretty paper to decorate the inside and the envelope flap!  I always have fun working with a sketch that has been designed by Mynn, they're always fab and it was high time I played along at HOC again! 


Supplies:
Stamps: Penny Black 'Joy Hope'
CS: PaperMania white square card blank, SU! Lost Lagoon, Riding Hood Red & Basic Black, silver mirri CS

Patterned paper:  Kaisercraft 'Mistletoe' 6 1/2" x 6 1/2" paper pad
Ink: SU! Lost Lagoon
Tools: Petite Oval Nestabilities dies, CottageCutz Petites 'Bells' die, circle punches, star punch
Embellishments & accessories: Ranger Glossy Accents, PaperMania gems, SU! Dimensionals


 photo RoseRuth.gif

Tuesday, 11 November 2014

Dangly Wooden Ornament Tent Card - Merry Monday #134

This week's challenge at Merry Monday is to create a card with ornaments in silver/grey and blue - what a fab challenge and such a pretty photo!  My new favourite thing at the moment is wooden shapes.  A while ago I bought a pack of PaperMania Create Christmas 'Words' wood shapes - there are ten shapes in the pack and one is an ornament.  All the shapes in the pack have holes - to me that means they're crying out to be dangled in an apertured tent card - so that's what I made!


First I coloured the wooden ornament using a blue Sharpie pen and Brushed Pewter Distress Paint for the hanger part of the shape and I set that aside to dry.  I glued the patterned paper panel to the front of a 5 1/4" square cream card base, cut out the circle aperture and cut a Very Vanilla CS circle frame to go around the aperture.  I glued a panel of polka dot embossed Very Vanilla CS inside the card so it shows through the aperture.  I stamped the sentiment and heat embossed it with silver embossing powder, die cut the label shape and attached the label to the card using silver brads.  I punched a 1 3/4" circle of Silver Glimmer Paper, glued that to the back of the ornament and added rhinestone gems to the centre of the ornament.  I punched a hole above the aperture, suspended the ornament using silver cord and I covered the hole with a silver snowflake shaped brad.  I added three Very Vanilla punched snowflakes and placed a rhinestone gem in the centre of each one.


Here's a close up view of the dangly ornament.


I love suspending elements so that they dangle freely within an aperture cut into a tent card - what I don't love is that tent cards have a tendency to collapse while on display.  To ensure my tent cards stay up I always add a connecting piece of CS cut and scored into a W shape.  This photo shows the card at a different angle so you can see the W shaped CS connecting piece.


I always write my message on the back when I've made a dangly tent card.  Here's the back of the card with a silver heat embossed sentiment and a strip of patterned paper.  I added a line drawn with a metallic silver Sharpie pen above the paper strip.  I covered the flap of the envelope with patterned paper to complete the card.


Supplies:
Stamps: SU! 'Joyful Christmas' set, Hero Arts 'Holiday Cheer' clear set
CS: PaperMania square cream card blank, SU! Very Vanilla & Silver Glimmer Paper

Patterned paper: Bo Bunny Snow Day 'Flurries'
Ink: Encore Metallic Silver pigment ink, blue Sharpie pen, metallic silver Sharpie pen

Tools: Circle Nestabilities dies, Spellbinder's 'Grommet Tags' die, Cuttlebug 5" x 7" 'Polka Dots' embossing folder, snowflake punches, circle punches, heat tool, paper piercer
Embellishments & accessories: PaperMania Create Christmas Wooden Shapes 'Words' pack, Brushed Pewter Distress Paint, silver embossing powder, rhinestone gems, silver brads, snowflake shaped brad, silver cord


 photo RoseRuth.gif

Saturday, 8 November 2014

Wooden Robin Redbreast Merry Christmas Card

Quite a few wooden shapes have found their way into my stash lately, a trip to the Glitter Pot usually results in yet another shape landing in the basket and I thought it was high time I actually started to use them!

I chose the lovely robin shape first and decided to paint it with metallic gold and red paints.  I painted the back first to see how I liked it - and actually I didn't like it.  So, I flipped the robin over and this time I covered the shape with Walnut Stain Distress Paint - much better!  I find the jumbo daubers brilliant for applying paint to the shapes.  I gave the shape a couple of coats of paint and then added Xmas Red Stickles to make a true robin redbreast.  I traced the shape onto a piece of Early Espresso CS, cut it out and glued it behind the wooden shape.  I added a black gem eye, red gems for holly berries and I covered the hanging hole with a red gingham bow.

I stamped the sentiment onto a panel of white linen effect CS, dry embossed it with a snowflake folder, layered it onto an Early Espresso mat and glued that to the front of a Real Red A6 card base.  I glued the robin to the snowflake panel and added punched snowflakes with red gem centres to complete the card front.


For the inside and the envelope front I embossed strips of the linen effect CS, glued them in place and added a CS strip alongside.  After stamping the sentiment I added three punched snowflakes with red gem centres. 


Supplies:
Stamps: SU! 'Seasonal Wishes' set, Hero Arts 'Very Merry Christmas' clear set
CS: SU! Real Red & Early Espresso, Woodware white linen effect CS
Ink: SU! Real Red
Tools: Darice 'Snowflake Swirl' embossing folder, jumbo sponge dauber, X Cut snowflake punch
Embellishments & accessories: PaperMania Create Christmas Robin Wood Shape, Ranger Tim Holtz Walnut Stain Distress Paint, Xmas Red Stickles, red gingham ribbon, PaperMania black gem & red gems


 photo RoseRuth.gif


Friday, 7 November 2014

Rustic Season's Greetings Card - Merry Monday #133

This week Merry Monday are asking for a rustic looking Christmas card using creams, tans and browns.  I've used those colours to make vintage looking cards - but not rustic as that really isn't my style.  However, it's good to step out from your comfort zone now and then and try something different!


A soon as I saw the word 'rustic' I knew the time had come to finally break out the stack of burlap paper that I've had in my stash for a few months.  I cut the burlap paper to 5 1/4" square, added the Deer Trio die cut shape plus two strips of brown gingham ribbon and adhered the panel to the front of a 5 3/4" cream card base.  I simply added die cut ivy and bells plus the sentiment label - the ivy and bells are popped up.  I didn't add any bling as I thought that might not be appropriate for a rustic look and feel - burlap and bling isn't a natural pairing LOL!


Here's the inside and the envelope.  Well, I had fun trying something different and this card will be ideal for a man and I'm glad to have at least one of those in my Christmas card stash!

Supplies:
Stamps: SU! 'Four the Holidays' set, Stampendous 'Merry Wishes'

CS: SU! Early Espresso, Very Vanilla & Brushed Gold, DCWV Burlap Paper Stack
Ink: SU! Early Espresso & Soft Suede
Tools: Memory Box 'Deer Trio' die, 'Ivy Corner' Joanna Sheen Signature die, CottageCutz Petites 'Bells' die, Spellbinder's 'Labels Trio' die

Embellishments & accessories: brown gingham ribbon, Dimensionals

 photo RoseRuth.gif

Thursday, 6 November 2014

November 2014 Card Group Projects

We got together this afternoon for our monthly card group meeting - I can't believe we're in November and only have one more meeting left for 2014!  I designed three Christmas cards for the ladies to make.

Card one features dry and heat embossing and a favourite Christmas theme of mine - snowflakes.  I recently got the very pretty Darice 'Snowflake Swirl' embossing folder and couldn't wait to use it on a card.  I used the folder to emboss a panel of white linen effect CS, inked the edges of the panel with Island Indigo ink and glued it to the front of a Pool Party A6 card base.  The snowflake was stamped in VersaMark ink, heat embossed using Aqua Tinsel embossing powder so it's beautifully sparkly and then die cut.  I added a circle dazzler to the centre and popped the snowflake up.  I stamped and die cut the sentiment label, edged it with Island Indigo ink and popped the label up.  I completed the card front with die cut photo corners and punched snowflakes with rhinestone centres.   


Here's the inside and envelope flap.


Card two also features dry embossing and snowflakes.  I stamped a background of snowflakes on a 5" square of Smoky Slate CS using Smoky Slate ink and glued the square to the front of a 5 1/4" square white card base.  I stamped and fussy cut the dove and popped it up on top of the swirl embossed white panel - I think the embossed swirls complement the swirls in the dove image really well.  I stamped and die cut the sentiment label and popped it up.  I added silver nailheads to the white panel and placed a rhinestone on the dove to finish the front.


Here's the inside and envelope flap.


The final card features an inked winter scene - I've been really enjoying creating inky scene cards recently!  I cut a rectangle of Whisper White CS and applied Tumbled Glass Distress Ink using an ink duster brush.  I used a 1 1/2" circle as a moon mask, dusted on more Tumbled Glass ink and followed that with Faded Jeans and Dusty Concord Distress Inks.  I peeled off the moon mask, added a bit more colour to the moon, stamped the row of trees in Memento Gray Flannel ink, stamped the fir tree and Santa's sleigh in black ink and edged the panel with SU! Elegant Eggplant ink.  I recently came across a tip to use watered down white acrylic paint as snow splatters so I decided to try that.  I dipped a paintbrush in the bottle of watered down paint and repeatedly tapped the brush to add the snowy dots.  I love how the paint gives a solid white colour and also adds a subtle texture.   Once the snow was dry I layered the scene panel onto a white mat, stamped the sentiment and glued the layer to the front of an Elegant Eggplant A6 card base.  To finish off I added two punched blue stars next to the sentiment.


Here's the inside and the envelope flap.


We always exchange Secret Santa gifts at the December meeting and I make a tag for each person and take them along to the November meeting.  I put all the tags in a container and we each pick a tag and attach that to the gift we buy for the person named on the tag.  I made things a bit easier for myself this year by purchasing a pack of ready made white circle tags.  The twine wasn't threaded through the holes though and I did that step first.  I then stamped the deer in Early Espresso ink onto Crumb Cake CS, fussy cut them and popped a deer up onto each tag.  I then added a sparkly red dot nose to each deer.  I stamped the sentiments, punched them out, glued the circles to the back of the tags and wrote a name on each tag with a red Sharpie pen.  Here are the ten tags all ready to go.


Supplies for snowflake card:
Stamps: SU! 'Festive Flurry' & 'Four the Holidays' sets, Penny Black 'Beautiful Season'
CS: SU! Pool Party, Island Indigo & Whisper White, Woodware white linen effect CS
Ink: SU! Pool Party & Island Indigo, VersaMark
Tools: SU! 'Festive Flurry' Framelits die, Darice 'Snowflake Swirl' embossing folder, Spellbinder's 'Labels Trio' die, MFT 'Photo Corners' Die-namics die, X Cut snowflake punch, heat tool, sponge dauber
Embellishments & accessories: Stampendous 'Aqua Tinsel' embossing powder, Creative Expressions Small Circle Dazzler,  SU! rhinestone jewels, Dimensionals, 3D foam tape


Supplies for dove card:
Stamps: Woodware 'Nordic Dove & Branch', 'Snowflakes & Sparkles' & 'Wishing You' clear stamps, SU! 'Four the Holidays' set,
CS: PaperMania white square card blank, SU! Smoky Slate & Whisper White
Ink: SU! Smoky Slate
Tools: Cuttlebug 'D'vine Swirl' embossing folder, Hero Arts 'Small Tag Frame' Frame Cuts die
Embellishments & accessories: silver nailheads, SU! rhinestone jewels, Dimensionals, 3D foam tape


Supplies for Christmas scene card:
Stamps: SU! 'Lovely as a Tree' & 'Season of Joy' sets, Inkylicious 'Santa's Sleigh', Hero Arts 'Joyful Christmas Season' cling set
CS: SU! Elegant Eggplant & Whisper White, Core'dinations Tranquil Blue
Ink: Memento Gray Flannel & Tuxedo Black, Ranger Tim Holtz Tumbled Glass, Faded Jeans & Dusty Concord Distress Inks, SU! Elegant Eggplant
Tools: Woodware 1 1/2" circle & small star punches, Inkylicious ink duster brushes, Stamp-a-ma-jig, sponge dauber
Embellishments & accessories: watered down Artiste white acrylic paint & paintbrush


Supplies for gift tags:
Stamps: Woodware 'Nordic Reindeer' clear stamp, Penny Black 'A Merry Christmas'
CS: PaperMania Bare Basics Tags & Twine - white circles, SU! Crumb Cake
Ink: SU! Early Espresso, red Sharpie marker
Tools: SU! 2 1/2" circle punch
Embellishments & accessories: PaperMania red shimmer dome stickers, 3D foam tape


 photo RoseRuth.gif


Tuesday, 4 November 2014

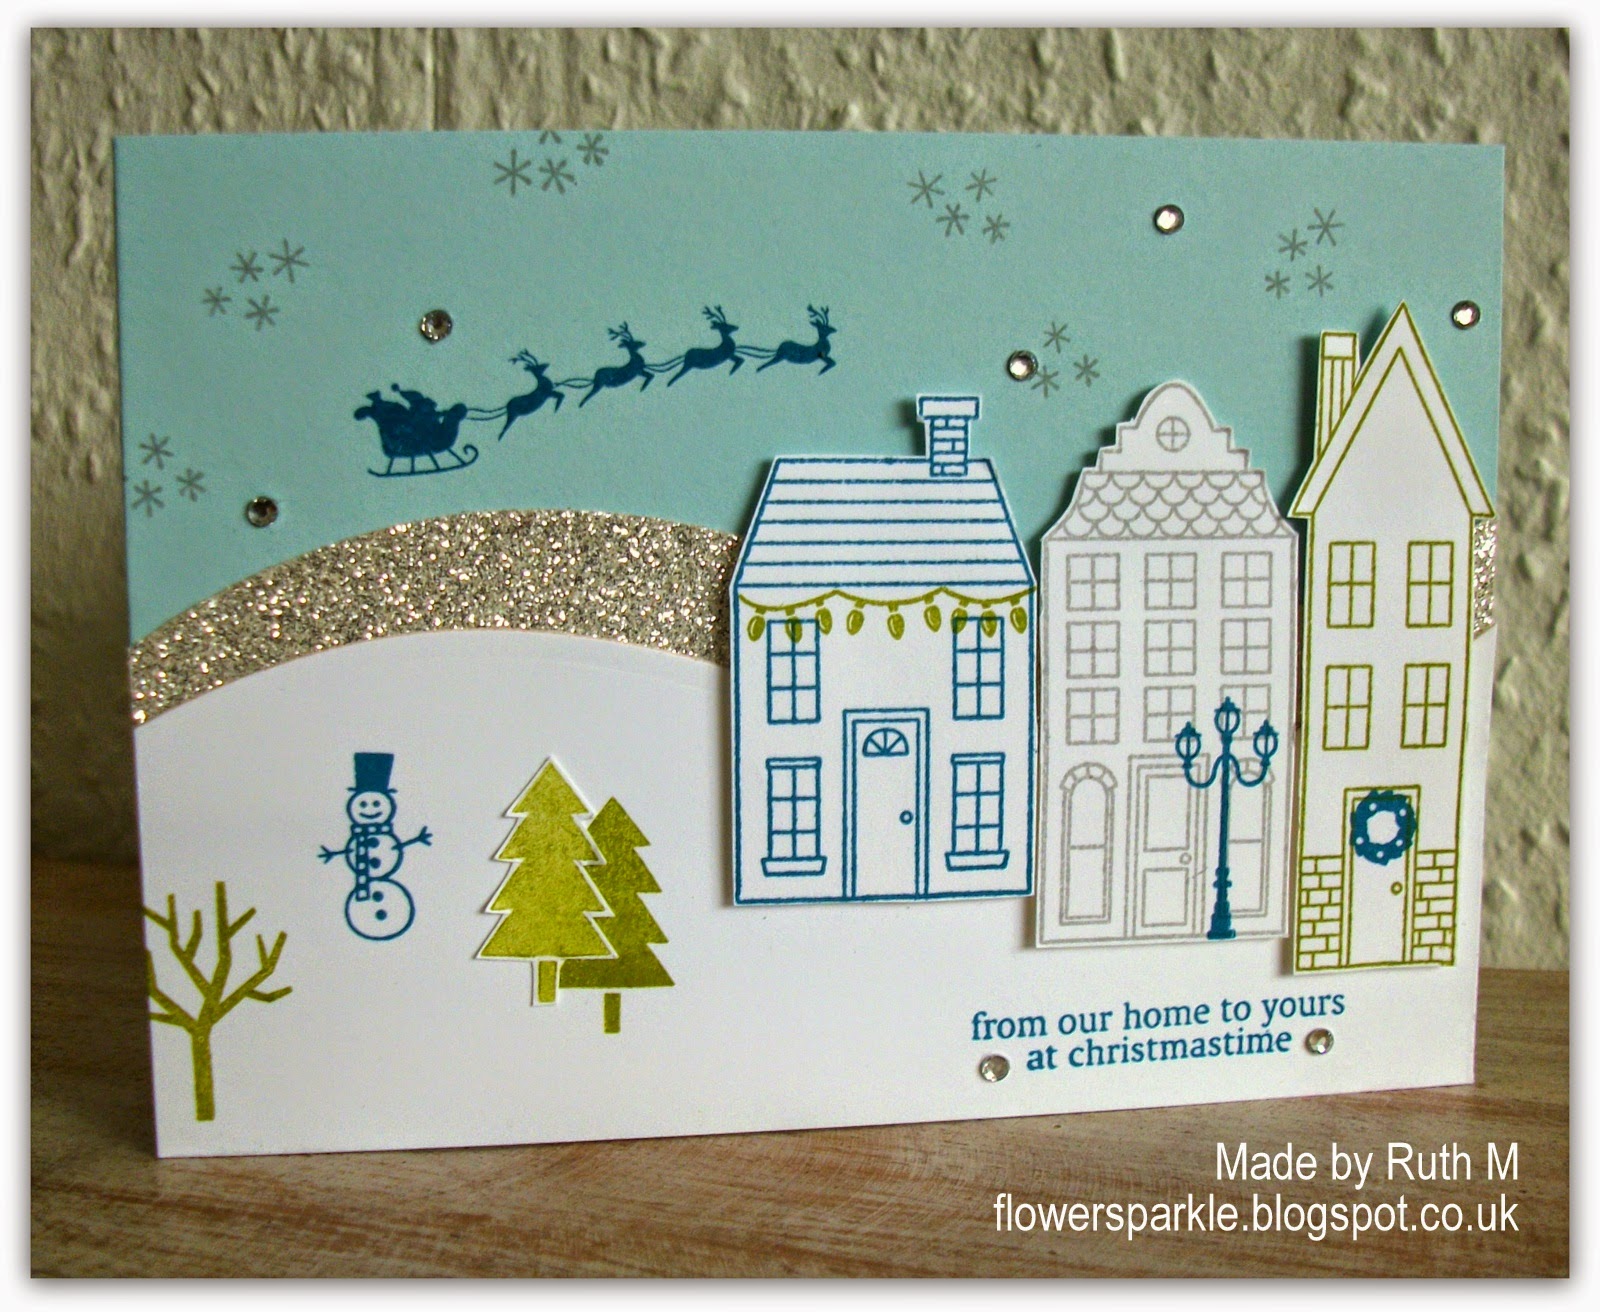
Houses Christmas Scene Card

I love the Christmas card on page 16 of the UK SU! Autumn/Winter catalogue and was keen to make my own version - of course, I HAD to include the snowman in my scene!  I made a Soft Sky A6 card base with the fold at the side and used curved border dies to make the white and sparkly silver snow banks.  I haven't purchased the set of dies as I reckoned the houses would be easy enough to cut with scissors and I do like a bit of fussy cutting!  The houses are popped up and I sprinkled on a few rhinestones to complete the card front.


Here's the inside and the envelope flap.  This was a really fun card to put together!


Supplies:
Stamps: SU! 'Holiday Home' set, Hero Arts 'Very Merry Christmas' clear set
CS: SU! Soft Sky, Island Indigo & Whisper White, Silver Glimmer Paper
Ink: SU! Island Indigo, Old Olive & Smoky Slate
Tools: Spellbinders 'Card Creator Borderabilities A2 Curved Border One' die set, circle punches
Embellishments & accessories: SU! rhinestone jewels, Dimensionals


 photo RoseRuth.gif


01 09 10