Saturday, 16 July 2016

Balloon & Clouds Birthday Card

New SU! goodies were awaiting me when I arrived home from work a few days ago and as it was the afternoon I had some time to head straight to my craft room and get inky!  I decided to make a quick and simple card using the 'Celebrate Today' stamp set and matching Framelits dies.  

The Pool Party card measures 5 1/4" square.  I lightly sponged the white square with Pool Party ink, edged it with Island Indigo ink and stamped the hot air balloon basket and the sentiment.  I then stamped and die cut the balloon, snipped off the knot at the bottom so that it looks like a hot air balloon rather than a party balloon and inked the edges with Island Indigo ink.  I used the SU! 'Sprinkles of Life' stamp set and matching 'Tree Builder' punch to create some clouds - perfect to go with a hot air balloon, I love it when different items work so well together!  I sponged the clouds with Pool Party ink, edged each one with Island Indigo ink, glued two shapes in place and popped up the third cloud.  I popped up the balloon and added silver Candi Dot embellishments to finish the front.


Here's the inside and the envelope.  I used the bunting stamp from the 'Celebrate Today' set to decorate the inside and the envelope flap.  D'oh - forgot to ink the edges of the white panel!


Supplies:
Stamps: SU! 'Celebrate Today' & 'Sprinkles of Life' sets, Clearly Besotted 'Happy Birthday' set
CS: SU! Pool Party, Island Indigo & Whisper White
Ink: SU! Pool Party & Island Indigo
Tools: SU! 'Balloon' Framelits dies, SU! 'Tree Builder' punch
Embellishments & accessories: Craftwork Cards Regal Silver Candi Dots, SU! Dimensionals


 photo RoseRuth.gif


Friday, 15 July 2016

Magnolia Bloom Happy Birthday Card

After making THESE CARDS I said I'd have a go at fussy cutting the leafy stem from the Clearly Besotted Magnolia Blooms stamp set.  Well, I did it - hmmm, quite fiddly but not TOO bad!

My vibrant colour combo is Emerald Envy and Melon Mambo.  The card measures 5 1/4" square and I used a stitched square die to cut my white layer.  I stamped and cut the flower twice so I could fussy cut the smaller part of the flower and pop it up over the larger fussy cut flower.  Once I'd done that I popped up the whole flower.  To finish the card front I sprinkled on a few rhinestone jewels.


Here's the inside and the envelope with simple stamping.  I do love that leafy vine image!


Supplies:
Stamps: Clearly Besotted 'Magnolia Blooms' set, Hero Arts 'Yummy Treats' set
CS: SU! Emerald Envy & Whisper White
Ink: SU! Emerald Envy & Melon Mambo
Tools: Memory Box 'Stitched Square Layers' die set
Embellishments & accessories: SU! rhinestone jewels, Dimensionals


 photo RoseRuth.gif

Wednesday, 13 July 2016

Coral & Navy Roses Birthday Card

While the Euro football tournament was on I spent a lot of time in my craft room, some of the time was spent using my two step stamping sets. This is the last of those cards featuring a firm favourite - the absolutely gorgeous SU! 'Stippled Blossoms' set.

Inspiration can be found everywhere!  I work in a busy shop which means I see a lot of people during a shift.  I'm sometimes struck by the pretty clothes the ladies wear and think how I could incorporate the designs and/or colour combos into my card designs.  Just recently a lady was wearing a beautiful, floral, summer dress in shades of coral and navy - very eyecatching - and I resolved to make a floral card using those colours.  The patterned paper is from the SU! 'Floral Boutique' DSP pack and I added a Calypso Coral Grosgrain Ribbon die cut strip above the paper.  I stamped the solid flowers in Peekaboo Peach ink (stamped off once) and the outline flowers in full strength Calypso Coral ink.  For the solid leaves I used Dapper Denim ink (stamped off three times) and full strength Night of Navy ink for the outline leaves.  I stamped the sentiment and then fussy cut the flowers and leaves.  I arranged the images, popping up the large rose and one of the smaller roses.


Here's the inside and the envelope.  I'm not generally a fan of orange but I can make an exception with Calypso Coral and I love how it looks with Night of Navy!


The Euro football tournament is over but I'm planning to schedule dedicated crafting time so I get a regular fix of inky therapy!  I'd like to start making some Christmas cards - it's never too early to be prepared with those!

Supplies:
Stamps: SU! 'Stippled Blossoms' & 'Butterfly Basics' sets
CS: SU! Calypso Coral, Night of Navy & Whisper White

Patterned paper: SU! 'Floral Boutique' DSP pack
Ink: SU! Peekaboo Peach, Calypso Coral, Dapper Denim & Night of Navy
Tools: Memory Box 'Grosgrain Ribbons' die set, Stamp-A-Ma-Jig
Embellishments & accessories: SU! Dimensionals


 photo RoseRuth.gif

Saturday, 9 July 2016

Three Ferns Easel Birthday Card

Today is my hubby Owen's birthday and this is the card I made for him.  I saw a lovely card a long, long time ago using the Hero Arts 'Three Ferns' stamp - one of my all time favourite stamps - and saved it to Pinterest as a card to CASE.  It's taken a while but finally here's my version of THIS CARD made by Tina.

I inked the stamp with Peeled Paint Distress Ink, spritzed it with water and stamped onto a piece of watercolour paper.  I inked the stamp again with Peeled Paint ink and added Gathered Twigs and Fired Brick inks to the stamp with sponge daubers.  I then spritzed the stamp with Perfect Pearls Pearl mist, stamped the image on a separate piece of watercolour paper and die cut the larger squares.

Firstly, I did try one small Nestie square die to cut out several squares but after I'd stamped on the squares I was struggling to position them evenly over the top of the image underneath.  So I used a grid die that cuts several larger squares at once.  It was much easier to line up after stamping first and then die cutting the squares!  I do think Tina's original design with the arrangement of the smaller squares looks nicer - but I was happy to cheat and go with the quicker, easier and less frustrating option!

Once I'd got my ferns panel sorted I decided to mount it on an easel card - using Early Espresso, Old Olive and Cajun Craze as my CS colours.  I went rootling in my stash for some suitable patterned paper and chose the green and white diagonal stripe design which is from a pack of SU! Christmas paper.  I popped up three fern squares plus the sentiment banner and I added a few silver nailheads to complete the card front.


Here's another view of the ferns panel so you can see the pearly shimmer.


Here's the bottom of the card.  I stamped the partial ferns image onto the Whisper White panel using the same colour Distress Inks and added just a light spritzing of the Perfect Pearls mist.  I stamped the sentiment which is from the same Hero Arts set as the sentiment I used on the card front so that ties together very nicely!  


A fourth fern square was left over as I only popped up three squares on the card front so I used that to decorate the front of the envelope.  Very gratifyingly Owen absolutely loved the card!


Supplies:
Stamps: Hero Arts 'Three Ferns', Hero Arts 'Messages With Flourish' set
CS: SU! Early Espresso, Old Olive, Cajun Craze, Whisper White, watercolour paper

Patterned paper: SU! 'Season of Cheer' DSP
Ink: SU! Cajun Craze, Ranger Tim Holtz Peeled Paint, Gathered Twigs & Fired Brick Distress Inks
Tools: Sizzix 'Grid Works 1 7/8" Squares' Thinlits die, MFT 'Fishtail Flag Stax' die set
Embellishments & accessories: Perfect Pearls 'Perfect Pearl' mist, silver metallic nailheads, SU! Dimensionals


 photo RoseRuth.gif


Thursday, 7 July 2016

July 2016 Card Group Projects

This afternoon we got together for our July card group meeting. It seems impossible that we're over halfway through 2016!

The gorgeous SU! 'Detailed Floral' Thinlits dies have been out on my desk since the day they were delivered and it was inevitable that I'd feature the die set on a card group card!  I came across this photo of a lovely card on Pinterest but there was no name on the photo and no link to a blog post.


If I've been inspired and want to CASE a card I always like to give credit to the original designer if I can.  Google has the fab option of searching for an image using an image and I quickly discovered this YouTube video made by Wendy from Perfectly Gorgeous Papercraft who designed and created the card.  Huge thanks to Wendy for the inspiration!

I love the layout and that the plain Soft Suede background really shows off the fancy floral die cut. For my version I opted for an Old Olive, black and white combo and I decided to pair the beautiful SU! 'Birthday Blooms' stamp set with the 'Detailed Floral' Thinlits dies.  After cutting the fancy floral panel I stamped across the top of the panel and used the largest die from the Memory Box 'Grosgrain Ribbons' die set to make my Old Olive 'ribbon' border.  I glued the strip to the panel, cut off the excess with the flagged end and glued that piece to the left side, adding a punched shaped flower and a rhinestone jewel.  I stamped off the floral image once, stamped it onto a scrap of Whisper White CS, stamped the 'for you' over the top in black ink, cut it out  with a 1 1/2" circle punch and layered it onto a larger black punched circle.  I glued the whole panel to the front of the Old Olive A6 sized card base and popped up the circle sentiment element.


Here's the inside of the card and the envelope.


Last time at card group someone asked if  I could make a card using the SU! owl punch.  I'm afraid to say it's been very neglected so I was happy to use my owl punch again!  I chose Crumb Cake, Pool Party, Soft Suede and white as my colour combo and opted to make a fun birthday card with die cut bunting and a present to go along with the owl.  I  made the present with a punched Crumb Cake square, added a hand cut Soft Suede rectangle for the present box lid and wrapped the pressie in white baker's twine.  I embossed the Pool Party panel with the SU! Woodgrain embossing folder and lightly brayered Soft Suede ink over the embossing.  I edged pretty much everything with Soft Suede ink applied with a sponge dauber and attached the bunting to the panel before gluing the panel to the front of the white A6 card base.  I popped up the bunting flags, the sentiment label, the pressie and the owl.  I made the bunting a touch festive by adding punched stars.   


Here's the inside and the envelope - with more bunting and some balloons!


Recently I made this gap card and I really enjoyed making it!  I decided to feature a gap card at this month's card group - but without the two step stamping - I know my ladies LOL!  I chose to use the very pretty SU! 'Birthday Blossoms' set and went with a colour combo of Mint Macaron, Sweet Sugarplum, Rich Razzleberry and Very Vanilla.  I made an A6 sized card base, cut a 2" gap (setting the piece of CS to one side for later) and added the Bo Bunny 'Raspberry' dotty patterned paper pieces.  I stamped the leaves a few times on a panel of vanilla CS and matted the panel on a Rich Razzleberry layer.  I glued a vanilla panel inside the card and stamped the sentiment.  I bridged the gap by gluing the image panel to the top and bottom pieces of the card.  I stamped the flower three times onto Sweet Sugarplum CS in Rich Razzleberry ink without re-inking between stamping.  I stamped leaves onto the Mint Macaron piece of CS that I'd set aside after cutting the gap, fussy cut them and glued them in place.  I punched the three flowers, snipped between each petal, shaped each flower and popped them up. 
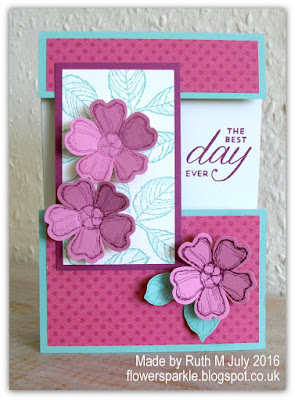

Here's the inside of the gap card and the envelope.  I stamped the flower cluster on the bottom of the Very Vanilla panel in stamped off once Mint Macaron ink before stamping the sentiments.  Cards with folds at the top tend to slide down when they're on display - which drives me mad!  Gap cards don't seem to suffer too badly from this but I did discover that this particular card did slide downwards.  To help with the weight distribution I glued a panel of Rich Razzleberry CS to the back of the card - perfect, no more sliding down!   


Supplies for Detailed Floral 'for you' card:
Stamps: SU! 'Birthday Blooms' set
CS: SU! Old Olive, Basic Black & Whisper White
Ink: SU! Old Olive, Memento Tuxedo Black
Tools: SU! 'Detailed Floral' Thinlits die set, Memory Box 'Grosgrain Ribbons' die set, circle punches, Woodware flower punch
Embellishments & accessories: SU! rhinestone jewel, Dimensionals 


Supplies for owl 'Happy Birthday' card:
Stamps: SU! 'Wacky Wishes' & 'Happiest Birthday Wishes' sets
CS: PaperMania white A6 card blank, SU! Pool Party, Crumb Cake, Soft Suede & Whisper White
Ink: SU! Soft Suede
Tools: SU! Owl punch, Woodgrain embossing folder, 'Apothecary Accents' Framelits die set, Sizzix 'Sweet Day' Framelits die set, Woodware square punch, balloon punch & star punch, brayer, sponge dauber
Embellishments & accessories: SU! white baker's twine, Dimensionals


Supplies for 'The Best Day Ever' gap card:
Stamps: SU! 'Birthday Blossoms' set
CS: SU! Mint Macaron, Sweet Sugarplum, Rich Razzleberry & Very Vanilla 

Patterned paper: Bo Bunny 'Raspberry' Double Dot
Ink: SU! Mint Macaron & Rich Razzleberry
Tools: SU! 'Pansy' punch
Embellishments & accessories: SU! Dimensionals


 photo RoseRuth.gif

Tuesday, 5 July 2016

Pink Ombre Watercolour Detailed Floral Note Card

Whilst browsing on Pinterest I came across this lovely card made by Sarah-Jane Rae using the exquisite SU! 'Detailed Floral' Thinlits dies.  Sarah-Jane has a fab video tutorial on her blog post and after watching it I knew I'd have to CASE her card and make my own version!

I placed drops of  Pink Pirouette, Blushing Bride, Melon Mambo, Primrose Petals and Rose Red inks onto a ceramic tile and I used a clean water brush to dampen a panel of watercolour paper.  I used the water brush to pick up the colours from the tile and apply a wash to the watercolour paper and when I'd finished I used my heat tool to dry the panel.  After die cutting the white fancy floral panel I glued it to the watercolour piece.  After attaching strips of Melon Mambo and Whisper White ribbons  I attached a flower shaped shell button  with silver elastic cord.  I then adhered the whole panel to the front of a Melon Mambo A6 sized card base, choosing to cover the whole of the front of the card and not to leave any border.  To complete the front of the card I sprinkled on a few rhinestone jewels.


Here's the inside of the card and the front of the envelope.  I used the edger die from the set on the piece that went inside the card but didn't use the edger die for the strip I adhered to the envelope.  The floral die is not large enough to cut a strip that will cover the whole height of the envelope so I cut the design twice.  After cutting the first time I lined up the die next to the cut design leaving a teeny tiny gap and I cut again.  That worked really well to get a continuous border, there were only a couple of hair like pieces of CS that I needed to snip out.


At the moment this is remaining a blank note card but I have the option of adding a sentiment inside when I come to use the card later on.  I have used the 'Detailed Floral' Thinlits die set to make another card (again influenced by a card I saw on Pinterest) which I'll be sharing later in the week.  It may then be time to give the die set a rest for a bit!  

Supplies:
Stamps: none
CS: SU! Melon Mambo, Whisper White, watercolour paper
Ink: SU! Pink Pirouette, Blushing Bride, Melon Mambo, Primrose Petals & Rose Red
Tools: SU! 'Detailed Floral' Thinlits die set, water brush
Embellishments & accessories: SU! Melon Mambo stitched satin ribbon, SU! Whisper White stitched grosgrain ribbon, SU! rhinestone jewels, silver elastic cord, flower shaped shell button, ceramic tile


 photo RoseRuth.gif

Saturday, 2 July 2016

Flamingo Floral Thanks Card

My SU! 'Detailed Floral' Thinlits dies arrived a few days ago and I just had to make a card using them!  When I borrowed the dies from Lesley I used Night of Navy CS, heavily influenced by the 'Floral Boutique Suite' pages (76 -77) in the SU! catalogue.  This time I opted for the pretty Flirty Flamingo new In Colour.  I used all three dies in the set to cut my floral panel, leaving just a small gap between the small and large floral dies and I popped the panel up.  I stamped the border stamp from the 'Floral Phrases' set onto a strip of white CS using stamped off twice Flirty Flamingo ink, stamped the sentiment over the top in Early Espresso ink, trimmed the strip to size and popped it up.


I stamped two floral spray images, fussy cut them and glued them inside the card.  I stamped the border die twice to decorate the envelope.


On Thursday it will be our July card group get together so I've got to stay focused on that and not get distracted!  I've made two cards, packaged the kits for one card and I'm part way through kitting up the second card.  I've just got home after doing some shopping and it's started throwing it down with rain - the perfect time to get in my craft room then!

Supplies:
Stamps: SU! 'Floral Phrases' set
CS: PaperMania white A6 card blank, SU! Flirty Flamingo & Whisper White
Ink: SU! Flirty Flamingo & Early Espresso
Tools: SU! 'Detailed Floral' Thinlits die set
Embellishments & accessories: small 3D foam pads, SU! Dimensionals


 photo RoseRuth.gif

01 09 10