Thursday, 28 February 2013

Just Because Card & Mini Pizza Box For SU! Workshop

I held an SU! workshop this afternoon for my card group ladies and a very happy afternoon it was too!  I designed a roses Just Because card for a Make & Take and then I demoed the Quint-Essential Flower mini pizza box.

The new Pool Party and Primrose Petals Core'dinations CS is wonderful, I love it and I love those two colours together!  The A6 size card was made with Primrose Petals CS and the mat layer is Pool Party Core'dinations CS that has been embossed with the Vine Street embossing folder and sanded.  I then embossed Primrose Petals Core'dinations CS with the Manhattan Flower folder, sanded and cut out the two roses.  I glued the top rose flat but popped up the lower rose.  I stamped the sentiment on Whisper White CS using Early Espresso ink, cut it out with the Extra Large Oval punch, sponged the edges with Espresso ink and popped the oval up.  I cut out a tiny butterfly using the Beautiful Wings Embosslits die and the Primrose Petals Core'dinations CS, sanded the butterfly, glued it to the oval and added a jewel.


I used the Madison Avenue stamp set for the inside and the envelope flap - it's great that the leafy stem stamp matches the Vine Street embossing folder!


I showed the ladies how to make a mini pizza box using the Simply Scored tool, the Quint-Essential Flower stamp and various circle punches.  The finished box size is 3 1/4" square and is 1" deep. 

I made the box topper before assembling the box.  The Pretty in Pink panel measures 3" square.  The Old Olive circle was cut out with the 2 1/2" circle punch and I glued that to the pink square.  I then stamped the Quint-Essential Flower 5 times in all - twice in Pretty in Pink ink, twice in Raspberry Ripple ink and once in Old Olive ink.  I then used 2 3/8" scalloped, 1 3/4" scalloped, 1" plain, 3/4" plain and 1/2" plain circle punches to cut out the five flower layers.  I glued the 1/2" circle flat to the 3/4" circle and added an Old Olive brad to the centre. 

To make the box, I cut a piece of Raspberry Ripple CS measuring 9 1/2" x 5 1/4" and scored on the long side at 1", 4 1/4", 5 1/4" and 8 1/2" and scored on the short side at 1" and 4 1/4".  I cut 4 slits on both sides to make 3 small square tabs on both sides and used Sticky Strip to adhere them.  I glued the pink square to the box, laid my length of Raspberry Ripple ribbon down, popped up all the flower layers and tied a bow at the side of the box. 

 
This photo has the measurements and shows the box at the pre assembly stage, after the lines have been scored and the tabs have been cut.  You can click on it to get a larger view.


This photo shows the box open.

   
Supplies for card:
Stamps: SU! Vintage Verses & Madison Avenue sets
CS: SU! Primrose Petals, Pool Party & Whisper White, Primrose Petals & Pool Party Core'dinations CS
Ink: SU! Early Espresso
Tools: SU! Vine Street & Manhattan Flower embossing folders, extra large oval punch, Beautiful Wings Embosslits die, sanding block, sponge dauber
Embellishments & accessories: SU! rhinestone jewels, Dimensionals


Supplies for mini pizza box:
Stamps: SU! Quint-Essential Flower stamp
CS: SU! Raspberry Ripple, Pretty in Pink, Old Olive & Whisper White
Ink: SU! Raspberry Ripple, Pretty in Pink & Old Olive
Tools: SU! Simply Scored Tool, 2 3/8" & 1 3/4" scalloped circle punches, 2 1/2", l", 3/4" & 1/2" plain circle punches, paper piercer
Embellishments & accessories: SU! Raspberry Ripple stitched ribbon, Old Olive brad, Dimensionals


 photo CatRoseRuth.gif

Tuesday, 26 February 2013

Pink Velvet Dress Glamour Girl Card - Make My Monday Pink & Black Challenge

I absolutely love pink and black together and when I came across this lovely card Mynnette had made for the Make My Monday Pink & Black Challenge I knew I just had to play along!

I bought the Cheery Lynn French Pastry doily die a while ago and I love it.  A week or so ago I was in my local craft shop, the Glitter Pot, and I saw the French Pastry Angel Wing die which cuts a mat layer for the doily.  The die was at half price so I couldn't leave it there and it had to come home with me!  You have to fold a piece of CS in half and then die cut because the die is a half circle shape.  I die cut that in black and then cut out a white doily to layer on top.  Oh yes, I like the layered doily look muchly!
 
My SU! Dress Up Framelits dies are living on my desk at the moment, I can't stop playing with them and I decided it was high time I made a pink dress.  Whilst rootling in my stash I came across some long forgotten pink velvet paper - oooh, a pink velvet dress, even better!  I die cut the dress from the velvet paper, adhered it to a CS dress shape for strength and then embossed it with the SU! Lacy Brocade folder.  The dress is SO touchable!  I added a black CS belt and some pink jewels.   I then had another deep delve in my stash and found some old QuicKutz dies that I've had forever but which haven't seen the light of day in a loooong time.  These are the 2" x 2" metal dies that went in the QuicKutz hand held Squeeze tool - which was the first die cutting machine I owned.  The tool has long gone but I kept a lot of my dies and I am so glad I did!  Amongst the dies I found a clothes hanger which is the perfect size for the dresses and the sweet little handbag die which I thought would go very well with my dress.  I cut the bag from black CS and the flap from the pink velvet paper.  I die cut a small flower (also an old QK die) and added a pink jewel.  I popped up the dress and the handbag onto the layered doily.  I made a 5 3/4" square Pretty in Pink card base, stamped the 'glamour girl' sentiment, adhered the doily to the card front and added two more small flowers on either side of the sentiment.

Inside I adhered a white panel with a strip of Pretty in Pink CS that I'd embossed with the Lacy Brocade folder and then added a narrow black CS strip.  I stamped the 'You're Fabulous!' sentiment and cut it out with a label die and added another small flower.  I then added a larger flower inside and also to the envelope flap - yet another old QK die I found!  I had a very happy time in my craft room making this card, it was really good fun and it was fab to successfully mix new with really old stash items!  Rediscovering neglected gems in your stash is almost as good as getting new goodies!


Supplies:
Stamps: DeNami 'glamour girl', 'You're Fabulous!' from SU! 'Bubble Queen' set
CS: SU! Pretty in Pink, Basic Black & Whisper White,  pink velvet paper
Ink: Memento Tuxedo Black
Tools: Cheery Lynn French Pastry & French Pastry Angel Wing dies, SU! Dress Up Framelits die set, SU! Lacy Brocade embossing folder, various QuicKutz dies, Spellbinder's Labels Trio die
Embellishments & accessories: pink rhinestone jewels, 3D foam tape


 photo BagSwingRuth.gif

Sunday, 24 February 2013

Six SU! Make & Take Cards

I went to Joanne's on Saturday for a Make and Take card making meeting and a thoroughly good time was had by all!  Joanne designs six cards for us all to make and has got a great system in place, she puts all the supplies we need to make each card in a basket, we have a basket each so we're all working on a different card and then we swap baskets between us as we finish the cards.  It works really well!  Because I enjoy chatting with everyone so much I never complete all the cards while I'm there, I finish off assembling them at home!

This card uses the technique of inking up clear mount stamp blocks to get a colour block background.  You apply ink to the block, lightly spritz with water and stamp.  The ink colours we used were Marina Mist, Daffodil Delight and Melon Mambo.  We stamped the sentiment in black ink and stamped the Fabulous Florets silhouette image in VersaMark and heat embossed with black embossing powder.  The shiny black image pops beautifully against the bright blocks of colour!


The second card gave me the chance to play with some fab new products from the Spring/Summer catalogue - the Hearts a Flutter Framelits dies, the Print Poetry DSP Stack and the Designer Builder Brads.  We die cut the banners, assembled and added the brad, stamped the sentiment and glued on two linen thread bows.  Such a simple card to make but very stylish I think - and would be a great masculine card! 


A bright and pretty anniversary card next using the cheery Sunshine and Sprinkles DSP.  We trimmed the paper strips into banner shapes, glued them to the white panel and then die cut the heart out from the panel.  When the panel was glued to the Marina Mist card base, the blue shows through the cut out heart.  We die cut a Melon Mambo heart, embossed it with the heart design folder from the Adorning Accents Folders set and popped that heart up.  Some rhinestone jewels add a touch of sparkle - lovely!  Before I added the jewels and popped up the heart, I decided I'd be clever and add a little touch of my own.  I thought some scored lines would look fab so I flipped my white panel over and scored some lines using my Simply Scored board.  Hmmm, I forgot I'd already stamped the Happy Anniversary sentiment and of course, I couldn't see it 'cos you emboss scored lines from the back.  So when I flipped the piece back over I saw I'd embossed lines right through the sentiment - not a good look and not clever at all LOL!  Remembering the crafting motto "there's no such thing as a mistake, just an embellishment opportunity" I stamped the sentiment again on a separate piece of CS, cut it out with the Word Window punch, inked the edges and covered up my boo boo!


Inside we cut out a heart from the white panel and added the patterned paper heart we had left over from making the card front.


Time for another thank you card, this time using the fab Madison Avenue stamp set that is a Sale-a-bration set and the Curly Cute set.  Some Stamp-a-ma-jig work was required here in order to stamp the leafy images and the tiny accents.   Brads were used to embellish and 1 1/4" and 1 3/8" circle punches were used to cut out the circle element.  I popped up the Very Vanilla circle.  I love the Baja Breeze, Midnight Muse and Old Olive combo with the Very Vanilla!


Next is a birthday card with a sweet dress and cardie - LOVE that!  I have had a great time playing with the Dress Up Framelits dies and I lent the die set to Joanne.  I was so chuffed when I saw she had designed a dress card for us to make!  We gave the Very Vanilla panel a fancy edge by die cutting with a Finishing Touches Edgelits die, stamped the sentiment and added the patterned paper strip.  Both of the dress dies from the set are needed to make the dress and cardie.  We die cut the sleeveless dress from patterned paper and then cut the sleeved dress - just to the waist - from Crumb Cake CS.  We sponged the edges of the the dress and cardie with Soft Suede ink and then glued the dress and cardie together and attached that to the dress form die cut - I popped the dress and cardie up.  Teeny tiny pearls are the cardie buttons - such a sweet touch!


The 6th and final card is this butterfly trio birthday card made using a yummy colour combo of Pool Party, Primrose Petals and Crumb Cake with Very Vanilla.  Before gluing the vanilla panel to the card front we embossed part of it with the Fancy Fan folder, stamped the sentiment and added the strip of Crumb Cake seam binding ribbon.  We used the Bitty Butterfly punch to cut out butterfly shapes from Very Vanilla CS pieces which we then cut out with the Postage Stamp punch.  We layered onto squares cut out with the 1 3/8" square punch and popped the squares up.  I did all the prep work for this card at Joanne's but assembled it at home.  I just couldn't resist adding rhinestone jewels to the butterflies! 


Joanne has to put such a lot of work in designing the cards and prepping the baskets and has to remember not to double up on any supplies or colours!   I'm sure you'd agree, Joanne did a fab job and came up with a lovely selection of cards, I know I enjoyed making all of them!

 photo FlowerBoxRuth.gif

Saturday, 23 February 2013

Leaping Deer Merry Christmas Card - 52 {C}CT Feb Embellishment Challenge

Danielle has set a fab embellishment challenge this week at 52 {C}CT - and the embellishment we want to see on your Christmas cards is felt.


I have a few Hero Arts felt snowflakes left in a package in my stash but I decided not to use them because I wanted to try die cutting my own felt pieces.  So I bought a few different coloured squares of wool blend felt and I tried cutting out flower and leaf shapes which turned out very successfully.  For my Christmas card I chose a bright red felt and the Memory Box Leaping Deer die.  I made a 5 1/4" square Crumb Cake card base and die cut Real Red and Crumb Cake square mat layers.

Having selected the deer die I became concerned about the very delicate antlers but the felt shape die cut beautifully, phew!  I laid the felt piece onto the white CS square and the white looked too stark so before gluing down the deer I stamped a Canvas Stripes background stamp in Crumb Cake ink stamped off once.  I also edged the panel with Crumb Cake ink.  I was extremely careful when gluing the antlers to my CS square, I could tell that a tear could easily happen if I wasn't gentle. Once I'd glued the deer I added a few rhinestones to the antlers and popped up the white square.  I then die cut the Large Scallop border from the red felt, glued that to the side of the card and added the gingham ribbon.  I then inked the sentiment and frame with VersaMark ink, stamped onto Real Red CS, heat embossed with white powder and die cut the tag frame shape.  I added rhinestone jewels to the label and red metal nailheads to the image panel to finish the card front.  


Here's the inside and envelope flap with more background stamping, a sentiment and some red snowflakes.  I had the card sitting out on a shelf waiting to be photographed when our friends Debbie and Mike visited.  Mike said "is that fuzzy felt you've used on that card?"  I was so impressed he could tell that from across the room!


I hope you'll join in with our felt challenge this week at 52 {C}CT, it's a fun embellishment to use.  The other DT members have made fab cards to inspire you so please check out their work before you head off to make your own creations.  I can't wait to visit your blogs to see your warm and fuzzy Christmas cards!

Supplies:
Stamps: 'Merry Christmas from SU! 'Four the Holidays' set, label frame from Hero Arts 'Sending You Love' clear set, Hero Arts 'Joyous Christmas' & 'Canvas Stripes', PSX 'Snowflake Medley'
CS: SU! Crumb Cake, Real Red & Whisper White
Ink: VersaMark, SU! Crumb Cake & Real Red
Tools: Memory Box 'Leaping Deer' die, SU! 'Large Scallop' Framelits border die, Hero Arts 'Small Tag Frame' Framelits die, circle punches, sponge dauber
Embellishments & accessories: Premium Wool Blend Felt from Paper & String, white embossing powder, red metal nailheads, SU! red & white gingham ribbon, Rhinestone Jewels, Dimensionals


 photo ruthcatonbranch.gif

Thursday, 21 February 2013

Honeycomb & Bees Thanks Card

I just recently got the SU! Honeycomb embossing folder and as soon as I got it I knew I wanted to pair it with a sweet bee stamp from a Hero Arts set I have.  I stamped the bees, die cut them, coloured the stripes with a Daffodil Delight marker and added Star Dust Stickles to their wings so they sparkle.  I embossed a piece of Daffodil Delight CS, cut a section of honeycomb out and glued it to a white panel.  I stamped the sentiment,  matted and layered the white panel, added the ribbon and bow and attached the whole thing to the front of the card.  I then popped the bees up.


Here's the inside and the envelope flap with more cut out honeycomb and popped up bees.  I very rarely use yellow but I have to say I do like a little bit of it used together with black and white. Next time, I'm going to use some yellow Core'dinations CS with the honeycomb folder so I can scuff it and bring out the embossed detail, I think that will look good!


Supplies:
Stamps: 'Thanks!' from SU! 'Vintage Verses' set, bee from Hero Arts 'Garden Flowers' stamp & die combo set, Hero Arts 'Thank You Messages' clear set
CS: SU! Daffodil Delight, Basic Black & Whisper White
Ink: Memento Tuxedo Black, SU! Daffodil Delight
Tools: SU! Honeycomb embossing folder, bee die from Hero Arts 'Garden Flowers' stamp & die combo set
Embellishments & accessories: SU! Daffodil Delight stitched ribbon, Star Dust Stickles, Stamp-a-ma-jig, Dimensionals


 photo ruthpbcat.gif

Wednesday, 20 February 2013

Cherries Best Wishes Card - Inkspirational Challenge #8

It's time for the monthly CASE challenge at Inkspirational.  This month we want you to CASE a card created by Vicky Hayes.  You can see Vicky's sweet card on this blog post.  I'd always be happy to CASE Vicky, she makes such pretty cards and is so inspiring!


I kept to a fruit theme but used cherries rather than an apple and I loved the sparkly heart and rhinestones so I kept those elements in my CASEd card.  I used the same SU! 'Sincere  Salutations' stamp set but used Best Wishes rather than Get Well Soon.  It is such a useful set, it's been one of my most used stamp sets.  Sadly, it's retired now but it will always be one of my fave sets and isn't leaving my craft room any time soon!  I inked the stamp in Gumball Green, stamped direct to the white panel, I then inked just the cherries in Cherry Cobbler ink,  stamped on a separate piece of CS, punched them out with a 3/4" circle punch and popped them up.  I used markers to ink the sentiment stamp, added a punched red glitter heart and some rhinestones.  I layered the white panel onto a Cherry Cobbler Lacy Square Nestie die cut shape and popped that up onto a Gumball Green plain square mat.


I added more cherries inside and 3 punched red glitter hearts on the envelope flap.


I hope you'll join in with our CASE challenge this week, I'd love to come and see what you make!  The other DT members will have projects to inspire you so make sure you check out their work too!

Supplies:
Stamps: SU! 'Button Buddies' & 'Sincere Salutations' sets
CS: SU! Cherry Cobbler, Gumball Green & Whisper White
Ink: SU! Cherry Cobbler & Gumball Green
Tools: Nestabilities Lacy Square die, SU! 'Heart to Heart' punch, 3/4" circle punch
Embellishments & accessories: SU! Rhinestone Jewels, Dimensionals


 photo ruthpinkhearts.gif

Tuesday, 19 February 2013

Dress Just Because Card

I recently got the SU! 'Dress Up' Framelits die set - oh, my goodness, they are such fun to play with!  I am so rubbish at any needlework so die cut dressmaking is perfect for me!  I have made up lots of dresses - once I started I couldn't seem to stop.  As you make one another idea pops into your head 'oooh, I wonder if THAT would make a good dress?'  and before you know it you've got another one added to the pile!  So far most of my dresses have been made with patterned paper but I've also used Glimmer Paper and fabric.   I won't be making any more just yet as I've loaned the die set to a friend - although I did made up a few before the dies left my craft room!  

Anyway, I thought it was high time I actually completed a card with a dress on it.  The card is A6 size and is made with Island Indigo CS.  I used paper from the Twitterpated DSP pack for the dress and Basic Gray CS to die cut the dress form.  I made an Island Indigo CS belt and added a punched flower with a rhinestone centre.  I then decided it would be fun to add a rhinestone necklace too!  I popped the dress up onto a Pink Pirouette panel layered onto a Riding Hood Red mat and tucked the stamped lace strip underneath.  I cut the sentiment out with the Word Window punch and added another flower.


I am sending this card to a treasured friend who is going through a very difficult time and I want to let her know that she is special to me and I'm thinking of her.  I can actually picture her wearing a pretty floral dress like this!  I used more of the floral paper and stamped lace to decorate the inside and the envelope.


Supplies:
Stamps: SU! 'It's Your Day' set, 'Viola's Lace' wheel stamp, Hero Arts 'Sending Smiles Messages' clear set
CS: SU! Island Indigo, Riding Hood Red, Pink Pirouette, Basic Gray &Whisper White

Patterned paper:  SU! 'Twitterpated' DSP
Ink: SU! Island Indigo & Riding Hood Red
Tools: SU! 'Dress Up' Framelits set, Word Window punch, flower punch from Itty Bitty Shapes Punch Pack, Fashionable Hearts Embosslits die
Embellishments & accessories: SU! rhinestone jewels, Dimensionals


 photo PinkBagRuth.gif

Monday, 18 February 2013

Butterfly With Best Wishes Card

This is a card I made for a friend I knew would be going through an ordeal and I wanted to let them know I was thinking of them and wishing them well.  I made this calendar easel card with my card group a little while ago


and I had some pre cut paper pieces and ribbon left over that didn't get used on the day.  These bits ended up in my 'bits for cards' box and rather than just leaving the pretties neglected in the box I resolved to use them on a card! I also need to resolve to use more bits from the box - it's filling up again!

I made a 5 1/4" square Crumb Cake card base and glued the dark brown damask paper to the front.  I stamped the butterfly in Early Espresso ink onto Cajun Craze CS, cut it out with the matching die and then spritzed gold shimmer mist onto it.  I always place my items to be spritzed in a shoe box and this time after spritzing I used my heat gun to dry the spray on the butterfly.  It was like having a real butterfly flitting about inside the box as the air from the heat gun made it move about so much LOL!  I folded up the wings a wee bit, glued the body flat but put Dimensionals under each wing.  Before gluing the butterfly square to the card I added the lace ribbon and a button I'd threaded with linen thread.  I stamped the sentiment, cut it out with a label die and added dark brown pearls to finish the card front.


Inside I stamped the sentiment onto a Very Vanilla panel and added more patterned paper and another stamped, die cut and spritzed butterfly.


I punched circles and added yet another butterfly for the envelope flap - you can never have too many butterflies!  After spritzing I let these two smaller butterflies air dry naturally rather than blasting them with my heat gun!


Supplies:
Stamps: Hero Arts/Sizzix 'Antique Flowers & Butterflies'  stamp & die set, Hobby Art 'Sentiments' clear set, Woodware 'Special Wishes' clear set
CS: SU! Crumb Cake, Early Espresso, Cajun Craze & Very Vanilla

Patterned paper:  Kaisercraft 'With Love' from Sweet Nothings collection, Echo Park Style Essentials 'Brown Damask'
Ink: SU! Early Espresso
Tools: dies from Hero Arts/Sizzix 'Antique Flowers & Butterflies' stamp & die set, Spellbinder's Labels Trio die, circle punches
Embellishments & accessories: 'Heirloom Gold' Perfect Pearl Mist, brown pearls, button, SU! 'Chantilly' lace ribbon, Linen Thread, Dimensionals


 photo ruthBF2.gif

Saturday, 16 February 2013

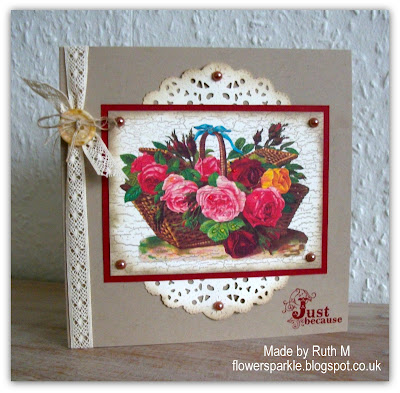
Rosy Basket Just Because Card - Inkspirational Challenge #7

This week at Inkspirational it's time for the February photo inspiration challenge and I'm here with an End of Week Encouragement post.  This is the gorgeous photo we have for you. 


Our prize sponsor this month is Eclectic Anthology, details of the prize can be found on the Inkspirational challenge blog.  As soon as I saw the Vintage Flower Basket Graphics that are available as a freebie from the site I knew I had to use one of the images on a card for this challenge!  I chose the lovely rosy wicker basket, I resized the image and printed it onto Very Vanilla CS.  I then inked the SU! Weathered background stamp with Crumb Cake ink and stamped over the top of the image.  I sponged the edges of the panel and the edges of 2 part doily shapes with Crumb Cake ink.  I layered the basket image onto a Cherry Cobbler mat, glued the part doily shapes behind the panel and glued the panel to the front of a 5 3/4" square Crumb Cake card base.  I then added the crochet trim and tied a mother of pearl button on with linen thread.  This is a button I got from my friend Kath's vintage button tin.  Kath was horrified to learn I actually paid for buttons to use in my card making and she let me rummage in her large vintage button tin and help myself to what I wanted - what a sweetheart!  I stamped the sentiment and added brown pearls to finish off the card front.


I used Glossy Accents to dot a few dew drops onto the image.  Here's a close up view.


I cut a Very Vanilla panel for inside the card and sponged the edges with Crumb Cake ink.  I used the SU! Viola's Lace wheel stamp to make a strip of lace.  I stamped onto a separate piece of vanilla CS and cut the lace out.  I know I could have stamped direct to the CS but I think that the dimension makes the lace strip look more realistic so I was happy to put the extra work in!   I then stamped and cut out a rose and leaves using the SU! Stippled Blossoms 2 step stamping set.  I stamped the leaves in Old Olive ink, used Regal Rose ink stamped off once for the solid rose and stamped the detail rose over the top in Cherry Cobbler ink.  I popped the rose up.


I stamped and cut out the smaller Stippled Blossoms rose and leaves, glued them to a Crumb Cake punched 1" circle and glued that to the centre of the SU! Gossamer Lace stamp.  Again, I stamped the lace onto a separate piece of Vanilla CS and cut it out before gluing it to the envelope flap.

 
I really hope you'll join in with the challenge this week - that inspiration photo is just too pretty to resist!  There'll be lots to inspire you from the rest of the DT so pop over to the Inkspirational challenge blog and check out what they've made.  I can't wait to visit your blogs and see what you create!

Supplies:
Stamps: SU! Stippled Blossoms & Vintage Verses sets, Viola's Lace wheel & Gossamer Lace stamp, Weathered background stamp

Digital image:  Vintage Flower Basket Graphics from Eclectic Anthology
CS: SU! Crumb Cake, Cherry Cobbler & Very Vanilla
Ink: SU! Crumb Cake, Regal Rose, Cherry Cobbler & Old Olive
Tools:  Cheery Lynn French Pastry doily die, 1" circle punch, sponge daubers
Embellishments & accessories: SU! Chantilly crochet trim, SU! linen thread, Glossy Accents, vintage mother of pearl button, brown pearls, Dimensionals


Photobucket

Lovey Dovey Snow Couple Card - 52 {C}CT Feb Theme Challenge

Danielle has set a wonderful Heart/Love theme challenge for us at 52 {C}CT this week.


I knew immediately what stamp to use - I can't help but think 'love' when I see this snowy couple!  I stamped the image onto watercolour paper and used inks and a paintbrush to colour.  This is a large image and I decided to trim it to make it smaller.  I sponged the edges with Old Olive ink and layered onto an Old Olive mat.  I thought the 'a wish from the heart for a wonderful Christmas' was the perfect sentiment for this card and I used masking and stamped the sentiment twice so that I could split the sentiment into two pieces.   I added the dotty Old Olive ribbon and popped the oval up.  I then used an Embosslits die to cut some hearts and I added a rhinestone to each heart.  


More embossed hearts on a panel inside with a 'love' sentiment from a Hero Arts set.   


The same set has this smaller 'Peace, Love & Joy' sentiment and I thought that was ideal to go on the envelope flap!  I thought more hearts were called for too!


What a happy card to make!  I do hope you'll join in with our fab theme challenge this week, I'd love to visit you and see your love/heart themed Christmas cards!  Check out the cards from the other DT members, they're sure to be fab!

Hazel very kindly left me a comment to tell me my card would fit with her CHNC challenges this week so I'm linking up this card there too!


Supplies:
Stamps:  Stampendous 'Snowfall Pair' Jumbo Cling stamp set, Penny Black 'a wish...', Hero Arts 'Very Merry Christmas' clear set
CS: SU! Riding Hood Red, Old Olive & Whisper White, watercolour paper
Ink:  VersaFine Onyx Black, SU! Riding Hood Red, Old Olive, Pumpkin Pie & Bordering Blue
Tools: SU! Fashionable Hearts Embosslits die, SU! large oval punch
Embellishments & accessories: SU! Old Olive dotted grosgrain ribbon, Rhinestone Jewels, Dimensionals


 photo SparkleHeartRuth.gif

Friday, 15 February 2013

Quint-Essential Flower Thank You Card

This is a card I made for a friend to thank her for the SU! order she placed with me.  How exciting, I got to play with some new goodies - the Quint-Essential Flower stamp and the Borders Scoring Plate!

I made the card a tad over 4" square and used Primrose Petals CS.  I used Pool Party, Primrose Petals and Midnight Muse inks to stamp the flower, used various circle punches to cut out the flower parts and assembled the flower, popping up a couple of the circles.  I popped the whole flower up on a 2 1/2" Pool Party punched circle, added a rhinestone to the centre and stamped the sentiment underneath.  I then flipped the card over and used the Borders Scoring Plate to emboss the card front with the scallop and dot design - I thought that went perfectly with the outside border of the Quint-Essential Flower stamp!  Wow, the overlay makes it SO easy to emboss a design, I'm very happy with my new toy tool!


Here's the inside and envelope flap.  I love that you can vary the design by punching out fewer or more circles from the flower!

 
Supplies:
Stamps: SU! 'Quint-Essential Flower' stamp & 'Curly Cute' set
CS: SU! Primrose Petals, Pool Party & Whisper White
Ink: SU! Primrose Petals, Pool Party & Midnight Muse
Tools: SU! 2 3/8" Scallop, 1 3/4" Scallop, 2 1/2", 1", 3/4" & 1/2" circle punches, SU! Simply Scored Borders Scoring Plate

Embellishments & accessories: SU! Jewel Rhinestone, Dimensionals

 photo CardFuchsiaRuth.gif

01 09 10