Wednesday, 12 June 2013

Nautical Birthday Wishes Card - Inkspirational Challenge #24

It's time for our monthly photo challenge at Inkspirational and here's the wonderful photo we want you to be inspired by.


I went with the nautical theme for my card and decided on a red, navy blue and kraft colour scheme.  I stamped the main image and sentiment in Night of Navy ink and popped up a lighthouse stamped in Real Red ink and fussy cut.  I layered onto Real Red and Night of Navy mats and mounted onto a 5 1/4" square Crumb Cake card base.  I found a fab nautical themed stamp set in a local craft shop recently - it was so reasonably priced for such a large set of stamps and I knew it would work well with my Kanban Lighthouse stamp set.  The stamps are made from clear vinyl, not the good photopolymer stuff, so even though the set was a great price I wasn't sure how good the images would stamp.  I ummed and aahed for a while and then bought the set anyway.  The new style SU! ink pads work brilliantly with clear stamps and I'm chuffed to bits that this cheapy set stamps absolutely fine!  I stamped the anchor and the length of rope, fussy cut them and popped them up. 


Here's the inside and the back of the envelope.  The images in the set are great and I wanted to use as many as I could!  I love the large map type image and the two gulls look like they're having a cosy chat LOL!


I just HAD to use the wonderful compass image in the set, so that got stamped on the front of the envelope!


It's not often a masculine card gets added to the stash but this challenge was the perfect opportunity for me to do just that!  I hope you'll be inspired by the seascape photo and join in our challenge at Inkspirational this week, I'd love to see what you make!  Don't forget to check out what the other DT members have created for your inspiration!

Supplies:
Stamps: Kanban 'Lighthouse' clear set, Viva Decor 'By the Seaside' clear set, Stampendous 'Sending Wishes' cling stamp
CS: SU! Crumb Cake, Real Red, Night of Navy & Very Vanilla
Ink: SU! Real Red & Night of Navy
Embellishments & accessories: 3D foam pads


 photo ruth.gif

Monday, 10 June 2013

Aqua & Yellow Summer Silhouettes Birthday Card

It's my friend Jan's birthday on Thursday and I always make three birthday cards for her.  One to give her from me at card group, one from me and Owen and one for her husband Alan to give to her.  This is the card I made for Alan to give to her.  I was totally inspired by photos I saw on Pinterest for this card.  I just adored this pincushion colour combo image - the original pic can be found here. 

Photo courtesy of I Heart Linen 

I saw this beautiful, stunning card made by Narelle Farrugia on Pinterest too so I took inspiration from it and CASEd her card.  Narelle's blog post for this card can be found here.  I don't usually gravitate towards yellow but yellow and blue make a striking and yummy combo! 


I started with a 5 3/4" Pool Party card base and then got busy layering with patterned papers and Bermuda Bay, Daffodil Delight and Coastal Cabana cardstocks.  For the main image panel I stamped and fussy cut leaves and flowers.  I stamped a butterfly in Bermuda Bay ink, coloured with Crushed Curry ink and a blender pen and punched it out.  I used a bookplate die for the sentiment, popped that and the flowers up and added jewels.  I added a bow to finish off the front.  I found it hard to get a good photo colour wise - Bermuda Bay is such a rich, deep greeny aqua colour but in the photo it looks more turquoisey blue.  The yellow is softer in real life too.  I absolutely LOVE Bermuda Bay, it is my favourite of the new SU! colours.


Here's the inside.  The border was stamped in Coastal Cabana ink - it goes beautifully with Bermuda Bay! - and I used Crushed Curry ink for the sentiment.  I was sure I wouldn't like Crushed Curry, not being a yellow lover, but it is a lovely golden yellow so I was pleasantly surprised to find I do like it!    


Here's the envelope flap with stamped leaves and a butterfly.  I'm happy how this card turned out - I just have to hope that Alan and Jan like the card!


Supplies:
Stamps: SU! 'Summer Silhouettes', 'Papillon Potpourri' & 'Blooming with Kindness' sets, Hero Arts 'Yummy Treats' clear set
CS: SU! Pool Party, Bermuda Bay, Coastal Cabana, Daffodil Delight & Whisper White

Patterned paper:  SU! Pool Party In Color DSP, Daffodil Delight Polka Dot Parade DSP
Ink: SU! Bermuda Bay, Coastal Cabana, Daffodil Delight & Crushed Curry
Tools: SU! Bitty Butterfly punch, Sizzix Bookplates die, Stamp-a-ma-jig
Embellishments & accessories: SU! Daffodil Delight stitched ribbon, Rhinestone Jewels, Dimensionals


 photo ruthpbcat.gif

Saturday, 8 June 2013

Fruity Flowers Happy Birthday Card - Inkspirational Challenge #23

At Inkspirational this week we have a summery, fruity colour combo challenge for you!  I'm here with an end of the week encouragement post.  If you haven't joined in already, there's still time to take part as the challenge is open until noon (CST) on Tuesday!


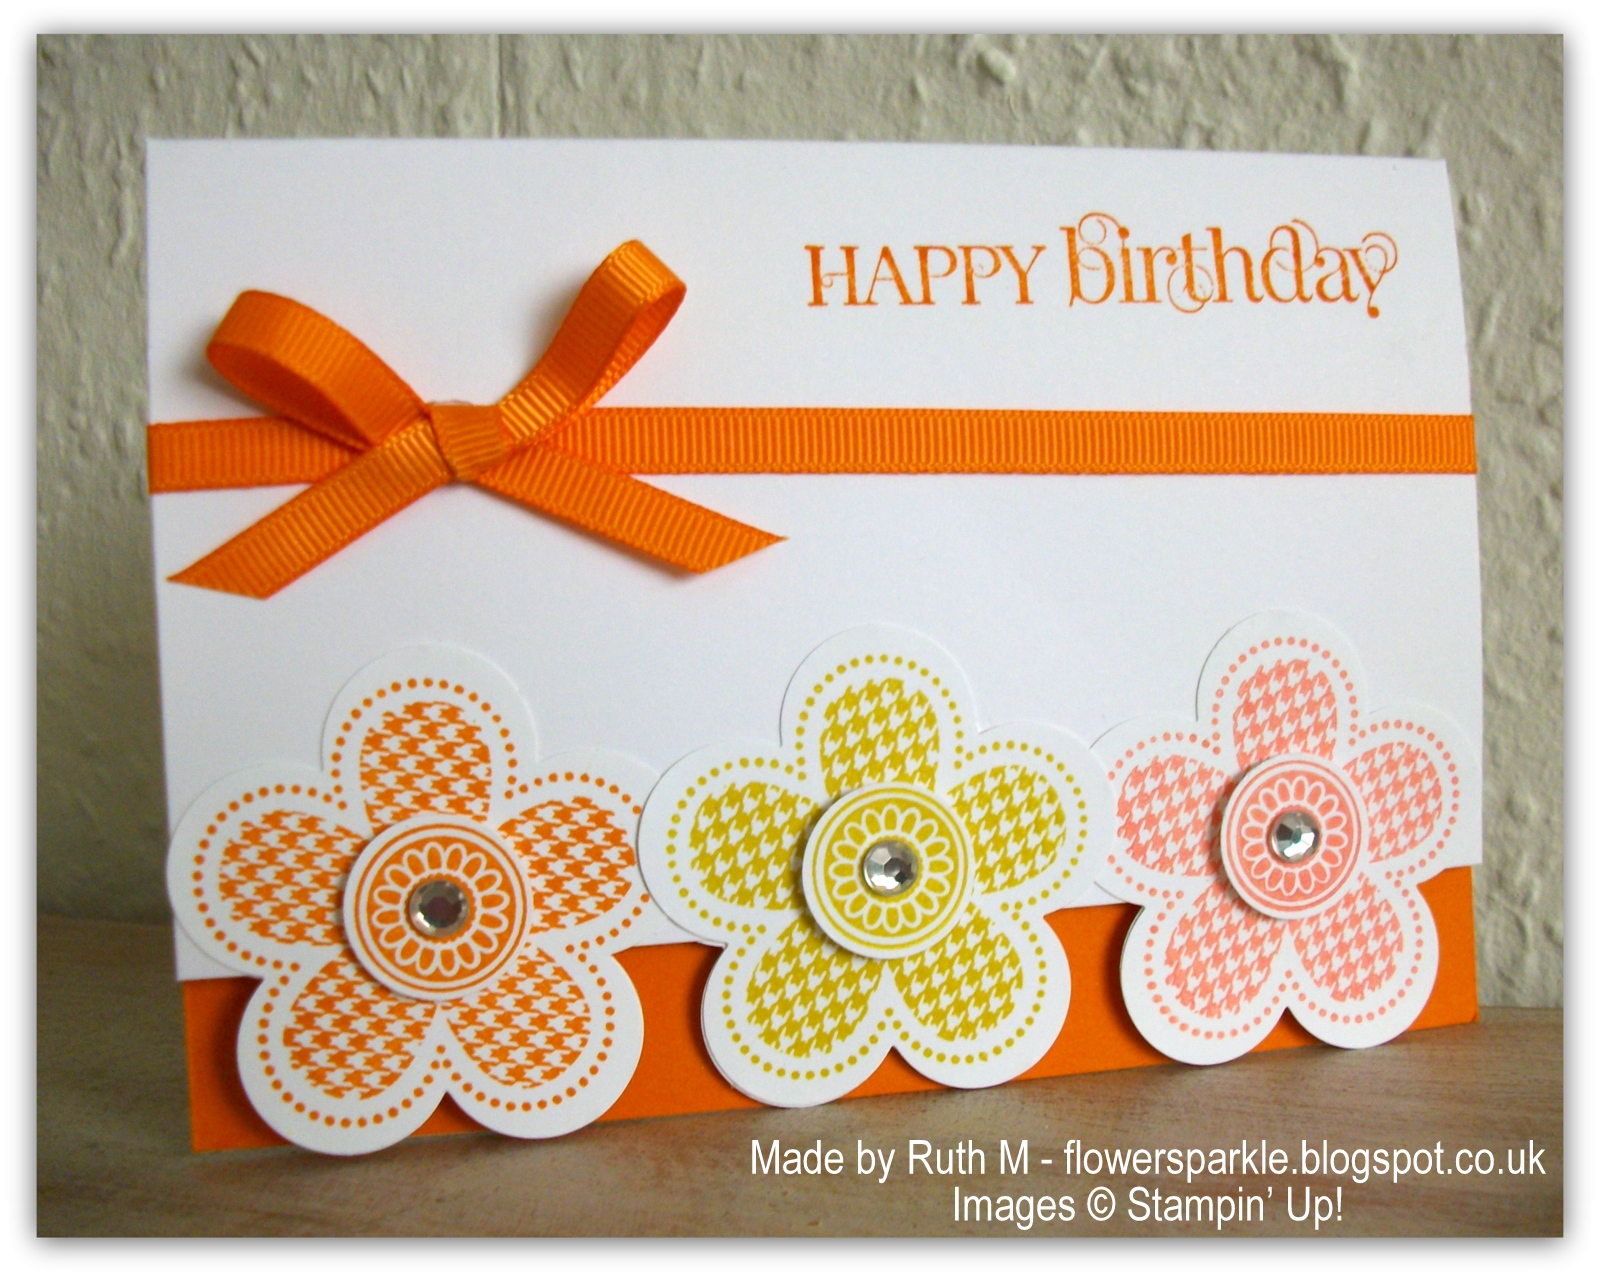
I've used SU! Pumpkin Pie and Summer Starfruit plus Pink Grapefruit VersaMagic ink - the closest colour I had to the melon shade in the prompt picture!  I love a flowery stamp set that has a matching punch and I reached for my SU! Posy Punch stamp set and Fancy Flower punch for this card.  I trimmed about 3/4" off the bottom of the A6 card base and then glued my three stamped and punched flowers to the bottom of the card.  When standing up on display the card rests on the flowers, so to add strength, I stamped and punched three more flowers and glued them behind the front ones.  I stamped, punched out and popped up centres for the flowers and added bling.  I stamped the sentiment and added some ribbon.  I wrapped a strip of ribbon around the card and taped the ends inside and then hot glued a separate bow onto the strip on the card front.  I find attaching a separate bow easier and less stressful!  


After cutting off the bottom of the card I glued a strip of Pumpkin Pie CS inside.  This shows through when the card is closed.


Here's the inside of the card and the envelope.  I used some glitter glue I've had in my stash for a very long time for the flower centres.  I haven't used it in years so I wasn't sure it would be any good but it was perfect still!


I have to confess and say putting orange and yellow together on the same card is a problem for me, it's not one of my fave combos.  And as for Summer Starfruit - let's just say I find that particular colour 'extremely challenging' and leave it at that!  However, I like the fresh and citrussy vibe along with the crisp white card base, it's very summery and makes me want to eat a fruit cocktail!  I hope you'll join us at Inkspirational this week and make fresh, fruity creations of your own - I'd love to come and see what you make!

Supplies:
Stamps: SU! 'Posy Punch' & 'Curly Cute' sets, 'Lovely Day' from Penny Black
CS: PaperMania white A6 card blank, SU! Pumpkin Pie & Whisper White
Ink: SU! Pumpkin Pie & Summer Starfruit, VersaMagic Pink Grapefruit chalk ink
Tools: SU! Fancy Flower punch, 3/4" circle punch, I Bond hot glue gun, Stamp-a-ma-jig
Embellishments & accessories: SU! Pumpkin Pie grosgrain ribbon, Puttin' on the Glitz 'Champagne' glitter glue, Dimensionals


 photo ruthbee.gif

Green Spirit Of The Season Card - 52 {C}CT June Colour Challenge

It's time for a colour challenge at 52 {C}CT this week and Jacqueline has chosen shades of green.  What a great colour scheme for Christmas cards!


Here's Jacqueline's explanation of the rules: "the rules for this challenge are pretty simple - you can use all your shades of green on this card but NO OTHER COLOURS. However, you may use one  neutral - these neutrals are: black, white, cream, kraft and gray and they may be ink or card stock. A flesh may be used for faces. Metallics are fine - as long as they are green so get colouring those brads with your Promarkers folks!"

I have just bought a new Mowed Lawn Distress Ink pad and I was keen to try that out so I got out my craft mat and proceeded to get VERY inky!  Using an applicator tool and sponges I applied Crushed Olive, Peeled Paint and Mowed Lawn inks to a piece of thick white CS.  Once I was happy how the colours had blended I added some water splatters.  I spritzed the water into my hand and then flicked the water from my hand onto the CS - a fab tip I picked up from Gilly Haigh!   As this was my first time trying this technique I think I may have been a tad splatter happy LOL!    I stamped the main image, sentiment and Santa sleigh image - I know it looks black in the photo but I actually used SU! Always Artichoke ink, a very deep, dark green.  I trimmed the panel to size, layered onto a Certainly Celery mat, added a strip of Celery ribbon and four Celery brads. I attached the panel to a Gumball Green A6 card base, tied a bow and added that to the ribbon strip to finish.


Here's the inside and the envelope.  I stamped Gumball Green snowflakes and stamped the sentiment in Artichoke.


I hope you'll join us at 52 {C}CT for our colour challenge this week, I'd love to visit your blogs to see what you make!  Don't forget to check out what the other DT members have made to inspire you!

Supplies:
Stamps: Kanban 'Enjoy the Spirit of the Season' clear set, Hero Arts 'Holiday Cheer' clear set, PSX Snowflake Medley
CS: SU! Gumball Green, Certainly Celery & Very Vanilla, thick white CS
Ink: Crushed Olive, Peeled Paint & Mowed Lawn Tim Holtz Distress Inks, SU! Always Artichoke & Gumball Green
Tools: Ranger applicator tool and sponges, paper piercer
Embellishments & accessories: SU! Certainly Celery grosgrain ribbon, Certainly Celery brads


 photo SparkleHeartRuth.gif

Thursday, 6 June 2013

Planes 50th Birthday Shadow Box Card

I went to my sweet friend Lesley's home for a stamping afternoon recently because she wanted to learn how to make shadow box cards.  She made a plane birthday one for her son as he flies planes.  It turned out wonderfully and I asked to borrow her stamp set so I could have a go myself.  Then a bit later on our friends Debs and Mike mentioned that Brian, a friend of theirs, was soon to be celebrating his 50th birthday.  I know Brian likes planes so I offered to make a plane themed card for them to give to him.  I made Mike this hot air balloons shadow box card for his birthday last month and I said "how about if I made a card for Brian with the same design but with planes instead?" and the commission was given and accepted!  Many thanks Lesley for the loan of the stamp set!

I made the shadow box card base from Old Olive CS and attached a stamped clouds background to the back panel.  I used oval dies to cut the aperture and frame for the card front.  I then stamped planes onto different brightly coloured CS and got busy fussy cutting and assembling.  I heat embossed the nose cones with black embossing powder to add some shine and finished off with a tiny silver pearl on the propeller - a fab finishing touch tip I got from Lesley!  I stamped some birds on the clouds, assembled the shadow box card and popped up the planes.  I added some die cut clouds and popped up a stamped and die cut sentiment label. 


Here's the back and the envelope flap.  I hope Brian the birthday boy enjoys this fun card - and I hope Debs and Mike like it too!  I had a blast putting it together - although at first I couldn't get the 'Magnificent Men in their Flying Machines' song out of my head, in the later stages of making the card the music from '633 Squadron' took over LOL!


Supplies:
Stamps: Woodware 'Patch a Flight' clear set, Hero Arts 'Clouds' background stamp, Hobby Arts 'Flock of Birds', SU! 'Memorable Moments' & 'Wacky Wishes' sets
CS: SU! Old Olive, Daffodil Delight, Real Red, Pacific Point & Whisper White
Ink: Memento Tuxedo Black, SU! Bashful Blue, Real Red & Pacific Point, VersaMark marker pen
Tools: Petite Oval Nestabilities dies, Memory Box 'Puffy Clouds' die, various sized circle punches, SU! Simply Scored, heat tool, Stamp-a-ma-jig, sponge dauber
Embellishments & accessories: SU! black embossing powder, tiny silver pearls, 3D foam tape & Dimensionals


 photo ruthrainbow2.gif

Tuesday, 4 June 2013

Two SU! Birthday Cards

My friend Jan came over for a card making get together and she wanted to make two cards.  This first card is very similar to one I designed for the card group ladies to make.  Jan had made it, taken it home with her and given the card away to a neighbour the very same afternoon!  She wanted to make it again as she remembered she'd loved the card but couldn't quite remember how to put the card together completely!

This is the original card I designed for card group.


This is the version I designed for Jan to make.  I kept to an all SU! design with a Window Framelits die for the label shape, the Little Leaves Sizzlits die and the Word Window punch for the sentiment labels.  I used Pink Pirouette CS in place of Pretty in Pink and fussy cut the lace image rather than cutting it out with a punch.  I popped up the lace panel and added rhinestone jewels.  After I'd taken the photo of this card I thought the sentiment labels may look better if the edges were sponged with Primrose Petals ink - so Jan did that for her card and it did look better!


Here's the inside and envelope.  I love that Viola's Lace wheel stamp!


Jan left the design for the second card up to me and I was inspired by this lovely card I saw on Pinterest made by Julie Wadlinger.  


Click here to go to Julie's original blog post. Her card features the SU! Two Tags die - which I have but which I don't use enough - and the fabulous Summer Silhouettes set.  I love the layout and the look of the tag as an element for the card front and I'm keen to try this with other stamp sets!  I CASEd Julie's card pretty closely, making just a few small changes.  I used Pool Party, Island Indigo and Early Espresso for my combo and made a circle sentiment element rather than a banner - and I couldn't resist adding a butterfly!  To get the shading on the flowers I inked first with Pool Party and then added Island Indigo ink with a sponge dauber - I find this sometimes works better than the rock 'n roll technique of inking.  


Here's the inside and the envelope flap.  A lot of Stamp-a-ma-jig action for this card but so worth it for the finished result I think!  Huge thanks to Julie for the inspiration!


Supplies for card 1:
Stamps: SU! 'Gossamer Lace' stamp, 'Apothecary Art' set, 'Viola's Lace' wheel stamp
CS: SU! Crumb Cake, Primrose Petals, Pink Pirouette, Lucky Limeade & Very Vanilla
Ink: SU! Crumb Cake, Primrose Petals & Lucky Limeade
Tools: SU! Window Framelits die, Flower Fusion & Little Leaves Sizzlits dies, Finishing Touches Edgelits die, sponge daubers
Embellishments & accessories: SU! Rhinestone Jewels & Dimensionals


Supplies for card 2:
Stamps: SU! 'Summer Silhouettes', 'Made for You' & 'Blooming with Kindness' sets
CS: SU! Pool Party, Island Indigo, Early Espresso & Whisper White
Ink: SU! Pool Party, Island Indigo & Early Espresso
Tools: SU! 'Two Tags' die, plain & scalloped circle punches, 'Beautiful Wings' Embosslits die, Stamp-a-ma-jig, sponge daubers
Embellishments & accessories: SU! Pool Party ruffled ribbon, Whisper White Baker's Twine, Rhinestone Jewels &Dimensionals


 photo DragonflyRuth.gif

Saturday, 1 June 2013

Joyful Christmas Season Tree Card - 52 {CCT} June Sketch Challenge

It's Jacqueline's turn to host the challenges over at 52 {C}CT in June and she's starting us off with this fabulous sketch.


It's such a versatile one I think!  I chose to rotate the sketch and started off by making an Old Olive 5 3/4" square card base.  I've used a new to me Hero Arts stamp set that I picked up at my LSS in the sale section where they have supplies that have been used in classes and demos at great prices.  Hmmm, I'm heading for that section of the shop quite frequently, I can't resist a bargain!  For the tree, sentiment and snowflake I inked the stamps with VersaMark and then immediately inked them again with Old Olive ink. I stamped the images, sprinkled on SU! Iridescent Ice embossing powder and heat embossed.  They are very colourful and sparkly!  I then coloured parts of the tree and snowflake with Old Olive and Cherry Cobbler markers.  I layered the Very Vanilla panel onto Cherry Cobbler and gold mats.  For the scalloped border portion of the layout I've used some Cherry Cobbler Dotted Scallop ribbon - but I've used the plain, non dotted side.  I punched some circles, added some gold nailheads and popped the snowflake circle up.


Here's a close up of some iridescent sparkle.


Here's the inside of the card and the envelope.  The stamp set I used contains the sweet dove with the olive branch in its beak and I was determined to use it somewhere on the card!  I used markers and a blender pen to colour the dove, fussy cut the image and popped it up onto the sentiment square with thin 3D foam pads.  I stamped more snowflakes, coloured parts of them with markers and cut them out with circle punches to finish.


I hope you'll join  us this week for our sketch challenge at 52 {C}CT and make a festive card using this fabulous layout!  I look forward to seeing what you make!

Supplies:
Stamps: Hero Arts 'Joyful Christmas Season' cling set, Penny Black 'Beautiful Season'
CS: SU! Old Olive, Cherry Cobbler & Very Vanilla, Imagination Crafts Satin Gold CS
Ink: VersaMark, SU! Old Olive & Cherry Cobbler
Tools: heat tool, various size circle punches, square Nestability dies
Embellishments & accessories: SU! Iridescent Ice embossing powder, Cherry Cobbler Dotted Scallop ribbon, gold nailheads, Dimensionals, 1mm 3D foam pads


 photo ruthcatonbranch.gif

01 09 10