Saturday, 12 February 2022

Rainbows Happy Birthday Card

 Another rainbows and clouds card - I just love these happy, colourful products!  This is a birthday card I gave to a friend.  Here's the card and envelope together.


Here's the card.  I CASEd Dena Rekow's card which can be seen on her blog HERE.  Dena shares a great tip about die cutting the rainbow pieces in the video linked on her blog post.  The clouds, rainbow and sentiment label are all popped up.  The iridescent rhinestone jewels are a lovely finishing touch!


Here's the inside of the card.  I used the clouds border die to give a fancy edge to the white panel, fussy cut the rainbow from a piece of  'Sunshine & Rainbows' patterned paper and glued it to the white panel.  I stamped and die cut the sentiment and glued that in place. 


As well as adding some patterned paper to the flap of the envelope I added a name label.


Supplies:
Stamps: SU! 'In Your Words' set
CS: SU! Bermuda Bay, Granny Apple Green, Mango Melody, Misty Moonlight, Polished Pink & Basic White
Patterned paper: SU! 'Sunshine & Rainbows' 6" x 6" DSP pack
Ink: SU! Polished Pink 
Tools: SU! 'Basic Borders', 'Brilliant Rainbow' & 'Hippo & Friends' die sets
Embellishments & Accessories: SU! Iridescent Rhinestone Basic Jewels, Dimensionals

Ruth

Thursday, 3 February 2022

Rainbow & Clouds Happy Hello Card

After making a rainbow card a few days ago I had some Basic White CS rainbow arc shapes left over.  I got out several ink pads and some blending brushes and got busy to make a second rainbow card. I love the contrast of the black and white against the pop of bright colours! Here's the card and envelope together.


Here's the card.  I applied Pumpkin Pie and Real Red inks to the first arc, Daffodil Delight and Mango Melody inks to the second arc, Bermuda Bay and Granny Apple Green inks to the third arc and Highland Heather and Misty Moonlight inks to the fourth arc.  I die cut the rainbow from a piece of Mother of Pearl Specialty Paper and then inlaid the inked rainbow arcs - nestling them in from the back and taping them in place. I glued the Mother of Pearl panel onto the Basic Black card base, stamped and heat embossed the sentiment, cut it out with a label die and  popped the label up.  The Mother of Pearl paper is so very pretty!  I punched and die cut several clouds, inked the edges with Pool Party ink and popped the clouds up.  To complete the card front I added some Iridescent Rhinestone Jewels.


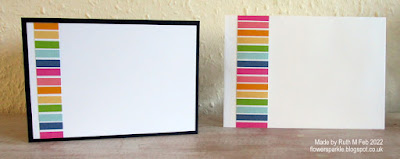
Some cheery rainbow striped paper decorates the inside of the card and the envelope.


Supplies:
Stamps: SU! 'Sunny Sentiments' set
CS: SU! Basic Black & Basic White
Patterned paper: SU! 'Sunshine & Rainbows' 6" x 6" DSP, 'Mother of Pearl' Specialty Paper
Ink: SU! Bermuda Bay, Daffodil Delight, Granny Apple Green, Highland Heather, Mango Melody, Misty Moonlight, Pool Party, Pumpkin Pie & Real Red, VersaMark
Tools: SU! 'Brilliant Rainbow' & 'Hippo & Friends' die sets, SU! 'Cloud' punch, Poppy Stamps 'Fancy Clouds' die set, Memory Box 'Puffy Clouds' die set, blending brushes
Embellishments & Accessories: SU! white embossing powder, Iridescent Rhinestone Basic Jewels, Dimensionals

Ruth

Wednesday, 2 February 2022

Sun, Clouds & Rainbow Card

The SU! 'Brilliant Rainbow' die set from the Jan - June 2022 Mini Catalogue strongly appealed to me and I just had to get it.  I want to send a close friend some happy mail while she goes through some health issues and the dies are perfect for creating bright and happy cards - plus they go really well with other items I have in my stash!

Here is the card and envelope together.


Here's the card.  The card base is made from Granny Apple Green CS and I used Pool Party and Basic White CS for the clouds.  I also used some blue 'Supple Shimmer' specialty DSP for a punched cloud - it's a gorgeous sparkly Pool Party colour.  I die cut the rainbow from the Basic White panel, adhered the rainbow striped DSP behind the white panel and glued the whole thing to the card base.  I stamped the sun from the 'Sharing Sunshine' set in Daffodil Delight, Mango Melody and Pumpkin Pie inks and popped it up along with the clouds.  I stamped the 'a little sunshine for your day' sentiment from the 'After the Storm' stamp set in Misty Moonlight ink, cut the piece to size and popped the sentiment up.  To finish off the card front I sprinkled on a few Iridescent Rhinestone Jewels which are beautiful!


Here's the inside of the card.  I stamped the sentiment, cut it out with the Cloud punch, inked the edges with Pool Party ink and glued it to the white panel.  I added a Pool Party cloud border, a small rainbow, a sun and a small cloud at the bottom of the white panel.


Here's the envelope with a sun and a couple of clouds.


This 'Brilliant Rainbow' die set is such a lot of fun to work with and the 'Sunshine & Rainbows' 6" x 6" Sale-A-Bration DSP goes so well with it!  I had the Basic White CS positive rainbow shapes left over from cutting out the shape from the white layer panel. After finishing this card I got inky with those pieces straight away to make a second rainbow card which I'll share next time! 

Supplies:
Stamps: SU! 'After the Storm' & 'Sharing Sunshine' sets
CS: SU! Granny Apple Green, Pool Party & Basic White 
Patterned paper: SU! 'Sunshine & Rainbows' 6" x 6" DSP, 'Supple Shimmer' Specialty Paper
Ink: SU! Daffodil Delight, Mango Melody, Misty Moonlight, Pool Party & Pumpkin Pie 
Tools: SU! 'Basic Borders' & 'Brilliant Rainbow' die setts, 'Cloud' punch, Poppy Stamps ''Fancy Clouds' die set 
Embellishments & Accessories: SU! Iridescent Rhinestone Basic Jewels, Dimensionals

Ruth

Monday, 31 January 2022

Flowers Of Friendship Bay Window Card

This is the second fancy fold card I made for Lesley and Wendy to make during our crafty day.  I've seen these bay window cards popping up all over and was keen to have a go myself.  I watched this fab video from Lisa Curcio to get the instructions and I then tweaked the measurements slightly to better suit UK A4 sized CS.  This blog post of Lisa's shows several designs of bay window cards - you'll see I CASEd Lisa's Flowers of Friendship card!

Here's the card and envelope together.  I used two patterned papers from the 'Pattern Party' DSP pack, the beautiful yellow floral damask and the pretty rainbow stripes.  Such a nice touch to add patterned paper to the envelope flap!


Here's the card folded flat ready to go in an envelope.  I love a dimensional fancy fold card that folds flat!  I used Stampin' Blends alcohol markers to colour in the flowers and leaves.  I used the matching 'Flowers & Leaves' punch to cut out the small flowers and leaves but I fussy cut the large floral image.  I popped all the images up and added rhinestone jewels to the flower centres and added two of the Brushed Brass Butterflies embellishments to the centre panel.   


Here's a side view.


Here's a front view.


Here's another side view.  The black square is popped up on Dimensionals and the lip of the card flap tucks underneath that so the card can be displayed with the bay window shape.  It's similar to an easel card mechanism where you have a 'stop'.  I placed more rhinestone jewels on the sentiment circle to add extra sparkle.   


Here's the inside of the card.  I used Flirty Flamingo CS for the sentiment rectangle.


Here's a view from the top.


We had a lovely day together and have already scheduled dates in for February, March and April!  It's so easy to arrange get togethers now I'm not working in retail and I don't have to work weekends!

Supplies:
Stamps: SU! 'Flowers of Friendship' & 'Peaceful Moments' sets
CS: SU! Basic Black, Flirty Flamingo & Basic White
Patterned paper: SU! 'Pattern Party' DSP
Ink: Memento Tuxedo Black, Stampin' Blends Light & Dark alcohol markers
Tools: SU! 'Stitched Shapes' & 'Stitched Rectangles' die sets, circle punch, paper trimmer with scoring blade
Embellishments & Accessories: SU! Brushed Brass Butterflies, Basic Rhinestone Jewels, Dimensionals

Ruth

Hello Friend Pinwheel Tower Card

Last weekend Lesley and Wendy came over for a crafty day and I made two fancy fold cards for them to make.  The first was a Pinwheel Tower card featuring Sale-A-Bration goodies you can get for free with a qualifying SU! purchase - the 'Friendly Hello' stamp set and 12" x 12" DSP.  Here's the card and envelope together.


Here's a view from the top so you can see the pinwheel tower construction.  I have Pinwheel Tower Card instructions on my Tutorials page.


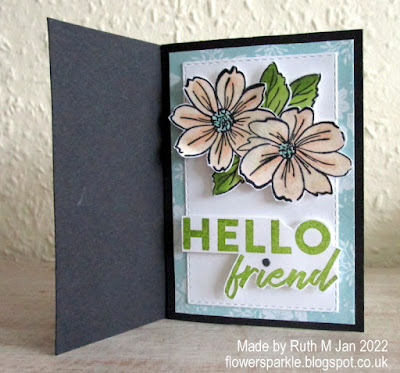
Here's the first pinwheel panel.  I used Petal Pink, Pool Party and Granny Apple Green Stampin' Blends alcohol markers to colour in the stamped images.  I fussy cut the flowers and leaves and popped them up.  I also fussy cut and popped up the Hello friend sentiment.  I used a Stampin' Blends marker to colour the dot above the i black.  It doesn't show up in the photo but the flowers are really shimmery because I added clear Wink of Stella to the petals.


Here's the second panel.


Here's the third panel.


Here's the last panel for the sentiment.  I coloured the small flowers with a Pool Party Stampin' Blends marker.


Supplies:
Stamps: SU! 'Friendly Hello' set
CS: SU! Basic Black & Basic White
Patterned paper: SU! 'Friendly Hello' DSP
Ink: SU! Granny Apple Green, Memento Tuxedo Black, Stampin' Blends alcohol markers
Tools: SU! 'Stitched Rectangles' die set, paper trimmer with scoring blade
Embellishments & Accessories: SU! clear Wink of Stella pDimensionals

Ruth

Sunday, 30 January 2022

Leafy Simple Fancy Fold Friendship Card

Julie Davison made a simple fancy fold card using patterned paper on one of her wonderful videos and I loved it and had to make my own version.  Here's the card and envelope together.


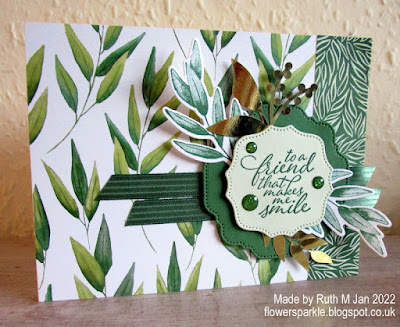
Here's the card which is made from a long strip of double sided patterned paper with a contrasting pattern piece folded back.  I cut the patterned paper to 4 1/8" x 12", scored at 5 1/2" and 11",  folded the 1" flap back and glued it flat.  I used fancy labels from the 'Hippo & Friends' dies and used stamped and die cut leaves with some gold foil elements.  I tucked some Garden Green ribbon behind the labels, popped up the labels and added some Garden Green glitter dots. 


Here's  a closer look at the leafy labels element.


Here's the inside of the card and the envelope.  It's lovely to see the reverse pattern of the paper on the inside.  I needed to give two cards to friends so I made two cards to this design.


Supplies:
Stamps: SU! 'Forever Fern' & 'Sunny Sentiments' sets
CS: SU! Garden Green & Basic White
Patterned paper: SU! 'Forever Greenery' DSP, 'Forever Gold' laser-cut specialty paper & 'Expressions in Ink' Ephemera Pack
Ink: SU! Garden Green
Tools: SU! 'Hippo & Friends' & 'Forever Flourishing' die sets
Embellishments & Accessories: SU! Garden Green ribbon, Toile Tidings Glitter Enamel Dots, Dimensionals

Ruth

Snowflakes Thanks Snow Much Fancy Fold Card

After taking a long break I'm back to blogging again.  I'll share a few cards over the next couple of days and then posts will become more regular in February hopefully.

I love snowflakes and it's great to be able to use them after Christmas. Here is the fancy fold thanks card together with the envelope.


I used Pacific Point and Basic White CS with some 'Snowflake Splendor' DSP and some vellum.  When you emboss vellum with an embossing folder the design goes white which is a fab effect.  I added sparkly elements using the 'Be Dazzling' specialty DSP.


Here's the card slightly open.


Here's the card fully open.


Here's the front of the envelope.


Here's the back of the envelope.


Supplies:
Stamps: SU! 'Snowflake Wishes' set
CS: SU! Pacific Point, Basic White & Vellum
Patterned paper: SU! 'Snowflake Splendor' DSP, 'Be Dazzling' 6" x 6" Specialty DSP
Ink: SU! Pacific Point 
Tools: SU! 'Snowfall; 'So Many Snowflakes' & 'Hippo & Friends' die sets, circle punches, SU! 'Winter Snow' embossing folder
Embellishments & Accessories: SU! Dimensionals

Ruth

01 09 10