We're going out today with our fab friends Debbie and Mike. Debbie loves mice and nature. I made this friend to friend card for her using an image from last year's Peter Cross cat calendar. The calendar was gorgeous, it had such cute images of cats and mice. As soon as I saw this image I knew I'd have to cut it out to use on a card for Debs. Knowing Debs as I do, I know that the only thing better than a mouse is a podgy mouse. And what's better than a podgy mouse? A podgy mouse holding an acorn!
I made a 4" square Crumb Cake card, embossed the front with a square Nestie die and used Chocolate Chip and Pear Pizzazz CS for layering the image. The pear panel is popped up. I stamped the sentiment on pear CS, trimmed it and added pearls. I love my friend Jan's term for this kind of 'just because' card - she calls it 'just a bit of nonsense'.
Supplies:
Stamps: SU! Pocket Silhouettes set
CS: SU! Crumb Cake, Chocolate Chip & Pear Pizzazz
Ink: SU! Chocolate Chip
Tools: Square Nestabilities dies
Embellishments & accessories: self adhesive half pearls, 3d foam pads
Saturday, 29 January 2011
Friday, 28 January 2011
Best Wishes Stamper's Ten Challenge Card
For our Stamper's Ten monthly challenge, Joanne gave us CS in Concord Crush, Pretty in Pink and Basic Grey, a piece of Lap of Luxury patterned paper, the Concord Crush flower with the Pretty in Pink flower centre and some ribbon. I have to say I'm not a fan of Concord Crush and I'm not all that keen on grey either - but at least I loved the Pretty in Pink!
I used my gorgeous leafy medallion stamp from the Day of Gratitude set. I stamped the image in VersaMark, heat embossed with silver powder, cut it out and secured the paper flower to the centre with a Hodgepodge Hardware brad. The medallion is popped up. I added a punched photo corner and popped the sentiment oval up over the ribbon strip. The Best Wishes is heat embossed in silver and I punched it out with the plain oval punch. I punched another plain oval in pink, cut it in half and chopped a bit off both sides and layered the two bits behind the Concord Crush oval.
Supplies:
Stamps: SU! Day of Gratitude and Ovals All sets, Hero Arts Sending Smiles Messages set
CS: SU! Pretty in Pink, Concord Crush, Basic Grey
Patterned paper: SU! Lap of Luxury Designer Series Paper pack
Ink: VersaMark, Pretty in Pink, Basic Grey and Elegant Eggplant
Tools: SU! plain oval punch, SU! Photo Corners punch, Labels Trio die
Embellishments & accessories: Silver embossing powder, SU! Pretty in Pink grosgrain ribbon, Hodgepodge Hardware brad, 3d foam pads
I used my gorgeous leafy medallion stamp from the Day of Gratitude set. I stamped the image in VersaMark, heat embossed with silver powder, cut it out and secured the paper flower to the centre with a Hodgepodge Hardware brad. The medallion is popped up. I added a punched photo corner and popped the sentiment oval up over the ribbon strip. The Best Wishes is heat embossed in silver and I punched it out with the plain oval punch. I punched another plain oval in pink, cut it in half and chopped a bit off both sides and layered the two bits behind the Concord Crush oval.
I'd just got a new clear set of Hero Arts sentiment stamps and I was itching to get those inky so I used a couple of those for the inside of the card. I used a Labels Trio die for the sunshine and smiles wording. I also stamped three leaves from the Day of Gratitude set and cut them out.
Supplies:
Stamps: SU! Day of Gratitude and Ovals All sets, Hero Arts Sending Smiles Messages set
CS: SU! Pretty in Pink, Concord Crush, Basic Grey
Patterned paper: SU! Lap of Luxury Designer Series Paper pack
Ink: VersaMark, Pretty in Pink, Basic Grey and Elegant Eggplant
Tools: SU! plain oval punch, SU! Photo Corners punch, Labels Trio die
Embellishments & accessories: Silver embossing powder, SU! Pretty in Pink grosgrain ribbon, Hodgepodge Hardware brad, 3d foam pads
Thursday, 27 January 2011
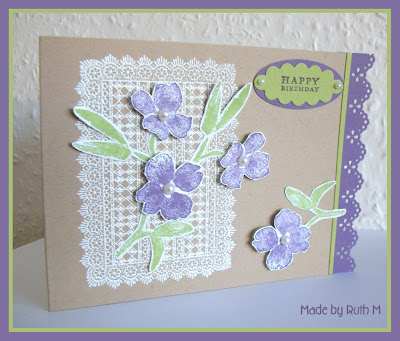
Flowers & Doily Happy Birthday Card
I picked up this rectangle doily stamp in the sale at the Glitter Pot. I couldn't wait to ink it up and try heat embossing with white powder, I think it turned out nicely. I stamped stems and flowers from the SU! Soft Summer set and cut them out. The flowers are popped up and I added a pearl to each centre.
Again, I made a side opening landscape oriented A6 card - I think they stand up better than the cards with the fold at the top. Also again, I cut off a strip from the right hand side and added a decorative punched border. I used Nellie Multiframe oval dies for the sentiment and added tiny pearls.
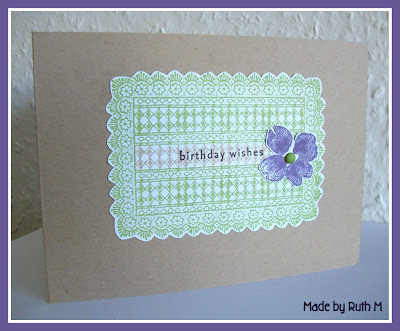
As per usual, I stamped the inside of the card as well. The doily looks great stamped in colour too! I stamped the doily in Pear Pizzazz ink, cut it out and also stamped it in Crumb Cake ink, added the birthday wishes sentiment and cut out a strip to layer over the pear doily. To finish off, I added a flower with a brad centre.
Supplies:
Stamps: Hero Arts Rectangle Doily, SU! Soft Summer, Vintage Frames & Wow Flowers sets
CS: SU! Crumb Cake, Perfect Plum, Pear Pizzazz & Whisper White
Ink: VersaMark, SU! Pear Pizzazz, Perfect Plum, Crumb Cake & Chocolate Chip
Tools: Martha Stewart Eyelet Lace border punch, Nellie Multiframe oval dies
Embellishments & accessories: White embossing powder, self adhesive half pearls, brad, 3d foam pads
Tuesday, 25 January 2011
CAS Flourish & Flowers Just Because - Craft For Life Card
Monday's CAS103 challenge on Splitcoast Stampers was to use a flourish. I used a stamp from the Inkadinkado Bold Damasks set as a leafy accompaniment to my trio of stamped flowers. I used a Memento Dew Drop ink pad but I wanted to achieve a rock and rolled look but you can't rock and roll on a small ink pad! So I inked the stamp, stamped off once and then went round the edges of the image with the pointed end of the ink pad, that worked a treat!
I still have Jan's oval Nesties on loan at home and I used them for my layers. I sponged distress ink around the vanilla oval. I cut 1/2" off the right side of my side opening A6 card and added a punched border and a plum strip. I seem to be loving decorative edges to my cards these days! To add some shaping and dimension to the flowers, I cut the petals deeper, placed them on a moulding mat and spiralled the thick end of an embossing stylus in the centre of each flower. The petals pop up a bit then. I've added gold self adhesive nailheads to each flower centre. This card will be donated to the Cancer Research UK Craft for Life campaign.
Supplies:
Stamps: Inkadinkado Bold Damasks clear set, SU! Vintage Vogue set, Personal Impressions Mixed Sentiments clear set
CS: SU! Very Vanilla & Perfect Plum, Core'dinations Amazon
Ink: Memento Sweet Plum, Memento Bamboo Leaves, SU! Chocolate Chip, Tim Holtz Antique Linen distress ink
Tools: Oval Nestabilities dies, Martha Stewart Eyelet Lace border punch, embossing stylus
Embellishments & accessories: Self adhesive gold nailheads
Monday, 24 January 2011
Birthday Twisted Easel Card
Monica Gale made a fabulous twisted easel card (see it here on her blog) and I couldn't wait to make one myself. I started off by cutting an A4 sheet of Close to Cocoa CS in half lengthways, I scored in the middle on the long side and then I scored a diagonal line. I see Monica has now made a video tutorial for how to make a twisted easel card (see it here) but I made my card before watching her video. Monica says you need to make sure the front panel is square - but mine isn't and it still worked. I think maybe it depends on the shape of the image you're going to have on the front as to whether to make that panel square or not. I'll try making one with a square panel to test this theory!
For my front panel I used the Sizzix Baroque die, I love how I could line points from the side of the die cut shape with the diagonal fold of the card! Also, this die is perfectly sized for US 5 1/2" x 4 1/4" size card fronts so it looks better here than on a standard C6 size card front. I inked the sentiment with Rose Red and Chocolate Chip markers, cut it out with an oval Nestie die and then trimmed it to fit on the patterned paper oval. I sponged Pretty in Pink and Close to Cocoa inks around the sentiment before gluing it down.
My stop for the easel was made using a pop up butterfly punch and I used the matching punch for the butterfly on the image oval. I added branches made using the Two Step Bird punch and 3 small flowers from the Boho Blossoms punch. I edged the flowers and butterfly with Cocoa ink and then I added pink gems.
I decided the best place to write a message would be the bottom of the card so I added a pink panel, stamped the flowers in Cocoa ink after stamping off and finished off with an oval sentiment element. It's difficult to see in the photo but the sentiment says "may your day be filled with flowers" - awww, lovely! (By the way, you can always click any photo to get a larger view). I stamped the same silhouette flowers on the front of the envelope in Rose Red ink after stamping off once first.
Supplies:
Stamps: Hero Arts Friends are Treasures sentiment cling set, Hero Arts Silhouette Corner, Personal Impressions Filled with Flowers clear set
CS: SU! Close to Cocoa, Rose Red, Pretty in Pink & Whisper White
Patterned paper: SU! Rose Red Prints Designer Series Paper pack
Ink: SU! Pretty in Pink, Rose Red, Close to Cocoa & Chocolate Chip
Tools: Sizzix Baroque die, oval & rectangle Nestability dies, Tonic Butterfly and Pop Up Butterfly punches, SU! Boho Blossoms punch, SU! Two Step Bird punch, metric Scor-Pal
Embellishments & accessories: Anita's gem wheel, 3d foam pads
Friday, 21 January 2011
Two Thank You Cards Made With The Just Believe Set
I absolutely love the SU! Just Believe set, I've used it for quite a few cards recently. These two thank you cards will be the last for a while I think, it's time to move on to other stamps! The first card was sent to Dawn Rapsas to say thank you for the opportunity to design for the UStamp events and for the SU! goodies she sent as gifts. It seemed only right to use one of the sets I chose as a gift.
I made this card very similar to others I've made recently, using bright colours teamed with a pop of black. I made a So Saffron side opening A6 landscape card, cut a bit off the right hand side and glued a strip of Melon Mambo CS on the inside. The circles overlap the edge. I stamped the leafy silhouette in saffron ink, added a strip of patterned paper and a Marina Mist strip edged with the Eyelet Border punch. The thank you panel is popped up. The flowery circles were stamped in saffron, melon and marina inks, punched out and matted on larger black circles.
The second thank you card was made for Joanne who very kindly lent me some SU! supplies to make my UStamp project. I received a lovely swap card from Nancy Horn a few days ago and I loved her Pear Pizzazz, Rose Red and Baja Breeze colour combo and I had to make a card with it straight away! I also used the Mojo Monday 97 sketch for the layout. I found a print out of the sketch when I cleared out my craft room recently - I'd had it since July 2009 and not made a card with it so it was about time I used it!
This is a Pear Pizzazz side opening A6 landscape card. The patterned paper at the bottom is from the retired Ski Slope DSP pack. I stamped the leafy silhouette in pear ink, stamping off first and then stamping again full strength. The thank you panel is popped up. You can't tell from the photo but I've added shimmer to the card by spritzing the leafy circle, thank you panel and the two flower circles with Champagne Mist spray. I added a button threaded with a thin strip of Rose Red CS to the layered photo corners. I also added a flowery circle element to the envelope flap.
Then I decorated the inside of the card.
Supplies for card one:
Stamps: SU! Just Believe set
CS: SU! So Saffron, Melon Mambo, Basic Black & Whisper White
Patterned paper: SU! Night & Day Designer Series Paper pack
Ink: SU! So Saffron, Melon Mambo and Marina Mist, black StazOn
Tools: SU! Eyelet Border punch, SU! circle punches
Embellishments & accessories: 3d foam pads
Supplies for card two:
Stamps: SU! Just Believe & inside sentiment from Trendy Trees set
CS: SU! Pear Pizzazz, Rose Red, Baja Breeze & Very Vanilla
Patterned paper: SU! Ski Slope Designer Series Paper pack
Ink: SU! Pear Pizzazz, Baja Breeze & Rose Red
Tools: Circle Nestabilities dies, SU! Photo Corners punch, circle punches
Embellishments & accessories: Spritz spray made with SU! Champagne Mist Shimmer Paint, SU! Latte Designer button, 3d foam pads
I made this card very similar to others I've made recently, using bright colours teamed with a pop of black. I made a So Saffron side opening A6 landscape card, cut a bit off the right hand side and glued a strip of Melon Mambo CS on the inside. The circles overlap the edge. I stamped the leafy silhouette in saffron ink, added a strip of patterned paper and a Marina Mist strip edged with the Eyelet Border punch. The thank you panel is popped up. The flowery circles were stamped in saffron, melon and marina inks, punched out and matted on larger black circles.
I also stamped inside the card.
Not forgetting the envelope.
The second thank you card was made for Joanne who very kindly lent me some SU! supplies to make my UStamp project. I received a lovely swap card from Nancy Horn a few days ago and I loved her Pear Pizzazz, Rose Red and Baja Breeze colour combo and I had to make a card with it straight away! I also used the Mojo Monday 97 sketch for the layout. I found a print out of the sketch when I cleared out my craft room recently - I'd had it since July 2009 and not made a card with it so it was about time I used it!
This is a Pear Pizzazz side opening A6 landscape card. The patterned paper at the bottom is from the retired Ski Slope DSP pack. I stamped the leafy silhouette in pear ink, stamping off first and then stamping again full strength. The thank you panel is popped up. You can't tell from the photo but I've added shimmer to the card by spritzing the leafy circle, thank you panel and the two flower circles with Champagne Mist spray. I added a button threaded with a thin strip of Rose Red CS to the layered photo corners. I also added a flowery circle element to the envelope flap.
Then I decorated the inside of the card.
Supplies for card one:
Stamps: SU! Just Believe set
CS: SU! So Saffron, Melon Mambo, Basic Black & Whisper White
Patterned paper: SU! Night & Day Designer Series Paper pack
Ink: SU! So Saffron, Melon Mambo and Marina Mist, black StazOn
Tools: SU! Eyelet Border punch, SU! circle punches
Embellishments & accessories: 3d foam pads
Supplies for card two:
Stamps: SU! Just Believe & inside sentiment from Trendy Trees set
CS: SU! Pear Pizzazz, Rose Red, Baja Breeze & Very Vanilla
Patterned paper: SU! Ski Slope Designer Series Paper pack
Ink: SU! Pear Pizzazz, Baja Breeze & Rose Red
Tools: Circle Nestabilities dies, SU! Photo Corners punch, circle punches
Embellishments & accessories: Spritz spray made with SU! Champagne Mist Shimmer Paint, SU! Latte Designer button, 3d foam pads
Thursday, 20 January 2011
Owl Birthday Wishes Card
Blimey, I made a masculine birthday card when I didn't actually need one! Well, I wanted to use my new woodgrain embossing folder. It will be nice to have one on hand in my stash anyway.
I made a side opening landscape A6 size card with More Mustard CS. I embossed the woodgrain folder on a piece of Core'dinations CS and scuffed the embossing with fine sandpaper. I stamped the owl and used oval Nesties to cut the image and layers out and then I sponged the vanilla edges with More Mustard and Chocolate Chip inks. I did the same for the sentiment. The owl panel is popped up and I added yellow gems to the owl's eyes.
I've borrowed Jan's oval Nesties to see how I like the petite sized ovals. I'm thinking ovals will be the next Nesties shape I get and I want to make sure I get the right ones and I think I'll be better off with slimmer ovals rather than fatter ones. You see, following my crafty clear out I'm determined to make fewer purchasing mistakes and make more sensible choices!
I then stamped the inside of the card. I bought a set of unmounted stamps from a friend - the swirl behind the sentiments and the leafy border on the envelope come from that set.
Supplies:
Stamps: Inkadinkado Birds Galore clear set, SU! Sincere Salutations set, inside sentiment from Hero Arts, unmounted stamps from unknown manufacturer
CS: SU! More Mustard, Chocolate Chip & Very Vanilla, Core'dinations Chocolate Mousse CS
Ink: VersaFine Vintage Sepia, SU! More Mustard & Chocolate Chip
Tools: Plain & scalloped oval Nestabilities dies, Craft Concept Woodgrain embossing folder
Embellishments & accessories: SU! Vintage brads, Anita's gem wheel, fine sandpaper, sponge daubers, 3d foam pads
Wednesday, 19 January 2011
Stamper's Ten Make & Take Cards
Last night was Joanne's Stamper's Ten Make and Take evening and she had two designs for us to make using the Sweet Summer Sale-A-Bration set. My cards differ from Joanne's slightly 'cos the stamping gods weren't smiling on me last night - or today - and I kept messing things up!
This first card uses the sprig stamp from the set, we coloured the leaves and berries with markers, drew lines and then added punched hearts with rhinestones and linen thread to one corner. We spritzed the Crumb Cake panel with the Color Spritzer tool and used the crimper to just crimp one portion of the panel. Joanne used the 'for you' stamp from the Fresh Cuts set but I finished my card off at home and made it an anniversary card. The image panel is popped up.
We decorated the inside with a Crumb Cake panel with three punched hearts in one corner.
For the second card, Joanne used the Scallop Trim border and matching corner punches on the saffron panel. Well, I just couldn't get my corners and borders lined up, I tried a couple of times but I gave up! I used the Eyelet Border punch on just one edge - much easier and far less frustrating! We coloured the flowers with markers scribbled on a tile and picked up the colour with a waterbrush. Then we cut out the flowers and popped them up. I coloured my sprig images for both cards in one go and got carried away - I carried on colouring the berries red when for this card I should have used the Marina Mist marker. So I've applied blue gems to cover up the red. The sprig was stamped in Marina Mist ink down the right side of the card and then we used a VersaMarker to colour in the images.
We decorated inside the card too. Joanne used the Scallop Trim punches again but I stuck with my Eyelet Border punch and added a saffron strip to the right side. I stamped my clear Hero Arts sentiment in Marina Mist ink - and then dropped the acrylic block on the white panel which resulted in some inky smudges * sigh * So I added some punched flowers to the bottom part of the panel. I really hate it when it's the very last thing on a card that goes wrong! Mind you I messed up on this one from the get go!
Supplies for anniversary card:
Stamps: SU! Sweet Summer set, sentiment from Stampendous
CS: SU! Cherry Cobbler, Crumb Cake & Whisper White
Ink: SU! Basic Black, Cherry Cobbler, Crumb Cake, Wild Wasabi, Cherry Cobbler & black marker pens
Tools: Crimper, Color Spritzer tool, SU! Heart to Heart punch, SU! Small Heart punch
Embellishments & accessories: SU! Linen Thread, SU! Basic Rhinestones, 3d foam tape
Supplies for birthday card:
Stamps: SU! Sweet Summer & Cheer & Wishes sets, Hero Arts Sending Smiles Messages clear set
CS: SU! Marina Mist, So Saffron & Whisper White
Ink: SU! Basic Black, Marina Mist, Wild Wasabi marker pen, VersaMarker pen
Tools: SU! Eyelet Border punch, X Cut mini flower punch, waterbrush
Embellishments & accessories: SU! Whisper White organza ribbon, SU! Dimensionals, Anita's gem wheel
Tuesday, 18 January 2011
Leafy Just For You Card For Mo
My friend Mo has just had a stay in hospital so I sent her this card to wish her well following her operation. I just can't get enough of the gorgeous silhouette stamp from the Just Believe set and I love it used with a soothing green colour palette. I wonder what it is that makes you fall in love with an image so? All I know is that it makes me happy to use it, the whole set is destined to be a firm favourite!
This card is a version of the card we made at our last card group. The card is a top folding portrait A6 size made with Certainly Celery CS. I've embossed the front with a leafy embossing folder and added some brown ribbon. I stamped the image in celery ink first and then in Memento Bamboo Leaves. The 'just for you' was stamped in pearlescent chocolate ink on a strip of vellum that was wrapped round and taped to the back of the white panel. The image panel is popped up. To finish the card front I added a large punched photo corner and green gems.
Then I decorated the inside of the card.
The last thing was to stamp the envelope. I love stamping the leafy frame on the front of envelopes - that's where I write the recipient's name.
Supplies:
Stamps: SU! Just Believe & Sweet Little Sentiments sets
CS: SU! Certainly Celery & Whisper White, Core'dinations Amazon
Ink: SU! Certainly Celery, Memento Bamboo Leaves, Brilliance Pearlescent Chocolate
Tools: Leafy Branch Cuttlebug embossing folder, rectangle Nestabilities dies, SU! Photo Corners punch
Embellishments & accessories: brown ribbon, Doodlebug Limeade gems, 3d foam pads
Monday, 17 January 2011
UStamp Swap Cards
Some of the designers for the UStamp with Dawn & Friends Year End Blow Out event took part in a card swap. Swappers had to make three cards using current SU! products. I've not taken part in a swap before and as there were only three cards involved I decided I'd do it. I generally don't make multiples of cards but three cards the same I can manage. How people make 50+ cards the same I'll never know, it would drive me barmy! We had to send two of the cards to Dawn (she keeps one and the others will be offered as a prize to a lucky winner) and then we had to send the third to our selected swap buddy.
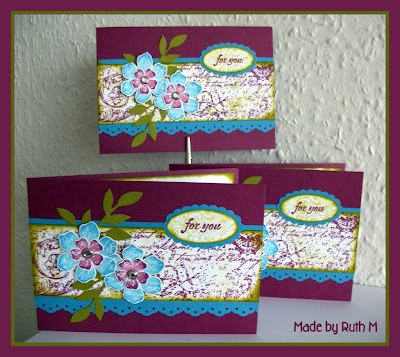
These are my cards using a few of my fave SU! products and colours. I made side opening A6 landscape cards. The colour combo is Rich Razzleberry, Marina Mist, Old Olive and Whisper White. I used the Vintage Vogue set, the co-ordinating Very Vintage jumbo wheel and the sentiment is from the Fresh Cuts set. Other well loved products used are the plain and scalloped oval punches, the Eyelet Border punch, the Little Leaves Sizzlits die and clear rhinestone brads.
I inked the flowers, stamped off once and then rock and rolled the edges. You get a nice gradation of colour that way. The flowers are popped up. For the sentiment, I stamped the Vintage Vogue flourish in olive ink after stamping off a couple of times before stamping the 'for you' and punching out.
Here's a pic of the front of just one card.
Here's the inside of Nancy's card. What a perfect sentiment for a sympathy card.
Supplies for my swap cards:
Stamps: SU! Vintage Vogue & Fresh Cuts sets, Very Vintage wheel
CS: SU! Rich Razzleberry, Marina Mist, Old OLive & Whisper White
Ink: SU! Rich Razzleberry, Marina Mist & Old
Tools: SU! Eyelet Border punch, SU! plain & scalloped oval punches, SU! Sizzix Little Leaves Sizzlits die, sponge daubers
Embellishments & accessories: SU! clear rhinestone brads, SU! Dimensionals
These are my cards using a few of my fave SU! products and colours. I made side opening A6 landscape cards. The colour combo is Rich Razzleberry, Marina Mist, Old Olive and Whisper White. I used the Vintage Vogue set, the co-ordinating Very Vintage jumbo wheel and the sentiment is from the Fresh Cuts set. Other well loved products used are the plain and scalloped oval punches, the Eyelet Border punch, the Little Leaves Sizzlits die and clear rhinestone brads.
I inked the flowers, stamped off once and then rock and rolled the edges. You get a nice gradation of colour that way. The flowers are popped up. For the sentiment, I stamped the Vintage Vogue flourish in olive ink after stamping off a couple of times before stamping the 'for you' and punching out.
Here's a pic of the front of just one card.
Of course, I had to stamp the envelopes and the insides of the cards too!
My swap buddy was the lovely Nancy. Here's the beautiful sympathy card she sent to me all the way from Idaho. Nancy chose two of my fave SU! colours - my old fave Rose Red and my new fave Pear Pizzazz - and I love the addition of some Baja Breeze in there. In fact, I liked the colours so much I had to make a card with these colours right away! I love the layout and adore the ruffled ribbon and tiny pearls! Nancy has used a new set called 'Thanks for Caring' from the USA mini catalogue.
Here's the inside of Nancy's card. What a perfect sentiment for a sympathy card.
Supplies for my swap cards:
Stamps: SU! Vintage Vogue & Fresh Cuts sets, Very Vintage wheel
CS: SU! Rich Razzleberry, Marina Mist, Old OLive & Whisper White
Ink: SU! Rich Razzleberry, Marina Mist & Old
Tools: SU! Eyelet Border punch, SU! plain & scalloped oval punches, SU! Sizzix Little Leaves Sizzlits die, sponge daubers
Embellishments & accessories: SU! clear rhinestone brads, SU! Dimensionals
Saturday, 15 January 2011
Winter Owl Candle Jar Wrap
Our friends Debbie and Mike gave us this lovely scented candle in a jar before Christmas. It's scented with cherry and almond fragrance - yummy, it makes me want Bakewell tart each time I light it LOL! It's a big candle and will last us a long time, it has a 100 hour burn time. We used it over Christmas and before I lit it I decided to make a wrap for it. I made it a winter themed wrap as opposed to a specific Christmassy one so I could keep it out after Christmas.
I wrapped olive snowflake paper around the body of the jar. Nothing is adhered to the glass so that I can easily swap out the wrap if I want to. I used Labels Four Nestability dies for the image and mat layers. I punched holes in the olive mat and tied it onto the jar with vanilla ribbon. I embossed the cherry mat with the Victorian Fleur embossing folder and popped it up. After stamping the owl and die cutting the label shape, I edged the shape with olive ink and added an olive crystal to the centre of the large snowflake. I've also popped up the owl layer.
For the lid, I die cut cherry and olive circles. I stamped a large snowflake on vanilla CS, die cut it into a circle, edged the circle with ink and put an olive crystal in the centre. The olive and snowflake layers are popped up.
Supplies:
Stamps: Inkadinkado Winter Birds clear set, My Cute Stamps Let It Snow clear set
CS: SU! Old Olive, Cherry Cobbler and Very Vanilla
Patterned paper: SU! Merry Moments Designer Series Paper pack
Ink: Memento ink in Rich Cocoa & Rhubarb Stalk
Tools: Labels Four & circle Nestabilities dies, PaperMania Victorian Fleur embossing folder, Crop-A-Dile
Embellishments & accessories: SU! Very Vanilla grosgrain ribbon, olive crystals, 3d foam pads
Wednesday, 12 January 2011
Thank You Card & Gift Box
This thank you card went to Jan and Alan to say thanks for our Christmas gifts. I bought Jan a stamp as a 'just because' gift as she's such a sweet friend. The gift box for the stamp was based on the packaging that some Waitrose chocolates came in. I carefully took the chocolate box apart to find out how I could make one myself.
For the card, I made a So Saffron side opening A6 size card and trimmed 1/2" off the right hand side. I then glued a strip of Melon Mambo CS inside the card. I stamped the foliage stamp 3 times across the card front in So Saffron ink and added the ribbons. I stamped the frame twice, once in olive and once in turquoise. I stamped the sentiment in melon on the turquoise frame and cut just the rectangle portion out and glued it over the top of the olive frame. The frame was popped up. I stamped the flowery circle in turquoise, melon and olive, punched them out, matted them on white circles and edged each white circle with melon ink. The circles overlap the trimmed off card edge.
Then I stamped the inside of the card and the envelope. I inked the edges of the white panel and stamped the lovely leafy image 3 times, stamping off for the first two images and stamping full strength for the third.
For the box top, I cut So Saffron CS measuring 24.5 x 12 cms and scored at 3.2, 11.4, 14.6 and 22.8 cms, then I turned the CS and scored at 3 cms. For the bottom of the box, I cut Melon Mambo CS measuring 23.5 x 15 cms, scored at 3, 11, 14 and 22 cms and then turned the CS and scored at 3cms. You can make this style box to whatever size you like but I came to realise you need to add 2mms to each of the 4 sides of the box top in order for it to fit - my first attempt wasn't a success! I stamped and decorated the box top while it was still flat. I used my Crop-A-Dile to punch a hole in the top for the ribbon loop, I put a length of ribbon through the hole and tied a knot inside. I think this is a very nice style of gift box, quite easy to make and it looks really striking if you use 2 contrasting colours of CS.
EDITED TO ADD: I was contacted by someone at Splitcoast Stampers who wanted imperial measurements so here they are.
For the box bottom, cut CS 9 1/2" x 6" and score at 1 1/4", 4 1/2", 5 3/4" and 9". Turn the CS and score at 1 1/4".
For the box top, cut CS 10" x 4 3/4" and score at 1 5/16", 4 5/8", 5 15/16" and 9 1/4". Turn the CS and score at 1 1/4".
You could easily adjust the measurements to make this box a different size but you must add 1/16" to each of the 4 sides of the box top so it fits over the bottom.
Supplies:
Stamps: SU! Just Believe set
CS: SU! So Saffron, Melon Mambo, Tempting Turquoise & Whisper White
Ink: SU! So Saffron, Melon Mambo, Tempting Turquoise & Old Olive
Tools: Metric Scor-Pal, circle punches, Crop-A-Dile
Embellishments & accessories: SU! Old Olive 5/8" grosgrain ribbon, SU! Tempting Turquoise 1/4" grosgrain ribbon, 3d foam pads
For the card, I made a So Saffron side opening A6 size card and trimmed 1/2" off the right hand side. I then glued a strip of Melon Mambo CS inside the card. I stamped the foliage stamp 3 times across the card front in So Saffron ink and added the ribbons. I stamped the frame twice, once in olive and once in turquoise. I stamped the sentiment in melon on the turquoise frame and cut just the rectangle portion out and glued it over the top of the olive frame. The frame was popped up. I stamped the flowery circle in turquoise, melon and olive, punched them out, matted them on white circles and edged each white circle with melon ink. The circles overlap the trimmed off card edge.
Then I stamped the inside of the card and the envelope. I inked the edges of the white panel and stamped the lovely leafy image 3 times, stamping off for the first two images and stamping full strength for the third.
For the box top, I cut So Saffron CS measuring 24.5 x 12 cms and scored at 3.2, 11.4, 14.6 and 22.8 cms, then I turned the CS and scored at 3 cms. For the bottom of the box, I cut Melon Mambo CS measuring 23.5 x 15 cms, scored at 3, 11, 14 and 22 cms and then turned the CS and scored at 3cms. You can make this style box to whatever size you like but I came to realise you need to add 2mms to each of the 4 sides of the box top in order for it to fit - my first attempt wasn't a success! I stamped and decorated the box top while it was still flat. I used my Crop-A-Dile to punch a hole in the top for the ribbon loop, I put a length of ribbon through the hole and tied a knot inside. I think this is a very nice style of gift box, quite easy to make and it looks really striking if you use 2 contrasting colours of CS.
EDITED TO ADD: I was contacted by someone at Splitcoast Stampers who wanted imperial measurements so here they are.
For the box bottom, cut CS 9 1/2" x 6" and score at 1 1/4", 4 1/2", 5 3/4" and 9". Turn the CS and score at 1 1/4".
For the box top, cut CS 10" x 4 3/4" and score at 1 5/16", 4 5/8", 5 15/16" and 9 1/4". Turn the CS and score at 1 1/4".
You could easily adjust the measurements to make this box a different size but you must add 1/16" to each of the 4 sides of the box top so it fits over the bottom.
This photo shows the top and bottom of the box separately. The top slides over the bottom. I put a clear round wrap seal sticker on each side to keep the lid on after I'd put the stamp in the box.
Supplies:
Stamps: SU! Just Believe set
CS: SU! So Saffron, Melon Mambo, Tempting Turquoise & Whisper White
Ink: SU! So Saffron, Melon Mambo, Tempting Turquoise & Old Olive
Tools: Metric Scor-Pal, circle punches, Crop-A-Dile
Embellishments & accessories: SU! Old Olive 5/8" grosgrain ribbon, SU! Tempting Turquoise 1/4" grosgrain ribbon, 3d foam pads
Monday, 10 January 2011
CAS Snowman Card
I checked today's CAS challenge on Splitcoast Stampers and saw that it was titled a Day in the Snow. I thought that was the perfect nudge for me to ink up my new Basic Grey set of snowman stamps. Well, I did ink them up and then promptly wished I hadn't! Oh dear, that set was an unwise purchase for sure. Anyway, plan B was to dig out a favourite, oldie but goodie, reliable snowman stamp.
I made an A6 size Real Red card which has the fold at the top. I embossed most of the front with the Cuttlebug Snowflakes folder and added gingham ribbon above the embossing. I stamped the snowman and coloured him with Copic markers. I've applied Stickles to the holly berries, the nose, the star and the line of snow at the bottom. I used oval Nellie Multiframe dies for the sentiment and added red brads. The sentiment oval is popped up.
I always edit my photos in Picasa and I noticed a new feature where you can further edit your photos in Picnik. I checked it out and saw you could add frames so I gave it a go - I rather like it!
This photo shows how I decorated the inside. I stamped snowflakes and the sentiment and then used the oval dies and red brads again. I also added a blue snowflake embossed strip.
Supplies:
Stamps: SU! Penny Black Brush Snowman, Personal Impressions Christmas Messages set, PSX Snowflakes Medley, Penny Black Each Friend
CS: SU! Real Red, black CS, Bazzill orange peel textured Teal CS, Craftwork Cards Digital CS
Ink: Memento Tuxedo Black, VersaFine Onyx Black, ColorBox Robins Egg, Copic markers
Tools: Oval Nellie Multiframe dies, Cuttlebug Snowflakes embossing folder
Embellishments & accessories: black & white gingham ribbon, red brads, Stickles in Xmas Red, Orange Peel, Yellow & Star Dust, 3d foam pads
Saturday, 8 January 2011
Thank You Card For Debbie & Mike
We spent Christmas day with our fabulous friends Debbie and Mike. We had a wonderful, relaxing day with delicious food and lovely gifts. This is the thank you card I made for them. I used my fab new SU! set I got from the USA as a gift for designing for the UStamp Year End Blow Out event. The set is called Day of Gratitude, it's a Thanksgiving set not available from the UK catalogue. I absolutely fell in love with the images in the set - how cute is that little acorn?! Debbie loves leaves so I know she'll like this set too.
I made a side opening A6 landscape card in Chocolate Chip CS. The embossed panel is Really Rust and the bottom panel is Pear Pizzazz and I added a strip of Very Vanilla ribbon. I stamped the medallion in pear ink, cut it out and I've added a gorgeous Antique brad to the centre - another fab UStamp gift I received. I stamped the acorns in Choc Chip and the leaves in Crumb Cake, Old Olive and Really Rust and cut them out. The medallion, one acorn on the medallion and the acorn on the sentiment are all popped up.
For the inside of the card, I used various stamps from the Elzybells 'Thank you for' sentiment set. The image on the circle is from the Day of Gratitude set - I inked it using marker pens so I could get three different colours. I put the same element on the flap of the envelope.
Supplies:
Stamps: SU! Day of Gratitude set, Elzybells Thank you for clear set
CS: SU! Chocolate Chip, Really Rust, Pear Pizzazz & very Vanilla
Ink: SU! Pear Pizzazz, Really Rust, Crumb Cake, Old Olive & Chocolate Chip
Tools: Victoria Cuttlebug embossing folder, Spellbinders Labels Trio die
Embellishments & accessories: SU! Very Vanilla grosgrain ribbon, SU! Antique brad, sponge daubers, 3d foam pads
Subscribe to:
Posts (Atom)