Wednesday, 30 March 2011

Nostalgia Bird For You BRAK Card

Yesterday's CC316 colour combo challenge on Splitcoast Stampers was Certainly Celery, Marina Mist and Baja Breeze with a 'dessert option' to use a bird.  I seem to really like blues and greens together these days so I was happy to make a card with this lovely, soothing colour combo.

I started off with a side opening celery A6 card, a Baja Breeze embossed panel and some Certainly Celery ribbon.  I decided I'd use my Inkadinkado Nostalgia set - I love this set, it has everything you need to make a birthday card  - fab images, a lovely sentiment, decorative details and even a 'handmade' stamp for the back of the card.  SU! classic dye inks don't work well with Inkadinkado solid clear stamps,  I normally use chalk or Memento inks with them.  However, the images in this set are distressed and slightly grungy so it doesn't matter if the ink coverage is less than perfect.  Another reason to love this set, I can use my SU! inks! 

I also decided to try out a new embossing powder I bought recently - Wow White Pearl.  It turns your stamped image pearly and tones the ink colour down somewhat.  I inked the bird stamp with ColorBox Peacock pigment ink which is quite an intense blue - after embossing with the pearl powder I was chuffed to find it turned out really close to Marina Mist!  I used square Nestie dies to mat and layer and I've added silver brads and pale green crystals to the white square.  The lacy square is popped up.  I finished off the card front with a Marina Mist punched photo corner and I couldn't resist adding more of the gorgeous pale green crystals!


I then stamped the envelope flap and inside the card using more images and the birthday sentiment from the Nostalgia set.  The word 'Birthday' has a flower over the i - a perfect place to pop another crystal!  Another BRAK card added to my stash.


Supplies:
Stamps: Inkadinkado Nostalgia clear set, 'for you' from SU! Fresh Cuts set
CS: SU! Certainly Celery, Baja Breeze, Marina Mist & Whisper White
Ink: SU! Marina Mist & Certainly Celery, ColorBox Peacock pigment ink
Tools: Square, Lacy Square & Petite Oval Nestabilities dies, PaperMania Victorian Fleur embossing folder, SU! Photo Corners punch, SU! Mat Pack
Embellishments & accessories: SU! Certainly Celery poly twill ribbon, Wow White Pearl embossing powder, silver brads, pale green crystals, 3d foam tape

Photobucket

Monday, 28 March 2011

Two CAS Cards - Cocktail Cheers & Peony Birthday

Kelly mentioned the Less is More sketch challenge on her Craftin' Corner blog and once I'd checked it out I decided to give it a go.  I don't use DL size cards very often, but of course, I do have some DL card blanks that have been languishing in my stash for ages!  So this challenge was the perfect opportunity to use one up.  I also took the opportunity of using another of my neglected stamp sets - this time the SU! Cheers to You set.

I stamped the image on watercolour paper, scribbled marker colours on a ceramic tile and picked up the colour with a blender pen.  I didn't want the entire sentiment on my circle so I masked off the 'to you!' portion, just stamped the 'Cheers' and then I added an exclamation mark with a Ruby Red marker.  After I'd coloured the image I chose CS colours for my three strips - Really Rust, Ruby Red and Marina Mist.You can't tell from the photo, but I added Dazzling Diamonds to the rim of the glass and Glossy Accents to the cherry.  You'll get a closer view if you click on the photo.  The Ruby Red circle and the image circle are both popped up.  To finish, I added a line of rhinestones and rounded the top right corner of the card.


The postie delivered a new set of stamps to me today.  I'm collecting a few retired SU! two-step stamping  floral sets from eBay and today I received the Pretty Peony set.  When I checked today's CAS112 challenge on Splitcoast Stampers and saw that it entailed cutting sentiments apart, I remembered I had a lovely birthday saying that would work so well with these floral sets.  It's from a set of See D's stamps that I have had for years but haven't used in a long while.  I dug out the sentiment and after stamping cut it into three strips.  I sponged the edges of each strip with Old Olive ink.  I used Pretty in Pink and Rose Red inks for my flowers and Certainly Celery and Old Olive for my leaves.  I sprinkled some Dazzling Diamonds on the centre of the large peony and popped it up.  I finished off the card by rounding all the corners and I added a pink gem to each Vanilla strip.  Another gorgeous flower set that I LOVE! * happy sigh *


Supplies for Cheers! card:
Stamps: SU! Cheers to You set
CS: Craft Creations textured white DL card blank, SU! Really Rust, Ruby Red & Marina Mist, watercolour paper
Ink: VersaFine Onyx Black, SU! markers in various colours, SU! Ruby Red
Tools: Circle Nestabilities dies, Crop-A-Dile Corner Chomper, blender pen
Embellishments & accessories: SU! Dazzling Diamonds, Glossy Accents, clear rhinestones, 3d foam pads


Supplies for peony birthday card:
Stamps: SU! Pretty Peony set, See D's Friendship Blooms set
CS: SU! Pretty in Pink & Very Vanilla
Ink: SU! Pretty in Pink, Rose Red, Certainly Celery, Old Olive & Early Espresso
Tools: Crop-A-Dile Corner Chomper
Embellishments & accessories: SU! Dazzling Diamonds, 3d foam pads


Photobucket

Saturday, 26 March 2011

Two CAS Golden Leaves Cards

A few months back I bought some stamps from Joanne after she'd had a clear out.  I'm always attracted to leafy and foliage images so I was immediately drawn to the Penny Black 'Golden Leaves' stamp Joanne was selling.  I realised a few days ago I hadn't inked it up yet so I set out to rectify that situation.  Oh my goodness, what a beautiful stamp!  I don't know how it's done, but you definitely get different colours on the image even though you only ink it in one colour of ink.  I'm putting it down to magic!  I'm so happy Joanne let this stamp come to a new home, thanks Joanne!

First off I made a birthday card using Baja Breeze CS -  I am loving Baja Breeze at the moment and can't seem to stop using it.  I stamped the Golden Leaves stamp in three different colours - Crumb Cake, Old Olive and Baja Breeze.  I then cut out part of the images with a square Nestabilities die.

I then had to perform surgery on a clear stamp - gulp!  I wanted to use the birthday sentiment from the Woodware 'Special Wishes' clear set.  The sentiment reads "Sending you the best wishes for a wonderful day".  Hmm, surely that should be "sending you best wishes..." or "sending you the best of wishes...".   I was not happy to use the sentiment as it was so I've cut it apart - I've been reluctant to do this with clear stamps in the past but it was easy with a sharp craft knife.  Anyway, now I have the "sending you" and the "Best Wishes..." wordings as two stamps which made it a doddle to stamp my sentiment separately.  Phew, it all turned out well! 

Before gluing the panels down, I scored lines using my Scor-Pal to add a bit of interest.  I then added some tiny punched butterflies with clear gems.


Next came the envelope and inside the card.  I LOVE this image stamped in Baja Breeze, gorgeous!


While I was making this card I thought the colour combo was soothing and would be suitable for a sympathy or thinking of you type card so that's what I made next.  I stamped the image in Old Olive ink a few times across a piece of vanilla CS, overstamped that with the Linen background stamp in Crumb Cake ink and sponged the edges.  I die cut a scalloped border, covered the holes with gold nailheads and added narrow Early Espresso strips.  For once, I haven't decorated the inside but I did stamp the leafy image in olive ink on the envelope flap.


Supplies for birthday card:
Stamps: Penny Black Golden Leaves, Woodware Special Wishes clear set, Hero Arts Fabulous Birthday
CS: SU! Baja Breeze & Whisper White
Ink: SU! Crumb Cake, Old Olive, Baja Breeze & Early Espresso
Tools: Martha Stewart multi butterfly punch, Scor-Pal
Embellishments & accessories: clear gems


Supplies for thinking of you card:
Stamps: Penny Black Golden Leaves, SU! Linen background stamp, Hero Arts Sending Smiles Messages clear set
CS: SU! Baja Breeze, Crumb Cake, Early Espresso & Very Vanilla
Ink: SU! Old Olive, Crumb Cake & Early Espresso
Tools: Sizzix Lace Edging decorative strip die, Stamp-A-Ma-Jig, sponge dauber
Embellishments & accessories: self adhesive gold nailheads


It's the WWF Earth Hour tonight, at 8.30 pm loads of people worldwide will be turning out their lights for one hour. Click here to get more details and you can click on the widget at the top of my page to sign up for it yourself. I'm looking forward to some cosy candlelight tonight!

Photobucket

Wednesday, 23 March 2011

Medallion & Bliss Best Wishes On Your Birthday Card

As soon as I saw the Bliss set I felt it would work well with the Vintage Vogue set - and it does.  My next experiment was to see how well it worked with the Medallion stamp and here's the result.  Yep, Bliss and Medallion as a combo works for me!  Another combo that works for me is Baja Breeze paired with Early Espresso - lovely! - I added in some Very Vanilla too.

I started off with an espresso A6 card.  Then I stamped my vanilla panel, firstly with the Victorian Lace background stamp in Antique Linen distress ink.  Then I added the medallion and the large Hero Arts birthday sentiment.  I stamped Victorian Lace again in Antique Linen on a piece of vanilla CS, stamped the flourish from the Bliss set and cut it out with a circle Nestie die.  I sponged the edges of the main panel and the vanilla circle with Antique Linen ink followed by a touch of Early Espresso ink.  Next I stamped the butterfly in Baja Breeze ink and I edged it in Antique Linen and Early Espresso.  I popped up the wings a bit and then added two pearls to the body.

This is probably the closest I'll get to making a really shabby chic, vintage style card.  I definitely gravitate towards a clean style most of the time - but a sponge dauber for distressing edges is never far from my hands these days!  Anyway, I was happy when the card was finished and I'll likely use it as a birthday RAK card.


For inside the card, I stamped a vanilla panel with the Victorian Lace background stamp and added a partial Bliss flourish at the bottom.  I'd just received a new Inkadinkado clear 'Collaged Expressions' set so I used one of the frames from that set to stamp my sentiment in.  That gorgeous Bliss flourish looks so elegant stamped on an envelope flap!


Supplies:
Stamps: SU! Bliss set, SU! Medallion & Victorian Lace stamps, Hero Arts Friends are Treasures cling set, Inkadinkado Collaged Expressions clear set
CS: SU! Early Espresso & Very Vanilla
Ink: SU! Early Espresso & Baja Breeze, Tim Holtz Antique Linen distress ink
Tools: Circle Nestabilities dies, Stamp-A-Ma-Jig, sponge daubers
Embellishments & accessories: self adhesive half pearls


Photobucket

Tuesday, 22 March 2011

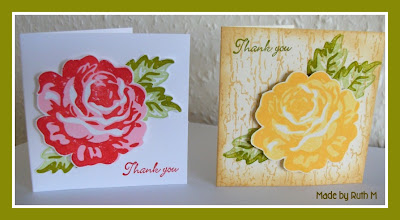
Rosy Mini Thank You Cards

My eBay selling is ongoing and I've made a few more mini thank you note cards to pop in the packages.  I used the utterly fabulous large rose from the a Rose is a Rose set.  I had a fun time trying out different colour combos for my roses - some were yuck (Saffron and Pumpkin Pie - blech!) and some were yummy - loved Pretty in Pink and Ruby Red! 

I made the Pretty in Pink and Ruby Red rose card first, I think it turned out very Cath Kidston!  I like the clean contemporary look but after I'd finished it I wished I'd added a background stamp.  So I used my Antique Cracking stamp on the next three cards which are much more vintage and shabby chic looking.  It took me a while to find a nice yellow rose combo I was happy with - I finally got a subtle creamy rose using SU! Barely Banana ink followed by Memento Cantaloupe ink for the outline image.  I stamped the Antique Cracking stamp in Antique Linen on that card.


Next, I used Pretty in Pink ink followed by Rose Red ink for the outline.  For all the cards so far I used Pear Pizzazz and Old Olive inks for the leaves.  For the last card I used Pale Plum followed by Rich Razzleberry for the rose and this time I used Mellow Moss followed by Always Artichoke inks for the leaves.  I used Crumb Cake ink to stamp the Antique Cracking background on these last two cards.  I was happy with my soft, subtle yellow rose but I am loving the dramatic roses you get when you use more contrasting ink colours!


So what's better than a rose on a card? A ribbon rose brooch!  Amanda is giving three gorgeous ribbon rose brooches away on her blog.  Go here to read the post and enter the giveaway.  Good luck - but not TOO much, I have to tell you I want one in Rich Razzleberry LOL!

Photobucket

Monday, 21 March 2011

Morning Glory Card For Theresa

Theresa won the Victorian Fleur embossing folder I offered as a giveaway.  I made a card for Theresa to accompany the folder using the folder plus my new SU! Marvelous Morning Glory stamp set.  I have to say I am SO taken with these old, retired, two-step floral sets, I LOVE them - and seem to be building a collection of them!  They're a tad time consuming what with all the Stamp-A-Ma-Jigging you need to do but then I think the results are worth it.  The old, retired background stamps I also seem to be collecting work so well with these floral sets too.

I started off with a 5 3/4" square Baja Breeze card which I stamped with the Weathered background stamp in Antique Linen ink.  I also stamped this on a piece of Whisper White CS.  I embossed a piece of Core'dinations CS with the Victorian Fleur folder and scuffed the embossing with fine sandpaper.  I stamped the white panel with the sentiment, stem, flowers and leaves, sponged the edges and cut out two flowers and popped them up.  Plain square and Lacy Square Nestie dies were used to mat and layer.  The Perfect Plum layer was popped up.


Of course I couldn't resist decorating the envelope flap and the inside of the card!


I had such a lovely message from Theresa to thank me for the folder and card, what a sweetheart!  Theresa, I hope you enjoy using this gorgeous folder as much as I do, it sure is one of my favourites! 

Supplies:
Stamps: SU! Marvelous Morning Glory & Best Yet sets, SU! Weathered background stamp
CS: SU! Baja Breeze, Perfect Plum, Not Quite Navy & Whisper White, Core'dinations Amazon CS
Ink: SU! Baja Breeze, Not Quite Navy, Perfect Plum, Pear Pizzazz & Old Olive, Tim Holtz Antique Linen distress ink
Tools: Square & Lacy Square Nestabilities dies, PaperMania Victorian Fleur embossing folder, Stamp-A-Ma-Jig, sponge dauber
Embellishments & accessories: SU! Vintage brads, 3d foam pads


Photobucket

Saturday, 19 March 2011

Two Flower & Fern Birthday Cards

A few days ago I made a CAS butterfly card and I had the negative pieces from the border punching left over.  Rather than discard the pieces I decided to make a card with them, keeping to the same layout.  I started off with a side opening Crumb Cake A6 card and I stamped the fern image a few times in espresso ink. I stamped an espresso fern on a Baja Breeze panel and glued this to my fancy borders.  I stamped a couple of flowers from the Growing Green set on Crumb Cake CS and cut the petals apart to use as leaves to tuck behind my large flower that I stamped on Rose Red patterned paper.  The flower is popped up.  I stamped my sentiment and used a Labels Trio die to cut it out.


I stamped the fabulous fern on the envelope front. As I will use this as a birthday RAK card I added the birthday sentiments over the top of the fern stamped inside the card.


The second card uses the same Growing Green set but this time I watercoloured the fern and flower.  I love how I got different looks using the same stamp set.   I haven't made a Z fold card in a while and they are one of my fave styles of card so I turned a side opening Pretty in Pink A6 card into a Z fold.  I'd just received an old, but new to me, SU! Fern Lace background stamp - gorgeous! - and I was itching to ink it up.  I stamped it in Crumb Cake ink on Whisper White CS after stamping off once and then stamped the fern.  I used petite oval Nestability dies to cut my image layer and mats. 

To colour the fern and flower, I patted ink pads on a ceramic tile and picked up the colour and painted with a waterbrush.  I popped up the flower and added the sentiment.  I stamped the Fern Lace background in Old Olive ink for the back panel and added a strip of Old Olive ribbon.  I've added pink gems to the ribbon - even though I'll use this as a birthday RAK card and I should keep things flat, I couldn't resist the lure of the bling!  Punched photo corners finished off the front.


For the message panel inside, I again used the Fern Lace stamp, inking in Old Olive but stamping off a couple of times.  You can see I also stamped the Fern Lace on the envelope front and I added a Rose Red strip.  I got a new sentiment stamp on my trip to the Glitter Pot last week, 'hope you have  great day' which I thought would be fab for birthday cards but could be used on other occasions too.  I used petite oval Nesties again for the sentiment.


Supplies for Sending Smiles card:
Stamps: SU! Growing Green set, Hero Arts Sending Smiles Messages clear set
CS: SU! Crumb Cake, Baja Breeze, Rose Red & Early Espresso
Patterned paper: SU! Rose Red Prints Designer Series Paper pack
Ink: SU! Early Espresso & Crumb Cake
Tools: Sizzix Tim Holtz 'Brackets' On the Edge die, Spellbinder's Labels Trio die, SU! Photo Corners punch
Embellishments & accessories:  3d foam pads


Supplies for Best Wishes Z fold card:
Stamps: SU! Growing Green & Sincere Salutations sets,  SU! Fern Lace bg stamp, Penny Black Great Day
CS: SU! Pretty in Pink, Old Olive, Rose Red & Whisper White
Ink: SU! Early Espresso, Old Olive, Pretty in Pink & Rose Red
Tools: Petite oval Nestabilities dies, SU! Photo Corners punch, waterbrush & ceramic tile
Embellishments & accessories: SU! Old Olive grosgrain ribbon, Prima pink gems, 3d foam pads


Photobucket

Thursday, 17 March 2011

Wall & Window You Make Me Smile - WT314

The WT314 challenge on Splitcoast Stampers today is Miles of Smiles.  What a perfect prod for me to use another of my neglected stamp sets - this time the SU! Window Dressing set.  I had a sort out in my craft room at the beginning of the year and set aside some stamps to sell.  I have a few sets, like this one,  that I don't want to part with but I know I don't use that often.  I really want to try to use my neglected stamps!

I bought a brick embossing folder at the weekend and I thought that would be ideal to partner with my window.  While I was in the shop I looked for some brick coloured Core'dinations CS.  What I found was too deep I thought so I chose a Cotswold sandstone type colour instead.  I embossed the piece of Core'dinations CS and scuffed the embossing with fine sandpaper.  I stamped the images on watercolour paper, coloured them with inks and a waterbrush and cut them out.  After stamping the arched sentiment I punched it out with a 1 3/4" circle, glued it flat to the card and added green star gems.  I then popped up the window image under the sentiment.  I added punched grass to the bottom and popped up the kitty.  I coloured this kitty the same colour as my older cat Tucker who is dark grey with white bits and has white paws and a white tipped tail.   I showed him the card - he didn't seem impressed LOL!


Supplies:
Stamps: SU! Window Dressing set
CS: SU! Pear Pizzazz, Core'dinations Cream-n-sugar CS, watercolour paper
Ink: SU! Basic Grey, Pear Pizzazz, Bordering Blue, Blush Blossom, Regal Rose, Creamy Caramel & Chocolate Chip
Tools: Creative Expressions 'Brick' embossing folder, Martha Stewart Grass border punch, SU! 1 3/4" circle punch, Stamp-A-Ma-Jig,  waterbrush, ceramic tile
Embellishments & accessories: green star gems, 3d foam pads

Photobucket

Wednesday, 16 March 2011

Little Thank You Notes Selection

I'm selling some items on eBay and I like to tuck a thank you note for the buyer in each parcel.  I went to the Glitter Pot last Saturday and bought a pack of PaperMania 3" x 3" card blanks with envelopes.  I thought they were so sweet and perfect to pop in my eBay packages.  This is just a selection of the cards I've stamped.  I've had a lot of fun making these mini cards. 

I used my new SU! Watercolor Minis set for the card on the left - even though it's a tiny card it was time consuming with all the Stamp-A-Ma-Jig action!  I really like the little Watercolor Minis set though, the images are so dinky and sweet.  I've added glitter to the butterfly and roses.   I used Pocket Silhouettes for the card on the right.  I edged the white panel with my Elegant Eggplant marker and then popped it up.


These two cards were made with one of my new fave colours - Baja Breeze.  I paired baja with olive on the Vintage Vogue card on the left.  For the Bliss card on the right, I teamed baja with espresso.  Very elegant I think.


These two springy cards use a couple of new Memento inks I bought at the Glitter Pot - Dandelion and Cantaloupe.  I used Vintage Vogue for the card on the left and my Inkadinkado Nostalgia set for the card on the right.  I inked the yellow flowers in Daffodil and then went round the edges with the Cantaloupe ink.  The small pink flower was inked in Pretty in Pink and rock and rolled in Regal Rose.  The card on the right also shows a new clear stamp set I bought from my visit to the Glitter Pot - the Woodware Leafy Accents set.


Photobucket

Tuesday, 15 March 2011

Bliss Butterfly For You Birthday RAK Card

As soon as I saw the Bliss Sale-a-bration set I thought it might work really well with the Vintage Vogue set and Very Vintage wheel.  This card came about to test that theory - and I think they do go together very well.  This card will be sent as a birthday RAK card in April.

So it's another Bliss butterfly birthday card using one of my fave colour combos - Rich Razzleberry, Marina Mist and Old Olive.  I stamped the flourish in razzleberry ink and cut it out with a square Nestie die so only part of the design is visible, layered it on a larger olive square and then matted onto a razzleberry lacy square.  I stamped the straight image from the Vintage Vogue set in razzleberry ink on the card front, added a panel I stamped with the Very Vintage wheel and then added two Olive strips.  I  attached small Marina Mist Vintage Vogue flowers to the flourish panel with vintage brads.  I added an olive butterfly with blue gems to the lacy square.  I sponged Marina Mist ink around the white panels of the card.


This is how I decorated the envelope and inside the card.


Supplies:
Stamps: SU! Bliss, Vintage Vogue, Fresh Cuts, Sincere Salutations & Frames with a Flourish sets, Very Vintage wheel
CS: SU! Marina Mist, Rich Razzleberry, Old Olive & Whisper White
Ink: SU! Marina Mist, Rich Razzleberry & Old Olive
Tools: Square, Lacy Square & Petite Oval Nestabilities dies, Stamp-A-Ma-Jig
Embellishments & accessories: SU! vintage brads, blue gems

Photobucket

Monday, 14 March 2011

Rosy, Lacy 50th Birthday Wishes Card For Joanne

This is the card I made for Joanne who is celebrating her 50th birthday today.  Hope she enjoys her special day!  I used gorgeous retired SU! stamps (or contraband items as Joanne refers to my SU! eBay purchases!) to make this card, the Rose is a Rose set and the Victorian Lace background stamp.  A match made in heaven, beautiful stamps to work with!  My colour combo is Melon Mambo, Old Olive and Basic Black, very striking I think.

I started off with a Melon Mambo side opening A6 card, I added a black mat and then my lacy layer.  I inked the Victorian Lace stamp with VersaMark and embossed with white embossing powder on Basic Black CS.  The roses and leaves were stamped with Regal Rose, Melon Mambo, Pear Pizzazz and Old Olive inks.  I cut all the images out, added Dazzling Diamonds to the roses and popped everything up.  I had to add a reference to the big 50 milestone - but at least I was subtle about it!  I stamped the lacy background in Pear ink after stamping off once, stamped the 50 in Melon ink after stamping off a few times, stamped the sentiment in black ink, cut it out with an oval die and edged the oval with Olive ink.  I've popped the white oval up.  To finish off the front, I added pink pearls and I added a sparkly rose circle to the envelope flap. 


I also decorated the front of the envelope and stamped inside the card.  I was determined to use that black lacy strip left over from my layer on the card front!  The Victorian Lace background stamp is SO pretty and I was looking on eBay a week or so ago and I came across another retired SU! lacy background stamp.  Of course I couldn't resist, I'm now stalking the postie, anxiously awaiting the arrival of my Fern Lace background stamp!


Supplies:
Stamps: SU! A Rose is a Rose & Wow Flowers sets, SU! Victorian Lace background stamp, Hero Arts Basic Numbers set, Hero Arts Fabulous Birthday
CS: SU! Melon Mambo, Old Olive, Basic Black & Whisper White
Ink: SU! Regal Rose, Melon Mambo, Pear Pizzazz & Old Olive, Memento Tuxedo Black, VersaMark
Tools: Petite oval Nestabilities dies, SU! Eyelet Border punch, SU! circle punches
Embellishments & accessories: SU! Old Olive grosgrain ribbon, white embossing powder, SU! Dazzling Diamonds glitter, Prima pearls, 3d foam pads


Photobucket

Saturday, 12 March 2011

Lilac Blossoms For Kelly

When I blogged my first projects made with the SU! Blossoms Abound set I received such a lovely comment from Kelly from Kelly's Craftin' Corner.  I've never met Kelly but I've had online contact with her a few times.  Anyway, I contacted her to ask if she would like to receive a card made with the Blossoms Abound set.  Kelly said yes so I set to work.  I didn't just make a card though, it turned into an ensemble (sounds posh LOL!) 


I added a bookmark and a decorated box containing some chocs.  I recently bought some sweet butterfly earrings from Past Times and I had kept the box as I knew I could do something crafty with it.   It's a nice sturdy box with a magnetic closure.  Not quite a perfect match to Razzleberry but close enough!

For the card I made a Razzleberry 5 3/4" square blank.  I added Old Olive and Whisper White to the colour scheme and I used papers from the SU! Cottage Wall pack - one of my favourite packs.  I had just received my SU! Linen background stamp from eBay so after stamping the lilacs panel I overstamped with the Linen using Crumb Cake ink and I sponged the edges.  Oh my word, I LOVE the Linen stamp, I'm so glad I got it!  I sprinkled sparkle on the flowers with Dazzling Diamonds glitter.  I added Old Olive ribbon, a flat bow and photo corners with olive crystals.


Here's a pic showing a close up of the Linen overstamping - and the sparkly Dazzling Diamonds!


Of course, it wouldn't be a complete Ruth M creation without a stamped inside and matching envelope!  Oh yes, my Stamp-A-Ma-Jig worked overtime on this project!  No glitter on the envelope or inside.


Here's the glittered bookmark.  I added a jumbo eyelet to thread the ribbon through.


Here's the decorated box.  I put some Cadbury's Crunchie Rocks in a cellophane bag inside.  Scrummy!  I'm sure the choc won't last long but hopefully Kelly can keep something in the box afterwards.


The Blossoms Abound set is truly gorgeous and a joy to work with.  I hope Kelly enjoyed receiving this as much as I enjoyed putting it together for her!  I have to say I am now lilaced out for now though LOL!  This set is now on loan to my crafty friend Jan - I've even lent her the Linen stamp too!  I'm not having too many withdrawal symptoms, after all I do have other new flowers to keep me busy - roses, morning glories and pansies - so stay tuned for those!

Supplies:
Stamps: SU! Blossoms Abound set, 'for you' from SU! Fresh Cuts set, SU! Linen background set
CS: SU! Rich Razzleberry, Old Olive & Whisper White
Patterned paper: SU! Cottage Wall Designer Series Paper pack
Ink: SU! Pale Plum, Rich Razzleberry, Pear Pizzazz, Old Olive and Crumb Cake
Tools: Square Nestabilities dies, Stamp-A-Ma-Jig, circle punch, Crop-A-Dile
Embellishments & accessories: SU! Old Olive grosgrain ribbon, SU! Rich Razzleberry dotted grosgrain ribbon, Anita's olive ribbon, SU! Dazzling Diamonds glitter, SU! pewter jumbo eyelet, olive crystals, 3d foam pads


Photobucket

Friday, 11 March 2011

Nostalgia Butterflies BRAK Card

Oh my goodness, I love the Inkadinkado Nostalgia set - gorgeous, flourishy floral butterfly image, a lovely birthday sentiment and a circle butterfly image perfect for the flap of envelopes - hello, what's not to love?!  It had my name on it for sure.  I'll be using this as a birthday RAK card so I kept it fairly flat for ease of posting.

I started off with a side opening Perfect Plum A6 card base which I stamped with the SU! Bella Toile background stamp.  I cut off a tad from the right hand side and added a punched Old Olive border and a narrow Elegant Eggplant strip.  I inked the main image with three different Memento inks and after stamping I cut it and a mat layer out with petite oval Nestie dies.  I overstamped the main image with the SU! Weathered background stamp in Antique Linen ink and I sponged the edges.  I've added a touch of sparkle with some pale purple gems.


Then I stamped the envelope - LOVE this butterfly circle image, it is so perfect for envelope flaps!  Then I stamped a Vanilla panel for inside.  I stamped the Weathered background, sponged the edges and stamped the sentiment.  Finally, I added the fancy flower flourish corners. 


The set includes a lovely 'handmade' stamp so I used that for the back of the card.


Supplies:
Stamps: Inkadinkado Nostalgia clear set, SU! Bella Toile & Weathered background stamps
CS: SU! Perfect Plum, Old Olive, Elegant Eggplant & Very Vanilla
Ink: SU! Perfect Plum, Memento Bamboo Leaves, Sweet Plum & Grape Jelly, Tim Holtz Antique Linen distress ink
Tools: Petite oval Nestabilities dies, Martha Stewart Eyelet Lace border punch
Embellishments & accessories: Pale purple gems

Photobucket

Thursday, 10 March 2011

Bliss Butterfly Cards - One Fancy & One CAS

I absolutely loved the SU! Bliss Sale-a-bration set when I saw it and thanks to my wonderful friend Jan I now have it!  As soon as I received it I dashed upstairs to make a thank you card for Jan using the set.  I used the lovely Marina Mist, Rich Razzleberry and Old Olive colour combo again as I like it so much. 

To start off I made a side opening Marina Mist A6 card and I repeatedly stamped the gorgeous damask flourish from the set as a background using Marina Mist ink.  I stamped the flourish in Razzleberry ink on Whisper White CS, die cut an oval and stamped a mesh background in Olive over the top.  I then sponged the edges of the oval and I've popped it up.  I stamped three butterflies in Marina Mist ink, stamping off once and then rock and rolling and I cut them out.  I've put half a dimensional with the backing paper still on behind one of the wings of each butterfly so that they will remain popped up.  I added clear gems to the bodies.

The thank you sentiment was cut out using a Labels Trio die.  I cut out the Razzleberry flower, added a bit of shaping and glued that to the label.  Next I added the ribbon.  I then embossed a scrap piece of Olive CS with the Victorian Fleur embossing folder and punched a small photo corner which I layered on a larger Razzleberry photo corner.


Then of course I had to decorate the envelope and stamp inside the card.  I love how the flourish can be used to add decorative corners!  Well, to be honest, I just am totally in love with that flourish!  I stamped the flourish in Marina Mist after stamping off a couple of times and then I added the 'from the heart' sentiment in Razzleberry.  I thought that sentiment was perfect 'cos this card is going to Jan with real heartfelt thanks.


 A bit later on I was browsing the Bliss gallery on Splitcoast Stampers while enjoying a cup of coffee and I saw a card that really caught my eye.  It's this one by rosigrld.  Having made quite a fancy card with the Bliss set I was taken with how fab the set works with a CAS style.  So off I dashed upstairs again to CASE the card.  I really loved everything about rosigrld's card so when I CASEd it I changed only a few things - I used different colours, a slightly different layout and I added some bling.  

Crumb Cake, Baja Breeze, Rose Red, Early Espresso and Very Vanilla was my chosen colour combo.  I used my Tim Holtz 'Brackets' on the edge die to make the three fancy strips.  I ran an embossing stylus down both sides of the butterfly body and folded the wings back and added some gems.  A Labels Trio die was used to cut out the sentiment.  I glued the butterfly flat to the Vanilla panel as this card will be posted as a birthday RAK card in April.


I stamped a partial flourish on the envelope front and added a butterfly.  For the inside, I stamped the flourish in Crumb Cake ink and stamped the lovely birthday sentiment in Early Espresso ink over the top.  This sentiment is from an Inkadinkado clear set called Nostalgia - oh my word, it's such a fabulous set!  A BRAK card made with the set is coming to Flower Sparkle soon!


Supplies for thank you card:
Stamps: SU! Bliss set, thank you from Fresh Cuts set, from the heart from Seasonal Wishes set, Hero Arts Large Delicate Woven Fabric background stamp
CS: SU! Marina Mist, Rich Razzleberry, Old Olive & Whisper White

Ink: SU! Marina Mist, Rich Razzleberry & Old Olive
Tools: Petite oval Nestabilities dies, Labels Trio die, SU! Photo Corners punch, PaperMania Victorian Fleur embossing folder
Embellishments & accessories: SU! Rich Razzleberry grosgrain ribbon, clear gems, SU! Dimensionals


Supplies for birthday card:
Stamps: SU! Bliss set, just for you from Just Believe set, inside sentiment from Inkadinkado Nostalgia clear set

CS: SU! Crumb Cake, Baja Breeze, Rose Red, Early Espresso & Very Vanilla
Ink: SU! Crumb Cake, Rose Red & Early Espresso
Tools: Tim Holtz 'Brackets' On the Edge Sizzix die, Labels Trio die, embossing stylus
Embellishments & accessories: Blue gems

Photobucket
01 09 10