While browsing Pinterest I've seen lots of cards made using a Stampin' Up! Tag Topper punch to make a tag tie closure card and I really like the look. Jan and Wendy came to my home last Saturday to make a card and I decided I'd design a tag tie closure card for them to make. As I don't have a Tag Topper Punch I created my own version of a tag tie closure card using supplies I did have.
I chose patterned paper first, opting to go with a piece of flowery Basic Grey paper - so pretty and lots of yummy colours! I cut a piece of Blushing Bride CS measuring 8 3/4" x 5 3/4", scored at 3" to form the card base and glued on the patterned paper. I cut two Lost Lagoon CS tags using the Sizzix 'Banners, Fancy' Framelits die set, punched 1/4" circle holes, scored one tag and I adhered that to the back of the card. I adhered the second tag to the short panel on the left hand side of the card and then glued a white CS piece over the top.
I then got out my Flower Patch stamp set with matching dies and got busy stamping and cutting. I stamped the larger flower four times in Rich Razzleberry ink, die cut the large flower, fussy cut the three smaller flower layers and stacked the four layers together to make a dimensional bloom. I stamped the leaves using Wild Wasabi and Mossy Meadow inks and used Crushed Curry and Blushing Bride inks for the smaller flowers. I shaped the leaves and flowers and adhered them to the front - popping up the larger flower. I stamped and die cut a sentiment label, popped that up and added a punched Lost Lagoon Bitty Butterfly. To complete the card front I added pearls to the flowers and butterfly and used Blackberry Bliss ribbon to tie the card closed.
For the inside of the card I stamped a sentiment on a panel of white CS.
To finish I decorated the front of the envelope with flowers and leaves plus a name label. This card will soon be in the post winging its way to my friend Bev. As Bev's birthday is during the first week of January I have sometimes been caught out and been late sending her card and I'm pleased this year that I'm in time. I must confess to being bad during 2014 with quite a few late birthday cards - I really must do better in 2015!
Supplies:
Stamps: SU! 'Flower Patch' & 'Blooming with Kindness' sets
CS: SU! Blushing Bride, Lost Lagoon & Whisper White
Patterned paper: Basic Grey RSVP 'Sprinkles'
Ink: SU! Blackberry Bliss, Blushing Bride, Crushed Curry, Lost Lagoon, Meadow Moss, Rich Razzleberry & Wild Wasabi
Tools: SU! 'Flower Fair' Framelits dies, Sizzix 'Banners, Fancy' Framelits dies, SU! 'Bitty Butterfly' punch, 1/4" circle punch, SU! Simply Scored, embossing tool, moulding mat & bone folder for shaping flowers & leaves
Embellishments & accessories: SU! Blackberry Bliss Satin Stitched Ribbon, pearls, SU! Dimensionals
Wednesday, 31 December 2014
Tuesday, 30 December 2014
Birthday Gift Ensemble
I gave this trio of gifts to our friend Gill for her birthday.
The papers I used are from the Pebbles Inc. 'Special Delivery, Girl' collection. First I used my Gift Bag Punch Board to make a gift bag to hold a pair of earrings. Gill loves rose scented bathing products and I found some Argan Moroccan Rose Bath Soak which smells lovely. However, the packaging is functional rather than pretty so I decided to cover the bottle front with the same paper I'd made the bag from. As it was going to be used in a steamy bathroom I then covered the paper with a wrap of acetate. I added a tag to the bottle and wrote what the bottle contained on the tag - but that only occurred to me after I'd taken the photos!
While shopping in Wilko recently I saw some 4" x 4" pine square photo box frames and I thought they'd be great for putting a dimensional crafty something inside. I painted the frame with white acrylic paint and decided to place a dimensional daisy inside. I die cut eleven daisies from white linen effect CS, edged each daisy with Spun Sugar Distress Ink, stacked the flower layers together and added a yellow button to the centre. I die cut two leaves from Wild Wasabi CS, edged both leaves with Wild Wasabi ink and shaped the leaves. I placed the polka dot paper inside and adhered the leaves. I then ruffled all the petals to make the daisy really dimensional and attached the daisy inside.
Here's a closer look at the daisy.
Here's a photo of the box frame from a different angle to better show the depth and dimension. The frame stands up by itself or can be hung up. I plan on snaffling a few more of these frames so I can have more dimensional crafty fun!
Wednesday, 24 December 2014
Standing NOEL
A bit of Christmas home decor to share today. I bought a pack of MDF bells and this NOEL to decorate but I've only managed the NOEL so far - the bells can wait 'til next year!
I gave the NOEL two coats of gold acrylic paint and added dark green gingham ribbon bows, red berries and gold jingle bells. Simple but I'm happy with how it turned out. As nothing is adhered permanently to the NOEL I can decorate it differently next year if I feel like it.
Supplies:
Embellishments & accessories: Kaisercraft NOEL Standing Word, Artiste 'Metallic Classic Gold' acrylic paint, dark green gingham ribbon, PaperMania Create Christmas Red Decorative Berries, gold jingle bells, gold cord
A few bits of gift wrapping still to do and I'm baking Delia's Last Minute Christmas Mincemeat Cake this afternoon. I made the mincemeat a couple of days ago and the smell was wonderful - I love that homely Christmas baking smell! I'll be back blogging in a few days and until then.....
Wednesday, 17 December 2014
Sparkly Poinsettia Floating Front Merry Christmas Card
I've so enjoyed making floating front cards recently and I know that Jan loves the design of these cards too. I thought a poinsettia design would be perfect to make for Alan to give to Jan. This card is all about sparkle, texture and dimension!
For the 5 3/4" square card base I've used luxurious Centura Pearl Ivory CS. I cut three panels of the ivory pearl CS, embossed each panel with a beautiful snowflakes embossing folder, rubbed Golden Light gilding wax over the raised areas and glued the panels in place. I added strips of holly ribbon to the front panels and added sparkle to the berries with Xmas Red Stickles. Using three sizes of Pinstriped Poinsettias stamps I stamped two of each size onto the pearl CS using VersaMark ink and I heat embossed each flower with Red Tinsel embossing powder. I die cut the six flowers, shaped them and stacked them together. I die cut one large poinsettia from green glitter CS, cut the petals apart to use as leaves and adhered them behind the flower. I stamped and heat embossed the sentiment and layered the Very Vanilla label onto a larger sparkly gold label shape. I gussied up the Very Vanilla label with a holly embellishment and two red gems. I placed a gold shimmer dome sticker in the centre of the poinsettia and attached the flower element onto the front of the card.
Here's a view of one of the side panels so you can see the pretty embossing and ribbon.
Here's a closer view of the sparkly poinsettia.
I adhered a piece of Very Vanilla CS to the back as a sentiment panel. More seasonal sparkle went here in the form of a punched red heart next to the stamped sentiment and I placed sparkly die cut holly leaves and berries at the bottom.
I made an envelope for the card using holly patterned paper. I punched two holes in the envelope, made green glitter CS washers as hole reinforcers, glued those in place, formed a ribbon loop and taped the ends inside the envelope. The envelope is tied closed by threading ribbon through the top hole, through the loop at the bottom and by tying a bow.
Here's the envelope tied closed with the ribbon bow. All ready to be popped in a cellophane bag and delivered to Alan. Hope he - and Jan - approve!
Supplies:
Stamps: Creative Expressions Sue Wilson 'Pinstriped Poinsettias' cling stamp set, SU! 'Seasonal Wishes' set, Penny Black 'Wish from the Heart'
CS: Centura Pearl Ivory, SU! Very Vanilla, Champagne Glimmer Paper & Red Glimmer Paper, Christmas Green glitter CS
Patterned paper: 'Frozen Lobster Tail' from Jillibean Soup 'Christmas Eve Chowder' Collection
Ink: VersaMark, SU! Garden Green
Tools: Creative Expressions Sue Wilson 'Classic Poinsettia' dies, Leane Creatief 'Snowflake Background' embossing folder, Spellbinder's 'Grommet Tags' dies, Cottage Cutz 'Holly Berry Mini' die, SU! 'Heart to Heart' punch, Envelope Punch Board, various sizes of circle punches
Embellishments & accessories: Stampendous Red Tinsel embossing powder, Creative Expressions Golden Light gilding wax, holly design satin ribbon, SU! Real Red satin ribbon, PaperMania Gold Shimmer Dome Sticker, PaperMania red gems, Joy Crafts Add-ies holly embellishment, 3D foam tape
Monday, 15 December 2014
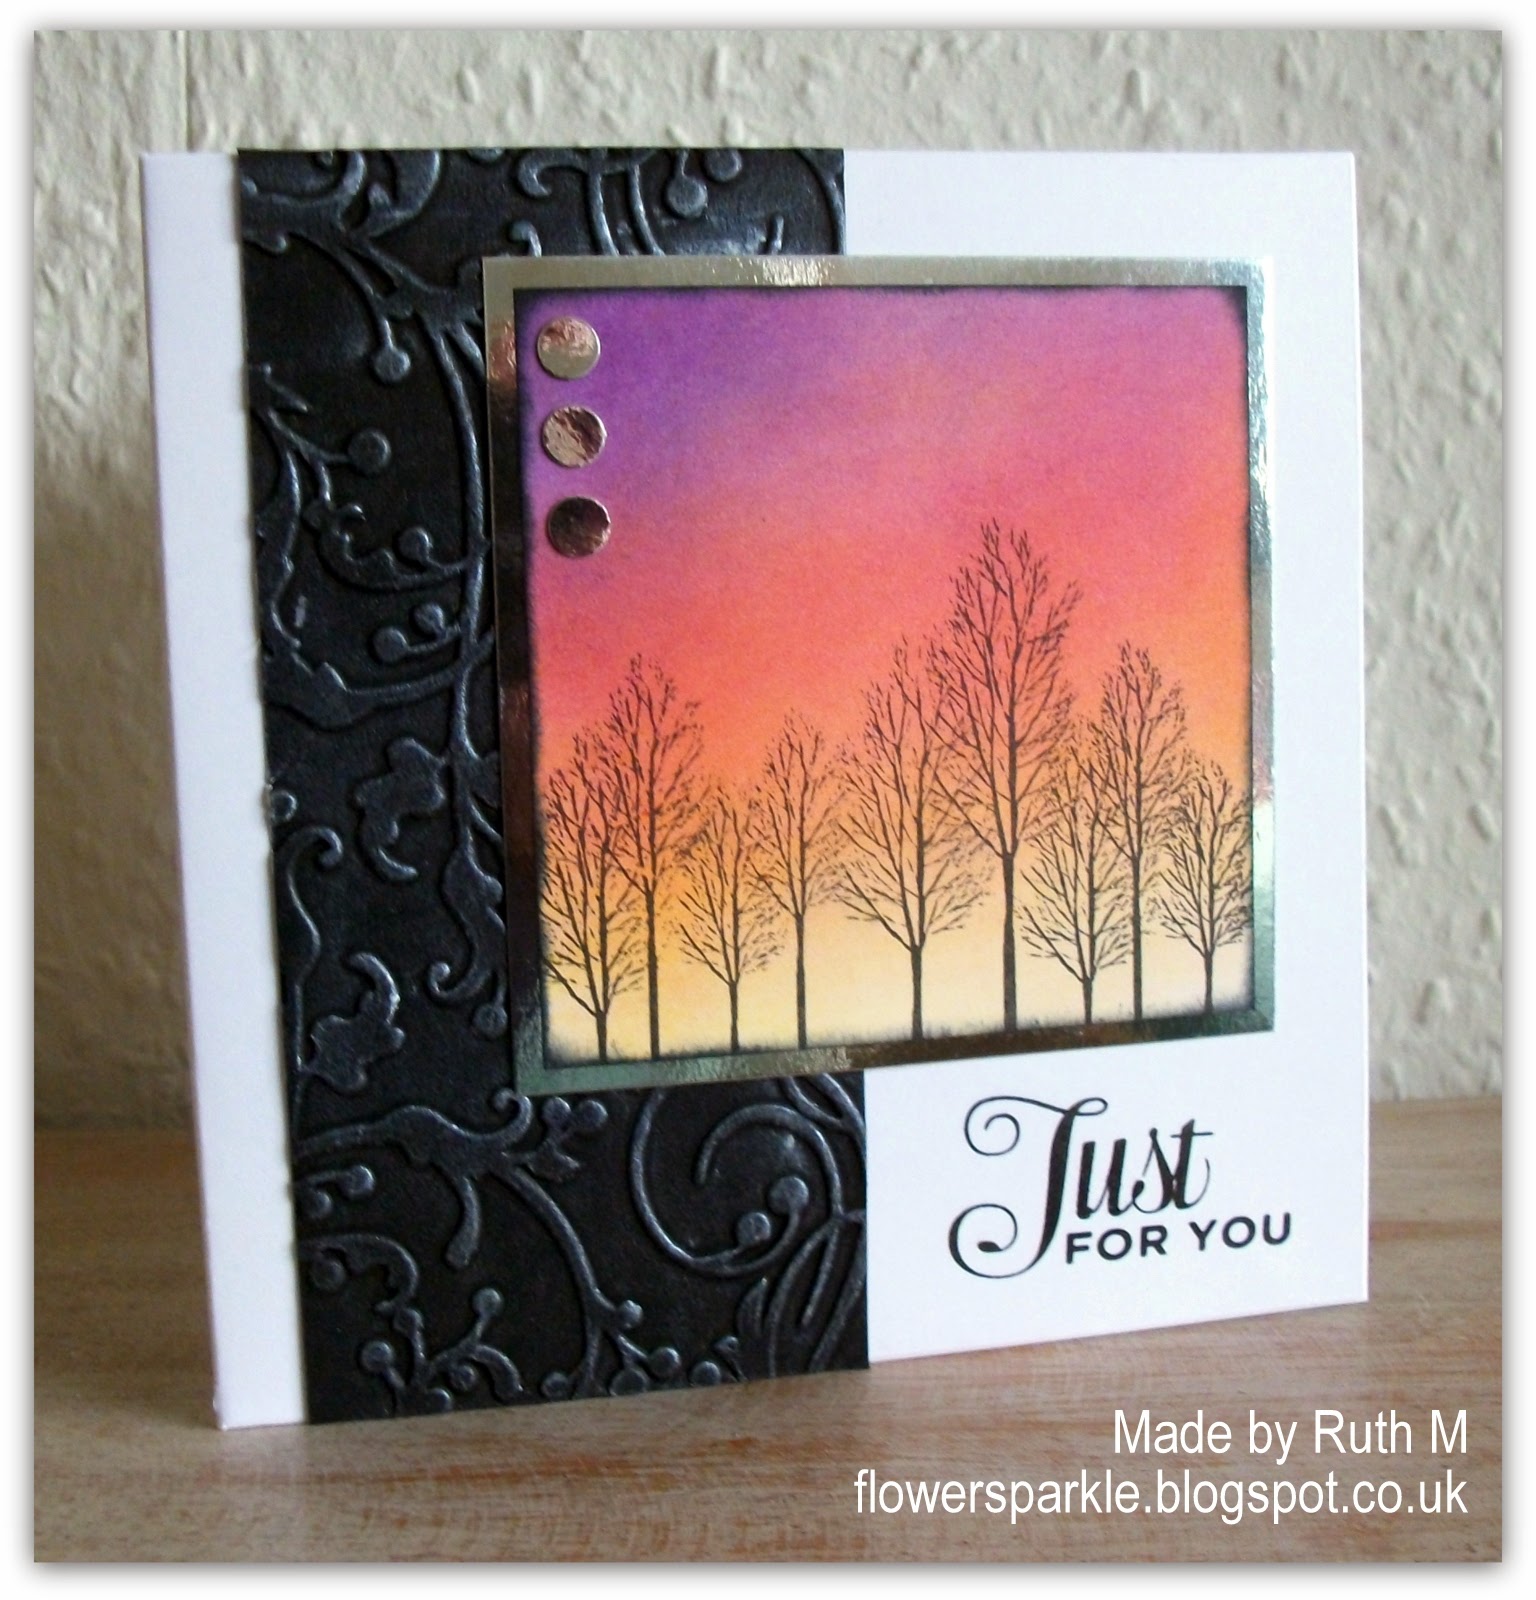
Black Forest Just For You Card & Flower Easel Calendar
Angela and Janet came round last Thursday afternoon to make a card and an easel calendar. They both love using the inks with ink duster brushes so I featured that technique on the card I designed for them to make. I dusted Dandelion ink onto the square of white CS first, followed with Lilac Posies ink and I finished off with Grape Jelly ink. I stamped the Inkylicious 'Black Forest' stamp at the bottom, edged the panel with black ink and matted it onto a layer of silver mirri CS. I embossed a strip of black CS, embossed it with an embossing folder and rubbed Pearl Moon gilding wax over the raised areas. I stamped the sentiment, adhered the panel and completed the card front by adding three punched silver mirri CS dots to the stamped panel.
Supplies for Just for You card:
Stamps: Inkylicious 'Black Forest' stamp, Personal Impressions 'Large Everyday Messages' set
CS: Papermania square white card blank, SU! Basic Black, silver mirri CS
Ink: Memento Tuxedo Black, Dandelion, Lilac Posies & Grape Jelly
Tools: Sizzix 'Starry Night' embossing folder, Inkylicious ink duster brushes, 1/4" circle punch, sponge dauber
Embellishments & accessories: Creative Expressions 'Pearl Moon' gilding wax
Supplies for hot air balloon easel calendar:
Stamps: Woodware 'Hot Air Balloon'
CS: Glitter Pot Thick White CS, Core'dinations Black Iris
Patterned paper: PaperMania 'Heritage Press' A4 paper pack
Ink: VersaFine Onyx Black, dark brown Sharpie pen
Tools: Woodware Crafty Edger Deluxe & border cassette
Embellishments & accessories: PaperMania 2015 Calendar Tab, Woodware Action Wobble Spring, PaperMania Heritage Press Mini Pin-striped buttons, 3D foam tape
Supplies for flower easel calendar:
Stamps: Woodware 'Dotty Flowers' set
CS: SU! Elegant Eggplant, Wisteria Wonder & Wild Wasabi
Patterned paper: SU! Wisteria Wonder paper from In Colour DSP stack
Ink: SU! Elegant Eggplant & Mossy Meadow
Tools: 'Lace Edger 2' Joanna Sheen Signature Die, SU! Bitty Butterfly punch
Embellishments & accessories: Woodware white satin stripe organza ribbon, white button, SU! rhinestone jewels, Dimensionals
Just some simple stamping for the inside and envelope.
On Saturday 6th December I spent all day at the Glitter Pot demonstrating and one of the things I made was an easel calendar which featured a stamped and paper pieced hot air balloon on a wobble spring.
Angela and Janet both really liked it, in fact Janet bought the hot air balloon stamp and the paper pack! They both wanted to make an easel calendar but Angela wanted a non balloon themed one and said she'd prefer flowers and butterflies. So I designed a flower easel calendar using Angela's fave colours and then Janet followed the same layout but used the hot air balloon stamp and blue CS and patterned papers. As Janet's calendar is intended as a gift for a man she didn't use the lacy die cut borders and ribbon - I forgot to take a photo of her completed calendar, d'oh!
The calendar base measures 5 1/4" square and I used a colour combo of Elegant Eggplant, Wisteria Wonder and Wild Wasabi. I stamped the dotty flowers on Wisteria Wonder CS using Elegant Eggplant ink, filled in the dots with an Elegant Eggplant marker, inked the edges with Elegant Eggplant ink, fussy cut and shaped the flowers and stacked the three layers together. I stamped the leaves onto Wild Wasabi CS using Mossy Meadow ink, fussy cut them, inked the edges with Mossy Meadow ink and adhered them behind the flower layers. I die cut the Wild Wasabi borders, tied the ribbon in a knot, popped up the flower element, added three punched butterflies and placed rhinestone jewels on the bodies. I threaded a thin strip of Wild Wasabi CS through the holes of a white button and attached that to the centre of the flower with a glue dot. I adhered the calendar pad to a mat layer of Elegant Eggplant CS and popped that up so it acts as a stop for the easel. Angela couldn't decide if she would give her easel calendar away as a gift or keep it for herself!
Stamps: Inkylicious 'Black Forest' stamp, Personal Impressions 'Large Everyday Messages' set
CS: Papermania square white card blank, SU! Basic Black, silver mirri CS
Ink: Memento Tuxedo Black, Dandelion, Lilac Posies & Grape Jelly
Tools: Sizzix 'Starry Night' embossing folder, Inkylicious ink duster brushes, 1/4" circle punch, sponge dauber
Embellishments & accessories: Creative Expressions 'Pearl Moon' gilding wax
Supplies for hot air balloon easel calendar:
Stamps: Woodware 'Hot Air Balloon'
CS: Glitter Pot Thick White CS, Core'dinations Black Iris
Patterned paper: PaperMania 'Heritage Press' A4 paper pack
Ink: VersaFine Onyx Black, dark brown Sharpie pen
Tools: Woodware Crafty Edger Deluxe & border cassette
Embellishments & accessories: PaperMania 2015 Calendar Tab, Woodware Action Wobble Spring, PaperMania Heritage Press Mini Pin-striped buttons, 3D foam tape
Supplies for flower easel calendar:
Stamps: Woodware 'Dotty Flowers' set
CS: SU! Elegant Eggplant, Wisteria Wonder & Wild Wasabi
Patterned paper: SU! Wisteria Wonder paper from In Colour DSP stack
Ink: SU! Elegant Eggplant & Mossy Meadow
Tools: 'Lace Edger 2' Joanna Sheen Signature Die, SU! Bitty Butterfly punch
Embellishments & accessories: Woodware white satin stripe organza ribbon, white button, SU! rhinestone jewels, Dimensionals
Tuesday, 9 December 2014
3rd Wedding Anniversary Kickstand Card
Kath asked me to make a wedding anniversary card for her son and daughter-in-law, David and Marie. I made their wedding card and 1st and 2nd anniversary cards and it's lovely to be asked to make a card for their third anniversary!
I decided on a kickstand card as I haven't made one of those in a while. I cut a 5 3/4" square piece of white pearly CS and embossed it with the elegant Embossalicious 'Splendour' 6" x 6" embossing folder. I cut a 10 1/2" x 3 3/4" strip of black CS as the kickstand and scored it at 5 3/4". I stamped the heart onto a piece of Authentique lace design paper, stamped three dotty flowers on the reverse side of the paper and fussy cut the heart and flowers. I die cut solid and outline Lorelai Leaf shapes, layered the outline over the solid and glued it to the heart. I used a black Sharpie pen to fill in the dots on the flowers, shaped each flower, stacked the three layers and popped the flower up. I computer generated the sentiment using the Grand Hotel font, printed it out onto the lacy paper, cut it into a strip, matted it onto a larger strip, glued it onto the black kickstand and glued the kickstand to the white square to form the card base. I rounded some corners, popped up the heart, added three punched flowers and a die cut and embossed bitty bow. I sprinkled on some black and clear gems to complete the front.
Here's a photo of the kickstand card from a different angle.
I cut a piece of white CS to go inside as a sentiment panel, added some strips at the bottom, stamped the 'With Love' and added three punched hearts.
The Authentique lacy paper is absolutely beautiful and I used it to make an envelope. I layered two die cut shapes to make a name label and added two clear gems. I'll be delivering this to Kath later today and I hope it gets a favourable response!
Supplies:
Stamps: PaperMania Sew Lovely heart stamp (freebie with DoCrafts Creativity magazine), Woodware 'Dotty Flowers' set, Personal Impressions 'Medium Everyday Messages' set
CS: white with a hint of silver Centura Pearl CS, SU! Basic Black
Patterned paper: Authentique Classique Elegant Nine
Ink: VersaFine Onyx Black
Tools: Embossalicious 'Splendour' 6" x 6" embossing folder, PoppyStamps 'Lorelai Leaf' & 'Lorelai Leaf Outline' dies, Sue Wilson 'Classic 3D Itty Bitty Bows' die set, Woodware multi flower punch, X Cut large corner rounder punch, Envelope Punch Board, flower shaping tool & moulding mat
Embellishments & accessories: black gems, SU! rhinestone jewels, Dimensionals, 3D foam tape
Thursday, 4 December 2014
December 2014 Card Group Projects
It was our last card group meeting of 2014 today and a lovely time was had by all! Plenty of chat and chuckles, we exchanged Christmas cards, Lesley made everyone a die cut tealight lantern, Sue baked the most scrumptious lemon cake to go with our afternoon cuppa and we finished off by exchanging Secret Santa gifts - a wonderful way to spend an afternoon!
I designed three items for the ladies to make, a birthday card with a matching gift bag plus a thank you card.
This elegant Authentique patterned paper caught my eye and I thought it was perfect for one of my favourite colour combos - black and white plus one additional colour. A very simple card with a flourish stamp, punched oval sentiment element and ribbon. Simple but classy too I hope! I used the Gift Bag Punch Board and a piece of 12" x 6" paper to make the matching gift bag. The tag was made with circle punches.
Here's the inside of the card.
Project three was this floral Kind Thanks card - thank you cards can come in very handy after Christmas! I stamped the beautiful IndigoBlu Rose Blush stamp in Cherry Cobbler ink onto Very Vanilla CS, stamped the SU! Weathered stamp over the top in Crumb Cake ink, die cut the fancy banner shape and inked the edges of the banner with Crumb Cake ink and a sponge dauber. I layered the vanilla banner onto a larger Cherry Cobbler die cut banner shape. The Sizzix 'Banners, Fancy' Framelits dies are a new acquisition and I love them - I'm a sucker for elegant brackety shapes! The die set comes with two smaller label dies perfect for sentiments so I used those and popped up the sentiment element over a strip of Cherry Cobbler CS. Some punched and shaped flowers with rhinestone jewel centres completed the card front.
The inside and envelope were decorated with simple stamping. I love this floral image muchly!
We always exchange Secret Santa gifts during our December meeting. I decorated a wooden favour box and placed my purchased gift inside. I painted the inside and out of the box with vanilla chalk paint and then added patterned paper and the ribbon border. I used Peeled Paint Distress Stain to colour the wooden tree shape and I added gold glitter domed circles. I've tied the tree around the handle with gold cord and a ribbon bow which means it can be easily removed. That way the box can be used all the year round, not just at Christmas time. Margaret A was the recipient of this favour box and inside there was an Inkylicious stamp set and two Memento Dew Drop ink pads.
The ladies that come to my monthly card group are such a lovely bunch, I'm so lucky! I gave them each a star ornament as a little gift from me. I painted each wooden star with metallic silver paint, added a star die cut from silver glittered card and placed a sparkly embellishment in the centre of each star. Here are all nine ornaments complete and ready to be packed away.
Here's a closer look.
Supplies for card and gift bag:
Stamps: SU! 'Elements of Style' set, Personal Impressions 'Medium Everyday Messages' set, Penny Black 'Lovely Day'
CS: PaperMania A6 white card blank, SU! Basic Black & Whisper White
Patterned paper: Authentique Classique Elegant Five
Ink: VersaFine Onyx Black
Tools: SU! plain and scalloped circle & oval punches, WRMK Gift Bag Punch Board, Crop-A-Dile
Embellishments & accessories: black satin stripe organza ribbon, Dimensionals
Supplies for Kind Thanks card:
Stamps: IndigoBlu 'Rose Blush', SU! 'Weathered' background stamp, SU! 'Thank You Kindly' set
CS: PaperMania A6 cream card blank, SU! Cherry Cobbler, Crumb Cake & Very Vanilla
Ink: SU! Cherry Cobbler & Crumb Cake
Tools: Sizzix 'Banners, Fancy' Framelits die set, EK Success & Woodware flower punches, flower shaper & moulding mat, sponge dauber
Embellishments & accessories: SU! rhinestone jewels, Dimensionals
Supplies for favour box:
Patterned paper: Kaisercraft Christmas Carol - All Ye Faithful paper
Embellishments & accessories: wooden favour box, wooden tree shape, Cosmic Shimmer Vanilla chalk paint, Tim Holtz Peeled Paint Distress Stain, dark green grosgrain ribbon, PaperMania gold shimmer dome stickers, gold cord
Supplies for stars:
CS: SU! Silver Glimmer Paper
Tools: Sizzix Stars Framelits die
Embellishments & accessories: PaperMania Create Christmas Star Wood Shapes, Cosmic Shimmer Silver Shimmer Paint, SU! Frosted Finishes embellishments, white satin stripe organza ribbon, glue dots
I designed three items for the ladies to make, a birthday card with a matching gift bag plus a thank you card.
This elegant Authentique patterned paper caught my eye and I thought it was perfect for one of my favourite colour combos - black and white plus one additional colour. A very simple card with a flourish stamp, punched oval sentiment element and ribbon. Simple but classy too I hope! I used the Gift Bag Punch Board and a piece of 12" x 6" paper to make the matching gift bag. The tag was made with circle punches.
Here's the inside of the card.
Project three was this floral Kind Thanks card - thank you cards can come in very handy after Christmas! I stamped the beautiful IndigoBlu Rose Blush stamp in Cherry Cobbler ink onto Very Vanilla CS, stamped the SU! Weathered stamp over the top in Crumb Cake ink, die cut the fancy banner shape and inked the edges of the banner with Crumb Cake ink and a sponge dauber. I layered the vanilla banner onto a larger Cherry Cobbler die cut banner shape. The Sizzix 'Banners, Fancy' Framelits dies are a new acquisition and I love them - I'm a sucker for elegant brackety shapes! The die set comes with two smaller label dies perfect for sentiments so I used those and popped up the sentiment element over a strip of Cherry Cobbler CS. Some punched and shaped flowers with rhinestone jewel centres completed the card front.
The inside and envelope were decorated with simple stamping. I love this floral image muchly!
We always exchange Secret Santa gifts during our December meeting. I decorated a wooden favour box and placed my purchased gift inside. I painted the inside and out of the box with vanilla chalk paint and then added patterned paper and the ribbon border. I used Peeled Paint Distress Stain to colour the wooden tree shape and I added gold glitter domed circles. I've tied the tree around the handle with gold cord and a ribbon bow which means it can be easily removed. That way the box can be used all the year round, not just at Christmas time. Margaret A was the recipient of this favour box and inside there was an Inkylicious stamp set and two Memento Dew Drop ink pads.
The ladies that come to my monthly card group are such a lovely bunch, I'm so lucky! I gave them each a star ornament as a little gift from me. I painted each wooden star with metallic silver paint, added a star die cut from silver glittered card and placed a sparkly embellishment in the centre of each star. Here are all nine ornaments complete and ready to be packed away.
Here's a closer look.
Supplies for card and gift bag:
Stamps: SU! 'Elements of Style' set, Personal Impressions 'Medium Everyday Messages' set, Penny Black 'Lovely Day'
CS: PaperMania A6 white card blank, SU! Basic Black & Whisper White
Patterned paper: Authentique Classique Elegant Five
Ink: VersaFine Onyx Black
Tools: SU! plain and scalloped circle & oval punches, WRMK Gift Bag Punch Board, Crop-A-Dile
Embellishments & accessories: black satin stripe organza ribbon, Dimensionals
Supplies for Kind Thanks card:
Stamps: IndigoBlu 'Rose Blush', SU! 'Weathered' background stamp, SU! 'Thank You Kindly' set
CS: PaperMania A6 cream card blank, SU! Cherry Cobbler, Crumb Cake & Very Vanilla
Ink: SU! Cherry Cobbler & Crumb Cake
Tools: Sizzix 'Banners, Fancy' Framelits die set, EK Success & Woodware flower punches, flower shaper & moulding mat, sponge dauber
Embellishments & accessories: SU! rhinestone jewels, Dimensionals
Supplies for favour box:
Patterned paper: Kaisercraft Christmas Carol - All Ye Faithful paper
Embellishments & accessories: wooden favour box, wooden tree shape, Cosmic Shimmer Vanilla chalk paint, Tim Holtz Peeled Paint Distress Stain, dark green grosgrain ribbon, PaperMania gold shimmer dome stickers, gold cord
Supplies for stars:
CS: SU! Silver Glimmer Paper
Tools: Sizzix Stars Framelits die
Embellishments & accessories: PaperMania Create Christmas Star Wood Shapes, Cosmic Shimmer Silver Shimmer Paint, SU! Frosted Finishes embellishments, white satin stripe organza ribbon, glue dots
Monday, 1 December 2014
Ho Ho Ho Dangly Tent Card
Almost a week since I last blogged - blimey! I've had some exciting news which has kept me rather busy - I'm chuffed to bits to tell you that I'm now a demonstrator and class tutor for the Glitter Pot shop in Burgess Hill! I am demonstrating at the shop on Saturday 6th December and the demo was to have been my first Glitter Pot gig. However, I actually ran a class there last Saturday because the tutor due to run it, Alex, was poorly. I had a blast on my first class, I had a friendly and fabulous group of ladies, huge thanks to Pat, 'cake' Lizzie, Amanda, Chris, 'glitter' Lizzie and Karen for giving me such a warm welcome and for making my first class such wonderful fun! Huge thanks also to everyone at the Glitter Pot for their help, support, for looking after me and keeping me supplied on Friday with cups of tea, choccie biccies and encouraging words while I prepared for Saturday's class!
Awwww, it's such a shame for poor Alex, it was her Christmas party class so the ladies all bought in scrummy food and she missed out, I do hope she feels better very soon. I'm hoping to still be tutoring at the Glitter Pot this time next year so I can have my very own Christmas party class!
Anyway, today I'm sharing another Christmas card using a wooden shape - I really love using these at the moment and they are so perfect for dangling inside a tent card! I used Lost Lagoon CS for the tent card base, cut an oval aperture and frame and decorated with pretty Kaisercraft 'Mistletoe' papers. I coloured the wooden shape with a red ProMarker, added some rhinestones and suspended the shape in the aperture with some gold cord. I die cut a red Santa hat and die cut the brim and bobble with Dazzling Diamonds Glimmer Paper for the essential seasonal sparkle! I added the Lost Lagoon ribbon and popped up the Santa hat to complete the card front.
Here's the back of the card.
Using the Envelope Punch Board I made an envelope using a piece of 12" x 12" CS from the Kaisercraft 'Mistletoe' collection. This photo shows the card and envelope together. A very bright and cheery number I think!
Supplies:
Stamps: none
CS: SU! Lost Lagoon, Riding Hood Red & Whisper White, Dazzling Diamonds Glimmer Paper
Patterned paper: Kaisercraft 'Mistletoe' 6 1/2" x 6 1/2" paper pad, Kaisercraft 'Mistletoe - Holly' 12" x 12" paper
Ink: Cardinal Red ProMarker
Tools: Petite Ovals Nestabilities dies, Sizzix 'Phrase, Ho Ho Ho w/Santa Hat' Sizzlits die, Envelope Punch Board, Crop-A-Dile
Embellishments & accessories: SU! Lost Lagoon satin ribbon, gold cord, SU! rhinestone jewels, Dimensionals
Tuesday, 25 November 2014
Wobbly Figgy Pudding Merriest Wishes Card
What a miserable, grey, wet and chilly day! Something cheery is called for and what better than a fun card that has a wobbly Christmas pudding on it?!
I stamped the pudding on watercolour paper, used inks and a water brush to colour the image, fussy cut the pudding and added Glossy Accents to the holly berry. I thought it would be fun to cut some pieces off the bottom of the pud to look like it's being eaten! I made a 5 3/4" square Real Red CS card base and added the patterned paper and Garden Green CS strips. I stamped and die cut the sentiment label and popped that up. I die cut the doily and mat layer and attached the pudding to the doily with a wobble spring. I stamped the spoon and fork, coloured them with a silver pen, fussy cut them and popped them up. To complete the card front I applied red gems to the sentiment label.
Here's the inside and the envelope.
Supplies:
Stamps: Woodware 'Figgy Pudding' set, Hero Arts 'Very Merry Christmas' clear set. Stampendous 'Merry Wishes', Dovecraft Holly
CS: SU! Real Red, Garden Green & Whisper White, watercolour paper
Patterned paper: Kaisercraft Christmas Carol
Ink: VersaFine Onyx Black, SU! Real Red, Garden Green & Pumpkin Pie, Gathered Twigs Distress Ink, SU! Silver Dazzle Marker
Tools: Cheery Lynn 'French Pastry Doily' & 'French Pastry Doily Angel Wing' dies, label from Sizzix 'Card, Fancy Frame Flip-It's #2' Framelits die set
Embellishments & accessories: Ranger Glossy Accents, PaperMania red gems, Woodware Action Wobble Spring, Dimensionals
Saturday, 22 November 2014
Glittered NOEL Card
A traditional red and green Christmas card - here's proof that I do make those occasionally! I've created my version of a very pretty, sparkly card I saw on display at the Glitter Pot using the Crafty Impressions 'Noel' stamp set. I haven't glittered an entire stamped panel in such a long time, it's good to revisit old techniques now and then to remind yourself how much fun they are!
I coloured the stamped NOEL panel with ProMarkers, covered it with a piece of double sided adhesive sheet, peeled off the backing to reveal the sticky side and sprinkled on ultrafine crystal glitter. After tipping off the excess glitter I firmly pressed a piece of kitchen paper over the glittered panel so that the glitter stays in place and doesn't shed. I layered onto a Garden Green mat, followed that with a Real Red mat and I glued the panel to the front of a Garden Green A6 sized card. I added the pretty holly ribbon, popped up the die cut shiny gold bells and added some red gems.
Here's the inside and the front of the envelope. I coloured the tiny holly berries with a ProMarker.
Supplies:
Stamps: Crafty Impressions 'Noel' clear set, Hero Arts 'Very Merry Christmas' clear set
CS: SU! Garden Green, Real Red, Basic Black & Whisper White, gold mirri CS
Ink: Memento Tuxedo Black, SU! Garden Green & Real Red, Pine & Cardinal Red ProMarkers
Tools: 'Bells' CottageCutz Petites die
Embellishments & accessories: Woodware double sided adhesive sheet, Crystal Clear Glamour Dust glitter, holly patterned ribbon, PaperMania red gems, 3D foam pads
Thursday, 20 November 2014
Window Tree Scene Warm Wishes Card
Back in October Angela and Janet used the SU! Lovely as a Tree set to make an inky scene card with me. They wanted to see more examples of cards made using the set before they bought it so I showed them cards I had made plus I did a search for SU! Lovely as a Tree on Google images - wow, a LOT of examples came up! One design in particular stood out for them - this beautiful window scene card made by Loll - and they asked to make something similar the next time they came round to make a card. I said that as I happen to own a window die they definitely could make something similar! So the ladies will be coming round this afternoon and they'll be making my CASEd version of Loll's lovely CAS card.
The A6 sized card blank was made with linen effect CS and I also used that for the window die cut shapes. I made the scene by applying Memento inks to a piece of Whisper White CS using ink duster brushes. I stamped the row of trees onto masking paper first and cut along the ground line underneath the trees. I kept both the top and bottom pieces of the masking paper, I laid down the bottom mask first and inked the sky using Dandelion and Lilac Posies inks I removed the bottom mask, laid down the top mask and inked the ground using Bamboo Leaves ink. With the help of my trusty Stamp-a-ma-jig I stamped the row of trees in black ink. I cut a piece of acetate to go behind the window and I trimmed the stamped panel to size. I really liked Loll's way of stacking a few window die cuts together to add some depth and dimension and I originally stacked three windows together. When I flipped the window over to apply adhesive I landed the front right on my mat where I'd been inking which resulted in inky smudges on my pristine white window so I ended up stacking a fourth die cut window! I decided against making this a definite Christmas card and went with the 'Warm Wishes' sentiment so it can be used for any winter occasion.
For the inside and the envelope I stamped the row of trees in Bamboo Leaves ink - stamping off once first - and then stamped the fir tree in full strength ink.
Supplies:
Stamps: SU! 'Lovely as a Tree' set, Crafty Impressions 'Medium Everyday Messages' clear set
CS: Woodware white linen effect CS, SU! Whisper White, Woodware 'Mask It' sheet, acetate
Ink: Memento Tuxedo Black, Dandelion, Lilac Posies & Bamboo Leaves
Tools: Poppystamps 'Grand Madison Window' die, Inkylicious ink duster brushes, Stamp-a-ma-jig
Subscribe to:
Posts (Atom)