Saturday, 23 June 2018

Tea Bags Gift Bag

At Slimming World meetings each week items are placed in a basket and the Slimmer of the Week gets to take home the basket contents.  For my basket offering this week I decorated a plain white gift bag and then placed six tea bags inside.  Not just any old tea bags mind - Twinings Nutty Chocolate Flavour Assam loose leaf pyramids!  This is one of my favourite teas and perfect for anyone following the Slimming World plan - a chocolate nutty taste with zero calories!

The sachet provided inspiration for the colours I chose - SU! Lemon Lime Twist and Berry Burst.


The 'This is for you' square is popped up.  I used a heart shaped paper clip as a bag closure.  I made a 'Congrats' tag and tied that onto the paper clip with silver ribbon.


I hope to make another one for next week, it's fun to do a creative little something and makes a change from taking fruit or a tin of beans!

Supplies:
Stamps: SU! 'Tin of Cards' & 'Tin of Tags' sets
CS: SU! Berry Burst & Lemon Lime Twist

Patterned paper: SU! 'Fresh Florals' DSP
Ink: SU! Berry Burst

Tools: SU! 'Stitched Shapes' square die, M&C Boutique rectangle stitched die set, MFT Die-namics 'Tag Builder Blueprints 2' die set
Embellishments & accessories: SU! silver ribbon, Dimensionals, Wilko heart shaped paper clip

Ruth

Wednesday, 20 June 2018

Flower Trio Little Thanks Card

I took the opportunity to try out some new SU! supplies - Gorgeous Grape CS and ink, the 'Subtle' Dynamic embossing folder and Glitter Enamel Dots - to make this thank you card for my lovely friend Lesley.  I do enjoy mixing my older supplies with new stuff though and I've inked up my fave flower from the retired SU! 'Petal Potpourri' set again.

I used Whisper White thick CS to make the A6 sized card base and for the 'Subtle' embossed panel.  I spritzed the panel with water before embossing and adhered it to the Gorgeous Grape mat layer once it had dried.  I stamped three flowers using Gorgeous Grape ink without re-inking so that I got different shades of purple and I stamped a flower using Granny Apple Green ink and snipped a few petals out for leaves.  I punched out the flowers, snipped between the petals, shaped the flowers and popped them up.  I stamped the flower centres onto So Saffron CS using Crushed Curry ink, punched them out with a 1/2" circle punch, popped the centres up and added the Glitter Enamel Dots.  I stamped the sentiment, cut that out with the oh, so useful, label die from the SU! 'Petals & More' die set, gave it a bit of a curl and glued it in place.


The 'Subtle' embossing folder is very well named, it does give a subtle texture but I really like it - it makes plain CS look like textured CS, similar to what Bazzill CS was like.  Perfect to add just a little something, a hint of understated texture to a project.  I want to try embossing a stamped image with the folder and see how that turns out.


Here's the inside and the envelope flap.  I stamped the pretty label image in Gorgeous Grape ink onto Highland Heather CS, punched that out with the 'Pretty Label' punch, stamped the 'You're the Best' and cut that out using a 1 1/4" circle punch and popped the circle up. 


Elegant Eggplant is a firm fave of mine and I'm not 100% convinced yet about Gorgeous Grape - maybe it will grow on me!

Supplies:
Stamps: SU! 'Petal Potpourri', 'One Big Meaning' & 'Label Me Pretty' sets
CS: SU! Gorgeous Grape, Highland Heather, So Saffron & Whisper White (regular & thick)
Ink: SU! Crushed Curry, Gorgeous Grape & Granny Apple Green
Tools: SU! 'Subtle' 3D Dynamic embossing folder, 'Pretty Label' punch, 1/2" & 1 1/4" circle punches, 'Petals & More' Thinlits die set, water spritzer bottle
Embellishments & accessories: SU! Glitter Enamel Dots, Dimensionals

Ruth

Monday, 18 June 2018

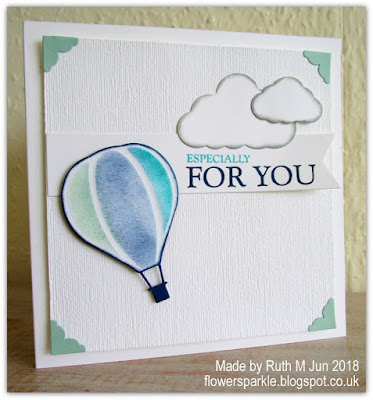
Balloon & Clouds Especially For You Card - FMS341

I've had a day off from work today and took the opportunity to spend some time in my craft room.  It's my weigh in day at Slimming World and I made a gift bag containing tea bags which I will pop into the Slimmer of the Week basket later on.  I really liked the sketch over at Freshly Made Sketches so decided to play along and make a card for that.  What a lovely way to spend some time on a Monday!   I had to ponder for a while as to what I was going to use as the circle elements of the sketch but I flipped through my die box and the hot air balloon and clouds caught my attention.


Using Whisper White thick CS I made a 5 1/2" square white card base, cut a 5" mat layer, embossed that using the SU! 3D Dynamic 'Subtle' embossing folder and I popped the layer up on 3D foam tape.  I die cut the balloon from Whisper White thick CS and keeping the shape in the die I applied Mint Macaron, Night of Navy and Bermuda Bay inks to the balloon using sponge daubers.  I snipped off the basket piece, inked around the white balloon shape with Night of Navy ink and glued the balloon over a die cut Night of Navy shape.  I inked the edges of the die cut clouds with Smoky Slate ink.  I stamped the sentiment, die cut the banner, added a bit of a curl to it, glued the banner in place and popped up the hot air balloon.  I glued the larger cloud flat to the mat layer but popped up the smaller cloud.  To complete the front I added some small die cut Mint Macaron decorative corners.


I decorated the inside of the card and the envelope using some Mint Macaron striped DSP left over from a card kit.  I may add a sentiment inside at a later date, depending on what I'm going to use the card for.  


Despite the inked edges of the balloon and clouds I think the card fulfills the clean and fresh requirement and it has texture and dimension too which adds some interest.  I'm happy with the end result anyway!

Supplies:
Stamps: Inkylicious 'For You' set
CS: SU! Night of Navy & Whisper White thick

Patterned paper: SU! Mint Macaron paper from a card kit
Ink: SU! Bermuda Bay, Mint Macaron, Night of Navy & Smoky Slate
Tools: SU! 'Subtle' 3D Dynamic embossing folder, Memory Box 'Beautiful Balloon' die, Poppystamps 'Fancy Clouds' die set, MFT 'Fishtail Flags' Stax die set, Die'Sire 'Decorative Corner 1' die set, sponge daubers
Embellishments & accessories: SU! Dimensionals, 3D foam tape

Ruth

Baby Girl Easel Card

A very rare make for me - a baby card!  This was made for someone I work with who has just become a new father.

I've used Pretty in Pink, Flirty Flamingo, Basic Gray and Whisper White as my colour combo.  Oh, my giddy aunt, it was so tough to get this pram die to cut out completely, it gave me forty fits! The Flirty Flamingo shape cut out but the intricate bits stayed in the die cut shape which actually worked in my favour as I was then able to adhere the Pretty in Pink die cut pram over the top.  It took a LOT of effort (and swearing!) to get the Pretty in Pink die cut but I was happy with the completed pram once it was done!

I stamped the sentiment, popped up the pram and added rhinestone jewels to the wheels.  I added a strip of silver mini sequin trim and finished off the panel with some stamped and punched buttons.  I haven't used the SU! 'Button, Button' set for ages but I just can't part with it!  I punched plain white circles and stacked a few together before gluing the stamped button circle on the top so the buttons have some dimension.  I added some organza ribbon and popped up the die cut sentiment panel to act as a stop for the easel.


Here's a closer look at the image panel.


Here's the white panel I adhered to the bottom of the easel card.  The very cute baby feet stamp was lent to me by my sweet friend Lesley - I stamped it using stamped off once Flirty Flamingo ink and stamped the 'congrats to you' over the top in Basic Gray ink.  I couldn't resist stamping some more buttons!


And yet more buttons on the envelope flap!


Here's the front of the envelope with a name banner and a baby bottle.  The sentiment and bottle dies in the die set were much easier to work with than the pram die, thank goodness!


Aside from the issue with the dastardly, difficult die I really did enjoy creating this card, it made a lovely change!

Supplies:
Stamps: SU! 'Button, Button' & 'Tin of Cards' sets, Personal Impressions 'Everyday Messages' set, All Night Media 'Baby Feet'
CS: SU! Pretty in Pink, Flirty Flamingo, Basic Gray & Whisper White
Ink: SU! Flirty Flamingo & Basic Gray
Tools: First Edition 'Baby' die set, MFT 'Fishtail Flags' die set, circle punches
Embellishments & accessories: SU! rhinestone jewels, Dimensionals

Ruth


Saturday, 16 June 2018

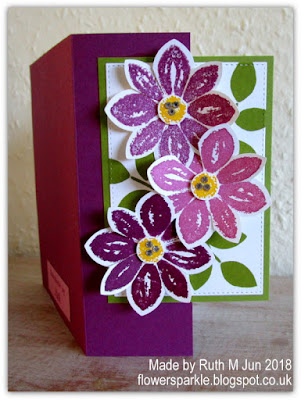
Floral Double Front Birthday Card

This is a birthday card I made for my friend Jan.  I like to give her a card that's a little bit different as, like me, she is partial to a fancy fold card that's easy to create.  Many thanks to Lisa Curcio who has this great Double Front Fold Card video tutorial on YouTube.

Jan loves a colour combo of SU! Rich Razzleberry with Sweet Sugarplum so I used those colours along with some Old Olive.  The card is a standard A6 size. I'm loving this flower from the Petal Potpourri stamp set, I can't seem to resist using it for cards at the moment!  I stamped the flower twice using Rich Razzleberry ink (without re-inking between stamping so that I got a lighter shade) and then I stamped a flower in Sweet Sugarplum ink.  I stamped the flower centres using Crushed Curry ink and cut those out with a 1/2" circle punch.  I stamped the leaves from the SU! 'Crazy About You' set in Old Olive ink onto the white panel and layered that onto an Old Olive mat.  I punched out the flowers, snipped between the petals, shaped the flowers a wee bit and popped up the centres, adding a few rhinestone jewels for some sparkle. 

At first glance, when the card is open for display like this, it looks like a cutaway front card.


Here's a view of the closed card.


Here's the first panel on the inside.  After gluing the gingham paper I added a line drawn with a Rich Razzleberry marker and a ruler.  I added more sparkle with three clear faceted gems.


Here's the second panel on the inside.  The 'a day all about you' label is popped up.


Here's a side view of the double front card on display.  It's nice and easy to create - basically it's a card inside a card where the front image panel lines up exactly with a matted panel on the inside. The slightly smaller Whisper White card is attached to the inside of the Rich Razzleberry card.  I cut the Whisper White card base to a normal A6 size and then just trimmed it down a bit so I got a nice border.  The whole back piece of the Whisper White card is adhered to the Rich Razzleberry card base.  When you come to assemble the card, adhere the matted layer (my 'the best day ever' panel) first and then it's easy to align your image panel for the front of the card with that.


I used a die cut bookplate as a name label for the card front.


Here's the back of the envelope with a decorated flap.  This envelope was very much plan B - I originally made an envelope using the envelope punch board from a square of the Sweet Sugarplum gingham paper. I just about managed to squeeze the card inside but really it was too snug a fit so I decorated a plain C6 size envelope instead!  I will have to make a custom sized card to fit inside the gingham envelope so it doesn't go to waste!


Supplies:
Stamps: SU! 'Petal Potpourri', 'Crazy About You' & 'Birthday Blossoms' sets
CS: SU! Old Olive, Rich Razzleberry, Sweet Sugarplum & Whisper White

Patterned paper: SU! 'Succulent Garden' DSP
Ink: SU! Crushed Curry, Old Olive, Rich Razzleberry & Sweet Sugarplum
Tools: SU! 'Flower Medallion' & 1/2" circle punches, SU! 'Petals & More' die set, M&C Boutique stitched rectangle die set, Sizzix Original 'Bookplates' die, flower shaper tool
Embellishments & accessories: SU! rhinestone jewels, clear faceted gems, Dimensionals

Ruth

Thursday, 14 June 2018

Happy Birthday Friend Gap Card

This is a gap card I made for a friend's birthday featuring the lovely SU! 'Southern Serenade' stamp set and the water stamping technique.  I applied Mustard Seed and Worn Lipstick Distress Inks to a piece of Whisper White thick CS using ink duster brushes.  I spritzed the SU! 'Burlap' background stamp liberally with water, pressed the stamp to the inked panel and then used my heat tool to dry the panel.  I stamped the lace strip, floral image and sentiment, trimmed the panel to size and matted it onto a black layer.  I used ProMarkers to colour in the floral image and added three die cut and embossed butterflies.

I made a 5 3/4" square Flirty Flamingo card base, cut away a piece from the card front, trimmed that to the size I wanted, added black CS border strips to my card front pieces and bridged the gap by popping up the image panel over the two card front pieces. 


Here's a side view of the gap card so you can see how the card is put together.


Here's a closer look at the water stamped panel.


Here's the inside of the card and the envelope flap featuring the gorgeous scrap of lace stamp from the 'Southern Serenade' stamp set.


I was looking for something in my embellishments stash and came across a few resin roses that I'd completely forgotten about.  They match beautifully with Flirty Flamingo so one was perfect to dress up the butterfly on the envelope front!  I popped up the name label to finish.


Supplies:
Stamps: SU! 'Southern Serenade' set, SU! 'Burlap' background stamp, Hero Arts 'Yummy Treats' set
CS: SU! Basic Black, Flirty Flamingo & Whisper White (regular & thick)
Ink: Ranger Tim Holtz Mustard Seed, Worn Lipstick & Black Soot Distress Inks, ProMarkers
Tools: Inkylicious ink duster brushes, SU! 'Beautiful Wings' Embosslits die, SU! 'Stitched Shapes' Framelits die set, Sizzix 'Card, Fancy Frame Flip- Its #2' Framelits die set
Embellishments & accessories: black & white gingham ribbon, resin rose, SU! rhinestone jewels, Dimensionals

Ruth


Tuesday, 12 June 2018

June 2018 Card Group Projects

Last Thursday I got together with my ladies for the June card group meeting.  Two of the ladies are celebrating their birthdays in June so there were lots of pretty hand made cards to look at and gain inspiration from.  It always amazes us that all of the cards are so different!

Margaret had requested a dangly tent card and I was very happy to go along with that suggestion as I do love those!  For this card I've dangled a hot air balloon in the aperture against a sky backdrop.  I used a colour combo of Elegant Eggplant, Soft Sky and Berry Burst.  I made an A6 sized card base, cut out a square aperture plus a square frame.  I stamped the SU! 'Watercolor Wash' background stamp onto a panel of Whisper White CS using Soft Sky ink and stamped some clouds.  To make the dangly element I stamped and die cut two hot air balloons, sandwiched a length of clear nylon line between the two balloon shapes and taped the line above the aperture.  I popped up the stamped and die cut sentiment label.


Here's a side view of the card.  In order for a dangly tent card to stand up when on display I glue a W shaped piece of CS on the inside.  I cut a piece of CS to the width of the card x 3 1/2"  and score at 1/2", 1 3/4" and 3" and valley, mountain, valley fold to make a W shape.  I glue just the back piece inside first and then glue the inside panel in place.  I glue the front piece of the W shape to the card front when everything else has been finished.   


Here's the back of the card and the envelope flap.


Up next was a card featuring water stamping which is such a lovely technique, I don't do it often but I always enjoy it immensely when I do!  I applied Broken China and Dusty Concord Distress Inks to a piece of SU! Whisper White thick CS using ink duster brushes.  I then spritzed the old but beautiful SU! 'Vintage Lace' background stamp with water using a spritzer bottle - I gave it about twelve spritzes - and pressed the stamp to the inked panel, pressing firmly.  I used my heat tool to dry the panel, stamped the sentiment, added the rose die cut and glued the panel to the front of a Night of Navy A6 sized card.


Here's a closer look at the water stamped background.  I believe the technique is also known as ghosting.  It's almost as if colour has been bleached away.  I like to use Distress Inks for creating a background for water stamping because those inks blend beautifully and react with water.  You need enough water on the stamp to show a definite, discernible pattern but you don't want to spritz the stamp so much that it is dripping when you turn it down to stamp.  If you use too little water the resulting background pattern is very subtle.  It's so worth it to experiment to find the perfect water spritz to stamp ratio to get the effect you're looking for - it's great fun! 


Here's the inside of the card and the envelope flap.


For card number three I used the sponging mask technique shown by Esther Howard in this video.  It's such a clever way to make a mask and so easy!  I've CASEd Esther's card before and I couldn't resist making another version to teach the technique to my card group ladies!  I opted for a lovely Springtime colour combo of So Saffron and Granny Apple Green and added some Soft Suede.  I stamped the bird onto Crumb Cake CS, die cut and then popped the bird up.  I forgot to put Crumb Cake CS into the card kits and I didn't take any sheets of CS with me so the ladies had to stamp their birds onto Soft Suede CS - which looked equally good!  I did some tone on tone stamping on opposite corners of the card and added the pretty die cut shape underneath the image panel.  


Here's the inside of the card and the envelope flap.


Next time we're decorating a gift box and there'll be a black and white card - thanks to suggestions made by the group!

Supplies for dangly tent card:
Stamps: SU! 'Lift Me Up' set, SU! 'Watercolor Wash' background stamp, Hero Arts 'Yummy Treats' set
CS: SU! Berry Burst, Elegant Eggplant, Soft Sky & Whisper White
Ink: SU! Berry Burst, Elegant Eggplant & Soft Sky
Tools: SU! 'Up and Away' & 'Petals & More' Thinlits die sets, square Nestabilities dies, SU! 'Simply Scored'
Embellishments & accessories: SU! Dimensionals, clear nylon line


Supplies for water stamped card:
Stamps: SU! 'Vintage Lace' background stamp, SU! 'Happy Wishes' set
CS: SU! Night of Navy & Whisper White (regular & thick)
Ink: SU! Night of Navy, Ranger Tim Holtz Broken China & Dusty Concord Distress Inks
Tools: Wild Rose Studio 'Wild Rose' die, Inkylicious ink duster brushes, water spritzer bottle 


Supplies for leaves & bird card:
Stamps: SU! 'Petal Palette' set
CS: SU! So Saffron, Soft Suede & Whisper White, white copy paper for mask
Ink: SU! Granny Apple Green, So Saffron & Soft Suede
Tools: SU! 'Petals & More' Thinlits die set, Creative Expressions Smoothie ink blending sponge
Embellishments & accessories: SU! Dimensionals

Ruth

Saturday, 2 June 2018

Waterfront Friendship Easel Card

Here is an easel card I've made for a very good friend using the wonderful SU! 'Waterfront' stamp set.  I've used Night of Navy, Pool Party and Whisper White as my colour combo and the card measures 5 1/2" square.

I cut a 3 1/4" square of watercolour paper and worked from the bottom up to stamp my scene.  After stamping the sea, ground and grass I went over the stamping with an Aquapainter.  I inked the sun stamp with Crushed Curry ink and added Calypso Coral ink round the edge using a sponge dauber and masked the grass before I stamped the sun.  For the palm tree tops I inked in Lemon Lime Twist ink and added Garden Green ink round the edges - again using a sponge dauber.  After I'd stamped the beach huts and my scene was complete I added a light wash of Balmy Blue ink around the images using an Aquapainter to create a sky.  I embossed a strip of Pool Party CS with the SU! 'Seaside' embossing folder and I glued that in place, choosing to have the debossed side showing.  I added some Kraft Rope Trim tied in a simple knot.  I popped up the 'Everyday Label' punched shape to act as the stop for the easel.


Here's a closer look at the stamped scene panel. The palm tree tops made me think of the Simpson's character Sideshow Bob - they remind me of his hair - I know, random!   


I simply used Night of Navy and white patterned paper to decorate the panel on the bottom of the card and for the envelope flap.


Supplies:
Stamps: SU! 'Waterfront' & 'Labels to Love' sets
CS: SU! Bermuda Bay, Pool Party & Whisper White

Patterned paper: SU! 'Floral Boutique' DSP
Ink: SU! Balmy Blue, Calypso Coral, Crumb Cake, Crushed Curry, Garden Green, Lemon Lime Twist, Night of Navy, Pool Party & Soft Suede
Tools: SU! 'Seaside' embossing folder, 'Everyday Label' & circle punches, Aquapainter, sponge daubers

Embellishments & accessories: SU! Kraft Rope Trim, Dimensionals
Ruth


01 09 10