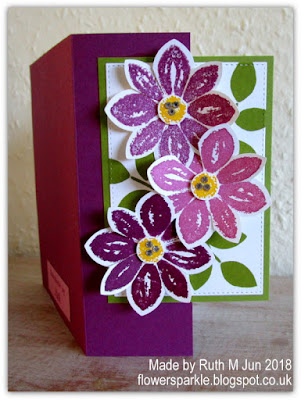
Jan loves a colour combo of SU! Rich Razzleberry with Sweet Sugarplum so I used those colours along with some Old Olive. The card is a standard A6 size. I'm loving this flower from the Petal Potpourri stamp set, I can't seem to resist using it for cards at the moment! I stamped the flower twice using Rich Razzleberry ink (without re-inking between stamping so that I got a lighter shade) and then I stamped a flower in Sweet Sugarplum ink. I stamped the flower centres using Crushed Curry ink and cut those out with a 1/2" circle punch. I stamped the leaves from the SU! 'Crazy About You' set in Old Olive ink onto the white panel and layered that onto an Old Olive mat. I punched out the flowers, snipped between the petals, shaped the flowers a wee bit and popped up the centres, adding a few rhinestone jewels for some sparkle.
At first glance, when the card is open for display like this, it looks like a cutaway front card.
Here's a view of the closed card.
Here's the first panel on the inside. After gluing the gingham paper I added a line drawn with a Rich Razzleberry marker and a ruler. I added more sparkle with three clear faceted gems.
Here's the second panel on the inside. The 'a day all about you' label is popped up.
Here's a side view of the double front card on display. It's nice and easy to create - basically it's a card inside a card where the front image panel lines up exactly with a matted panel on the inside. The slightly smaller Whisper White card is attached to the inside of the Rich Razzleberry card. I cut the Whisper White card base to a normal A6 size and then just trimmed it down a bit so I got a nice border. The whole back piece of the Whisper White card is adhered to the Rich Razzleberry card base. When you come to assemble the card, adhere the matted layer (my 'the best day ever' panel) first and then it's easy to align your image panel for the front of the card with that.
I used a die cut bookplate as a name label for the card front.
Here's the back of the envelope with a decorated flap. This envelope was very much plan B - I originally made an envelope using the envelope punch board from a square of the Sweet Sugarplum gingham paper. I just about managed to squeeze the card inside but really it was too snug a fit so I decorated a plain C6 size envelope instead! I will have to make a custom sized card to fit inside the gingham envelope so it doesn't go to waste!
Stamps: SU! 'Petal Potpourri', 'Crazy About You' & 'Birthday Blossoms' sets
CS: SU! Old Olive, Rich Razzleberry, Sweet Sugarplum & Whisper White
Patterned paper: SU! 'Succulent Garden' DSP
Ink: SU! Crushed Curry, Old Olive, Rich Razzleberry & Sweet Sugarplum
Tools: SU! 'Flower Medallion' & 1/2" circle punches, SU! 'Petals & More' die set, M&C Boutique stitched rectangle die set, Sizzix Original 'Bookplates' die, flower shaper tool
Embellishments & accessories: SU! rhinestone jewels, clear faceted gems, Dimensionals
Ruth


No comments:
Post a Comment